Screencast your Mac to Apple TV over AirPlay

That screen you’re looking at there? It’s not my Mac. It’s my Apple TV. TUAW reader James Low wondered if you could stream your OS X screen using the screen:// feature of VLC along the lines of the instructions found on this blog post. I decided to test it out using the same method I described in my earlier DVD-to-Apple TV post.

Instead of streaming from my DVD (namely via dvdread:///dev/rdisk5@1:3-), I substituted screen://, as follows.

/Applications/VLC.app/Contents/MacOS/VLC -vv screen:// --intf=rc '--sout=#transcode{vcodec=h264,vb=2048,acodec=mp4a,ab=192}:standard{mux=ts,dst=-,access=file}' | mediastreamsegmenter -f /Library/WebServer/Documents/stream -D

It worked. All other instructions remain the same as from the DVD post.

So what are the downsides? First, the image was a bit blurry due to the H.264 transcoding and the limited bit rate, but it wasn’t too bad. It remained reasonably readable at all times. Second, there was a distinct lag between what was going on at the Mac and what was being shown on the Apple TV. Pausing the stream, like I did to take this screen shot, slightly increased that lag.

On the bright side? Screencasting. From your Mac. To your Apple TV.

I think that’s pretty cool.

Screencast your Mac to Apple TV over AirPlay originally appeared on TUAW on Wed, 22 Dec 2010 07:00:00 EST. Please see our terms for use of feeds.

Source | Permalink | Email this | Comments

Skyfire for iPad Now Available in The App Store

Skyfire for iPad is now available for download in the App Store. Skyfire for iPad lets you watch flash video contents on the iPad along with some other features not found in native Safari mobile browser.

skyfire for ipad
Skyfire for iPhone was released in the first week of November. The Skyfire app for iPhone and iPad performs a common function and converts Flash-to-HTML5 and let you watch it on your iPhone. However, Skyfire for iPad comes with additional features. Checkout the Skyfire for iPad features below.

Skyfire for iPad Features

  • Play millions of Flash videos – everyday, with no limits!
  • All-new ‘Skybar’ toolbar gives one-click access to video and related content
  • Stay in touch: Unique Facebook and Twitter ‘Quickview’ allows you to see your wall and feeds with one click.
  • Universal ‘Like’: Like ANY page on the internet, with one click.
  • Fireplace: See only the links shared by Friends. Why? Filter what friends did from what friends shared (which is a great starting point for browsing)
  • Popular: See what Friends and the Facebook community have to say about the site you are currently exploring
  • Be informed: Quick access to GReader feeds
  • Be social: Share via Facebook and Twitter
  • Share to more services including GReader, Instapaper, Pinboard and Read It Later
  • Standard browser elements: Tabs, search, sharing, bookmarks, history, etc.
  • Full screen option for maximum use of screen real-estate – with scroll to top
  • ‘Desktop’ option loads pages as on a desktop browser, giving more flexibility in accessing web sites
  • Private Browsing option: Browse with no history and cookies left behind

Download Skyfire for iPad

You can purchase and download Skyfire for iPad from the App Store for $4.99. [iTunes Link][via]

Video Demo

You can follow us on Twitter, Join us at Facebook, and also Subscribed to RSS Feed to receive latest updates.

Also checkout:

Digg
Twitter
StumbleUpon
Facebook
Reddit
del.icio.us

Remote 2.1 for iOS – Adds AirPlay Video Control, Radio Streaming

Apple has just updated Remote app for iPhone, iPad and iPod Touch to version 2.1. Remote 2.1 comes with AirPlay video support to control iTunes on your computer to stream videos to an Apple TV, remote radio control to play radio stations on iTunes, and numerous new features and performance improvements.

What’s New in Remote 2.1?

  • AirPlay video support to control iTunes on your computer to stream videos to an Apple TV
  • Internet radio control to play thousands of internet radio streams in iTunes on your computer
  • The ability to control iTunes on your computer to play Movies and TV shows that are rented from the iTunes Store
  • Addresses issues connecting to an iTunes library or Apple TV
  • Includes stability and performance improvements

Download Remote 2.1

You can download Remote 2.1 for iPhone, iPad and iPod Touch  from the App Store for Free! [iTunes Link]

You can follow us on Twitter, Join us at Facebook, and also Subscribed to RSS Feed to receive latest updates.


Also checkout:

Digg
Twitter
StumbleUpon
Facebook
Reddit
del.icio.us

Camera+ 2.0 Now Available in the App Store

Camera+ 2.0 for iPhone, a popular photography app has returned to the App Store with new features and lots of improvements. Camera+ was pulled from the app store because Apple didn’t like its ability to allow a volume button camera shutter which violated Apple’s guidelines on how an app can interface with the iPhone’s controls.


camera+ 2.0
After a few months, Camera+ 2.0 for iPhone is now available in the App Store. Checkout the huge list of new features and improvements below.

What’s New in Camera+ 2.0

  1. added sliders to effects for adjusting effect amount
  2. added exporting geolocation and metadata when saving to the Camera Roll
  3. added photo info panel which shows photo metadata, editing recipe, and map with photo geolocation
  4. significantly sped-up startup time
  5. reworked much of the user interface so that it’s more unified and much more intuitive
  6. improved the usability of zoomed photos in the Lightbox
  7. improved usability of Touch Focus/Touch Exposure
  8. removed “SLR” screen for a simpler user interface
  9. added rotation of photos
  10. added flipping of photos
  11. improved most effects
  12. added Cyanotype effect
  13. added Tailfins effect
  14. added Depth of Field effect
  15. added in-app purchasing of effects, with the first being the “I ? Analog” effects pack
  16. added Diana effect (in I ? Analog pack)
  17. added Silver Gelatin effect (in I ? Analog pack)
  18. added Helios effect (in I ? Analog pack)
  19. added Contessa effect (in I ? Analog pack)
  20. added Nostalgia effect (in I ? Analog pack)
  21. added Expired effect (in I ? Analog pack)
  22. added XPRO C-41 effect (in I ? Analog pack)
  23. added Pinhole effect (in I ? Analog pack)
  24. added Chromogenic effect (in I ? Analog pack)
  25. improved most borders
  26. grouped borders into Simple and Styled sets
  27. added Light Mat and Dark Mat borders
  28. added Round White and Round Black borders
  29. added Offset border
  30. renamed Grit border to Light Grit and added Dark Grid border
  31. added Viewfinder border
  32. added Old-Timey border
  33. added Film border
  34. added Sprockets border
  35. added shooting preferences panel
  36. improved operation of stabilizer
  37. added timer shooting mode
  38. added burst shooting mode
  39. improved most scene modes
  40. added Darken scene mode
  41. added Cloudy scene mode
  42. added Shade scene mode
  43. added Fluorescent scene mode
  44. added white balance lock
  45. added a function to save and leave photos in Lightbox
  46. added a function to commit all edits in photos
  47. added a function to copy photos with edits committed
  48. added a function to copy photos without edits
  49. added a function to undo all edits in photos
  50. added a function to remove geolocation in photos
  51. added 3×2 crop
  52. increased menu size and included it on both camera screen and Lightbox
  53. Touch Exposure now works on iPhone 4 and 4th generation iPod touch front facing camera

Major bugs fixed

  • fixed a bug in which the keyboard wouldn’t appear when posting to Twitter
  • fixed a potential crash when posting multiple photos to Facebook
  • fixed a bug where no previews were shown for photos taken with Camera+ and later imported into iPhoto or Aperture
  • pasting photos now preserves the photo’s metadata
  • And many, many, many minor enhancements and bug fixes.

Download Camera+ 2.0

You can purchase and download Camera+? 2.0 for iPhone from the App Store for $0.99. [iTunes Link]

You can follow us on Twitter, Join us at Facebook, and also Subscribed to RSS Feed to receive latest updates.

Also checkout:

Digg
Twitter
StumbleUpon
Facebook
Reddit
del.icio.us

SB 2 Cloud – Upload iPhone/iPad Screenshots Straight To The Cloud

SB 2 Cloud is a new jailbreak tweak that uploads iPhone/iPad/iPod Touch screenshots straight to the Cloud App account without any user interaction. If you use Cloud App to save your files and screenshots in the cloud, SB2Cloud is indeed a great jailbreak app for you.

sb2cloud
For those who don’t know, CloudApp allows you to share images, links, music, videos and files just like Dropbox and others.

SB 2 Cloud uses your CloudApp account to upload your iOS screenshots to your CloudApp account. You can register a Basic CloudApp account for free. You can access that account via CloudApp website or a small desktop utility for Mac.

How it Works:

  1. Register a free ClouApp account here.
  2. Install SB 2 Cloud from Cydia (Price: $1.49)
  3. Go to Settings > Sb 2 Cloud and Enable SB 2 Cloud
  4. Input your CloudApp account

That’s it! Now whenever you take your iDevice screenshot, a small cloud icon will appear next to battery icon showing that your screenshot is being sent to the CloudApp account, and a little chime when it’s done. Screenshots are also saved to camera roll just like normal.

If you ever want to disable screenshot uploads to the CloudApp, simply turn the  SB 2 Cloud toggle to OFF in Settings.
sb2cloudsb2cloudsb2cloud

You can follow us on Twitter, Join us at Facebook, and also Subscribed to RSS Feed to receive latest updates.

Also checkout:

Digg
Twitter
StumbleUpon
Facebook
Reddit
del.icio.us

Android App Development- Controls Part Three: Android Selection Controls

Android offers selection Controls like

  1. List View.
  2. Check box.
  3. Radio Button.
  4. Spinner.
  5. GridView.

List View:

ListView represents a list of items that can be selected. It is similar to the ListBox in C#.

<?xml version="1.0" encoding="utf-8"?>
<LinearLayout xmlns:android="http://schemas.android.com/apk/res/android"
    android:orientation="vertical"
    android:layout_width="fill_parent"
    android:layout_height="fill_parent"
    >
<TextView
    android:layout_width="fill_parent"
    android:layout_height="wrap_content"
    android:id="@+id/txt"
    />
    <ListView
    android:layout_width="wrap_content"
    android:layout_height="wrap_content"
    android:id="@+id/List"
    />
</LinearLayout>


To populate the list and handle the ItemClick event we can do it like this :

final String [] items=new String[]{"Item1","Item2","Item3","Item4"};
        ArrayAdapter ad=new ArrayAdapter(this,android.R.layout.simple_list_item_1,items);
        list=(ListView)findViewById(R.id.List);
        list.setAdapter(ad);
list.setOnItemClickListener(new OnItemClickListener()
        {

   public void onItemClick(AdapterView arg0, View arg1, int arg2,
     long arg3) {
    // TODO Auto-generated method stub
    TextView txt=(TextView)findViewById(R.id.txt);
    txt.setText(list.getItemAtPosition(arg2).toString());

   }

        }
        );

The above code displays the selected item text in the textview:
The parameters of the OnItemClick method are:

  • AdapterView Arg0:the listview, notice that it is of type AdapterView.
  • view Arg1: the view that represents the selected item, in this example it will be a TextView
  • int Arg2: the position of the selected item.
  • long Arg3:: the id of the selected item.

When creating the adapter you can specify the layout of the list by using Android’s built layout resource simple_list_item_1 to display a simple list or by using simple_list_item_single_choice to display radio buttons for single selection:

Or by using simple_list_item_multiple_choice to display check boxes for multiple selection:

You can set the choice mode of the list by using setchoicemode() method:

public void onCreate(Bundle savedInstanceState) {
        super.onCreate(savedInstanceState);
        //setContentView(R.layout.main);
        final String [] items=new String[]{"Item1","Item2","Item3","Item4"};
        ArrayAdapter ad=new ArrayAdapter(this,android.R.layout.simple_list_item_multiple_choice,items);
        setListAdapter(ad);
      ListView list=getListView();
        list.setChoiceMode(ListView.CHOICE_MODE_MULTIPLE);

    }

Now suppose you want to change the text of the an item when it is clicked, you can do it like this:

list.setOnItemClickListener(new OnItemClickListener()
        {

   public void onItemClick(AdapterView arg0, View arg1, int arg2,
     long arg3) {
    // TODO Auto-generated method stub
    TextView txt=(TextView)findViewById(R.id.txt);
    items[arg2]="changed";
    list.setAdapter(new ArrayAdapter(ListControls.this,android.R.layout.simple_list_item_1,items));

   }

        }
        );

See that you actually change the value of the string array item at the selected position then bind the listview with the adapter again.
You can capture the View object and do what you want in a more neat way:

list.setOnItemClickListener(new OnItemClickListener()
        {

   public void onItemClick(AdapterView arg0, View arg1, int arg2,
     long arg3) {
    // TODO Auto-generated method stub
    TextView temp=(TextView)arg1;
    temp.setText("changed 2");
   }

        }
        );

If the activity will contain just one listview you can create an activity that extends list view. In this case you don’t have to specify a layout as a listview will fill the screen.

public void onCreate(Bundle savedInstanceState) {
        super.onCreate(savedInstanceState);
                final String [] items=new String[]{"Item1","Item2","Item3","Item4"};
        ArrayAdapter ad=new ArrayAdapter(this,android.R.layout.simple_list_item_1,items);
        setListAdapter(ad);


If you want to reference or customize this listview then you can define it in the layouts xml fine by assigning it the id android:id=@android:id/list so that the activity knows which listView is the main list for the activity ..
This example shows a listview and a textview in a layouts xml file:

<?xml version="1.0" encoding="utf-8"?>
<LinearLayout xmlns:android="http://schemas.android.com/apk/res/android"
    android:orientation="vertical"
    android:layout_width="fill_parent"
    android:layout_height="fill_parent"
    >
<TextView
    android:layout_width="fill_parent"
    android:layout_height="wrap_content"
    android:id="@+id/txt"
    android:text="List View Demo"
    />

    <ListView
    android:layout_width="fill_parent"
    android:layout_height="wrap_content"
    android:id="@android:id/list"
    />
</LinearLayout>

Now if you want to customize the ui of each row of the listview you define two layouts files: the first has the layout of the activity and the other has layout of each row in the listview. and pass the reference of the rows xml layout file to the constructor of the adapter that the list view is bound to.

Check Box:

The checkBox has two states: Checked and UnChecked. It inherits from TextView so it has all of its properties:

<?xml version="1.0" encoding="utf-8"?>
<LinearLayout xmlns:android="http://schemas.android.com/apk/res/android"
    android:orientation="vertical"
    android:layout_width="fill_parent"
    android:layout_height="fill_parent"
    >
    <TextView
    android:layout_width="fill_parent"
    android:layout_height="wrap_content"
    android:id="@+id/txt"
    />
    <CheckBox
    android:layout_width="fill_parent"
    android:layout_height="wrap_content"
    android:id="@+id/Chk"
    android:text="This is a check box"
    android:checked="false"

    />
</LinearLayout>


and to handle the check/uncheck events:

CheckBox chk=(CheckBox)findViewById(R.id.Chk);
        chk.setOnCheckedChangeListener(new OnCheckedChangeListener()
        {

   public void onCheckedChanged(CompoundButton arg0, boolean arg1) {
    TextView txt=(TextView)findViewById(R.id.txt);
    if (arg1)
     txt.setText("checked");
    else
     txt.setText("Unchecked");

   }

        }
        );

Radio Button:

Android provides RadioButton control. You create a RadioGroup and add RadioButtons inside it.

<?xml version="1.0" encoding="utf-8"?>
<LinearLayout xmlns:android="http://schemas.android.com/apk/res/android"
    android:orientation="vertical"
    android:layout_width="fill_parent"
    android:layout_height="fill_parent"
    >
    <TextView
    android:id="@+id/txt"
    android:layout_width="fill_parent"
android:layout_height="fill_parent"
    />
   <RadioGroup
   android:id="@+id/group"
android:layout_width="fill_parent"
android:layout_height="fill_parent"
android:text="Radio Group"
>
<RadioButton android:id="@+id/item1"
android:layout_width="wrap_content"
android:layout_height="wrap_content"
android:text="Item1"
android:checked="true"
 />
<RadioButton android:id="@+id/item2"
android:layout_width="wrap_content"
android:layout_height="wrap_content"
android:text="Item2" />
<RadioButton android:id="@+id/item3"
android:layout_width="wrap_content"
android:layout_height="wrap_content"
android:text="Item3" />
</RadioGroup>
</LinearLayout>


You can get the checked item from code like this:

RadioGroup rg=(RadioGroup)findViewById(R.id.group);
        rg.setOnCheckedChangeListener(new android.widget.RadioGroup.OnCheckedChangeListener()
        {

   public void onCheckedChanged(RadioGroup arg0, int arg1) {
    // TODO Auto-generated method stub
    TextView txt=(TextView)findViewById(R.id.txt);
    RadioButton rb=(RadioButton)findViewById(arg1);
    txt.setText("You selected "+rb.getText());

   }

        }
        );

and this was part one in the selection controls. in the next post we’re going to see the Spinner and the GridView Controls.

Angry Birds Seasons: The Birds are Back

Back in October, the team at Rovio Mobile launched a new game in their ever-popular catalog: Angry Birds Halloween. Now the birds are back in Angry Birds Seasons, a free upgrade to the Halloween game adding 25 new levels for the month of December!

Back in August, developer Rovio announced it had gained more than 6.5 million paid downloads on Apple’s app store with the iPad version owning over 200,000 of those sales. More of the same thing can surely only be good, and Rovio have achieved that.

Why are these Birds so Angry?

If you own an iOS device, it must be hard not to know of Angry Birds. Nevertheless, here’s a quick rundown. Angry Birds is a simplistic game that hit the App Store to be come one of the most popular paid apps. The storyline is a group of green pig-like creatures have stolen eggs from the birds, which in turn makes them “angry”. In order to extract revenge, the birds seem to sacrifice themselves in order to kill the pigs. The aim of the game is to destroy the pigs with the least amount of birds whilst trying to gain points at the same time.

Trick or Treat

It may seem cumberstone to try and write a review on Angry Birds as a franchise now that it’s grown to such a tremendous size. And it’s still difficult to attempt a review of a differently-themed version of the same game. Luckily though, Rovio has added some new treats in the center of 45 new halloween levels.

Treats? No. Only pigs!

Each of the 45 new levels in the Halloween game offer a new Halloween-style branding to them, complete with bare trees, floating lamps and pumpkins. Initially, this theme starts off with the fairly easy, red-bird-only level with a simple one-pig goal. However, this quickly accelerates into much harder levels at a faster pace than the original game.

Similar to the watermelons we saw in the original game, most of these levels are infested with the cliche jack-o-lantern which offers the player more points if squashed. In terms of gameplay, the game is just more of what we love with little additions. If you’re akin to the play-one-then-move-on attitude of the previous Angry Birds, you’ll feel right at home as you try to progress.

Angry App-vent Calender

Personally, I was a late adopter to this version of the game but the news of a Christmas update to the Halloween game persuaded me to buy. The second theme entitled “Season’s Greedings” adds a 25 new levels which is fifteen shy of the Halloween game. In an advent calender style, a level of the 25 is only playable on and after that day. For example, we can’t dive into level 25 until Christmas day.

Similar to the Halloween theme, there is little gameplay added. The winter theme swaps leafless trees to snow-topped pines and pumpkins to presents.

Merry Bird-mas

Merry Bird-mas!

Game Center fun

Angry Birds isn’t multiplayer, yet the Seasons game is a first for iPad owners to get a taste of Game Center for the franchise. Seasons comes with Game Center support whilst Rovio have announced that an update will be available soon for the full game’s GC compatibility.

Gamecenter Screen for Angry Birds Seasons HD

Angry Birds Seasons is one of the first game center games for iPad

“Why should I pay again?”

Ever since the Halloween game was released, some players have questioned Rovio’s decision to charge an additional $0.99-$1.99 (depending on device). I’m not here to change your view on the situation, but in my opinion, paying an extra dollar or two is nothing. Stack up the price of a traditional console game against the combined price of all Angry Birds games and it’s still far less than half! Then consider the hours of entertainment that those birds will give you and make your own judgement.

Plus, Rovio has already confirmed a Valentines Day’s update to the game and they’d be stupid not to include an Easter update full of chocolate eggs. Unfortunately though, there’s no news on a New Year’s edition with drunken pigs and fireworks.

Conclusion

Taking the lack of significant new gameplay, the game probably only achieves a 4/5 rating in my view but if you’re new to the franchise, expect it to rise to all your expectations and hit a 5/5.

Angry Birds Seasons is available on iOS and Android. This review was based upon the iPad game avaliable for $1.99 on the Apple App Store.

Seeing the World Through Google Goggles

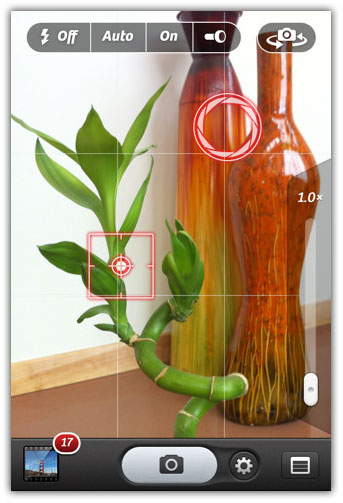
Earlier this fall Google upgraded their Google Mobile App for the iPhone to include Google Goggles (try saying that ten times fast), a feature that was previously only available to Android users. In a nutshell, Google Goggles allows you to perform Google searches using images taken with your iPhone’s camera. Once you’ve installed the free Google Mobile App, Goggling (I’m not sure if that’s the official term) is as simple as tapping the camera icon to the right of the search bar and snapping a photo of the item in question.

Before you go too camera happy, it’s important to note that only certain types of items are likely to work with Google Goggles. The software is designed to recognize covers of books, DVDs and CDs as well as barcodes and logos. Goggles will also recognize some buildings and landmarks and will do it’s best to pull text from photos and to identify objects.

There’s no denying that Google Goggles looks impressive in a demo, but how well does it work in the real world? I put Google Goggles to the test, with some help from friends in Ottawa, London and Melbourne. The question du jour: is Goggles truly useful or a novelty that soon grows old?

Judging a Book By Its Cover

I first put Google Goggles through its paces by scanning both book covers and barcodes of numerous books from a variety of sources. This included books from my own collection and a random assortment of books at a local bookstore, among them some rather esoteric titles from small publishers. I’m happy to report that Google Goggles correctly identified books every time, whether I took a photo of the barcode or the cover, and results came back within seconds on my iPhone 4.

The initial search result presented me a choice of accessing information specific to the book or performing a search based on text or images found on the book’s cover. Since the app correctly identified the books without fail, I didn’t have much use for the second and third options. Tapping the blue “Book” option brings up a basic summary of the book, including the author, publisher, date published and ISBN number, along with the title and book cover. The results page also includes two buttons: “Product Search” and “Book Search” in addition to web search results.

Google Goggles Book Search

Google Goggles identified books covers flawlessly.

Tapping the “Product Search” button leads to a list of merchants for price comparison. A “set location” link allows you to specify your current location – though having to do this on a mobile app feels foreign. Even after specifying my location as Vancouver, the results that came back were all from American resellers. As such, the price comparison feature is not very useful here in Canada, but is no doubt handy in the USA.

The “Book Search” button leads to the Google Books website, which contains a wealth of information about the book, and sometimes includes reviews and even sample pages from the book. Unfortunately Google Books isn’t optimized for mobile devices just yet, so getting to the information wasn’t as convenient as it could have been. Instead I found that I more often chose Amazon.com from the list of web results as a source of additional information and reviews. Amazon.com is optimized for mobile browsing and I generally find the user-submitted reviews to be useful.

Google Googles also proved very reliable when scanning covers and barcodes of both DVDs and CDs. In all but one case Goggles correctly identified the media correctly. As was the case with books, the search results included a summary of the product, price comparisons and web search results.

Labels, Logos and Text

Encouraged by my success with books, CDs and DVDs, I started snapping photos of logos, labels and text. The results were decidedly mixed.

I enjoy a good glass of wine, but am far from an expert and when purchasing a bottle of vino tend to stick with the limited selection of wines that I’m familiar with. Armed with Google Goggles I sought to expand my horizons. On a visit to the liquor store I snapped photos of labels of wines that looked promising and did find some matches, complete with reviews. But there were some cases where Goggles was only able to extract some text or a logo from the wine bottle, which often led to searching Google the “old fashioned way” – typing text into a search box.

In most cases Goggles was able to correctly identify logos for well established brands. In these cases, the search results page simply contains the logo, company name and a list of search results. The associated brand’s website predictably shows up as the first result on the list. I could see this feature being handy in some instances. For example, some logos don’t include the name of the product or organization they represent. Assuming you’re not already familiar with the logo, it would be difficult to search any other way.

Google Goggles Labels, Logos and Text

Google Goggles proved useful when searching for labels, logos and text.

I also tried scanning text from various sources. The text from signs, especially those with relatively simple designs, was often identified correctly. So, if you’re thinking of eating at a restaurant, you could take a photo of the sign as the basis for a Google Search. In reality, I’d most likely opt to use a more specialized app such as Urbanspoon or Yelp in these instances. I also tried scanning a variety of business cards. In some cases Goggles was able to identify the most relevant data on the card and produce useful search results. In other cases the words that were extracted were seemingly random and the search results were of little use.

Landmarks, Buildings and Images

One of Google Goggles’ signature features is the ability to identify certain landmarks and buildings. This feature worked quite well in my experience. I took a picture of a photo that I once took of the Taj Mahal and Goggles correctly identified this famous marble mausoleum and offered search results that included the Taj Mahal’s Wikipedia page. A photo of Canada Place, one of the most recognized landmarks here in Vancouver, was also correctly identified, though I did have to take shots from a few different angles before getting the anticipated result.

Google Goggles Identified Taj Mahal

Obtaining information on famous buildings and landmarks using Google Goggles also proved useful.

Goggles will always make an attempt to produce some meaningful results. In cases where it doesn’t find a close match, I found that the “similar images” that it offers are completely unrelated to the subject that I photographed. For example, I took a photo of my Samsung laser printer and the “similar” images included a photo of a dog posing beside a surf board, among others. Cute, but not particularly relevant. To help improve results, Google recommends avoiding glare from the flash and getting as close to your subject as possible. Though I found that many images couldn’t be identified, even in optimum lighting conditions.

Monetizing Google Goggles

Just recently Google started looking at the possibility of using Goggles as an advertising tool, with Google Goggle-enabled ads from Buick, Delta, Diageo, Disney and T-Mobile being included in the initial trials. The way it works is simple. Just take a photo of the Google Goggle-enabled ad, which you may find in the form of an ad in a magazine or a poster, and Google provides additional information on whatever is being advertised. For example, clicking on a Google Goggle-enabled movie poster might allow you to instantly view a trailer of the movie being promoted. Look for ads with the Google Goggle’s logo.

It will be interesting to see what comes from this experiment. It’s a clever idea which could be useful beyond the world of advertising. For example, I could see the same concept being applied in an educational setting. Or perhaps a traveller could take a snapshot of a plaque for a famous landmark and be taken to relevant information in their own language.

An International Perspective

I recently introduced some friends to Google Goggles and asked them to send me feedback on their experiences.

Kieran in Ottawa, Canada found it worked well for identifying logos, paintings and drawings and was pleasantly surprised when Goggles correctly identified the “The Shakespeare Pub” as an English pub sign. In his experience, the app fell short when identifying more generic images.

Phil put Goggles through its paces in Jolly Old England and successfully used Goggles to identify a beautiful building he often passed on the train. He’s confident that it’s a tool he’ll continue to use.

Al put Goggles to the test in Melbourne, Australia. He was impressed that Goggles was able to correctly identify some celebrity photos, logos and even a Peugeot 3008 with no associated text. He found this feature fun to play with, but is most likely going to continue to use Google Mobile App’s Voice Search feature for most of his mobile searches.

What’s Missing?

There’s a lot to like about Google Goggles and there is still plenty of room to grow. While Goggles is very effective at identifying certain types of images, such as book covers and logos, it tends to fall flat when it comes to more generic images. The “similar images” that pop up as a last ditch effort to produce a meaningful search are generally useless in my experience. I imagine the accuracy will improve over time as Google tweaks their image recognition algorithms and increases the depth of information in their databases.

I couldn’t find an easy way to share search results. For example, it would be convenient to be able to e-mail a search result for further review. Fortunately the Google Mobile App does keep a history of past searches in reverse chronological order. This feature, which is easy to miss, is accessed by clicking on the clock icon that appears when you’re taking a photo.

Occasionally searches came back with a network error, even when I was connected to a fast and reliable Wi-Fi connection. In most cases, the issue was resolved with a single tap on the “Try Again” button.

Google Goggles Issues

I encountered a few quirks along the way. And similar images were not always so similar.

A Peek at the Future

Google acknowledges that it’s still early days for visual search technology. Though, Goggles does offer a tangible look at what’s coming in the not too distant future. I look forward to the day when I can going out for a hike and aim my iPhone at a leaf to learn more about the tree it’s attached to or identify a bird that’s perched nearby. Visual search technology could also be a very useful tool when travelling, especially in cases where you don’t speak the language. For example, I can see taking a photo of a sign written in Japanese and instantly having a translation pop up on the screen. The possibilities are endless.

The Verdict

Will I continue to use Google Goggles for my day-to-day Googling? Absolutely. It won’t replace typing into the search box by any means, but is very useful in certain situations. I’ll definitely use it to quickly access reviews for things like books and DVDs and will likely put it to good use the next time I visit an art gallery. I’m also looking forward to using it during my travels. I often see landmarks and buildings that I admire but know nothing about. Searching any other way may not be practical – in the absence of any textual data it wouldn’t be obvious what term to search for. Being able to snap a photo and get information almost instantly is genuinely useful.

Are you currently using Google Goggles? If so, what has your experience been like so far? Is a tool that you use frequently or one that you pull out on rare occasions? If you haven’t given this technology a whirl, I encourage you to try it out and report back with your impressions. Happy Goggling!

8 iPhone Apps for LEGO Lovers

When I was a kid, I was fascinated with all kinds of building kits. LEGOs, K’nex, Steel Tec, Lincoln Logs, I had them all and would spend hours creating the most complex structures I could dream up.

Technology has an awesome way of putting a new twist on an old favorite. Today we’re going to check out a handful of great LEGO titles you can download right on your iPhone. Whether you’re addicted to Harry Potter or just want to build things like when you were a kid, there’s something here for you.


LEGO Batman: Gotham City Games

The LEGO games on various consoles are famous for awesomely simple and addictive gameplay. You should know up front that this is not one of those games. As long as you keep that in mind, along with the fact that it’s $0.99 instead of $49.99, you can enjoy the app for what it is: a series of 16 LEGO Batman-themed mini games. There’s also a Lite version that you can try for free before you buy.

Each game is quick and meant to be played in only a few minutes. As a bonus, progressing through the games awards you with wallpapers for your iPhone!

Price: $0.99
iTunes Rating: 3/5

screenshot

LEGO Batman: Gotham City Games

LEGO Harry Potter: Years 1-4

I mentioned above that the Batman LEGO game isn’t anything like the classic LEGO video games you’re used to, this game is. LEGO Harry Potter is a much more solid implementation of the LEGO series, featuring beautiful graphics and all the Hogwarts roaming, Voldemort busting gameplay you can handle.

The app is designed for both iPad and iPhone users but will only work on iOS 4.1, so if you’re running anything older, don’t be surprised when the game doesn’t work. The biggest complaint from users is that controls are a little difficult to get the hang of, but the typical purchaser speaks only of being addicted! Whether or not you’re a Potter maniac, if you love the LEGO games, you should give this one a shot.

Price: $4.99
iTunes Rating: 4/5

screenshot

LEGO Harry Potter: Years 1-4

LEGO Creationary

This game may not hold your interest for very long but is great for kids. Roll the dice to choose a category and then watch the LEGO blocks build something in that category while you try to guess what is being built before time runs out!

Apparently the app is based on a popular board game with the same premise. Like the previous app, LEGO Creationary is a universal and will run on both your iPad and iPhone.

Price: $0.99
iTunes Rating: 2.5/5

screenshot

LEGO Creationary

LEGO Photo

Have you ever wanted to see your face in logos? Me neither, but just in case you do, you guessed it, “There’s and app for that.”

The process is simple, just point and snap and your LEGO creation will appear. It’s not amazing, but it’s hard to complain for the price!

Price: Free
iTunes Rating: 3/5

screenshot

LEGO Photo

LEGO Step-by-Step

This neat and free little app is essentially a digital version of those little instruction books that you get with your LEGO kits. LEGO Step-by-Step contains 10 instruction manuals for simple items like a plane, car and even a chicken!

Price: Free
iTunes Rating: 4.5/5

screenshot

LEGO Step-by-Step

Blocks!!

Enough with these silly games, where are the apps that actually let you build whatever you want with LEGO blocks? Strangely enough, it seems as if the folks at LEGO want to keep the actual building experience out of the digital realm (they no doubt want to avoid cannibalizing their toy business).

Fortunately, other developers don’t care much about LEGO’s bottom line and have made your LEGO iPhone dream come true. Blocks!! features a 3D interface and a number of your favorite LEGO pieces. Build to your heart’s content on both your iPhone and iPad.

Price: $1.99
iTunes Rating: 2.5/5

screenshot

Blocks!!

Bricasso

Bricasso is another take on an actual LEGO building app. Like the previous app, you interact with your virtual box of bricks on a 3D interface and easily create simple models on swappable backgrounds.

The graphics are a little more cartoony than Blocks!!, but the ratings are higher and it’s cheaper so it might be a better way to go.

Price: $0.99
iTunes Rating: 4/5

screenshot

Bricasso

iRate LEGO Pro

This one is for serious LEGO lovers only. The app centers around an online LEGO community where users can browse and the creations of others and upload photos of their own!

If you’re looking for some awesome building inspiration or maybe some validation for your own mad LEGO skills, this one is for you.

Price: $1.99
iTunes Rating: 3.5

screenshot

iRate LEGO Pro

Conclusion

The apps enough should provide you with enough brick-centric entertainment to keep you occupied for days. Leave a comment below and let us know what you think of these and any other LEGO apps you’ve come across!

Win One of Five Daylite Prize Packs!

Recently, we gave you an exclusive sneak peek at Daylite for iPad, an awesome extension of the incredibly powerful Daylite Productivity Suite. Today we’re happy to announce that Daylite for iPad has now been released in the iTunes Store!

To mark the occasion, we’re going to be giving away nearly $1,200 in awesome Daylite prizes! Each of the five winners will receive a Daylite prize pack consisting of:

  • Daylite Productivity Suite: 1-user license (worth $189.95)
  • Daylite Touch: 1-user license for 1 year ($49.95)
screenshot

Daylite for iPad

How To Enter

All you need to do to enter is follow @iphoneappstorm on Twitter and leave a comment below with your screen name.

We’ll select the five winning comments at random in one week, on Monday, December 27th. Good luck!

The Cartographer: Bring the Beauty Back to Maps

The Cartographer started from an idea, an appreciation for something that we now see as mundane and boring. Nautical charts and maps were once seen as symbols of wealth and power. They were handed down from generation to generation and were extremely valuable. They were symbols of status, with kings and queens owning hand-made maps that were beautiful works of art. Maps opened up the world around you, making it possible for travel and exploration.

Today, maps have lost their beautify and flair. They have changed from objects to be cherished into objects to be stored in the back of you motor vehicle. The Cartographer is all about bringing the beauty back into your maps. It’s about building maps, travelling the world, and having fun.

A Beautifully Unique Interface

Cartographers interface looks amazing on the iPhone 4 Retina Display

The Cartographers interface looks amazing on the iPhone 4 Retina Display

While today we don’t see value or beauty in our maps, we do see beauty in our apps. Whether it’s Camera+, Take Five, Calcbot, and now The Cartographer, finding apps that are well designed is rare and they almost instantly become extremely popular. The Cartographer’s interface takes you back to the days when maps were hand-made works of art. It features high quality Retina display graphics that look amazing. Maps are transformed by a vintage paper overlay, giving them an aged look. You can also customize pinpoints of locations and choose from a library over nearly 100 unique vintage icons. Personalize each location with it’s own pinpoint icon.

Explore

Explore the world or take a trip to somewhere far away.

Explore the world or take a trip to somewhere far away. Either way, The Cartographer makes it easy to plan and enjoy that trip.

The Cartographer is all about exploring new locations and revisiting your favorite places. Sync up your Google Maps account and Cartographer will download all your “My Maps” from Google. Select a map and start exploring it using an interface similar to Maps. Load up any of your current Google Maps or create a entirely new map that you can build upon. Tap a pin on the map to learn more about it. Select the Navigate option and it will open up the Maps with directions from your current location.

The Cartographer is great when you’re planning a road trip, or exploring a new location. Just open up maps.google.com on your desktop and start searching for interesting places. As you find them, add them to a new map titled “Places I would like to see”. As you search and discover, you built your very own map that is personalized with the locations you’d like to visit. Now open Cartographer and using the built-in CoreLocation feature, you’ll be able to locate yourself on the map and find the nearest places.

When you start adventuring out into the world, you might find that you venture somewhere new. You venture into a previously unknown location that you really like and would like to visit again. Just open up Cartographer and click the auto-locate button. Then tap the new pin button and drag it over the location. Tapping on the pin brings up an information menu where you can customize the pin icon, the place title and the description. You can even share the location with friends and family on Twitter.

Cartographer allows disable map downloading and can also sync your Google Maps data.

The Cartographer allows disable map downloading and can also sync your Google Maps data.

Needed Improvements

The Cartographer is still a child in terms of its development. It was released a few weeks ago and will continue to grow over the next few years. As with any 1.0, there are occasional bugs and missing features that will later be added. Here are my thoughts on some interesting features and changes to make in future versions.

First off, The Cartographer currently has a known issue with it crashing on extremely large public Google Maps. It works perfectly for 99% of maps, but if you have joined a Public Map on My Maps and the map is extremely large, you might experience a crash. At this moment the only fix is removing yourself from that map. The Cartographer teams are working on a fix for submission in the next few weeks.

Suggested Features

  • Augmented Reality setting or at least some form of 3D-ish way of showing all the places in your surrounding area. This would make it really easy to visually see upcoming places.
  • Social Check-Ins/ Itineraries would help make that adventure experience even better. With the push of a button, you can see upcoming spots sorted by distance from your currently location. Perhaps even a check mark where you can check off items you have already visited. Social Check-Ins could be integrated with Gowalla and added to the Share menu.
  • Make it easier to find specific locations on the go. Perhaps a search bar above the map for easy searching of a location. At this time you have to know where the location is on the map before entering it in.
  • Integrate location info from Yelp or Google Places to make information pages more robust. Users can find location such as phone number, street address, and other important information.

Conclusion

The Cartographer is truly a unique app for exploring the world around you. With such incredible detail in graphics, you almost want to treasure each and every map that you view. It offers great features and amazing graphics that make this application a must buy for all travelers.

If you find yourself wishing you could plan adventures or keep track of your favorite spots, then Cartographer is the perfect app for you. Cartographer is currently $1.99 on the Apple app store.

Top iPhone and iPad Apps of 2010

Here’s the top list of iPhone and iPad Apps for 2010. Winners are listed at the end of the post. Take note that Apple has created the top 3 iPad apps themselves.

=============================
Overall Top 10 PAID iPhone Apps
=============================

Angry Birds
Doodle Jump – BE WARNED: Insanely Addictive!
Skee-Ball
Bejeweled 2 + Blitz
Fruit Ninja
Cut the Rope
ALL-IN-1 GAMEBOX
The Moron Test
Plants vs. Zombies
Pocket God

==============================
Overall Top 10 FREE iPhone Apps
==============================

Facebook
Angry Birds Lite
Words With Friends Free
Skype
Tap Tap Revenge 3
The Weather Channel®
Paper Toss
Bing
ROCK BAND FREE
Talking Tom Cat

==================================
Overall Top 10 GROSSING iPhone Apps
==================================

MLB.com At Bat 2010
Angry Birds
Call of Duty: Zombies
Bejeweled 2 + Blitz
FriendCaller 3 Pro
Zombie Farm
TomTom U.S.A.
TETRIS®
Plants vs. Zombies
Doodle Jump – BE WARNED: Insanely Addictive!

===========================
Overall Top 10 PAID iPad Apps
===========================

Pages
GoodReader for iPad
Numbers
Angry Birds HD
Keynote
Glee Karaoke
WolframAlpha
Pinball HD
Friendly for Facebook
Star Walk for iPad

===========================
Overall Top 10 FREE iPad Apps
===========================

iBooks
Pandora Radio
Netflix
Google Mobile App
Solitaire
Movies by Flixster – with Rotten Tomatoes
IMDb Movies & TV
Kindle
Google Earth
Virtuoso Piano Free 2 HD

================================
Overall Top 10 GROSSING iPad Apps
================================

Pages
Numbers
Keynote
LogMeIn Ignition
SCRABBLE for iPad
Documents To Go® Premium – Office Suite
Angry Birds HD
Real Racing HD
Plants vs. Zombies HD
Proloquo2Go

================================

And the Winners are…

Hipstamtic [iTunes Link]

Plants Vs. Zombies [iTunes Link]

Flipboard [iTunes Link]

Osmos [iTunes Link]

AirPlay, Apple TV authentication and protected iTunes content

Erica continues her hacking explorations into the Apple TV and AirPlay.

Here’s the thing. As far as I can tell, you can play back any content that plays back in your iPhone’s iPod and video applications on any Apple TV. That includes DRM content, all that encrypted stuff that normally requires you to register your computer with your iTunes account.

Somehow the AirPlay protocol sends over enough information to the Apple TV to allow that device to gain at least temporary authorization to play the media you stream to it. From what I’ve been able to find out, that authentication step seems to be transmitted via a simple key using a message that looks something like this…

Continue reading AirPlay, Apple TV authentication and protected iTunes content

AirPlay, Apple TV authentication and protected iTunes content originally appeared on TUAW on Tue, 21 Dec 2010 21:15:00 EST. Please see our terms for use of feeds.

Source | Permalink | Email this | Comments

Camera+ 2.0 is in the App Store, contains 328% more wow

We let you know yesterday that Camera+ was coming back to the App Store with a host of changes. The development team has given us the heads-up that Camera+ 2.0 (on sale for $0.99, normal price is $1.99) is now available in the App Store, and the changes are amazing.

The team at tap tap tap obviously listened to feedback from customers and reviewers. The SLR screen that made the app so unique was also a bit of a UI hindrance, so it’s been removed. The entire user interface was reworked to make it much more intuitive and unified.

As part of the UI changes, Touch Focus and Touch Exposure were improved to make them much more usable. When these features were added to Camera+ early in its life, I found them to be extremely powerful, but quite tricky to use. Menus are now larger, and included on both the camera screen and the Lightbox.

The app also used to be slow in launching, which was irritating when you wanted to get a quick shot of something. The developers significantly improved the start-up time so it’s not so slow. You’ll probably remember my comments in the original review about the somewhat freaky image stabilization feature, which didn’t work too well. Never fear, it’s been fixed.

Continue reading Camera+ 2.0 is in the App Store, contains 328% more wow

Camera+ 2.0 is in the App Store, contains 328% more wow originally appeared on TUAW on Tue, 21 Dec 2010 19:10:00 EST. Please see our terms for use of feeds.

Source | Permalink | Email this | Comments