Zombieville 2: Zombie-Blasting Fun!

Game developer Mika Mobile has done it again. Their newest game, Zombieville 2, is a combination of brilliant gameplay, animation and responsive controls that translate to an awesome experience.

While the game builds on the previous Zombieville, it adds many new elements and improves on others. The graphics have had an awesome refresh that definitely improves the whole feel for the game, and the character customization has been greatly expanded as well. Let’s see what it’s got!

Starting Up

The start screen shows our hero riding along in a helicopter, trusty shotgun by his side. The options page contains a short list of settings: You can enable or disable iCloud or Gamecenter, and turn SFX and music on or off. For those of you who like playing multiplayer, there’s the option to turn voice chat on or off as well.

Zombieville 2 Start Screen

Zombieville 2 Start Screen

Selecting Gamecenter brings up what you’d expect: high scores and achievements. But enough delay — let’s get to the interesting part: the game! I hit play, then Solo, because we’ll take a look at the multiplayer a bit later.

Equipping Your Character

Character Selection

Character Selection

Starting off, you can already see one of the awesome features of the game: tons and tons of customization. What you see here is about half of the many available characters. Want to play as a ninja? Got it. What about a SWAT team member, or a cook? A guy in a hazmat suit? It’s got them all and many more. Needless to say, blasting zombies with a shotgun is a whole lot more fun when you’re Santa Claus.

Weapon Select

Weapon Select

Next? Weapons, of course. How could you survive a zombie apocalypse without them? Again, there are a huge number of weapons available for your disposal – everything from pistols to shotguns to a giant electric telsa cannon. I counted a total of 19 weapons/tools, and as you’ll soon see each of these can be upgraded up to five times to increase its power. Picking weapons isn’t only a question of preference, but strategy. For example, the bat is extremely low damage, but knocks enemies further away so that you can attack them with a more powerful weapon. The rocket launcher can vaporize large groups of zombies, but ammo is scarce. There are also items that are more akin to tools than weapons, such as med-kits or flashbang grenades that stun the enemy.

Upgrading and Equipping

Upgrading and Equipping

Selecting a weapon will bring you to a menu that allows you to buy it if you don’t already have it, and equip it or upgrade it if you already bought it. There’s a short description of the weapon that gives you an idea of how it’ll work, but the best way to get a feel for it is to actually use it for a round or two. Upgrading weapons is a crucial part of gameplay; as you advance to harder stages, you won’t be able to survive unless your weapons are more powerful. Upgrades range from increased damage or ammo to unique traits, such as dual-wielding uzis or a faster charge rate for the telsa gun.

Skill Selection

Skill Selection

In addition to weapons, Zombieville 2 has a host of skills that boost specific traits of your character. The ninja skill, for example, increases the damage of all melee weapons. The radioactive skill makes it so that your character slowly regenerates health at all times, which is super helpful. Upgrading a skill increases the potency of that particular skill, so the level 1 ninja skill won’t make nearly as much of a difference as the upgraded level 5 ninja skill would.

Choosing a Level

Level Select

Level Select

The level selection screen is where you can choose how difficult you want the round to be – the later levels have a greater variety of zombies, more of them, and last longer. You can’t access the later levels until you’ve killed a certain number of zombies — this is a helpful restriction that’ll encourage you to get better weapons and skills until you can handle the harder rounds.

Gameplay

The controls of Zombieville 2 are simple to use and very effective. A virtual joystick on the left controls movement, while the three buttons on the right are for your weapons. Having three separate buttons for each weapon you currently have equipped allows you to instantly use the weapon you want to use instead of having to switch: this is much more useful than you’d think. The top left corner displays your ammo and health; on the opposite corner is your current score. In the middle is the all-important timer: when this timer runs out, a helicopter arrives and you can escape the zombie hordes.

Agh! Zombies!

Agh! Zombies!

Until then, however, you need to stay alive. Zombies drop money, so you’re going to want to make sure to grab that so you can buy and upgrade weapons at the end of each round. Random crates, parking meters and cones litter the street, and destroying these will often reveal ammo. To survive a round, you need to find the proper balance between killing zombies and finding ammo, as well as learning to keep moving so you don’t get surrounded.

Mission Complete!

Mission Complete!

You’ve survived a round! Once you jump on that helicopter and escape the zombies, a “Mission Complete!” screen will appear showing your final score, how much money you’ve collected, and some interesting stats like how accurate you were or how much health you had when you finished. Tap to go back to the selection screen so you can change your weapons, skills or character, and start another round!

Multiplayer

There really isn’t much to say about multiplayer since it works just about exactly as you’d expect it to. Start a game on Gamecenter, invite a friend and you can both play together. If you’ve enabled voice chat in the options page, you can talk to each other just as easily as if you were on the phone. Even on the rather slow connection I used, multiplayer was relatively lag-free.

Conclusion

Mika Mobile has truly created a beauty of a game with Zombieville 2. The graphics (especially on a iOS device with the Retina display) are stunning, the style is charming and the animations are fluid and realistic (in a comic sort of way). If you’ve been craving a side-scrolling, zombie-blasting, comic-styled game, look no further; this is it.

Tweetbot 2: The only Twitter client your iPhone needs

Tweetbot is no new entry to the market, Tapbots (its creator) released it first into the App Store back in April 2011 and we reviewed it back when it launched . But since then it has become better and better, and grown higher and higher in the charts (aided by the release of the official Twitter 4 client). Earlier this week,Tapbots revealed Tweetbot 2, along with the iPad version.

Follow on to see what’s new in this free update to Tweetbot!

The Design

Those of you who have used Tweetbot before will have no trouble using the new version, and at first glance may even find it difficult to notice the changes. For the most part, the design has remained unchanged, and the classic custom UI is still there. There is some debate as to whether the design is too “heavy.”  While there is an element of truth to that discussion, I don’t find it too distracting and it certainly helps distinguish itself from the thousands of other twitter apps out there.


Old "New tweets" banner on left, new and more subtle one on right

Old "New tweets" banner on left, new and more subtle one on right

On the whole, the new UI feels fresher cleaner than before. For example, when new tweets come in, rather than a big in your face blue bar, you get a more subtle one displaying the number of tweets. Retweets are also displayed within tweets themselves, rather than as an additional line as before.

New DM design (left), image previews (right)

New DM design (left), image previews (right)

You’ll also notice the DM section has been redesigned to look more akin to Apple’s messaging app, making it easier to track conversations. One addition I specifically enjoy is that linked images are shown in a small preview box on the tweet — so you know what you’re going to be seeing before you tap on it — not to mention that it gives a larger and more convenient tapping location.

Features

The new Tweetbot’s update certainly isn’t limited to design alterations; there are many tasty new features to sink your teeth into.

Blue indicates the links are tapable

Blue indicates the links are tapable

First and most notably, links and users are now accessible directly, eliminating the need to tap on the individual tweet beforehand to expand it. This makes a surprising amount of difference to using previous versions, and makes the experience much easier. The whole app just seems simpler to use when clickable links are just one tap away.

Normal vs Readability view

Normal vs Readability view

Another new feature included is when directed to the in-app browser there is the option to turn of Readability mode. This will strip down the website you are on, removing ads and other distractions, bringing the focus solely onto the reading content. This is accessed by a small toggle on the dark bottom bar. For the most part, I’ve found this to be very reliable, however there are occasions when this view doesn’t work, when it doesn’t know what to focus on or there are too many other elements. Nonetheless, its a great feature and very welcome, especially when it comes to long reads.

The Other Stuff

Tweetbot 2 seems to have had a general performance enhancement. Scrolling, opening the browser and of course clicking on links are all accomplished more quickly and smoothly. The app was not lacking features in its 1.x versions, and those features still remain. For example, Tweetbot was one of the first twitter clients to include Tweet Marker — an incredibly useful tool that will sync where you got to when you leave, so when you return to another app with Tweet Marker enabled it will bring you back to that position. The very useful gestures and sounds are all still present, making sure that the app hasn’t lost any of its notorious Tapbot identity.

Conclusion

Overall, Tweetbot was certainly one of the best Twitter clients for the iPhone, and this recent update has brought about a series of great new features that improve it even more. The app is very speedy and with tools like Tweet Marker, single link tap and the image preview it has quickly become my favourite Twitter app for the iPhone (and iPad now). If you’ve been holding back, I suggest now is the time you give it a try.

Daily iPad App: Cut the Buttons HD lets you play with scissors

Some of the most compelling iOS games provide a perfectly-tuned example of an established genre. Other strive to create a completely new experience, with varying levels of success. The latter often stands out, if only for the bold attempt at doing something new.

Cut the Buttons is a great example of a game that’s rather unlike anything I’ve seen on the App Store. The mechanics are akin to Fruit Ninja, in that targets fly across the screen and it’s your job to destroy them. But instead of a slashing sword, Cut the Buttons uses a pair of scissors.

Game play is intuitive to anyone who’s used scissors. No, you can’t poke your fingers through the handles, but the multitouch display lets you control each arm independently, just as you would a physical pair of scissors. The graphics use a great too, offering a trompe l’oeil style that makes the scissors and the buttons very realistic.

Simply slicing away at buttons would be too easy, so there are some you’re not supposed to hit. If you miss too many, it’s game over. Cut the Buttons is done in the arcade style, with several modes to play with, as well as a multiplayer mode that puts two sets of scissors on the same screen. Cut the Buttons is definitely something to see, and the HD version is the way to go. The game’s available for just US$1.99 right now.

Daily iPad App: Cut the Buttons HD lets you play with scissors originally appeared on TUAW – The Unofficial Apple Weblog on Fri, 17 Feb 2012 10:00:00 EST. Please see our terms for use of feeds.

Source | Permalink | Email this | Comments

Google allegedly bypassed privacy settings to track user browsing in Safari

The Wall Street Journal reports that Google has been bypassing privacy settings in Safari intended to block websites from tracking user activity across the Internet. Stanford researcher Jonathan Mayer discovered that Google had been implementing code that bypasses Safari’s user-determined privacy settings, and the Journal’s own researcher independently confirmed Mayer’s findings. This code affected both Safari on the Mac and its mobile counterpart on iOS devices

According to the Journal, Google’s code “exploited a loophole in [Safari’s] privacy settings.” By default, both Safari and Mobile Safari block cookies designed to track user activity unless that user specifically interacts with a website by filling out a form or performing some other activity. This default setting blocks most advertising networks from tracking users’ activity unless the user purposefully interacts with an online ad.

The Journal reports that Google’s code “tricked” Safari into believing that users were submitting “an invisible form” to Google. This allowed Google to install cookies on the Mac or iOS device and subsequently track user activity. Such tracking allows ad networks to target specific ads to users based on their browsing habits — and with the overwhelming majority of Google’s revenue coming from advertising revenue, the discovery of this code raises very serious questions about Google’s motivations for bypassing user-defined privacy settings.

The Wall Street Journal’s testing found that 22 of the top 100 visited sites in the US were affected by the code bypassing Safari’s default security settings; the iPhone’s mobile version of Safari fared slightly worse, with 23 of the top 100 sites affected by the bypass code. The Journal reports there is “no indication” any of these sites knew about Google’s code; indeed, even the Wall Street Journal itself found that its own ads were affected.

The code implementation involves the same iframe HTML code used, for example, to embed YouTube videos on external websites — we use iframe codes all the time to deliver videos from YouTube, Vimeo, and other sources to TUAW readers. However, it appears that Google has been using the same iframe snippet to inject content from doubleclick.net, which the Journal calls “the primary tracking cookie for Google’s ad network.”

The iframe window was able to detect the current browser agent, and if Safari or Mobile Safari was being used, Google inserted “an invisible form” into the iframe container. This “form” was automatically filled out by the injected code, making Safari act as though the user had intentionally filled out a form. This then allowed Google to store a cookie on the user’s device, effectively bypassing the user’s privacy settings.

Google+ users have an added “benefit” from this code in the form of encoded information about their account, the Journal reports. Anyone not using Google+ or not logged into their account would instead have a blank cookie.

The cookie installed by Google’s workaround code was temporary, according to the Journal, with an expiration between 12 to 24 hours. However, a “technical quirk” in Safari meant Google’s code essentially acted as a Trojan horse for more cookies to be added after the installation of the first cookie. Any user who saw another Google ad before the initial cookie inspired would have further cookies added on top of the first one.

The Wall Street Journal characterizes this as Google tracking user activity across the Internet regardless of what user privacy settings may have been set to; in effect, Google was tracking even those users who specifically set up their browsers to disable such tracking.

For its part, Google says that “The Journal mischaracterizes what happened and why. We used known Safari functionality to provide features that signed-in Google users had enabled. It’s important to stress that these advertising cookies do not collect personal information.” That having been said, as soon as the Journal contacted Google regarding the matter, Google disabled its bypass code.

Apple responded to the Journal on the matter and said it is “working to put a stop” to Google’s apparent workaround of Safari’s privacy settings.

Google has already been under fire for privacy concerns in several parts of the world and for many different reasons. If the Journal’s investigation into this alleged practice is true, it has widespread implications for the search giant that may come to haunt it later, regardless of whether or not Google has subsequently disabled this code. Google has reported in the past that iOS browsers deliver a majority of its mobile ads; if it turns out that the company has been intentionally bypassing user privacy settings on those browsers, Google will find itself at the center of a well-deserved controversy.

Google allegedly bypassed privacy settings to track user browsing in Safari originally appeared on TUAW – The Unofficial Apple Weblog on Fri, 17 Feb 2012 09:00:00 EST. Please see our terms for use of feeds.

Source | Permalink | Email this | Comments

Mountain Lion’s Gatekeeper adds additional security options to OS X

With the many updates and new features announced for the upcoming OS X release of Mountain Lion, one may have slipped by, but it’s an important feature. It’s also likely to become controversial.

Gatekeeper gives users some extra security when running third party software. Apple says Gatekeeper will help prevent users from “unknowingly downloading and installing malicious software.” The system preference has three levels of security. One only allows you to install apps from the Mac App Store. A second level allows installation of apps from what Apple calls “identified developers.” Apple is starting up a program that basically allows developers to have digital signing of their apps. The lowest level of security allows apps to be installed from any source, but OS X will warn you if the app is not digitally signed.

What Gatekeeper doesn’t do is protect you against malware and viruses, which admittedly have not been a big problem on the Mac platform. Apple does have some built in tools to identify potentially harmful programs, but sometimes the problems can get ahead of Apple implementing a solution. Of course, Windows faces similar challenges, but on a much larger scale.

Gatekeeper is in the recently released developer preview, but it is not activated. AppleInsider reports that it can be turned on by using the new OS X system policy control command-line tool “spctl(8)”.

It will be interesting to see if Gatekeeper matures and adds features by the time Mountain Lion is released in late summer. We’ll do a deeper dive on Gatekeeper and its possible implications for the Mac platform later on.

Mountain Lion’s Gatekeeper adds additional security options to OS X originally appeared on TUAW – The Unofficial Apple Weblog on Fri, 17 Feb 2012 08:00:00 EST. Please see our terms for use of feeds.

Source | Permalink | Email this | Comments

Tim Cook: Right CEO at the right time

Tim Cook wowed us in his recent presentation at a Goldman Sachs investment conference. Rather than formal and serious, Cook was very casual and lively in this talk. He was also forthcoming about Apple, discussing its immediate concerns with manufacturing conditions and its overall plan for the future.

Though Cook talked about 37 million iPhones and 100 million iCloud users, that wasn’t the most important part of his talk. Cook and his humble demeanor were the star of the show. You see, Tim Cook, as ZDNet aptly writes, is the right man at the right time for Apple.

In this recent presentation, Tim Cook is approachable and likable. These two character traits will be invaluable when Apple has to juggle Congressional inquiries, factory inspections and complaints about privacy concerns. He’s exactly what Apple needs as it transitions from a scrappy startup to one of the top companies in the world.

At the same time, Cook hasn’t lost the vision that brought Apple to this elevated position. He won’t forget the important things that Steve Jobs hammered into him all those years. Apple, Cook tells us, will continue to revolve around exceptional user experiences and great products. It won’t produce “a cheap version of the best product.” Apple will also stay focused on only a few products and not try to conquer every sector within consumer electronics. It will be selective when it enters a new market and will venture out only when it can “make a significant contribution to society, not just sell a lot of products.”

It was refreshing to hear Tim Cook speak this way about Apple. We, as Apple fans, can rest easy knowing Cook won’t change the things that make Apple great. We can also look forward to the new ideas Cook is willing to bring our way. If you haven’t listened to the presentation, it’s available on Apple’s website as a QuickTime stream.

Tim Cook: Right CEO at the right time originally appeared on TUAW – The Unofficial Apple Weblog on Fri, 17 Feb 2012 07:00:00 EST. Please see our terms for use of feeds.

Source | Permalink | Email this | Comments

Coverage? for iOS tells when you can and can’t get on the cellular network

Coverage? is an iOS app that tells you where to expect coverage from all the major US carriers. The maps are based on coverage maps from the cell companies, but they are interpreted, updated, and quite a bit more useful. You can see all major US carriers, and overlay them. I initially looked at Coverage? in 2010 when the iPhone was only on AT&T. At the time, I found the comparisons a bit depressing. The Verizon coverage was pervasive, and the AT&T coverage was pretty sparse outside the big cities.

Fast forward to today, and Coverage? is out with a new version that has updated maps, and, for the first time, maps that include AT&T LTE signals. The current iPhone and iPad don’t work on LTE, but I suspect that is about to change. Also new is a search feature so you can get the good or bad news for places you plan to visit.

I found the original version very useful when I was on the road, and in almost every case it confirmed why my signal was good or bad. There are also interesting nuggets that can be gleaned from comparing old and new maps. If you check the gallery comparing maps from early 2011 and 2012, you’ll see Sprint has almost completely vanished from Montana and Wyoming while AT&T has moved in.

Coverage? is a free update to current users, and US $1.99 if you’re buying it for the first time. It’s on sale for 99 cents through the weekend. Maps cover the entire continental USA, Alaska, Hawaii, Puerto Rico, and the US Virgin Islands for AT&T, Sprint, Verizon & T-Mobile. ‘Coverage?’ is not intended to give city level details – it’s goal is to provide an overview while traveling. You can catch a video of the app working to see if it will be useful to you. I like Coverage?. If you travel I think you will too.

Coverage? for iOS tells when you can and can’t get on the cellular network originally appeared on TUAW – The Unofficial Apple Weblog on Thu, 16 Feb 2012 20:00:00 EST. Please see our terms for use of feeds.

Source | Permalink | Email this | Comments

EverQuest Mac saved by the fans

EverQuest Mac, or EQMac, is a fascinating version of the very popular (and classic, at this point) MMO EverQuest. The title is basically an unsupported version of EverQuest, still running on Sony’s servers, but a version that does not include most of the current PC game’s expansions and new features. In that way, fans see it as a time capsule of EverQuest’s history, a way to go back in time on the constantly evolving MMO, and not only play the game on the Mac, but also see what it was like way back when.

EverQuest announced plans a little while ago to go free-to-play, and with those plans, the company also decided that it would finally shut down EQMac, closing the book on that chapter of the game’s history. Fan outcry, as you might imagine, was huge, and Sony’s John Smedley has now tweeted that thanks to the outpouring of fan voices, EQMac is here to stay.

Unfortunately, that’s just one tweet from late last night, so there aren’t any details on exactly how Sony will navigate the changeover to free to play from an EQMac point of view. But it is at least good news for Mac users still playing EverQuest and a sign that there are tons of passionate and active gamers on the Mac platform.

EverQuest Mac saved by the fans originally appeared on TUAW – The Unofficial Apple Weblog on Thu, 16 Feb 2012 19:00:00 EST. Please see our terms for use of feeds.

Source | Permalink | Email this | Comments

Mountain Lion to move Software Update to the Mac App Store

Every version of OS X has featured a standalone application called Software Update that delivers updates to Apple’s operating system, applications, and hardware drivers. According to Pocket Lint, Software Update is being deprecated in the next version of OS X, Mountain Lion, in favor of delivering software updates entirely via the Mac App Store instead.

After OS X Lion was made available only via the Mac App Store, it created a somewhat confusing situation where Apple’s own programs were updated via the standalone Software Update application while many third-party apps were updated via the Mac App Store. Mountain Lion eliminates this confusion and makes the Mac experience more like that on iOS devices; Mountain Lion users will have only one interface to reckon with when updating software components on their Macs.

Presumably Apple will continue to deliver updates via Software Update for Mac users running legacy operating systems like Snow Leopard (and soon, Lion). Hopefully Apple will also continue to offer standalone updates on its support site so paranoid users like me can keep downloading and applying combo updates when OS X updates come out.

Mountain Lion to move Software Update to the Mac App Store originally appeared on TUAW – The Unofficial Apple Weblog on Thu, 16 Feb 2012 18:00:00 EST. Please see our terms for use of feeds.

Source | Permalink | Email this | Comments

Magnus magnetic stand has a hold on your iPad 2

Sometimes the most simple accessories can be the most effective. When I received a tiny box from Ten One Design claiming to hold a stand that would support an iPad 2 in an upright position, I scoffed. But it turns out that the Magnus magnetic stand (US$49.95) really does work.

The Magnus is a tiny sculpted piece of aluminum with a very powerful magnetic strip at the bottom. When you place an iPad 2 onto it in the designated landscape orientation (with the home button on the right side), the Magnus and iPad click together. Held in the magnetic clutch of the Magnus, the iPad is nicely balanced and stays securely perched.

This is one of the smallest iPad stands I’ve reviewed so far … and I’ve reviewed a lot of ’em. For anyone who wants a stand that will hold an iPad in landscape orientation and is virtually invisible at the same time, the Magnus is your product.

On the other hand, if you like your iPad in the full, upright position (portrait) look elsewhere. For movie viewing or using the iPad with a Bluetooth keyboard, the Magnus is perfect.

At 4.6 ounces, the Magnus won’t load down your favorite iPad bag while in transit. And dang, it just looks good. There’s not much more to say than that, so I’ll just let you take a look at the gallery for more views of what could become your favorite slab of aluminum … other than your iPad 2.

Magnus magnetic stand has a hold on your iPad 2 originally appeared on TUAW – The Unofficial Apple Weblog on Thu, 16 Feb 2012 17:05:00 EST. Please see our terms for use of feeds.

Source | Permalink | Email this | Comments

Top 10 new features from Apple’s next Mac OS X Mountain Lion

In a very un-Apple fashion the Cupertino company yesterday released the developer preview of the next version of its Desktop operating system, which will carry the name OS X Mountain Lion. As you will see from this top 10 new features Mountain Lion is heavily influenced by iOS.

Here are the top 10 features from the OS X Mountain Lion preview.

1) Login to the cloud – With Mountain Lion, iCloud gets even more love from Apple,  you can now use your Apple ID to login to your Mac. After you have logged in iCloud will automatically synchronize all your emails, documents, photos and contacts. And just the same way that iCloud works today, any changes made on the Mac are instantly reflected across all your devices – iPhone, iPad and iPod touch. This is great news for those who own several Apple devices.
iCloud_Mountail_Lion.jpg
2) Messages – With Messages Apple is pretty much killing the iChat. iPhone and iPad users will already be familiar with Messages. Whats great is that you can add chat via your AIM/ Google Talk/ Yahoo! account or send unlimited message to iPhone, iPad and iPod touch users using iMessage – for free! It also features attachment support, delivery reports, read receipts etc.
Messages can be downloaded as a beta version today, it can be downloaded from the following link.
Messages_Mountain_Lion.jpg
3) Reminders – An all new Reminders app that syncs to your iPhone, iPad or iPod touch via iCloud. If you are anything like me you will also forget a whole bunch of important things. This new app for Mountain Lion means you can add new reminders or check up on the reminders you have from the desktop. Thanks to  iCloud support all your reminders are automatically synced to your iPhone.
Reminders_Mountain_Lion.jpg

4) Notes – A lot of us have been waiting for this update, even though Notes isn’t new per se, the changes to Notes in Mountain Lion is that its broken free from the Mail app into its own app to parallel the Notes app in iOS. Now you can make notes as an when you want and even stick them to the desktop to help you remember them a little more clearly. These notes will also be synched with your iOS Devices.
Notes_Mountain_Lion.jpg

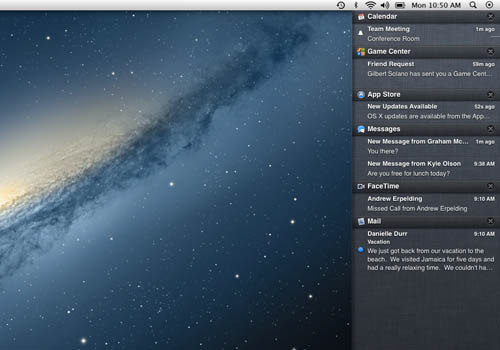
5) Notification Center – Perhaps our favourite feature is an iOS style Notification Center. Mac OS X will be the first OS X release to have a built-in Notification Center that lets you stay on top of things. The Mac OS X Notification center is very similar to the iOS version. Working like the Notification drag down bar in iOS, users will be able to access a panel to the right of their desktop at any time to see what the latest notifications are.

Notification_Center_Mountail_Lion.jpg

6) Share Sheets – Share Sheets are heavily inspired by the share button seen across the Web. A handy way of emailing links or posting videos to Youtube, we believe you will use this feature more often than you can probably think right now. Sharing your content has never been so easy.
Share_Sheets_Mountain_Lion.jpg

7) Twitter – Twitter integration is another feature that’s straight from iOS. Operating System level support for Twitter accounts that lets you sign-in once and tweet from any application, will be very useful. In the same way Twitter is everywhere on your iPhone or iPad, Apple has added the blue bird in a similar way here.

8) Game Center – If you enjoy playing games then this is great news for you. Apple is bringing the Game Center from iOS to Mountain Lion, allowing users to find friends to play with, check out their leaderboard stats and achievements gained. What is interesting is that  it will allow you to play other Game Center users regardless of what device they are on.
Game_Center_Mountain_Lion.jpg

9) Airplay – Airplay Mirroring is as easy as on iOS. With an Apple TV hooked up to a television set, Air Play lets you mirror your Mac on a HDTV or simply stream the movie playing on your Mac to the TV.
Airplay_Mountain_Lion.jpg

10) Gatekeeper – Gatekeeper is designed make your Mac more secure. It gives you the ability to run your Mac in 3 different modes. The first one lets you download and install any app you want, just like OS X Lion. The second lets you run apps from the Mac App Store and apps with a Developer ID. The third mode restricts your Mac to only apps from the Mac App Store.


What feature are you most excited about? Let us know in the comments!


5 days left : 3 iPhone App Design Templates At $97 instead of $210

NOTE: This deal has been extended until 22nd February 2012. Grab it now so you don’t miss out.

Your App has to stand out in the App Store to even get a chance at success. There are lots of ways to do that.

You can make sure you have a good title, a well thought out description, good rankings etc.

Another way is to have great design. The type that blows the iPhone/iPad user’s mind away, they just have to tap the “Buy Now” button to check it out.

Up until now, to make your App look good but you either had to

  • Break the bank and hire a top-notch designer
  • Launch Photoshop and spend 30 hours making something that looks “nice”, or not.

There is another way.

Use an iOS App Design Template

Now you can buy an iOS App Design Template from App Design Vault and you get graphics to skin your app and make it look like a million dollars.

All that at a fraction of the price of hiring designers and at a fraction of the price 30 hours of your time is worth.

Here is a sample of templates you could own today.

Get Three Themes For Only $97 instead of $210

Here is how you can get a bundle of three iOS App Design Templates for $97 instead of $210.

After you purchase your bundle, you will be awarded enough credits to download any three templates of your choice from the Gallery

Here are some reasons why getting the bundle makes sense.

  • A designer will charge you a minimum of $2000 to design something similar
  • You will have to spend at least 30 hours of your time to get similar designs (Calculate 30 times how much an hour of your time is worth)
  • Tope is crazy enough to give you the discount for a limited time

Yes, this is only available until 22nd February 2012

The deal is only valid until the 22nd of February so it is good to act now. You get a 100% money-back guarantee, without time limits.

You can be rest-assured you are in good hands as there are already lots of happy customers with apps live in the iTunes Store using the templates.

Tutorial: Creating A 2D Game Using iOS 5?s GLKit

I’ve mentioned some excellent tutorials on using the GLKit API that was added with the iOS 5 SDK providing easier programming of OpenGL ES on the iPhone and iPad.

Today I came across an excellent step-by-step guide from on how to create a game from the ground up using GLKit.

In the tutorial you’ll learn how to set up a GLKit project, create a sprite class, position the sprites, basic collision detection, and more.

The tutorial is from Ray Wenderlich, and you can find it in two parts here:
Part 1, Part 2.

Makes for a great intro to the GLKit framework – and how it maeks OpenGL ES 2.0 easier to swallow.

©2012 iPhone, iOS 5, iPad SDK Development Tutorial and Programming Tips. All Rights Reserved.

.

DeliciousTwitterTechnoratiFacebookLinkedInEmail


Tutorial: Developing 2D Games In Unity 3D – Without Paying Extra For Tools

Developing 2D games on the iOS platform with Unity 3D is something that I’ve seen a lot of interest in on this site.  Some time ago I mentioned a set of tutorials on creating 2D games with Unity 3D by Tim Miller.  Although that was an excellent guide it did require you to use premium tools like Sprite Manager 2 and Maya.

Tim has created another excellent set of tutorials on how to develop a 2D platformer game in Unity 3D this time using only tools that provide a free licensing option.  The principles in both sets of tutorials work together, but you’ll probably want to start with this set because you won’t have to pay up front for tools just to get thorugh the tutorials.

The tutorials guide you through laying out the level through to enemy pathfinding.

You can find the tutorial in five parts here:
Pt. 1, Pt. 2, Pt. 3, Pt. 4, Pt. 5.

If you wanted to go through the other tutorials, but couldn’t get through them because you didn’t own Sprite Manager you should check these out.

©2012 iPhone, iOS 5, iPad SDK Development Tutorial and Programming Tips. All Rights Reserved.

.

DeliciousTwitterTechnoratiFacebookLinkedInEmail


Open Source: Library For Automatic Serialization/Deserialization To And From JSON Dictionaries

Some time ago I mentioned the excellent library allowing you to save any object to a Plist file.

Today I came across a library allowing you to automatically take JSON dictionaries, or property lists and turn them into model objects (or vice versa).

Here’s an example from the Github page demonstrating what makes this library so interesting.

You can take a JSON dictionary like this:

 {
 "userID" : 1234,
 "name" : "Jane Smith",
 "likes" : ["swimming", "movies", "tennis"],
 "invitedBy" : {
 "userID" : 9876,
 "name" : "Bob Willis"
 }
 }

And out comes a model object like this:

 @interface User : NSObject
 @property (assign) int userID;
 @property (copy) NSString *name;
 @property (strong) NSArray *likes;
 @property (strong) User *invitedBy;
 @end

The library is JAGPropertyConverter from James Gill, and you can download the library and find further information on usage on the Github page here.

Definitely a very useful looking library.

[via @romainbriche]

©2012 iPhone, iOS 5, iPad SDK Development Tutorial and Programming Tips. All Rights Reserved.

.

DeliciousTwitterTechnoratiFacebookLinkedInEmail