I would like open-video-ads http://code.google.com/p/open-video-ads/ to be integrated into a custom flashplayer. Perhaps you could create a more user friendly approach to this, like an API so I could… (Budget: $30-250, Jobs: Flash, Flex, PHP)
Author: Blancer
ONLY FOR USER websiteforyou – Slice Project (code BMT2010) by pyno
This project is ONLY for the user websiteforyou. DO NOT BID IF YOU ARE NOT USER websiteforyou. (Budget: $250-750, Jobs: Website Design)
Wiki installation and customising by cosmo
Hi there, titel says it all. Simple and sweet. I need someone who installes media wiki on my site and costomices it a bit. Thanks for bidding (Budget: $30-250, Jobs: Script Install, SQL)
Mötesbokare/säljare (svensk) by souled
Hej! Jag driver en webbyrå och söker nu en mötesbokare eller säljare. Din uppgift blir att ringa runt till företag och boka in “informationsmöten” åt mig. Ingen försäljning per telefon utan den biten tar jag hand om när jag sedan träffar kunden… (Budget: $250-750, Jobs: Advertising, Marketing, Sales, Telemarketing)
SEO needed for itouch website by saulyx
Hi, I’m looking for someone to do some SEO work on my website, I’m looking to get my website in top 3(on first page) for keyword “free ipod touch” The website is http:// *** 1freeipodtouch *** …. (Budget: $30-250, Jobs: Link Building)
Need people who wants extra cash – Anyone who can write by Realopportunity
Please check out the attached file for more info. (Budget: $30-250, Jobs: Article Rewriting, Articles, eBooks, Ghostwriting)
Craigslist POSTER EXPERT only HOUSING section – 400 ads by lentech
I need 400 ads posted PER DAY. In the APT/HOUSING section of craigslist. If you do not have experience posting in this section. Do not bid. Requirements: You must have your own IP solution and PVAs… (Budget: $250-750, Jobs: Advertising, Data Entry, Internet Marketing, Marketing, Virtual Assistant)
Native Writers needed to join writing team by writershunt
We need native writer who can write articles, researched articles of about 300-600 words. Native Writers are welcome Unique content Copyscape premium passed Swift communication Professional Writers(freelancers) We will pay at least $2/300-500 words… (Budget: $30-250, Jobs: Articles, Copywriting, Ghostwriting, Research)
10 articles 500 words $3 each-2 by kb23c
Hi All, I need 10 articles of 500 words each to be completed in 2 days. Terms as under:- 1. All articles must be high quality and must pass copyscape. 2. No grammatical or spell errors. 3. no escrow or upfront payments and payment only after buyers approval… (Budget: $30-250, Jobs: Articles, Copywriting)
Install and Setup Dimdim web conferencing on Linux server by benpiscopo
Need some help here and I’m too busy to figure this out by myself. With open source Dimdim web conferencing (an executable file), I’d like you to load dimdim onto a VPS that I will rent in Hong Kong. You’ll… (Budget: $30-250, Jobs: Java, Linux, Software Testing)
Web content writer needed (Huge Project) by writershunt
We need native writer who can write web content, product reviews, articles, researched articles of about 300-600 words. Native Writers are welcome Unique content Copyscape premium passed Swift communication We will pay at least $2/300-500 words… (Budget: $30-250, Jobs: Articles, Copywriting, Ghostwriting, Research)
WordPress blog needs small changes by sblog
Hello, my blog www.blogalberghi.it needs the following small changes: In the homepage there are now three boxes: 1) The first one is Confronta Portali. I need you to create the following box Please view the attached document for image… (Budget: $30-250, Jobs: PHP, WordPress)
US Writer for CRAIGSLIST content – 700+ words per DAY by lentech
US WRITERS ONLY – Real Estate experience a plus. – Must be able to produce 100% UNIQUE content. – No software spins/rewrite. – Content is for Craigslist housing section. – Must know about Craigslist bodies and titles… (Budget: $250-750, Jobs: Articles, Copywriting, Craigslist, Ghostwriting, Virtual Assistant)
Ableton Live Racks: Creating One Knob Macro Controls
Ableton Live has a macro control mapping function similar to the Reason’s Combinator Device. In this tutorial I’ll try to explain how to use it on effect devices and control many parameters with one macro knob.
In this tutorial we are going to create an Audio Effects Rack which consists of a Filter, a Reverb and a Distortion. We will map multiple parameters of these effects to single Macro Knobs and do different mapping combinations for easy effects manipulation.
Step 1: Creating the Effect Rack
First drop a sample on an empty audio track. The loop I used on this tutorial is in the playpack, you can use any loop though. Go to the Live devices and create a new Audio Effects Rack on this audio track.
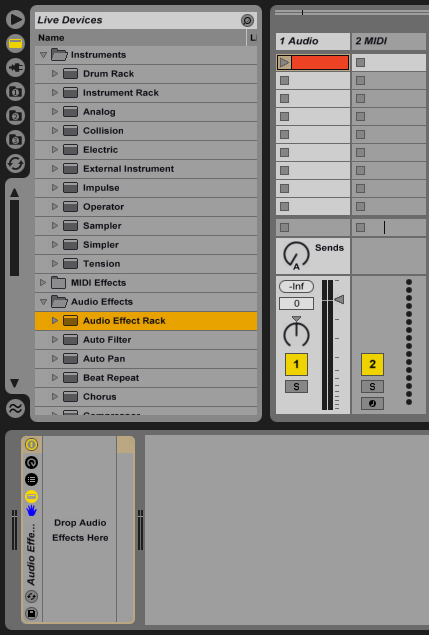
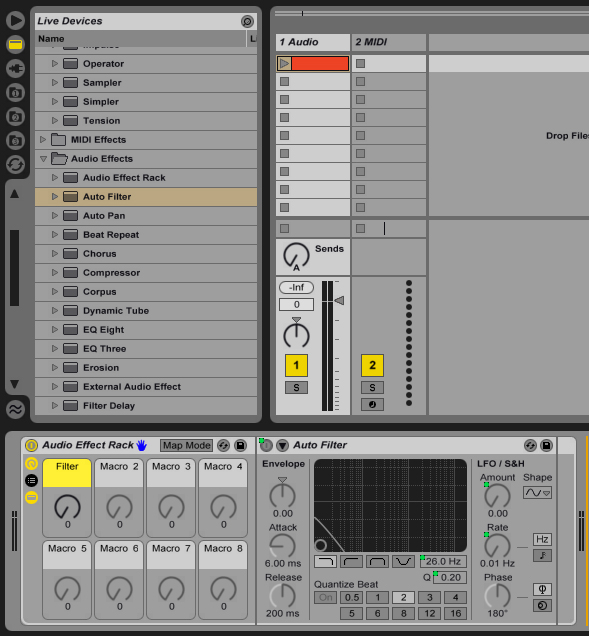
Step 2: Low Pass Filter
In this Effect Rack we will create several effects and map these to macro controls. Let’s start with a filter, go to audio effects and drop an Auto Filter into the Audio Effects Rack. Right Click on the “Filter Freq” and select “Map to Macro 1″, then do the same for “Filter Q”, “LFO Amount”, “LFO Rate” and “Device On/Off”; map all these parameters to Macro 1 and rename it to “Filter”. I also gave it a nice yellowish color. Notice that as we map the parameters to macros, the parameter becomes disabled and a green dot appears next to it.
The idea here is when we move this knob effect will be enabled and works as a smooth low pass filter. To do this we have to have different control on the parameters we have mapped to Macro 1. On the Audio Effects Rack device bar click the “Map Mode” button, a window like this should appear.
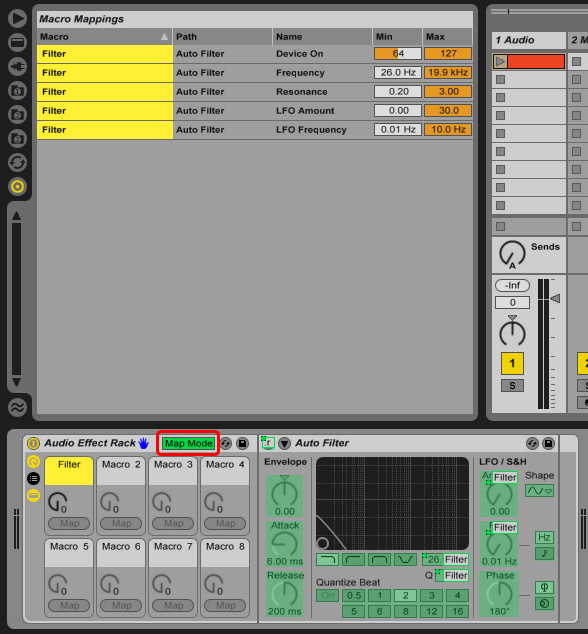
Now the values I use n the filter is:
- Device On > Min: 1, Max: 0
- Freqency > Min: 6.70 kHz, Max: 130 Hz
- Resonance > Min: 0.77, Max: 2.10
- LFO Amount > Min: 0.00, Max: 15.0
- LFO Freq > Min: 0.04 Hz, Max: 10.0 Hz
And it sounds like this:
Download audio file (Audio 1.mp3)
As you see when I move Filter Macro up, more low pass is applied with a slight LFO and when it’s at zero the effect is disabled.
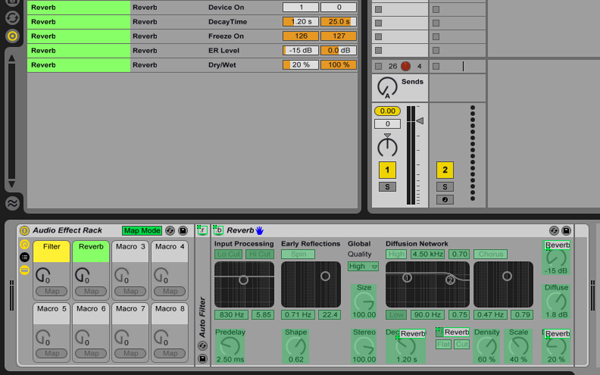
Step 3: Reverb
Drop a Reverb device after the Auto Filter, map the “Dry/Wet”, “Decay Time”, “Reflect”, “Device On/Off” and “Freeze” to Macro 2.
Let’s click on the “Map Mode” and configure Reverb controls like this:
- Device On > Min: 1, Max: 0
- Decay Time > Min: 1.20 s, Max: 25.0 s
- Freeze On > Min: 126, Max: 127
- ER Level > Min: -15 dB, Max: 0.0 dB
- Dry/Wet > Min: 20 %, Max: 100 %
This is a nice setting on the Reverb which disables it at “0″ and freezes the signal at “127″. I also tweaked the Reverb a little to make it sound better. Here’s How it sounds:
Download audio file (Audio 2.mp3)
Step 4: Vinyl Distortion
Now add a Vinyl Distortion at the end of the chain, then map “Crackle”, “Tracing Drive”, “Tracing Freq”, “Tracing Width”, “Pinch Drive”, “Pinch Freq”, “Pinch Widht” and “Device On/Off” to the Macro 3. Here’s the mapping for these parameters:
- Device On > Min: 1, Max: 0
- Tracing Drive > Min: 0.00, Max: 0.30
- Tracing Freq > Min: 5.00 kHz, Max: 50.0 Hz
- Tracing Width > Min: 3.00, Max: 0.10
- Pinch Drive > Min: 0.00, Max: 0.30
- Pinch Freq > Min: 50.0 Hz, Max: 5.00 kHz
- Pinch Width > Min: 0.10, Max: 0.50
- Crackle Volume > Min: 0.00, Max: 0.50
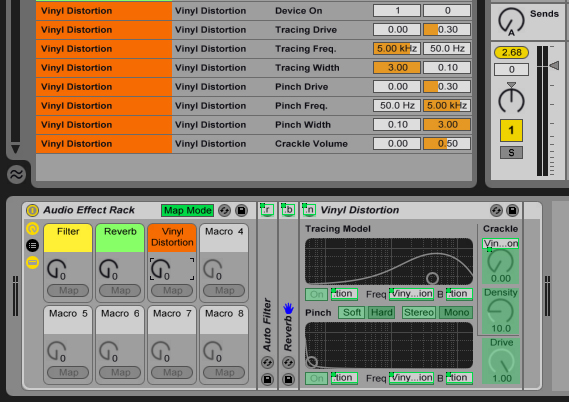
Feel free to tweak all these mappings as you wish, with my settings it applies a slight cracke which shoud sound nice after the reverb.
Download audio file (Audio 3.mp3)
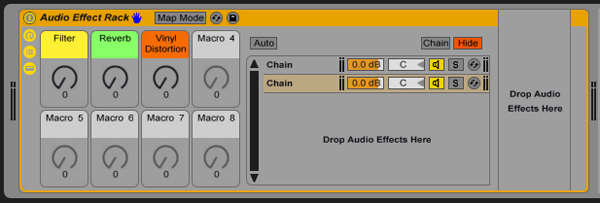
Step 5: Wet/Dry Control
To create a Wet/Dry control, open up the Chain Selection panel on the Audio Effects Rack. We’re going to do a trick here, grab any audio effect -Let’s say an Auto Filter- and drop it below the first Chain. After you have created the chain, delete the effect device so you have an empty chain, this is how it looks:
Name the first chain as “Wet” and the empy one as “Dry”. Right click on the chain volume levels and map them to Macro 4, then rename Macro 4 as “Wet/Dry”. Then go to the Map Mode and:
- Wet Mixer > Min: -inf dB, Max: 0 dB
- Dry Mixer > Min: 0 dB, Max: -inf dB
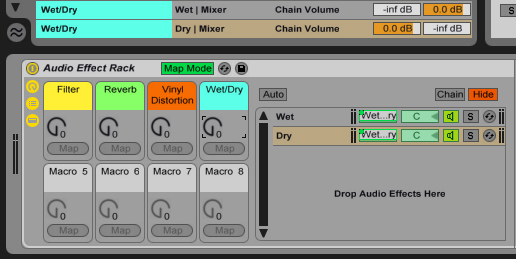
This will create a crossfader between the original and effected sound.
I hope it is all clear and you find it useful. This tutorial should give you the basic idea of mapping the macro controls to multiple parameters. We’ll go for more advanced effect devices in the next tutorials.
15 articles 500 words $3 each-2 by kb23c
Hi All, I need 15 articles of 500 words each about health to be completed in 3 days. Terms as under:- 1. All articles must be high quality and must pass copyscape. 2. No grammatical or spell errors… (Budget: $30-250, Jobs: Articles, Copywriting)