Hello,
I just need a quick 1 page press releases written for a startup in the travel industry. I will give you lots of details and even an example press release to follow. Should be simple.

Blancer.com Tutorials and projects
Freelance Projects, Design and Programming Tutorials
Hello,
I just need a quick 1 page press releases written for a startup in the travel industry. I will give you lots of details and even an example press release to follow. Should be simple.
Description:
I need a logo redone.
It consists of a scottish thistle and a saying wrapped around the outside.
The saying ( God Made Scots A Wee Bit Better ) must be used, possibly in a font of Blackmoor Let
Try to incorporate both flowers (photo attached)
Requirements:
Designer MUST supply a mock up, as the best mock up will be the winner.
Must be in color, only three colors may be used;
Green for the thistle leaves,stem, base, and possibly gradient letter color
Purple for the flower
Black for shading, and lettering
All rights to the image are given to me upon completion, and the files supplied in .gif .tiff
jpg and the raw file from which it was made.
Thank you
I need an experience writer to edit this paragraph to make it stand out. I have put together a paragraph and i need a specialist that can take the story and make it a press release worthy for news reporters. I want it to grab attentions. I want the writer to go thru my website http://www.dcnitephoto.com understand it so it would be easy to describe what it does and benefit the community.
This is what i have put together for you to go by. You can use most of the stuff from here.
Joseph and Fares Gessese are entrepreneurs from Ethiopia. During the summer of 2000 Joseph and Fares Gessese decided to move from Washington, DC area to Fort Wayne, IN to become successful entrepreneurs. In Fort Wayne, IN, the brothers didn’t idle away their precious time; instead they utilized it for gathering further knowledge about becoming able entrepreneurs. They were frequent visitors of the local library and from there they devoured very many books connected with entrepreneurship. After months long research they decided to float their first business. They started their own carpet cleaning business, with the main stress on the low income families. Slowly they began to grow and moved to Columbus, with a view of expanding their growing business. By hard work and sincerity they were really successful and became the founders of African Midwest Yellow Pages, African Cup USA and also started to function as the franchisee of the 4th largest tax service of America in Manhattan, NY.
In May 2010, Joseph and Fares moved back to Washington DC area and founded DMVStars.com to highlight the stars in DC, MD, and VA. They wanted to connect the DMV Stars with their fans. DMVStars.com allows their fans to vote for their favorite DMV star. DMVstars.com also helps the upcoming artist in DMV by giving them a platform to show case their talents. Fares says, “I felt like DMV needs to know “who is who” in our community and DMVStars.com does exactly that.” The brothers say that they are obliged to giving back to the community they grow up in.
drupal developement design very small budget. fields for entering data to database. insight on which way to go as for best developement practice. also implementing click to call into the website. kind of a call center environment.
For a file manager, I need two icons, one ‘folder’-icon and one ‘file-icon’. The specifications are:
* size: 25 x 25 pixels
* transparent background
* png file format
* style: Mac OS X
Of every icon, I need a copy in a second color. Hence, the total number of deliverables is 4.
I’m looking for creative, yet simple designs.
Thanks for bidding!
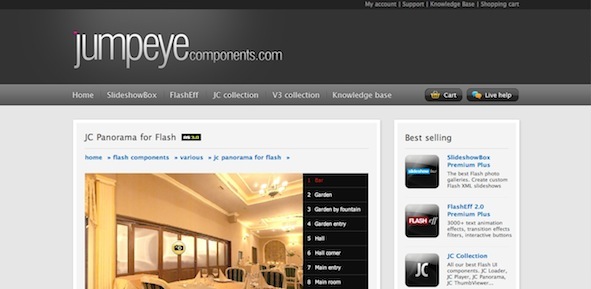
A Panorama is a picture or photograph displaying a wide view.
In this tutorial, we’ll create an Interactive Panorama Viewer using a third party application: JC Panorama Editor.
We’ll create a panorama viewer using the JC Panorama Editor application and explore the many options and posibilities available.

An excellent and clear description is available from the JC Panorama authors:
JC Panorama Viewer is a flash component that can be used to display several types of panoramic images: plain, cylindrical, spherical (equirectangular) and cubical. This flash panorama component supports hotspots (informative, web link and panorama), horizontal and vertical mouse movement, scroll zoom, transitions and virtual tours.
JC Panorama Editor is a very easy to use AIR application that allows you to create and edit panoramas to be loaded by JC Panorama Viewer as well as virtual tours directly on your desktop.
You can get two versions of JC Panorama.
A fully unlocked app for $99, and a trial (very usable) version with a few limitations:
Both versions available at the component’s website.
There are always pros and cons when using third party components to develop your applications.
Pros:
Cons:
JC Panorama uses an AIR based clean interface with several options to generate your panorama viewer.
The process is really simple, choose an image, the type of the panorama you want to create and choose between the several options to customize the resulting SWF file.
Go and check out the demo. It’s a simple panorama generated by the JC Panorama Editor app, I’ll walk you through the creation process in the next steps.
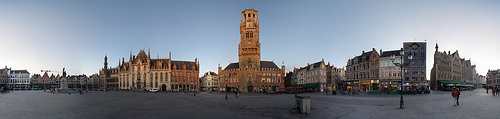
The first thing you have to do is select the image you want to use in your panorama, I chose this Flickr image by Steve & Jemma Copley licensed under Creative Commons.
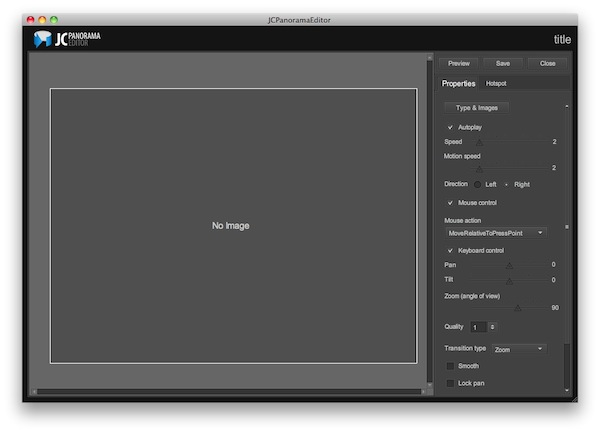
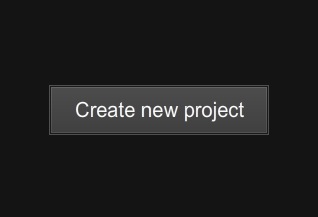
Open the JC Panorama Editor application and create a new project.
Another view will be presented in the app, press the "+" sign to add the image you chose before.
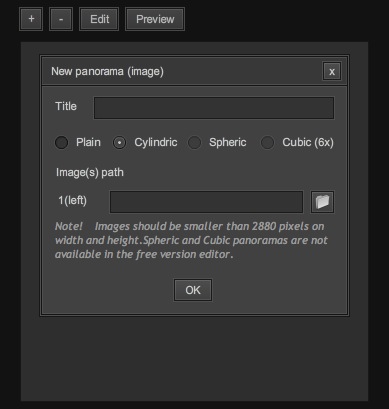
In this panel you will also asked to name your project and select the type of panorama you are creating.
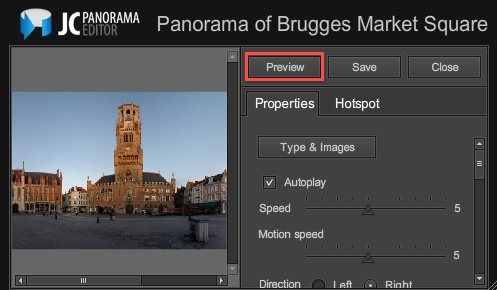
Once you proceed, a new screen will be revealed where you will see the image being used and an options panel at the right. Press the Preview button in the top-right part of the window to see your panorama in action.

The Properties panel is located at the right part of the screen in the preview window, it shows the available options that you can choose to customize your panorama.
Let’s take a look at those properties:

The Hotspots are markers that are superposed in your panorama that can perform an action. There are three types of hotspots:

Four types of panoramas can be created with JC Panorama Editor, two available in the trial version and four in the full version.
Examples of the four types can be seen in the component’s website.
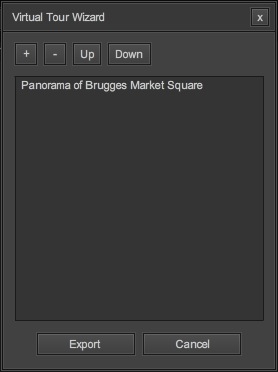
A Virtual Tour is a collection of panoramas displayed by a single swf. You can create a Virtual Tour by pressing the Make a virtual tour button in the new project screen and selecting the desired panoramas.
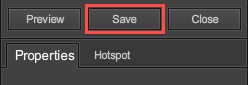
When you’re done, click the Save button in the top-right corner of the window, this will save your work. Now you’re ready to test and use your panorama viewer.
You can see how easy it is to create a Panorama image viewer using JC Panorama, try out the different options and choices to create your own Panorama!
Thank you for reading!
3Ds Max author Ben Tate is back once again with the final part of this exclusive 3-part tutorial series covering all of the processes involved in creating ‘The Lantern’. After modelling the lantern in the first part and UVing in part 2, today Ben sets about adding the final textures to the lantern model. Let’s get started!
In this tutorial we’ll go through the entire process of modelling, uvmapping, texturing, lighting and rendering an old lantern in 3d Studio Max. In the first part of the tutorial, we used poly modelling techniques for the majority of the model, but also took a look at how to use splines to create the more complex pieces.
With the modelling completed, we’ll now move on to the UV mapping – all of which will be done inside of 3ds Max using the many tools contained in the Unwrap UVW modifier, such as Flatten and Pelt Mapping. We’ll also discuss tips and tricks for UV mapping sub-divided geometry. With the mapping completed, we’ll scale the uv islands to the correct proportions and clean up our objects.
Finally we’ll pack and finalize our UV’s into a single layout, before moving into Photoshop to create the Diffuse, Bump and Specular Maps in the final part of the tutorial. We’ll also create procedural materials for the candle and flame inside Max, and finalize our scene lighting for the final render.
Download
Note: click the ‘Monitor’ icon to view tutorial in full-screen HD.
Download
Note: click the ‘Monitor’ icon to view tutorial in full-screen HD.
Don’t miss more CG tutorials and guides, published daily – subscribe to Cgtuts+ by RSS.
I like to swim. The rhythm of the stroke, the silence of the water, the regularity of breathing: they bring peace to an overactive mind that otherwise gets overwhelmed by things to do, while getting little done.
Recently, I expressed a desire to increase my lung capacity underwater. If I could come up less often for air, my stroke would be more efficient, and my lap time would be faster. The technique I was shown was fundamentally simple, but through it I discovered a way to overcome writer’s block.
As a writer, I’m painfully aware of how crippling the pressure of my own expectations can be to my work. My search for the perfect word or phrase often leads to paralysis rather than progress, leading to a compressed state of mind and body. In that state, my habit has been to abandon my work entirely, indulging instead into unnecessary distractions (reformatting old to-do lists, making new to-do lists, deciding that “right now” is the best time to try out that three-hour curry recipe or remove an ancient stain from a corner of the carpet). Giving in to anxiety at critical moments has not, so far, helped me to be more productive.
To increase my lung capacity, I had to learn to hold my breath underwater for longer. My first instinct was to think hard about holding my breath, gulp a huge lungful of air, go under for as long as I could, and come up when I thought I was going to collapse. Scratch that, I was told by my dive-master friend, it’s the same bad habit from work: building up expectation, creating unnecessary pressure and abandoning the exercise as soon as things got uncomfortable. Instead, I was told to think less about the process, take a moderate lungful of air, go under and just watch my mind. It sounded weird, but not so weird that I wasn’t willing to try it.
While we were talking, my friend suddenly turned to me and said,
“OK. Go.”
Before I had a chance to over-prepare or make a big deal of anything, I had taken a natural breath of air and was underwater. In the silence of the empty pool, I focused on stepping back to “watch my mind”. It was a strange sensation, like watching a movie: I saw my mind notice the blue tiles of the pool, a floating twig, the bubbles from the pool filter, my floating limbs, the coolness of the water against my skin. I saw it wander around, wanting to do something (even asking “Are we there yet?”), willing my body to resurface right now. I watched as it started to make a big fuss: You’re out of air. You’re about to burst. Your lungs are going to collapse any second now.
My mind was pushing every panic button it knew, and this time I chose to just observe it in silence. The less attention I paid to it, the less the imagined anxiety grew, and the less breathless I felt. In that moment I discovered magic reserves of air that allowed me to stay underwater longer, when previously I’d have resurfaced a long time ago. I watched my mind push the panic button twice more before I felt, with no anxiety, that now it was time to come up. When I resurfaced, I wasn’t gasping for air, but was breathing deeply, normally. I checked my time, and saw that I’d been underwater for five times longer than I’d expected.
In quiet observation, I saw my mind’s desire to believe an anxiety that didn’t really exist. In staying steady through discomfort, an imagined disaster disappeared. In the process of stepping back, I was relaxed enough to write this article in a fifth of the time it’d otherwise have taken me. In learning to hold my breath underwater, I found a spaciousness that allowed me to work more efficiently.
Lessons Learned
Through this process, I discovered the following tips to get more done with less stress:
I also learned that the next time writer’s block strikes, I’m going underwater to hold my breath.
Handling criticism – especially the constructive kind – is not the easiest thing to do. Yet we face it each day, whether in small doses or in large chunks. It pays to be adept at knowing what to do when someone criticizes you or your work — not how you handle can have a positive (or negative) impact on you. It can impact your livelihood, your perception of yourself and those around you and even the source of the criticism itself. As you can see, there are a number of factors to take into account when faced with handling criticism; these 3 tips should get you in the right mindset to deal with it accordingly.
Jason Finnerty says you should listen carefully, think about it and discuss it.
“Consider the source, and then think through their suggestion. Is it something that you can possibly do? If you were to complete the task at hand in the way they are suggesting, would the final outcome be different?”
Oleg Mokhov thinks you should externalize it:
“When you externalize criticism, you escape the defensiveness trap. You stop being self-conscious and take criticism objectively, which lets you reap the benefits of the helpful tips that the criticism contains.”
In this interview, Gary Vaynerchuk says it’s work embracing:
“Approach all critical comments from the perspective of gratitude. They represent an opportunity to improve on an aspect of your job and will only help you in the long run. And even if you don’t agree with what’s being said, by being the bigger person you’ll still come out looking good.”
You know you could do a better job of handling criticism. I’m only saying this because I’m trying to help…
Germany has Leica, Zeiss, Voiglander and Rollei. Sweden has Hasselblad. Japan has Canon, Nikon, Pentax, Sony and Olympus. If you’re a photographer, you know these brands. You probably own cameras and lenses made by one or more of these companies. But there is a dark horse in the camera world, Russian and former Soviet countries also produced some great cameras, and some still do. It’s an intriguing story and a branch of photography that can yield some incredible value.
In this tutorial, I’ll present a brief history of Russian cameras, cover many of the major brands that are available, and talk about some of the great lenses that were made for these cameras!
The following image was made with a Zorki 4K. We’ll get to it, don’t worry!

First, let me say that “Russian” is a catch all term for a variety cameras that were produced in Russia and the USSR, and then in the former Soviet states after 1991 when the USSR collapsed. I use the term “Russian” out of convenience, and I don’t want it to imply anything too specific.
That being said, the vast majority of the Russian camera industry came into being after World War II. Germany, a camera-making powerhouse, was split into sections. One of these was controlled by Russia. Also many German companies were forced to give up their patents and designs. So companies in Russia started producing copies or similar cameras and lenses to the famous German models. Some of these were great, others suffered from poor quality control.

The first thing you’ll notice about Russian cameras, and the thing that initially draws most people to them, is the price. They are incredibly affordable. A Leica from the 1960s might cost you $600, a Zorki or Fed from the same period might cost $60. The same principle applies to the lenses.
Initially I just wanted to get a rangefinder camera. At the time, Leica, Contax, Zeiss, and even new Voigtlander cameras, were just too expensive. After browsing the internet, I stumbled across a huge number of cameras that I’d never even heard of. Thus began my journey. If you’ve read my previous tutorials, you’ll know that I’m always looking for a deal. And let me tell you, dollar for dollar, some Russian cameras are the best in the world. The following image was made with a Lomo LC-A.

There are many brands and types of Russian cameras and lenses. For the record, these are film cameras. For those digital diehards out there, keep reading. Many people use Russian lenses with adapters on their digital cameras for their value and unique look. I’ll be covering brands in this tutorial to give you a tour of what’s our there.
Keep in mind that brands are different than companies. Several of the brands below are produced by the same company. Sometimes a single company produces a single brand. But that’s just something to keep in mind.
What’s important is that every major type of camera was produced in some form by a Russian company. If you’re looking for rangefinders, SLRs, modular medium format SLRs, folding cameras or TLR camera, they’re all here.

Zenit is a 35mm SLR camera brand that most people have heard of. The Zenit was created by KMZ, which produced many different brands that I’ll be describing here. The brand was then produced by BelOMO. Information about the brand’s current status is hard to find in English, but it looks like they can still be purchased new from several websites.
The old Zenits have a strong legacy of being extremely heavy and extremely simply built. People say Russian manufacturing puts a large emphasis on easy repair rather than initial quality. I cannot speak for this personally, but in my research, I can say that the reliability of certain cameras is always a concern. Zenits can be found in many varieties, but the Zenit-E is one of the most famous with over 12 million being produced. Later Zenits used the Pentax-K mount for their lenses.

The Zorki, specifically the 4K model, is my favorite Russian camera. It’s classic design and apparently great reliability make it a winner in my book. Zorki cameras were also produced by KMZ and were initially direct copies of the Leica II, due to the World War II situations I discussed earlier. But Zorki did go on to develop it’s own unique variations.
Like the Leica, they are rangefinder cameras. The original Zenit SLRs were just hacked Zorki cameras. Zorki is no longer produced, but models can be purchased online for as little as $30. They make a very unique sound when shot due to the rubber shutter, most cameras from this era had cloth shutters.

The FED is also a rangefinder and again started out as a straight Leica II copy. But FED was its own company and did produce cameras before World War II. The history of the company is very interesting. It was based in modern-day Ukraine and, in the 1930s, even produced limited-edition cameras for Stalin’s secret police.
The FED and the Zorki both use the the M39 lens mount – also known as the Leica Thread Mount or LTM. In theory, early screwmount Leica cameras and the FED and Zorki could also use the same lenses. I say in theory because the quality control on the Russian cameras and lens were often so low that things didn’t always fit together in the same way.

The Moskva was a KMZ camera as well. It is very different from the previous cameras because it shoots medium format film and uses the very early technology of bellows. This type of camera is a very enjoyable way to shoot medium format film. Many of the Moskva models have rangefinders and can shoot 6×9 cm negatives. This type of “folder” camera was produced by most camera companies at one stage, including the famous Zeiss Nettar and Kodak Autographic.
The biggest concern with these cameras is the bellows. Bellows are fragile no matter who made them. Heat, humidity and prolonged use just wear them out. You can check bellows with a flash light in a dark room to see if they have any holes or wears.
The Moskva is a very portable and easy to use, and some film shot in a 6×9 cm format can beat the resolution of many modern digital cameras. The folding camera format is my favorite way to shoot medium format.

The Horizon camera is one of the few film cameras that does something digital cameras can only imitate, and they imitate it poorly. The Horizon is a swing-lens camera that has had many different models produced. It produces long, panoramic images by using a lens that moves and pans the scene. The results can be stunning.
There are over 120 versions of this camera, but KMZ still produces a couple of models. In the U.S., they are available as the Horizon Kompakt and the Horizon Perfekt. Older models were made of metal and had the same manufacturing qualities as other Russian cameras (emphasis on simplicity rather than quality). The current models are plastic, but seem to be more reliable.

The Lomo company has enjoyed a recent surge in popularity due to the Lomographic Society, which sells a wide variety of cameras from all over the world. The original Lomo company is still in existence in St. Petersburg, but most produces military and medical optical equipment.
The Lomo branded cameras such as the LC-A are often produced in China by the Lomographic Society, which works closely with Lomo itself. The most popular vintage Lomo cameras are the LC-A compact point-and-shoot and the Lubitel Twin Lens Reflex camera. Both are still produced by the Lomographic Society.
In my opinion, the LC-A is fun, rugged and unique camera. The Lubitel is capable of very professional results, but a mainly plastic construction is worrisome.

The Kiev brand of cameras is produced by the Arsenal Factory in Kiev, Ukraine. The factory was in business for 245 years, before it quietly closed in 2008. Cameras and lenses are still being sold through old distributor, but apparently these sales are coming from stockpiles instead of newly manufactured products.
There are three important Kiev cameras. First, the Kiev 88 is a medium format modular SLR modeled after the early Hasselblad. The Kiev 60 is also a medium format SLR, but looks like a big traditional SLR with a fixed back. Finally, the Kiev 4 is a 35mm rangefinder, but it’s a Contax copy rather than a Leica copy.
Kiev also produced a number of other 35mm SLRs and rangefinders. The Kiev 88 especially suffers from reports of horrible quality control, and is often sold pre-refurbished by companies for around $500 USD. It has been said that Kiev cameras are “pre-assembled kits” requiring a lot of work – not out-of-the-box consumer products like we’re used to.

There are more Russian lenses out there than one could ever possibly use. Almost every Russian camera company also produced it’s own lens brand. While these lenses are used by film enthusiasts, they are also purchased and mounted to digital SLRs using adapters. The cheap cost and sometime fantastic quality of the lenses makes them a great alternative to spending hundreds on expensive new lenses.
KMZ produced Jupiter lenses for their rangefinders, and the famous 50mm f/2 Jupiter 8. They also produced Helios lenses for the Zenit, and the incredible Helios 40 85mm f/1.5. FED produced Industar lenses. The Industar 22/50 is a collapsible lens that holds it own against rivals of the same period.
Finally, Arsat lenses are produced by Kiev and their 35mm f/2.8 Tilt-Shift lens is an extremely inexpensive alternative to modern tilt-shift lenses. The following image was made with an Industar:

I hope you’ve heard something today that is new to you. But as someone who loves Russian cameras, I’d like to ask that don’t tell your friends about them! I don’t want them all going online and driving the prices up…
Russian cameras were produced by companies with a very different set of priorities than most current camera manufacturers. When you find one that works, which happens more often than you think, it will work forever.
Even if you’ve abandoned film for digital, the lenses are incredible deals and, in the Russian tradition, you can take them apart and fix them yourself if you ever have a problem. Try doing that with your image stabilized 70-200mm f/2.8 lens!
While in hospital I had a chance to play Swipe Soccer HD created by blog reader Markus Halttunen for the iPad. This is a great game that is very polished and uses what I think is a unique control mechanism. There are plenty of line drawing games available such as Flight Control allow the player […]
Blog reader Steven Burgess dropped me a line yesterday letting me know he had seen Sir Lamorak’s Quest on the Staff Favourites list on the App store in the UK. I couldn’t resist jumping onto the App Store and taking a look. Sure enough, Sir Lamorak’s Quest has made it onto the Staff Favourites. This […]

CineTap for Netflix (US $0.99) is the newest and nicest Netflix management app I’ve seen so far. It won’t replace the Netflix
app, since you still need to have that installed to instantly watch movies. But CineTap adds some great features to the experience that the Netflix app doesn’t include. The app is amazingly fast and absolutely gorgeous, taking full advantage of the iPad‘s screen real estate. Instead of lists, it uses posters to represent movies that can be scrolled left or right, or if you tap the Show All button, the line expands to fill the screen with posters that can then be scrolled up or down. In Show All mode, you’ll see 20 posters plus a navigation bar in landscape mode, or 25 poster in portrait mode with an optional navigation bar that covers up some of the posters, which is no big deal since it’s easily dismissed.
Gallery: CineTap for the iPad


TUAWCineTap brings a great Netflix frontend to the iPad originally appeared on The Unofficial Apple Weblog (TUAW) on Mon, 27 Sep 2010 20:00:00 EST. Please see our terms for use of feeds.
Read | Permalink | Email this | Comments
 The Canadian Broadcasting Company is reporting that 18 Canadian cabinet ministers and five senior staff members in the province of Saskatchewan are receiving iPads in an attempt to get a handle on the costly consumption of paper. With the cost of the 64GB 3G iPad running about CDN$879 plus fees and taxes, the initial cost of the iPads will run about CDN$23,000. However, the government expects that double that amount will be saved in the first year alone, since paper and printing costs will be cut drastically, and fewer courier runs will be required to deliver physical documents.
One senior official in the premier’s office noted that he’ll save 68 boxes of paper in his office alone in the first year. He noted that a single cabinet minister can often be loaded down with six to 10 kilograms of paper in a typical week. The government officials believe that the security provided by the iPad is sufficient for their needs. Unfortunately, there’s no information available on just how much money will be wasted by all of the ministers playing Angry Birds HD during cabinet meetings (we kid!).
Thanks to John for the tip (and sorry about the blatant display of Canadian stereotypes in the picture at the right).
TUAWCabinet members in Saskatchewan getting iPads to reduce paper use originally appeared on The Unofficial Apple Weblog (TUAW) on Mon, 27 Sep 2010 19:00:00 EST. Please see our terms for use of feeds.
Read | Permalink | Email this | Comments

Patently Apple has a few new patent illustrations from China that may hint at future iPad hardware features. The first is a second dock on the side of the tablet. As you can see above, the connector would come in handy if you wanted to view the iPad in landscape form, but didn’t want to have a cable sticking out of the side. Personally, I can’t really see Apple duplicating functionality in this way, though — while a second port would be handy, it seems a waste to have a completely separate port used only half the time. Like most patents, this is only an idea at this point — Apple isn’t required to actually use it in a future release.
The second idea is more interesting, in my mind: the images show what seems to be a touch-sensitive area on the corner of the front of the iPad. PA presumes that this would be a button-less button, an area you could tap or press to do things like return to the iPad’s homepage or flip pages in iBooks. Now that’s a really interesting idea — the front glass section of the iPhone and iPad is pretty much unused at this point, and if Apple could work it out so that even part of it could become functional (even in a limited way), that would be exciting.
And finally, it’s worth noting that quite a few of these pictures have what’s presumably a small camera sitting at the top of the iPad’s screen. Yes, by now it’s pretty much a given that the iPad will come with a camera in the next iteration, but there’s another slice of evidence to stick in the growing proof sandwich.
TUAWPatent illustrations hint at double-dock iPad, touch-based corner button originally appeared on The Unofficial Apple Weblog (TUAW) on Mon, 27 Sep 2010 18:00:00 EST. Please see our terms for use of feeds.
Read | Permalink | Email this | Comments