Barack Obama and the iPad-in-Chief

US President Barack Obama has been well-known for his love of RIM’s BlackBerry, at least until last year when he admitted that the device is now “no fun” because of the security strictures he faces as Commander-in-Chief. The President has also said that technology in the White House is “30 years behind,” with a lack of “really cool phones and stuff.” The President recently admitted he got an iPad, but until a recent photo, it wasn’t clear whether he got the old model or the new iPad 2. Consider this mystery solved, because based on this photo of him boarding Marine One it’s clear the President is toting around a brand-new iPad 2, complete with a Smart Cover.

The iPad-in-Chief

We’re still not sure what the President uses his iPad for, though it’s funny to picture the world’s most powerful politician playing Angry Birds on Air Force One while the “football” sits nearby. It seems Apple’s device has been cleared by White House security, which typically is not an easy feat — the President reportedly had trouble getting clearance for his BlackBerry. If you work for a company whose IT department has been reticent about letting the iPad in, you’ve now got some potent ammunition for your counterargument.

Thanks for the tip, Alex!

Barack Obama and the iPad-in-Chief originally appeared on TUAW on Mon, 25 Apr 2011 10:00:00 EST. Please see our terms for use of feeds.

Source | Permalink | Email this | Comments

HazeOver dims background windows to help you focus

HazeOver

Have you ever wished that you could fade out non-active windows in the background, leaving you to focus on the task at hand? HazeOver does just that in a simple and Mac-like fashion.

A small utility that runs in the background, HazeOver dims any non-active windows automatically in a smooth ramp down to darkness. The amount of dimming is adjustable, from 10 to 80 percent, with an option to have a menu bar icon for quick access to settings. When you switch to a new window it is instantly thrust into the light, but when you switch away from it, HazeOver will fade it out smoothly into the background darkness.

It’s a really nice little utility that creates a very Mac-like effect and helps you focus on one window at a time. For US$0.99, HazeOver is worth a buck to add a little spice to your desktop and help you focus in on the task at hand. Hit the break to see HazeOver in action.

Continue reading HazeOver dims background windows to help you focus

HazeOver dims background windows to help you focus originally appeared on TUAW on Mon, 25 Apr 2011 09:00:00 EST. Please see our terms for use of feeds.

Source | Permalink | Email this | Comments

TUAW’s Daily App: Starfront Collision

Gameloft has earned a reputation for, ahem, “borrowing” some game ideas for the App Store. A lot of the company’s (very popular) games are more or less copies of popular titles on other platforms. One of Gameloft’s latest games, Starfront Collision, is no different; it’s basically a clone of StarCraft.

But here’s the thing: Who cares? Blizzard hasn’t actually put out a version of StarCraft for iOS, and to be honest, the RTS options are pretty limited. So if Gameloft wants to “borrow” the genre and even some of its various factions and units, that doesn’t bother us one bit.

Unfortunately, it doesn’t quite have the polish of StarCraft (what does?), but it’s a working RTS, built from the ground up for the iPhone. While it would be nice to see some official Blizzard games on iOS, we don’t have those yet. In the meantime, fans of the genre and Blizzard’s classic can check out Starfront Collision, either as a free version with in-app purchases for content, or by buying the app at US$2.99.

TUAW’s Daily App: Starfront Collision originally appeared on TUAW on Mon, 25 Apr 2011 08:00:00 EST. Please see our terms for use of feeds.

Source | Permalink | Email this | Comments

Four apps for the Royal Wedding

royal wedding
When it comes to European royalty, Americans go crazy. Beyond the garden-variety obsession with royalty, British royalty in particular is like Yank catnip. The ultimate bonkers-maker, however, is British royal weddings.

When there’s a royal wedding across the pond, Americans absolutely seem to lose their marbles. There’s just no getting around it. You can’t listen to the radio or turn on the TV without hearing about Prince William and Kate Middleton. Seriously, right now those two are bigger than Justin Bieber and Selena Gomez, which I didn’t think was even possible.

And don’t even think about browsing a newsstand. Close to half of the magazines have the royal and royal-to-be on the cover. Maybe it’s the romanticism of it all or the fact that we Americans tend to mix fantasy with aspiration, but whatever the cause, I’m happy to contribute to the hysteria. Without further ado, here is a list of four iOS apps that allow you to live out the royal wedding on your iPhone and iPad. Best of all, all the apps are free, so you can hold onto the family jewels.

The Royal Wedding by Hello! — This app, brought to you by one of the trashiest gossip magazines in the UK, is little more than a photo scrapbook of the fairytale romance between Wills and Kate. It’s got dedicated albums for the bride and groom, along with albums dedicated to royal wedding rings, wedding dresses and gifts. One of the cooler albums shows images from past royal weddings.

Continue reading Four apps for the Royal Wedding

Four apps for the Royal Wedding originally appeared on TUAW on Mon, 25 Apr 2011 07:00:00 EST. Please see our terms for use of feeds.

Source | Permalink | Email this | Comments

Testing the Sonos-AirPlay solution

AirPlay is a very cool technology, but it’s limited to the second generation Apple TV and a few receivers. Sonos, as I reported last week, has come up with its own way to integrate AirPlay into a multi-room music system, and the company was nice enough to lend me an Apple AirPort Express to try it out.

Since I already had a Sonos music system, the AirPort Express was the only missing piece. You plug AirPort Express in, connect it to one of your Sonos ZonePlayers with an Ethernet cable, and run a stereo mini-plug to stereo RCA cable from the AirPort Express to your Sonos unit.

From there, you open the AirPort Utility (it ships with OS X, and you can download a Windows version) and configure it in a couple of easy steps. You then move to your updated free ZonePlayer software version 3.4 to let the Sonos system know that the AirPort Express is there. That’s it.

From that point on you can wirelessly stream audio from your iPhone, iPod touch or iPad into your Sonos system. The Sonos is smart enough to auto switch to the correct input, and then you can hear the music on any individual ZonePlayer or on all of them at the same time. Of course, since the playlists on my iPhone and iPad are subsets of the music that Sonos normally has access to from my Mac, there’s not much advantage there. On the other hand, I went out running yesterday listening to a podcast, and when I got back to the house, I was just a couple of taps away from hearing it on any or every audio system I had in the house. When the audio switched, not even a word was dropped.

Continue reading Testing the Sonos-AirPlay solution

Testing the Sonos-AirPlay solution originally appeared on TUAW on Mon, 25 Apr 2011 06:00:00 EST. Please see our terms for use of feeds.

Source | Permalink | Email this | Comments

Talkcast reminder: Holiday edition, 10 PM ET Sunday

It’s talkcast time again, and since it’s also Easter Sunday we expect that some of our usual gang of chatterboxes may be tied up with religious or family obligations (and possibly sleeping off an overdose of Peeps).

With that in mind, we’re not going to worry too much about polishing the agenda or sorting out our topics of conversation ahead of time; if you show up, and there’s something you want to talk about, we’ll talk about it. Rumored MacBook Air refresh? iPhone finally turning white? iOS location leaks and privacy concerns? Apple grabbing the lion’s share of wireless profits? You name it, we’ll tawk.

To participate on TalkShoe, you can use the browser-only client, the embedded Facebook app, or download the classic TalkShoe Pro Java client; however, for maximum fun, you should call in. For the web UI, just click the TalkShoe Web button on our profile page at 4 HI/7 PDT/10 PM EDT Sunday. To call in on regular phone or VoIP lines (yay for free cell phone weekend minutes!): dial (724) 444-7444 and enter our talkcast ID, 45077 — during the call, you can request to talk by keying in *8.

If you’ve got a headset or microphone handy on your Mac, you can connect via the free Blink or X-Lite SIP clients; basic instructions are here (if you like Blink, the pro version is available in the Mac App Store). Talk to you tonight.

Talkcast reminder: Holiday edition, 10 PM ET Sunday originally appeared on TUAW on Sun, 24 Apr 2011 15:30:00 EST. Please see our terms for use of feeds.

Source | Permalink | Email this | Comments

Jailbreak iPad 4.3.2 with PwnageTool 4.3.2 [Untethered]

You can jailbreak iPad 4.3.2 iOS untethered with PwnageTool 4.3.2. These are the steps to jailbreak iPad 4.3.2 firmware with PwnageTool 4.3.2. Staps to jailbreak iPad 1, iPhone 4, 3GS, iPod Touch 4G, 3G with PwnageTool are the same.


Note: There’s no iPad 2 jailbreak out yet. These jailbreak steps applies to iPad 1 only.

Jailbreak iPad 4.3.2 with PwnageTool 4.3.2

Step 1

Rest of the steps to jailbreak iPad 4.3.2 with PwnageTool 4.3.2 are exactly similar to the guide posted earlier:

How to: Jailbreak 4.3.2 with PwnageTool 4.3.2

How to Jailbreak iOS 4.3.2

You can follow us on Twitter, Google Buzz, Facebook, and Subscribed to RSS Feed to receive latest updates.

Also checkout:

Downgrade iOS 4.3.2

Digg Twitter StumbleUpon Facebook Reddit del.icio.us

Unlock iPhone 4.3.2 with UltraSn0w

Ultrasn0w 1.2.2 can unlock iPhone 4.3.2 firmware on iPhone 4 and iPhone 3GS. This UltraSn0w unlock does NOT include any new iPhone baseband sport, instead, it just fixes the iOS 4.3.2 compatibility issues.

Important

  • Compatible Basebands: 01.59.00 | 04.26.08 | 05.11.07 | 05.12.01 | 05.13.04 | 06.15.00
  • Not-Compatible Basebands: 02.10.04 | 03.10.01 | 04.10.01 | 05.14.02 | 05.15.04 (Dev-Team is working on Downgrade Baseband method)
  • iPhone 3GS (not-compatible baseband) users can upgrade to 06.15.00 baseband which is unlockable (Here is How to). Upgrading your iPhone 3GS baseband to the 06.15.00 iPad baseband hack to unlock MAY cause you to lose your GPS!

Let’s Unlock iOS 4.3.1 with UltraSn0w Unlock on iPhone 4 and iPhone 3GS.

How to Unlock iPhone 4.3.2 with UltraSn0w

***T-Mobile USA users please disable 3G network first. (Settings >General >Network and turn the “Enable 3G” switch to OFF.)

Your iPhone 4 or iPhone 3GS must already jailbroken on iOS 4.3.2. Jailbreak iOS 4.3.2 guides are linked at the bottom.

Assuming that your iPhone 4 or 3GS is jailbroken on iOS 4.3.2;

  1. Open the Cydia;
  2. Let the Cydia Load and Update if it prompts you;
  3. Go to Search tab and search for ultrasn0w and install it.
  4. Installing UltraSn0w will unlock iPhone 4 or iPhone 3GS iOS 4.3.2 with baseband 01.59.00 / 04.26.08 / 05.11.07 / 05.12.01 / 05.13.04 / 06.15.00. Once the installation is completed, reboot your iPhone.

unlock ios 4.3.1 ultrasn0wunlock ios 4.3.1 ultrasn0wunlock ios 4.3.1 ultrasn0w

Voila! You have unlocked iPhone 4.3.2 on iPhone 4 / 3GS with UltraSn0w and can use SIM from any carrier now.

How to Jailbreak iOS 4.3.2

You can follow us on Twitter, Google Buzz, Facebook, and Subscribed to RSS Feed to receive latest updates.

Also checkout:

Downgrade iOS 4.3.2

Digg Twitter StumbleUpon Facebook Reddit del.icio.us

After Effects CS5.5 on Fxguidetv

Mark Christiansen and Steve Forde are guests on fxguidetv #108 to discuss CS5.5, After Effects, and the tech behind the new tools. Mark favors the new Camera Lens Blur effect and light fall-off, and gives tips on what to look out for in the Warp Stabilizer effect.

Mark and host John Montgomery would like to see improvements in 3D and user friendly sharing of encapsulated presets, expressions, & scripts. One area of improvement needs to be in Dynamic Link and the RAM pool, which can get out of control when too many instances of the apps are running. Even the headless instances of Adobe apps running in the background have ”giant pulsating brains.”

You can find links to more on CS5.5, including Mark’s review, on AE Portal.


Read More

Quick Tip: How to Create a 3D Map Pullout for Information Graphics


In this Quick Tip Video, you will learn how to use a clever trick to make a map element appear to zoom out from its background. Popular with information graphics, this effect is perfect for a variety of creative uses. Let’s get started!

Continue reading “Quick Tip: How to Create a 3D Map Pullout for Information Graphics”

25+ Best of, How to in Illustrator: Brush Tutorials


Need to amp up your Adobe Illustrator brush skills, then take a look at the best tutorials we have on Vectortuts+ for creating and using Illustrator brushes. Jump into one of these Illustrator tutorials that cover a range of workflows, such as using complex art brushes, pattern bushes, the Blob Brush Tool, and more. Whether you’re looking to master the technical how to of Illustrator’s brush tools, or how to integrate their use into a highly create workflow, we have you covered with a vast range of technical and artistic tutorials.

Continue reading “25+ Best of, How to in Illustrator: Brush Tutorials”

How to Create Custom Traktor Pro Mappings for Numark Omni Control

Native Instruments’ Traktor Pro is one of the most popular digital DJ software available on the market. But unless you want to control Traktor Pro with just your mouse and keyboards, you are going to need a specialised DJ MIDI controller with the necessary MIDI mapable knobs and sliders to enhance your DJ experience. One of those controllers is the Numark Omni Control.

A cut-down version of Traktor LE software is included with the controller. Once the software is installed, a configuration file can be imported that will map all necessary Traktor LE controls to the Omni Control. Traktor Pro can also be used with the controller but support from Numark or Native Instruments is a bit sketchy at the moment in a sense that a proper official map hasn’t been officially released from both software companies. There is a map included in Traktor Pro but according to my own experience, it didn’t work very well at all. In this tutorial I am going to show you how to create custom MIDI mappings in Traktor Pro version 1.2.7.


Setting Up

First of all, I have attached two images that show both the controller input values and LED notes. The input values are the ones that are assigned when you MIDI learn a particular control and are also visible during control assignment. The LED values are useful when assigning values for controls that also have a LED indication(for instance, the PLAY/PAUSE button). LED indicators act as an indication that a certain button or control has been activated, a useful functionality especially when we perform our set in low-level light conditions. It will all become apparent in a bit.

Omni Controller input notes

Omni Controller LED notes


MIDI Assignment

Please check the Numark website to install the necessary drivers for your operating system. Once everything is set up and connected, load up Traktor Pro and go to the Preferences by clicking on the necessary icon at the top right of the Traktor Pro window.

Click the Controller Manager tab, and at the Device Setup click Add->Generic MIDI. Optionally, you can select Numark Omni Control as both In-Port and Out-Port unless you want to have other controllers plugged into different ports interacting with your set. In our case, we will leave it at the default All Ports. Let’s assign the PLAY button of Traktor Pro to the PLAY button on our controller(bottom left side, last button from the left). From the Assignment Table, select Add In…->Transport->Play/Pause. Click Learn on the Device Mapping area and hit the PLAY button on the controller. The value of the G4 note appears on the Mapped To column and also next to the Learn button. Click the Learn button to exit mapping mode. Further down in Mapping Details, select Deck A on the Assignment drop-down box. We would want our PLAY button to stay activated once we press it once, then, deactivate it on second press. So, select Toggle as interaction mode. keep the Preferences window open.

Pressing the PLAY button would start the playback in Traktor Pro, another press would pause it and so on. The functionality is there but the LED is not yet lighting up when the button is pressed. Select Add Out…->Transport->Play/Pause. Now, take a look at the LED notes above and find the note that corresponds to the left deck’s PLAY button(D4). Select Deck A from the Assignment drop-down box in the Mapping Details section then select D4 from the Device Mapping section between the Learn and the Reset button.

Now, the PLAY LED lights up when we press PLAY and is turned off when we hit PLAY again to pause playback.

PLAY LED light up when pressed.

Let’s try another one now. Let’s assign the jog wheel to the Jog Scratch and Tempo Bend functionality in Traktor Pro. As before, select Add In…->Transport->Jog Scratch + Tempo Bend. Click Learn then touch and move the left jog wheel slightly. The CC value of 024 is assigned to our controller. Hit Learn again to exit mapping mode. In the Mapping Details section select Encoder as Type of Controller and set Interaction Mode to Relative. Select 7Fh/01h as Encoder Mode and select Deck A on the Assignment drop-down box. Finally, on the Rotary Encoder section, dial in a Rotary Sensitivity of around 50%.

Now, when a track is played on Deck A, the controller’s jog wheel will act as a tempo bend while it will act as a scratch control when the deck is paused.

Select Add In…->Mixer->EQ->EQ Low to assign the BASS rotary knob for the left deck. Click Learn then rotate the knob. Click Learn again to exit map mode. Select Deck A on the Assignment drop-down box in the Mapping Details section. Now, select, Add In…->Mixer->EQ-> EQ Low Kill. Click Learn and push the same knob down. Click Learn again to exit mapping mode. Select Deck A on the Assignment drop-down box in the Mapping Details section, also select Toggle for Interaction Mode. Finally, select Add Out…->Mixer->EQ-> EQ Low Kill, select Deck A on the Assignment drop-down box in the Mapping Details section and finally select the A#5 note in the Device Mappings section. The BASS knob controls the EQ Low in Traktor Pro. Pushing the same knob downwards acts as a kill switch for that frequency. Pushing down again the kill switch gets deactivated.

BASS knob pressed.


Adding Modifier Conditions

Let’s try a final more advanced one. We are going to use a modifier condition to declare a button that will act as our modifier. We will map the TRACK button of the controller to the List Select Up/Down in Traktor Pro to scroll though our Browser playlist up and down. When the TRACK knob is clicked the selected track will be loaded into the Traktor Pro Preview Player. Then, when the modifier key is pressed down, the TRACK knob will scrub through the track currently previewing on the Preview Player. Letting go of the modifier key will allow us to scroll through our playlist as normal and pushing the TRACK knob again will stop the selected track from previewing. We will use the DIRECTORY button on the controller as our modifier key. If you don’t see the Preview Player, bring up the Preferences, go to Browser Details and check Show Preview Player.

TRACK and DIRECTORY knobs.

How to show the Preview Player.

To set up our modifier key, select Add In…->Modifier->Modifier #1. Click Learn and hit the DIRECTORY key on the controller. Click Learn again to exit mapping mode. In the Mapping Details section set Button as Type of Controller and Hold as Interaction Mode. In the Button Options section, set the value to 1. Now, we need to set the output LED value for our modifier. Select, Add Out…->Modifier->Modifier #1. Have a look at the controller LED notes and select the appropriate note from the list in the Device Mapping section. Click the DIRECTORY button to test if the LED lights up. It should turn off once you let go of the button.

Now, select Add In…->Browser->List->List Select Up/Down. Click Learn and move the TRACK knob. Click Learn again to exit mapping mode. In Mapping Details set Modifier Conditions. Set M1 as Modifier with the value of 0. Select Encoder as Type of Controller, Relative as Interaction Mode, 7Fh/01h as Enc.-Mode and set Rotary Sensitivity to 11% in the Rotary Encoder section. Now, the TRACK knob scrolls through tracks in our playlist.

Select Add In…-> Preview->Preview Load Selected. Click Learn and push the TRACK knob down. Click Learn again to exit mapping mode. This will load a selected track from the playlist to the Preview Player and start playing it. Pushing once again, it will stop playback on the Preview Player. Now, select Add In…-> Preview->Preview Seek Position. Click Learn and move the TRACK knob. Click Learn again to exit mapping mode. In Mapping Details set Modifier Conditions. Set M1 as Modifier with the value of 1. So, whenever we push and hold the modifier key and turn the TRACK knob, we will be able to scrub through the track which is loaded in the Preview window. Select Encoder as Type of Controller, Relative as Interaction Mode, 3Fh/41h as Enc.-Mode, set Rotary Sensitivity to 11% and check the Invert option in the Rotary Encoder section.

Now try the functionality. Turn the TRACK knob left or right to scroll through tracks from your playlist. Once you have one highlighted, push down the button to load the track in the Preview Player and start playing it in there right away. Hit the DIRECTORY button, keep it pressed and turn the TRACK knob to the right to scrub the preview track forward(turn to the left to scrub backwards). You can let go of the DIRECTORY key and use the TRACK button to scroll through your playlist collection as normal. Then, push and hold the DIRECTORY key again so that you can once again control the playback of the track currently being previewed.

And that’s it! I will leave you experiment with the other controls but if you followed what I’ve described you will have no problem whatsoever mapping the rest of the controls accordingly. As a last tip, you can go to the Numark Omni Control website in the Documents & Downloads section and download the Omni Control One-Touch-scratching using Traktor Pro MIDI mapping TSI file. You can import the TSI file into Traktor Pro through the Preferences. Go to Controller Manager and in the Device Setup select Add…->Import and navigate to the file. Once you have imported the file you will be able to use the jog wheels to scratch tracks which are playing. Holding down the DIRECTORY button in the center of the controller will allow you to use the wheels to pitch-bend (while playing) or quick-search (while stopped).

I have also attached the TSI file with the mappings we’ve worked with in this tutorial. Feel free to import it, use it and modify it to your needs. To export your final maps for backup just go to Preferences->Controller Manager and click Edit->Export.


Read More

Use Photoshop to Create a Still-Life Lamp, Nightstand, and Picture Frame


Photoshop allows us to manipulate most of the photos that we take and combine them into just about anything. It also allows us to create much of what we see in real life from scratch. In this tutorial, we will create the inside of a home from scratch using only Photoshop. In the end, we will create a lamp, nightstand, a picture frame and several other elements using layer styles and filters along the way. Let’s get started!


Step 1

Before we jump into creating the scene, we are going to create a wood board texture that we will use for flooring. Create a new document 3000 px by 3000 px (since the wood floor will be in perspective, the large document size will minimize pixelation).


Step 2

Start by adding Noise. Then, pixelate the noise using the Mosaic Filter (Filter > Pixelate > Mosaic). This gives us the geometric shapes to work off of. Next, add a strong Motion Blur. To get better definition, adjust the levels and add another Motion Blur.


Step 3

Now we have a good start to our wood boards. To break up the texture into more defined boards, go to Image > Adjustments > Posterize.


Step 4

Create a New Layer and fill it with a wood color. Set your foreground and background colors to two shades of brown and go to Filter > Render > Fibers and max out both values. Set this layer’s Blending Mode to Overlay. This will add some texture to the wood.


Step 5

Make a copy of the base layer and move it to the top of your stack. Go to Filter > Stylize > Find Edges. Use Levels (Command/Ctrl + L) to increase the contrast of the lines and give the layer a strong Motion Blur. Set the Blending Mode to Multiply. As you can see, this gives the individual boards more definition.


Step 6

We are done with the initial wood floor texture. Go ahead and flatten and then copy the image. Create a New Document size: 750 px by 1000 px. Create a new group called “Floor” and paste the wood floor into this image. I have adjusted the levels slightly to brighten the wood.


Step 7

Use the Transform Tool (Command/Ctrl + T) to skew the wood floor into perspective.


Step 8

Make a copy of this layer and Desaturate it (Command/Ctrl + Shift + U). Go to Filter > Stylize > Emboss with settings shown below. When finished, set this layer’s Blending Mode to Overlay and its Opacity to 59%.


Step 9

On a New Layer, use the gradient tool and add a gradient as shown. Set the Blending Mode to Multiply and the Opacity to 41%. This will help darken the corners a little.


Step 10

Create a New Group called “Wall” and use the Rectangular Marquee Tool to select an area for the wall. Fill with a yellow color (#DEC181).


Step 11

To give the wall some texture, make a copy of this layer and go to Filter > Noise > Add Noise with a value of 145%. Next, go to Filter > Stylize > Emboss with the settings shown. Set the Blending Mode of this layer to Overlay.


Step 12

Create a New Layer called “Trim.” Use the Rectangular Marquee Tool to select a band at the base of the wall and fill using the Gradient Tool.


Step 13

Make a copy of the “Trim” layer (Command/Ctrl + J) and Transform (Command/Ctrl + T) this trim piece as shown.


Step 14

We are going to start on the end table. Create a New Group called “End Table” with a layer called “Table Base” inside. Go ahead and draw the shape of a table and fill it with any color


Step 15

We will be building this table piece by piece with a separate texture using the “Base” layer to maintain the shape (by using clipping layers). You can use any texture you wish for this, however, I will use one I’ve already created in Photoshop. Start by opening your texture in a separate document, use the Rectangular Marquee Tool to make a selection on your texture and copy and paste it in your scene.


Step 16

Convert this layer to a clipping layer by Alt + Clicking in between the two layers. Move the texture so that it covers the entire table.


Step 17

Copy and paste another selection of texture. This time give it a 1 px black stroke and rotate it 90 degrees to the position as shown.


Step 18

Copy and paste a square selection of texture into your scene and name this layer “Door Base.” Add a Drop Shadow and Outer Glow to simulate shadows.


Step 19

Copy and paste a small rectangular selection of texture and paste it into your scene (shown as the highlighted piece). Rotate it into position and make it a clipping layer to the “Door Base.” Position it as shown.


Step 20

Add a Bevel and Emboss to this layer.


Step 21

Continue copying and pasting small rectangles of texture to build the rest of the cabinet door as shown.


Step 22

Copy and paste another selection of texture to become the drawer. Give this layer the following Layer Styles.

The drawer should resemble this:


Step 23

Add another strip of texture to the top of the end table. This time, use the marquee tools or the Eraser tool to give the top rounded corners.


Step 24

To create the knobs for the drawers, start by create a light colored circle (#CBCDA5) on a New Layer named “Knob”). Add the following Layer Styles. Copy the knob to the other drawer.


Step 25

Go back through the different layers of the end table and add extra highlights and shadows with the Dodge and Burn Tools.


Step 26

Create a New Group called “Lamp” under the “End Table” group. Draw a shape of a lamp and fill it with #6B5A3E.


Step 27

Next, we want to use the Dodge and Burn Tool to add some detail. A useful technique is to use the Dodge and Burn Tool in conjunction with the marquee tools.

Continue to add detail with the Dodge and Burn Tools, keeping in mind how

the light will hit the base.


Step 28

Feel free to add more highlights and shadows. In this case, I’ve used a square brush and the Blur Tool to add the following highlights.


Step 29

To give the lamp’s base a pattern, create some vertical lines in gray. Warp (Edit > Transform > Warp) the lines into an organic shape around the lamp base.


Step 30

Add a Bevel and Emboss.


Step 31

Merge the Bevel and Emboss effect to the layer. Make this layer a clipping layer and set the layer’s Blending Mode to Overlay and its Opacity to 67%. We’ll go back and add some more detail later.


Step 32

To create the lampshade, start by making two layers named "Front Shade" and "Side Shade". Draw the lampshades on the respective layers using a different tint of the same color to tell them apart.


Step 33

Copy these two layers above their respective selves and add a stroke. Change each layer’s Fill to 0%. Adjust the size of the stroke as necessary for the side shade.


Step 34

On a new clipping layer to the original front shade layer, use a yellow color and a large brush with 0% hardness to add some color to the top of the shade. Set the Blending Mode to Color Dodge and the Opacity to 86%. Do the same for the other shade layer.


Step 35

On a new clipping layer, add a gradient (Make sure you chose Foreground to Transparent) of darker red color to the bottom of both shades.


Step 36

Create a New Layer called “Lamp Underside” and place it at the bottom of the “Lamp” group, draw in the rest of the lampshade with white. Give this layer a stroke.


Step 37

Now, we are going to create the picture frame. Create a New Group called “Picture Frame” and create a light-colored square.

Next, add the following Layer Styles.

Your picture frame should resemble the following:


Step 38

Copy this layer and Transform (Command/Ctrl + T) to a smaller square. Make the following adjustments to the Layer Styles (remove all others).


Step 39

Make a new copy of this layer and remove all Layer Styles except for “Inner Shadow.” Make the following changes to the Layer Style and set the layer’s Fill to 0%.


Step 40

Create a New Layer and add a light-tan square in the center of the picture frame. Add the following Layer Styles. When you’re done you can draw a leaf on a separate layer to complete the Picture.


Step 41

Now we’ll create the initial light from the lamp. Create a New Group called “Lighting” just above the “Wall” group. Use the Polygonal Lasso Tool to make a triangular selection of light. Fill this with a white-to-transparent gradient and set the layer’s Opacity to 58%. Now, use the Layer Styles panel to adjust the Blend If sliders as shown.


Step 42

Make two copies of this layer and Transform (Command/Ctrl + T) the shapes so the light appears more complex. Adjust the Opacity as necessary. When you’re done, make a copy of these and rotate them in the opposite direction.


Step 43

Now we are going to create the shadows casted by the end table. Create a New Group called “Shadows.” Inside this group create a New Layer and draw in some shadows as shown below. Use the Blur Tool to feather some of the edges. I’ve also added an additional shadow directly under the end table.


Step 44

The end table looks too bright. To darken, I’ve merged the “End Table” group to a new layer and adjusted the levels. I’ve also use the Burn tool on the base and top of the table.


Step 45

We are done with building the scene. The next section will start enhancing the lighting. The current scene will be used for the base lighting and we will add shadows on top of this. To start, create a New Group called “Dark Scene.” Add the following Adjustment Layers inside this group. This should make your image almost all black.


Step 46

Select the “Dark Scene” group and add a layer mask. Use the Marquee Tools, Brush Tool, and Blur Tool to add the light back into the scene. Using the Brush Tool with a 0% hardness and opacity of 20% or so, you can really start to add realistic variations in the lighting.


Step 47

On a New Layer, use a small brush to go back through the image and add highlights to the picture frame, table top, and lamp base. You can also add lowlights using the same technique.


Step 48

To add some extra lighting on the floor, I’ve created a new layer, added a white-to-transparent gradient to the floor and adjusted the Blend If and Opacity sliders, just like we did for the lights in the “Lighting” group.
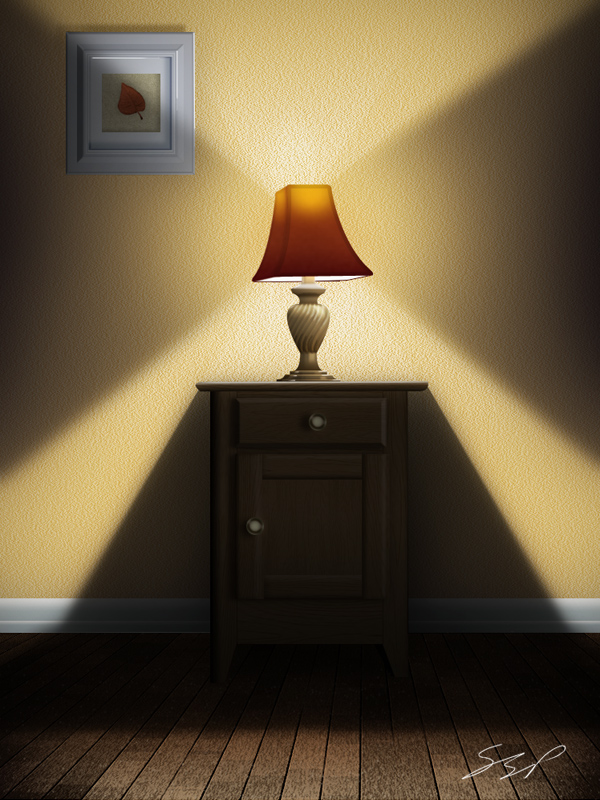

Conclusion

To finish, you can add some details wherever you like. I’ve also add a vignette to enhance the light’s falloff.

Read More

Seeking Socialengine Expert

Hello,

We are currently seeking a SocialEngine EXPERT. We are looking for someone to modify elements of SocialEngine and purchased modules and plug ins in order to get it to function the way we need it to. We have found many modules and plug ins that have made great strides in getting us started with what needs to be done, now it’s just a matter of customizing these to make them work the way we need them to.

The requests will vary based on what is available and such so we are asking that you please bid your hourly rate as the project details may change as we progress through.

I am looking for a reliable programmer who is available to chat during working business hours in the United States.

We are working on a deadline so prompt, professional communication is a MUST.

Our hope is to start an ongoing relationship with a solid programmer who is able to make this work.

If you are available, are willing to work, are easily accessible and can show past Social Engine works, please let me know.

Bids without links to past SocialEngine works will not be reviewed.

Thank you.