Complete Web Redesign For 3dcart Web Store

I need someone with knowledge of 3dcart as my website is hosted by them.
www.anljewelry.com
I need my website overhaul to unique, professional, but keep the cute look. 3Dcart have premade premium templates for sale, but I don’t like any of them.
I would like new template, landing page, product page, category page..etc..every single page redone in a light purple or light blue color jewelry theme.
I need flash banner scrolling thru items on home page
Here are a few example of websites that I like
http://www.discountwatchstore.com/ (I like the functions of this site)
http://www.gemsny.com/ (I like the look and category pages)
http://www.jewelrycentral.com/ (I like the look and category pages, product pages)

Shopping Search Engine Script With Basic Design

Hi,

I am looking to have a shopping search engine script coded for me the basic role of the script will display products from selected affiliate programs i choose so I will be able to upload xml data feeds and i will want a manual upload section so i can enter an image, text and affiliate link to product to upload. So for the admin backend this is really all i will need to manage.

The affiliate programs i will be using are affiliate window, Affiliate future, cj but also will use others possibly but these can be uploaded via the manual upload of products.

The script will work by searching by keyword or selecting category from homepage this will then display the results on a grid display with image and title of product, Clicking onto a product will then display this on a new page within the site with a description along side it and a buy button upon clicking this buy button it will then take you through to the vendors site by the affiliate link.

See the below demo i like how this works i am looking for a more simple version of the below demo as i would not be looking for any comparison part of the script just the product search and display.

Demo: http://v3-us-skin3.demo.datafeedscripts.net/default.aspx

So if you search an item you will see a search results page then clicking an item will show the selected item on a new page with an image and text description. Then alongside this i would have a buy button which will take visitors to the vendors site via my affiliate link.

I would like url rewrite to create search engine friendly urls and all keywords searched create a tag cloud and sitemap, Also i would like a sitemap of all products uploaded.

Aetuts+ Hollywood Movie Title Series – Captain America

This entry is part 18 of 18 in the series Hollywood Movie Titles

Continuing our Aetuts+ Hollywood Movie Title Series, today’s tutorial will explain how to make the “Captain America ” flying logo style. In this tutorial using Cinema 4d, we’ll make the logo and shield. Then in After Effects, we’ll complete our project with lens flares, a particle system of the explosion and final compositing. Follow your Avenger hero ;)


Tutorial

Download Tutorial .m4v

File size: 119 MB


{excerpt}
Read More

Design a Print-Ready Beer Label in Adobe Illustrator


A few times a each month we revisit some of our reader’s favorite posts from throughout the history of Vectortuts+. This tutorial by Alan Ballard was first published on March 18th 2009.

Alright folks, it’s time to roll up the sleeves and get down to business with this full-featured Adobe illustrator CS3 tutorial. This one takes you from setup to production of a really cool beer label, although this could be useful for any bottled concoction of your choosing.

We get to cover all kinds of useful Tools like Type On A Path, Live Trace, and the Opacity Mask. My buddy brewed his own beer and I made him labels using this technique, and they were an instant hit! I’m very happy to show you how it’s done. OK, let’s do it!

Continue reading “Design a Print-Ready Beer Label in Adobe Illustrator”

An Overview of the CAGED System

The CAGED system is a very large yet simple step in the right direction for the guitarist of any level. It teaches things as basic as understanding the fretboard, all the way to understanding and playing different modes. If you want to learn to solo like your favorite guitarist, it starts right here.
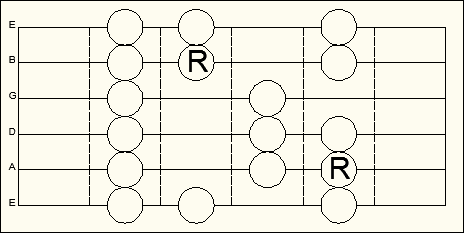

Step 1: Form C

Form C will be the first pattern that we investigate. Following the diagram is quite simple: start at the lowest root note (labeled “R”), play up the scale past the next root, all the way to the top of the pattern, then start descending. When you descend, play the scale all the way past the first root, down to the bottom of the pattern, then go back up the pattern and stop at the root note that you started with.

For the sake of convenience, this entire tutorial will be based on the key of D major. Just to clarify, the form IS called Form C, even though its in the key of D. The reason it is called Form C is that if you slide the pattern down to open position, you will see the open C major chord in the pattern.

Anyway, now that we have established that we are playing in D major, it is obvious that the root note must be D. For this pattern, start with your fourth finger (pinky) on the fifth fret of the A string.

Download audio file (Form C.mp3)
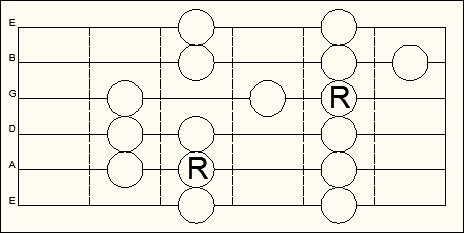

Step 2: Form A

Form A, like Form C, will start on the fifth fret of the A string. With Form A, however, you start with your second (middle) finger. It is called Form A because if you shift it down to open position, you can see the open A major chord in the pattern.

Learning this pattern is slightly more tricky than Form C because a shift is required when moving from the G string to the B string. So, start at the bottom root note, and work your way up the pattern. When you play the notes on the G string, you will use your first (index) finger, your third (ring) finger, and your fourth (pinky) finger. You will then shift up a fret by using your index finger on the next note. Once you reach the top of the pattern, start descending.

On the B string, you will use your fourth finger, third finger, and first finger, and then use your pinky on the first note you play on the G string in order to shift back down a fret. From there, play the rest of the pattern all the way to the bottom, and then back up to the root.

Download audio file (Form A.mp3)
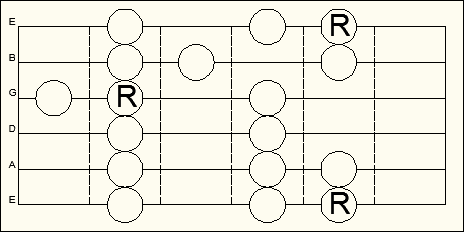
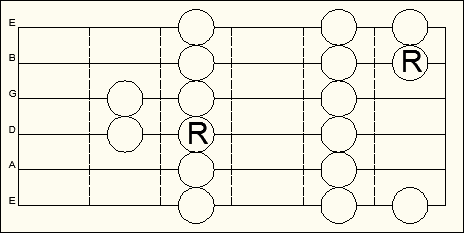

Step 3: Form G

Form G is possibly the most difficult pattern in the CAGED system. It has not only one shift, but two shifts: both down a fret and up a fret. You start it with your fourth (pinky) finger on the tenth fret of the low E string. The notes on the D string will be played with your first (index) finger and your fourth (pinky) finger in order to shift down a fret on the next string.

The G string is the only one string that is shifted down a fret, so in order to shift back up a fret on the B string, you will play the notes on the G string with your first (index), second (middle), and fourth (pinky) fingers. The first note on the B string will be played with your first (index) finger. Once you reach the top of the pattern, start descending. Descending from the B string to the G string entails using your fourth (pinky) finger on the first note of the G string.

After playing the third note on the G string with your first (index) finger, use your fourth finger and first finger on the D string. Start descending on the A string with your fourth finger. Play to the bottom of the pattern, and back up to the root.

Download audio file (Form G.mp3)


Step 4: Form E

Form E is probably the most basic pattern due to the fact that there are no shifts. It starts with your second finger on the tenth fret. Quite simply, make your way up to the top, and come back down, then up to the root.

Just in case your not sure, the notes on the B string are supposed to be played with your second and fourth finger, and NOT your first and third or first and fourth. By using your second and fourth fingers, you will be disciplining yourself and teaching yourself to use a finger pattern that is not as easy or comfortable, thus making you more flexible and dextrous as you practice it.

Download audio file (Form E.mp3)
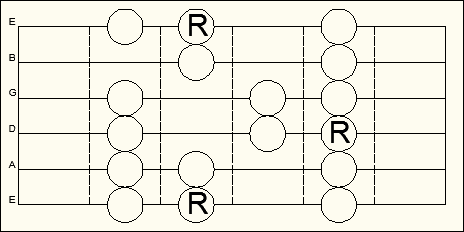

Step 5: Form D

The D form is the fifth and final major scale pattern in the CAGED system. Like the G form, it too shifts both down a fret and up a fret. Unlike any other form, however, it starts on the D string.

The first note of this pattern is to be played with your second finger on the seventh fret of the D string. After you play the third note on the G string, shift up and play the first note on the B string with your first finger. Play the rest of the scale up and then start descending.

After playing the third note down on the B string, play the top note of the G string with your index finger. Play the notes on the G and the D string. In order to shift down a fret, you will play the notes on the A string with your fourth and first finger, and then you’ll play the first note on the E string with your pinky. Play the notes on the E string, and go back up to the root, but remember that the A string notes are to be played with the first and fourth fingers in order to shift.

Download audio file (Form D.mp3)


Conclusion

You now know all five major scale patterns! These patterns allow you to play all over the fretboard, and as long as you remember which pattern you’re in, you’ll never hit a wrong note! Although you know these patterns, there is still much more to learn, such as comprehensive scales and modes. Even though this is only the beginning of a long process, it is still a HUGE step forward. Good luck!


{excerpt}
Read More

Workshop #221: Epic Heart by Hiko Chase

This track has been submitted for your friendly, constructive criticism. What useful feedback can you give the artist? The floor is yours to talk about the track and how they can fix problems in and improve upon the mix and the song.

Download audio file (182EPICHEART.mp3)

Description of the track:

Emotional climax, epic feelings.

Artist’s website: www.trueheromusic.com

Terms of Use: This track is available for download.

Have a listen to the track and offer your constructive criticism for this Workshop in the comments section.

  • Do you enjoy the song or track itself? Does it have potential?
  • Can the arrangement be improved?
  • How did you find the mix? What would you do differently?
  • What do you enjoy about the rhythm track? What can be done to improve it?
  • Is the choice of instruments relevant and effective for the style/song?
  • Are the lyrics (if any) effective? Does the style, arrangement and genre of the song suit them?
  • Can you suggest any specific techniques that might improve the track?
  • Do you have any other constructive feedback?

Need constructive criticism on your own tracks? Submit them for a workshop using this form. Most but not all submissions are published. There may be a wait of up to two months.


{excerpt}
Read More

Create a Realistic Telephone Keypad Using Layer Styles

Creating real-world objects in Photoshop can be somewhat challenging. The key is to pinpoint and accentuate small details such as shadows, lighting, and extruding edges. In this tutorial, you’ll learn how to achieve acutely life-like telephone dial buttons in Photoshop using shape layers and layer styles!


Step 1

Let’s start with a new document in Photoshop at 600×600 pixels.


Step 2

Let’s create the keypad’s background. Start by creating a layer called “background” and fill it with a dark color. I used #363636


Step 3

Let’s add some texture to our background. Duplicate the background layer and rename it “Texture.” Go to Filter > Noise > Add Noise, Amount: 60%, Distribution: Uniform, Monochromatic: Checked, Set the blending mode of the “Texture” layer to Overlay and opacity at about 15%.


Step 4

Now let’s add a gradient lighting effect to the background. Set your foreground color to white (keyboard shortcut: press “D” to reset foreground to black and background to white. Then press “X” to swap the two). Duplicate the “Texture” layer and rename it “Gradient.” Set the layer’s fill to 0%. Go Layer > Layer Style > Gradient Overlay, Blend Mode: Overlay, Style: Radial, Angle: 90, Scale: 117%, Set the gradient color to foreground to transparent (this is why we set our foreground to white). Set the blending mode of the “Texture” layer to Overlay and opacity at about 15%.


Step 5

Now let’s start on creating our dial buttons. Use the ellipse to create a small circle. This will be the outer shadow of the button so I named the layer “Button (Outer).” Mine is about 76 pixels. Set the layer’s fill to 0%. Go Layer > Layer Style > Bevel and Emboss, Style: Outer Bevel, Depth: 441%, Direction: Down, Size: 10px, Angle: 90; Altitude: 60; Global Light: Checked. Set the blending mode of the “Texture” layer to Overlay and opacity at about 15%.

Now we have the outer part of our dial button looking something like this:


Step 6

Let’s create our inner button now. Duplicate the “Button (Outer)” shape and rename it “Button (Inner)”. Be sure you duplicate it so it appears in the exact same spot as our shadow button. You can do this by right clicking on the layer in the layers panel and selecting duplicate layer.

If it’s not already, set the “Button (Inner)” shape layer’s color to the darker color we’ve been using (#363636) and set the fill opacity to 100%

We should now have something like this:


Step 7

Now that we have our inner button in place, let’s adjust our layer styles to give it a more realistic look. First, we’ll start with the drop shadow of the “Button (Inner)” shape layer.


Step 8

Now let’s adjust the inner shadow of the “Button (Inner)” shape layer.


Step 9

Now we’ll adjust the inner glow of the “Button (Inner)” shape layer. This will give a little texture to our dial button.


Step 10

Now let’s change the bevel and emboss settings of the “Button (Inner)” shape layer. This is what gives our button a more realistic, three dimensional shape.


Step 11

Now let’s change the gradient overlay settings of the “Button (Inner)” shape layer. This gives our button a slight highlight on the bottom.

Now, after adjusting all of those layer settings, we should have something like this:


Step 12

Let’s add our numbers and letters to the dial now. Simply use the type tool to create your number (I used 40pt Helvetica). Then, using the type tool again, create your letters (I used Helvetica 15pt Oblique).


Step 13

Now, let’s add a slight inner shadow to the layer styles of our number and letters.

Group the button, number, and letters we’ve created into a group

Now, we should have something like this:


Conclusion

Now you can simply duplicate the group layer and change the numbers and letters as needed! You can use the final image as a reference to see what numbers correspond to which letters (if you don’t already have it memorized).

You’ve just created a realistic telephone keypad using pure layer styles! Hopefully you can employ the skills you’ve learned here in future projects to help add a bit of realism to your design elements.


{excerpt}
Read More

3d Cart – Add New Products to Shopping Cart by Dante77

I am looking for someone to add approximately 65 products to a 3d cart store. Adding products includes inputting product description, pricing, distributor, attaching product photographs,catagorizing and formatting text, (there will be no inventory data)… (Budget: $30-$250 USD, Jobs: eCommerce, HTML, Shopping Carts, Website Design)