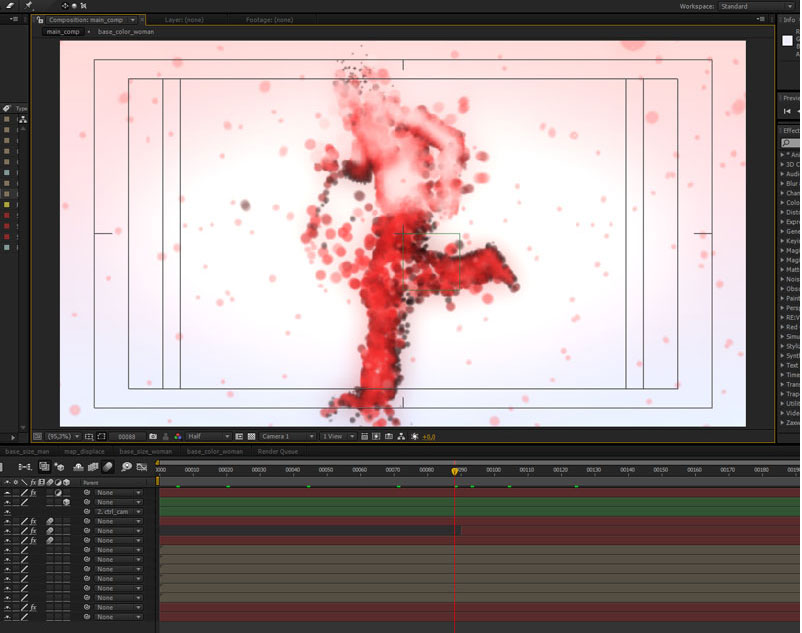
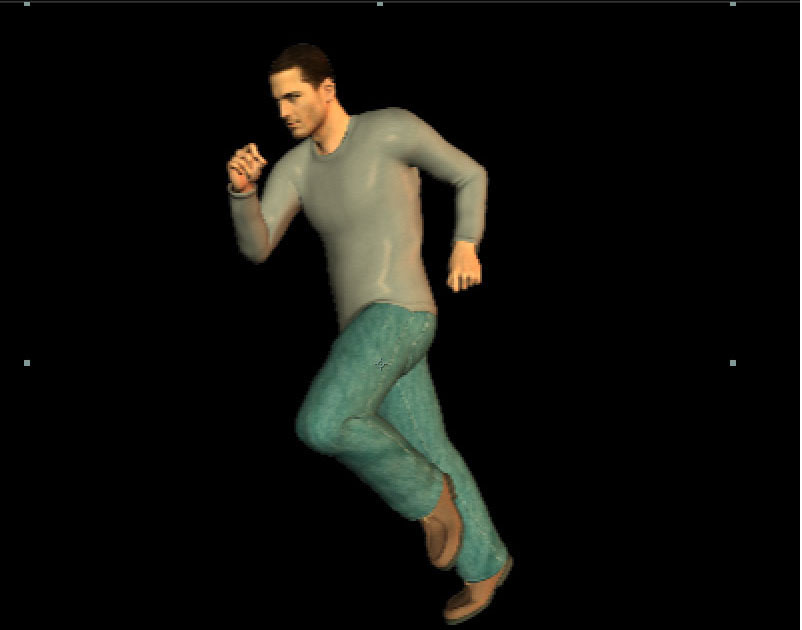
The effect we’ll try to remake is inspired by the motion graphics created for Pacha. (watch video). We’ll use the Trapcode Form plug-in and two source clips to create the shapes. The clips are just one example. I used two png sequence rendered in Curios Labs Poser. You can use all the footages you want.
Step 1
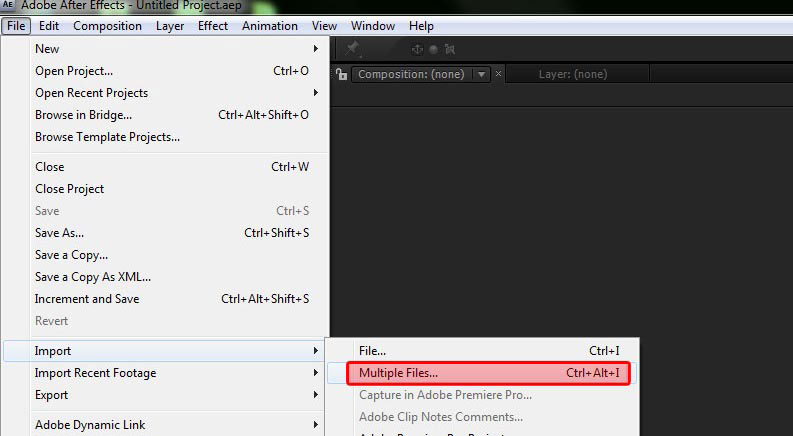
Open Adobe After Effects and go to File > Import > Multiple Files… (Ctrl+Alt+I). (To download the footages for tutorial click here)
Step 2
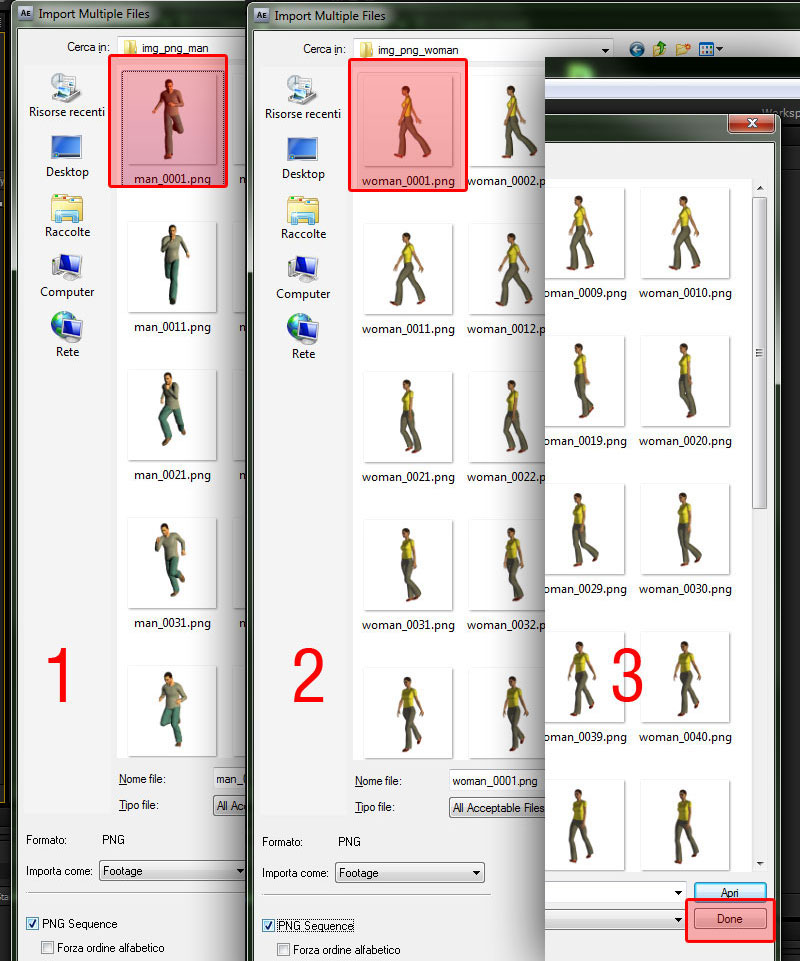
In "img_png_man" folder select man_0001.png, check "PNG Sequence" is activated and click open. Do the same for the "woman_0001.png and click Done.
Step 3
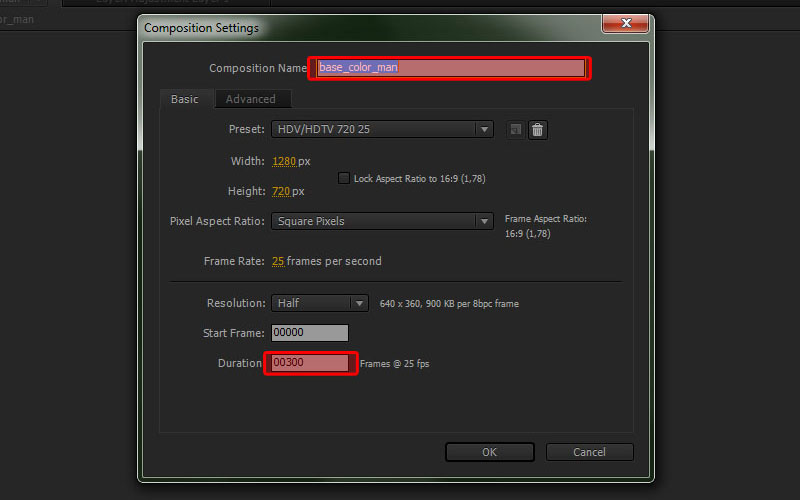
Go to Composition > New Composition (Ctrl+N). In Coposition Settings window make the following settings:
- Composition Name: base_color_man
- Preset: HDV/HDTV 720 25
- Duration: 300
Click Ok.
Step 4
Add the "man_0001.png" footage in "base_color_man" composition.
Step 5
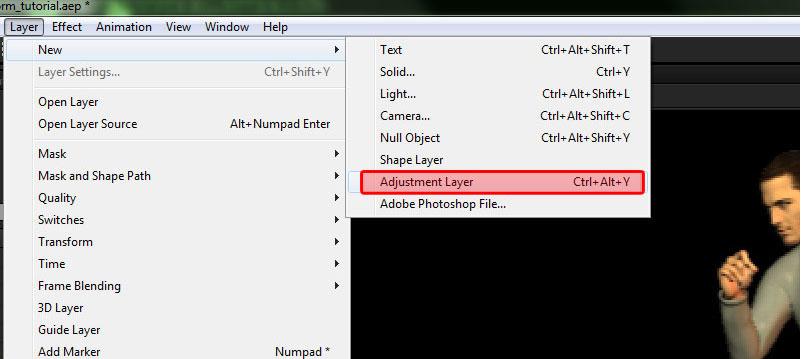
In "base_color_man" composition add a new Adjustment Layer. Go to Layer > New > Adjustment Layer (Ctrl+Alt+Y).
Step 6
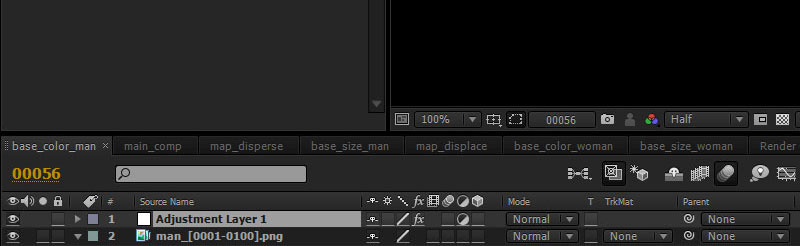
This is the arrangement of layers in the "base_color_man" composition.
Step 7
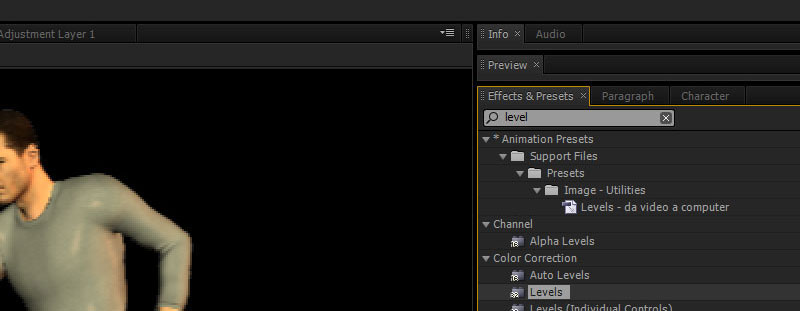
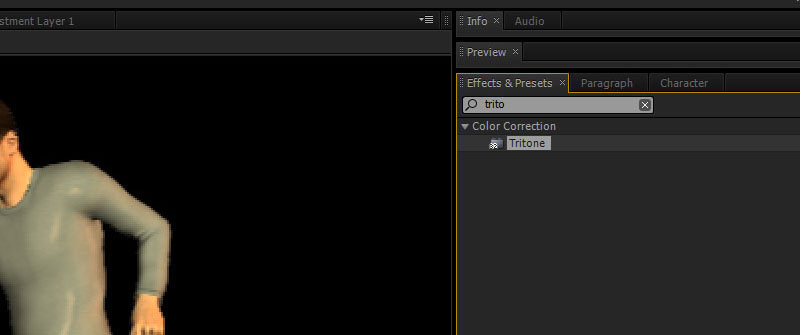
Apply effects in Adjustment Layer.
- Select the "Adjustment Layer 1" in the composition
- In "Effects & Presets" window, type "level" or simply "lev" ( This process allows us to quickly find the effect, just typing the first letter of the effect you want).
- Down there are all effects starting with "Lev". Double click on Levels to apply
Step 8
Do the same for the "Tritone" effect.
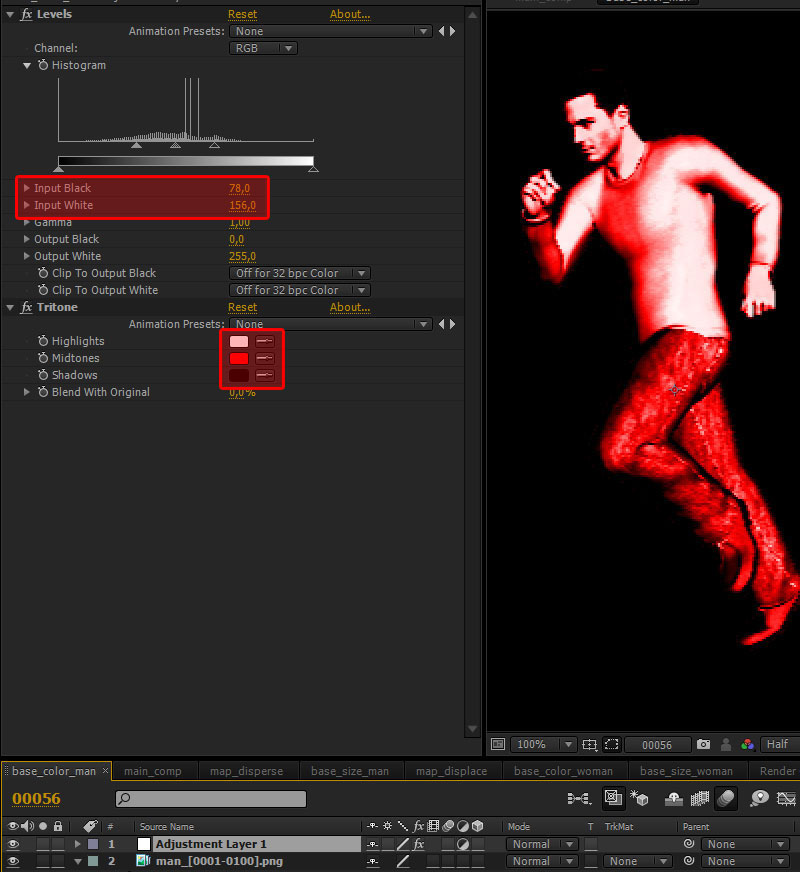
Step 9
Select "Adjustment Layer 1". In Effect Controls window make the following settings:
- Input Black: 78
- Input White: 156
- Midtones: change color with the red (R: 255 G:0 B:0)
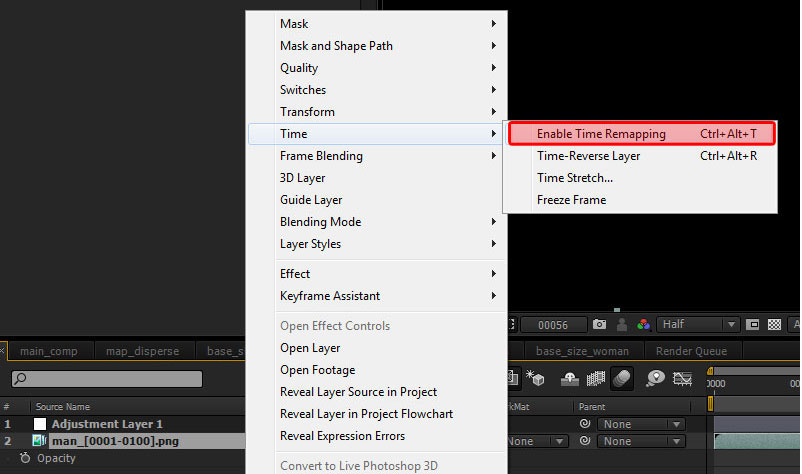
Step 10
Select "man_[0001-0100].png in composition. Right click and go to Time > Enable Time Remapping.
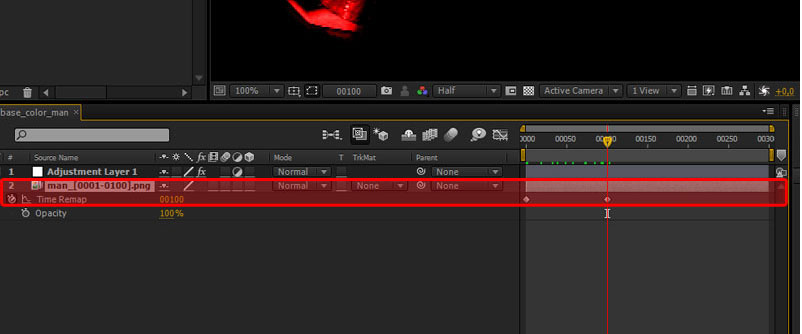
Step 11
Now you can extend the level on the entire composition.
Step 12
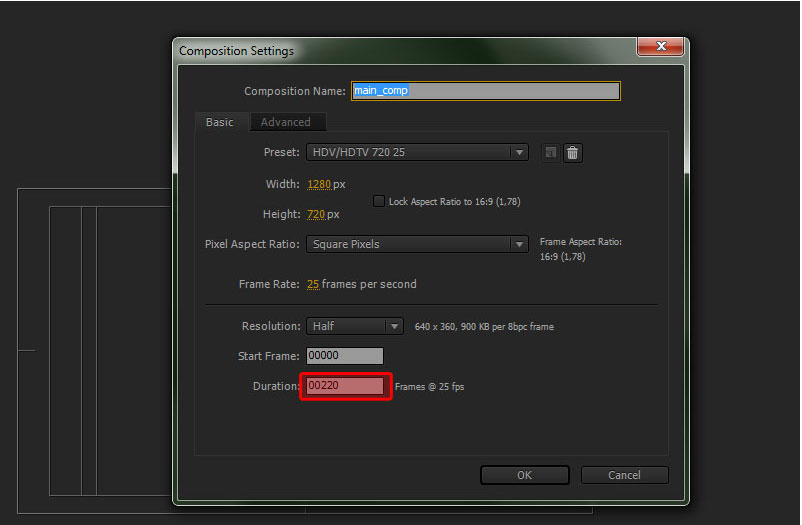
Go to Composition > New Composition (Ctrl+N). In Coposition Settings window make the following settings:
- Composition Name: main_comp
- Preset: HDV/HDTV 720 25
- Duration: 220
Click Ok.
Step 13
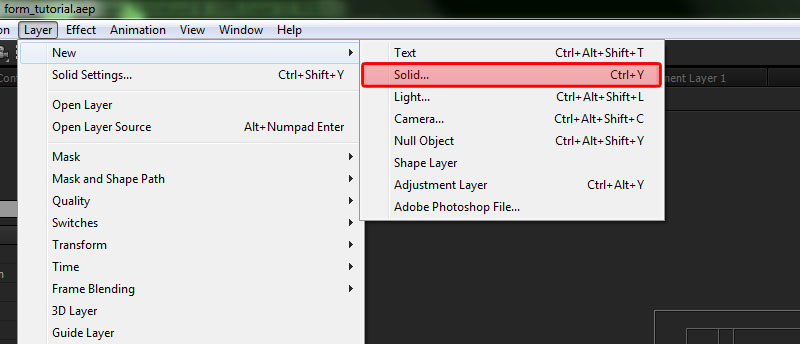
Create a new Solid. Go to Layer > Solid… In "Solid Settings" window make the following settings
- Click on "Make Comp Size"
- Click Ok. ( Color doesn’t matter. I chosed the color white).
Step 14
Apply effects in Solid Layer.
- select the "white solid 1" in the composition (White solid because I chosed the color white).
- Change its name to "form man".
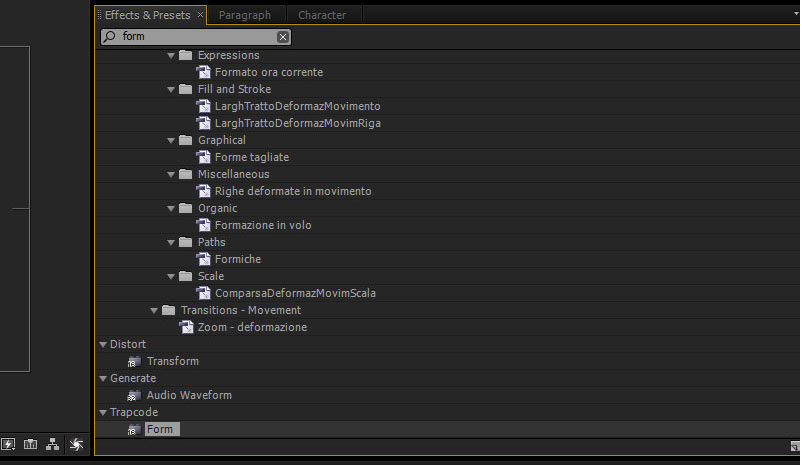
- In "Effects & Presets" window, type "form" or simply "fo".
- Double click on Form effect to apply.
Step 15
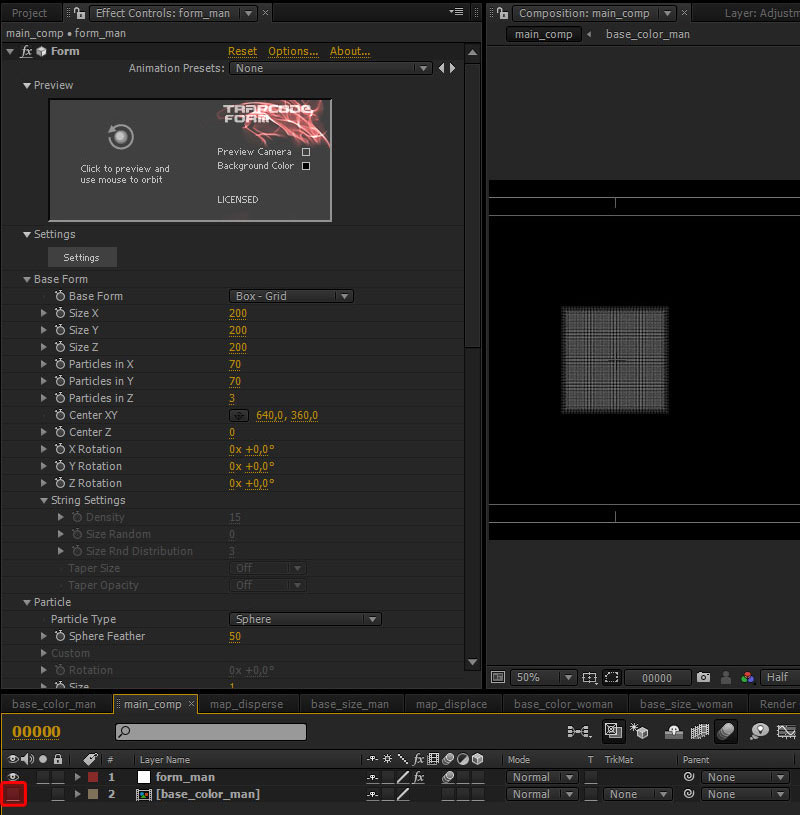
Add the "base_color_man" composition and click on eye icon to hide it. This is the arrangement of layers in the "main_comp" composition.
Step 16
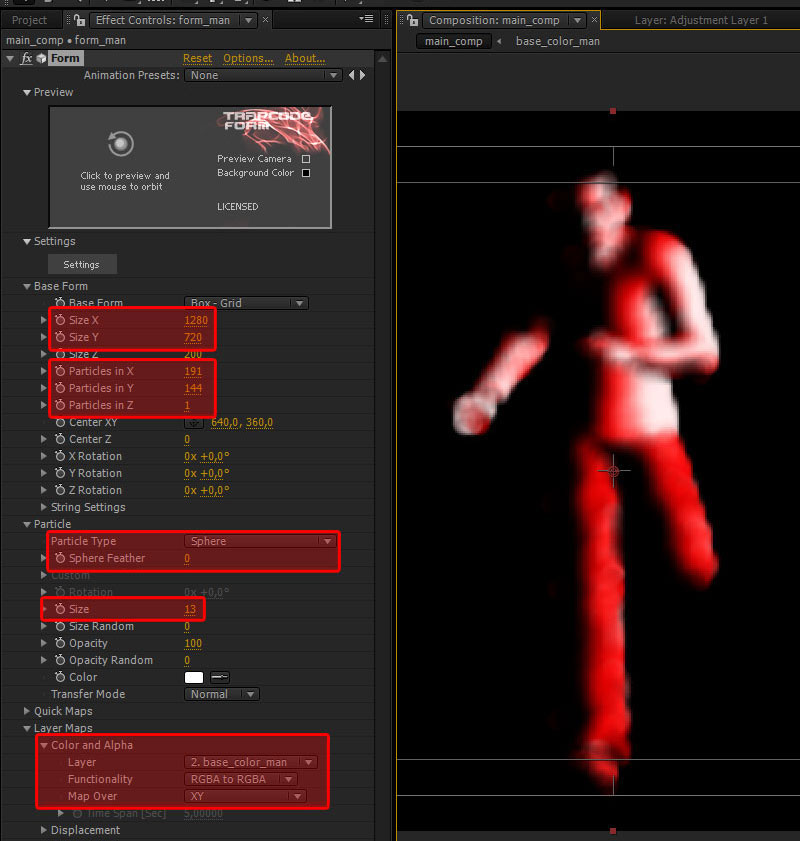
Select "form_man" layer. In Effect Controls window make the following settings:
- size X: 1280
- size Y: 720
- Particles in X: 191
- Particles in Y: 144
- Particles in Z: 1
- Particle Type: Sphere
- Sphere Feather: 0
- size:13
- layer: base_color_man
- Functionality: RGBA to RGBA
- Map over: XY
Step 17
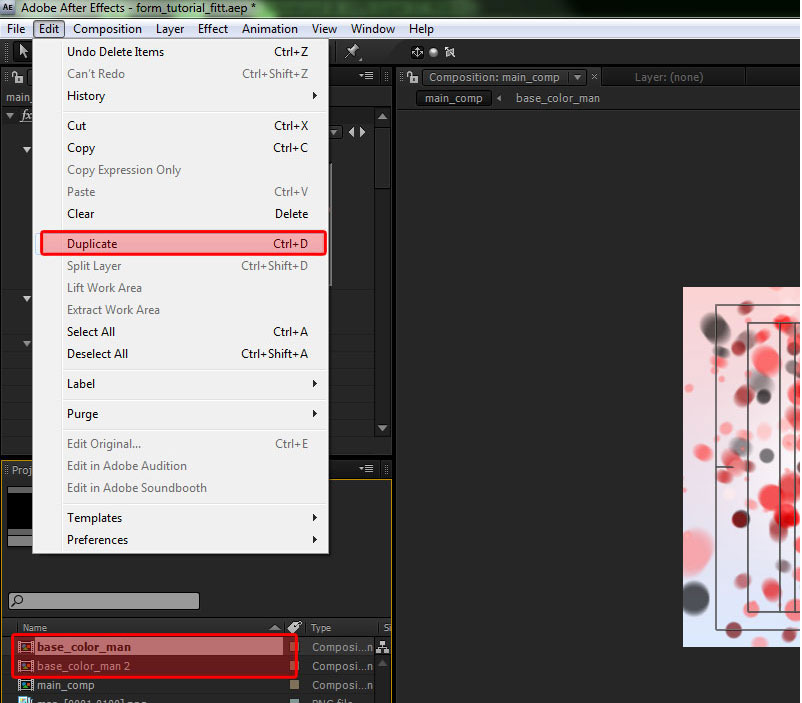
- select the "base color_man" composition in Project window.
- Duplicate the composition. Go to Edit > Duplicate (Ctrl+D)
- Change its name to "base_size_man".
Step 18
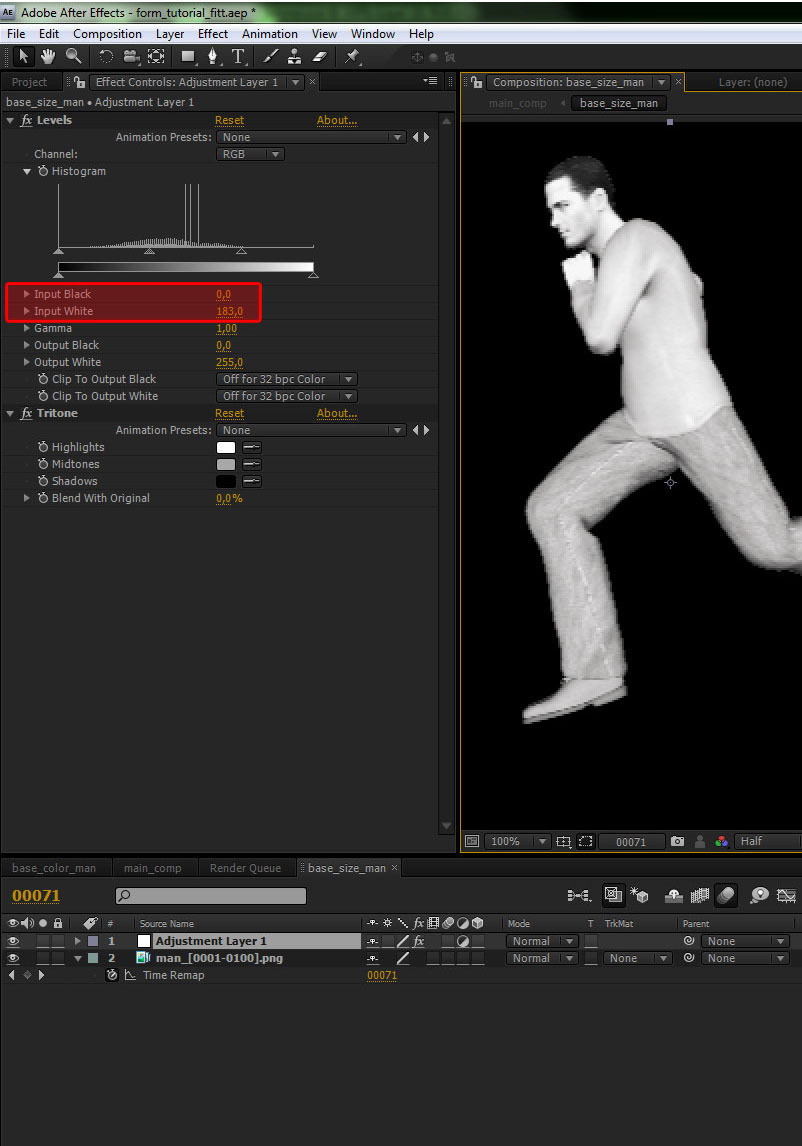
Add the "base_size_man" composition in "main_com" composition. Open "base_size_man" composition and make the following settings:
- Input Black: 0
- Input White: 183
- Midtones: change color with the gray (R: 167 G:167 B:167)
Step 19
Select "form_man" layer. In Effect Controls window make the following settings:
- Layer: base_size_man
- Map Over: xy

Step 20
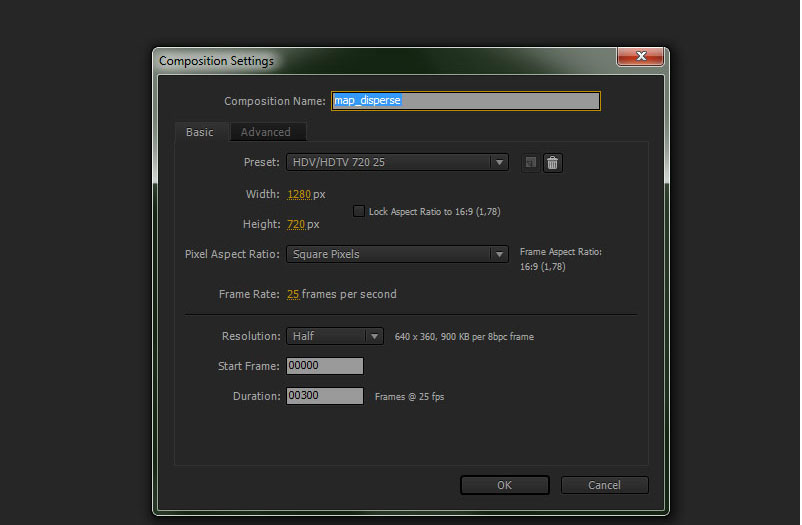
Create a new composition and in Composition Setting window make the following settings:
- Preset: HDV/HDTV 720 25
- Duration: 300
Step 21
Add a new solid layer in "map_disperse" composition (see step 13). You can also add the existing solid layer (white solid 1) which is inside Solid folder in Project window. In Effects & Ptresets search "Fractal Noise" and apply to solid layer.

Step 22
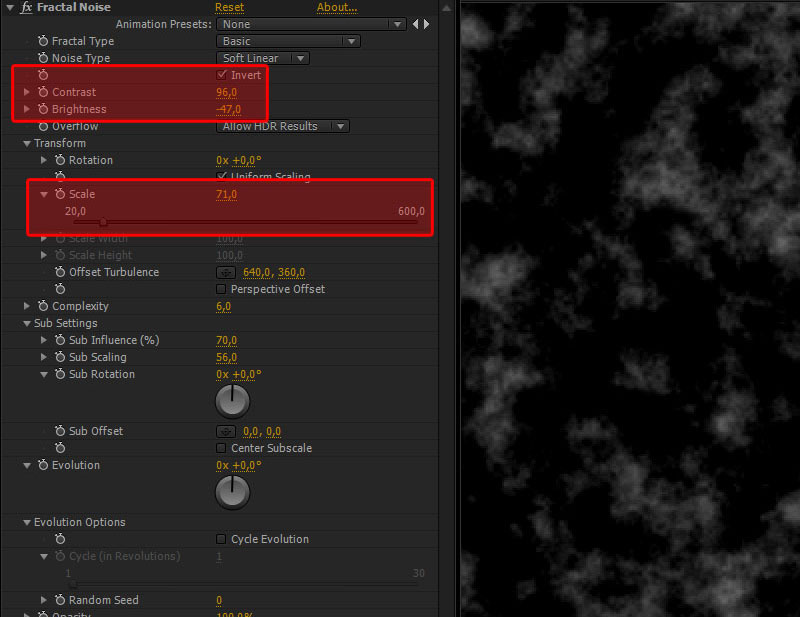
In Effect Controls window make the following settings:
- Invert: on
- Contrast: 96
- Brightness: -47
- Scale: 71
Step 23
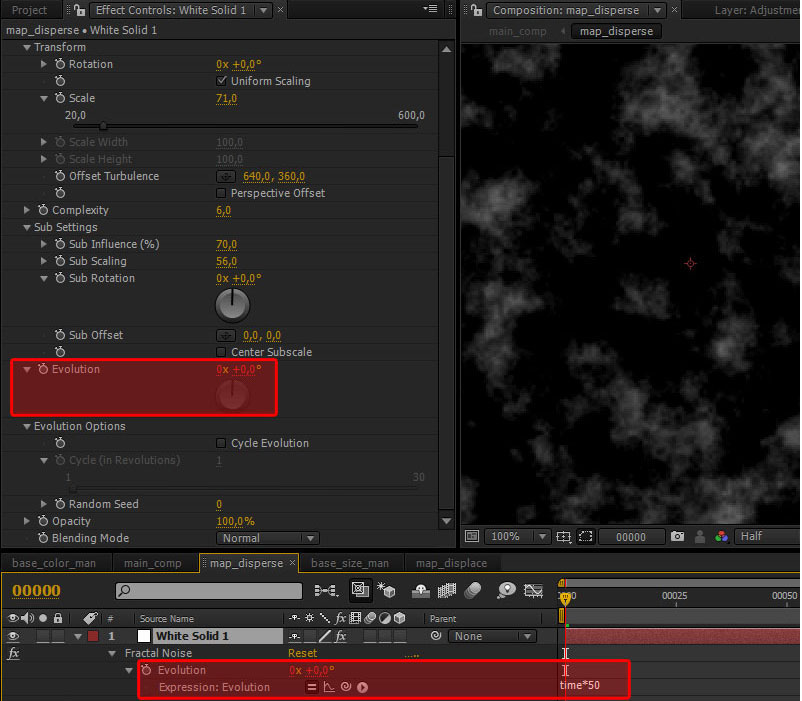
Now we animate the fractal noise effect. In Evolution setting type a very simple expression:
-
time*50
Step 24
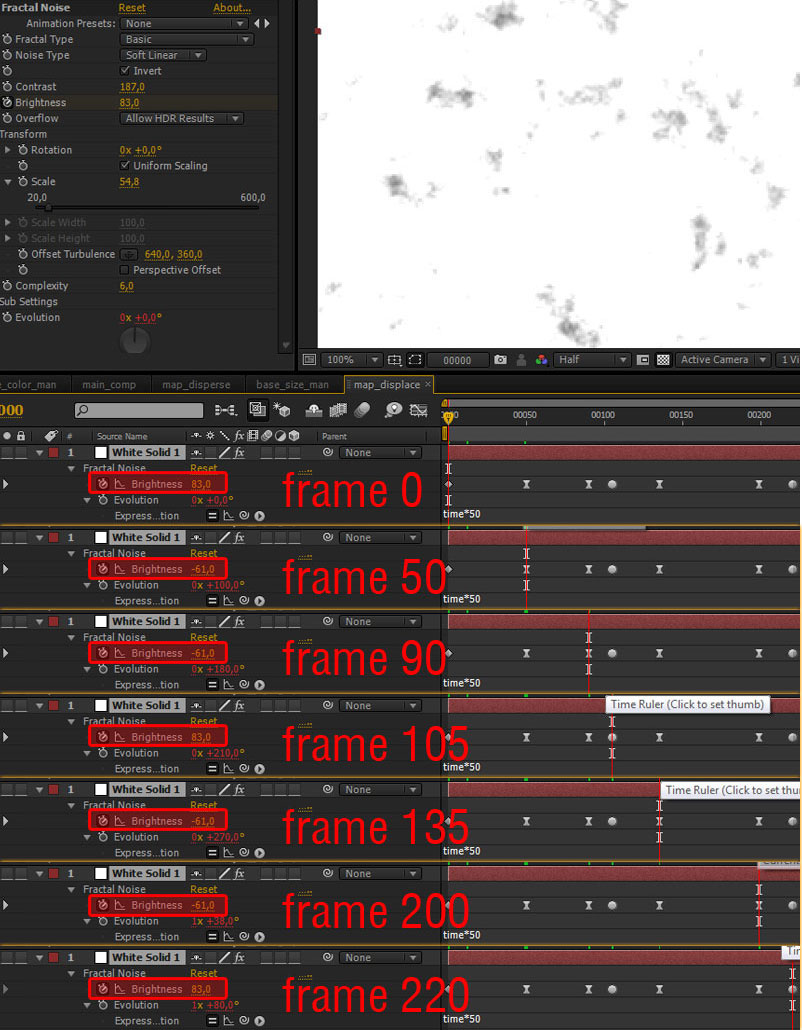
Duplicate the "map_disperse" composition and rename it to "map_displace". Go to in "map_displace" composition and animate the setting Brightness as follows:
- Frame 0 Brightness 83
- Frame 50 Brightness -61
- Frame 90 Brightness -61
- Frame 105 Brightness 83
- Frame 135 Brightness -61
- Frame 200 Brightness -61
- Frame 220 Brightness 83
Step 25
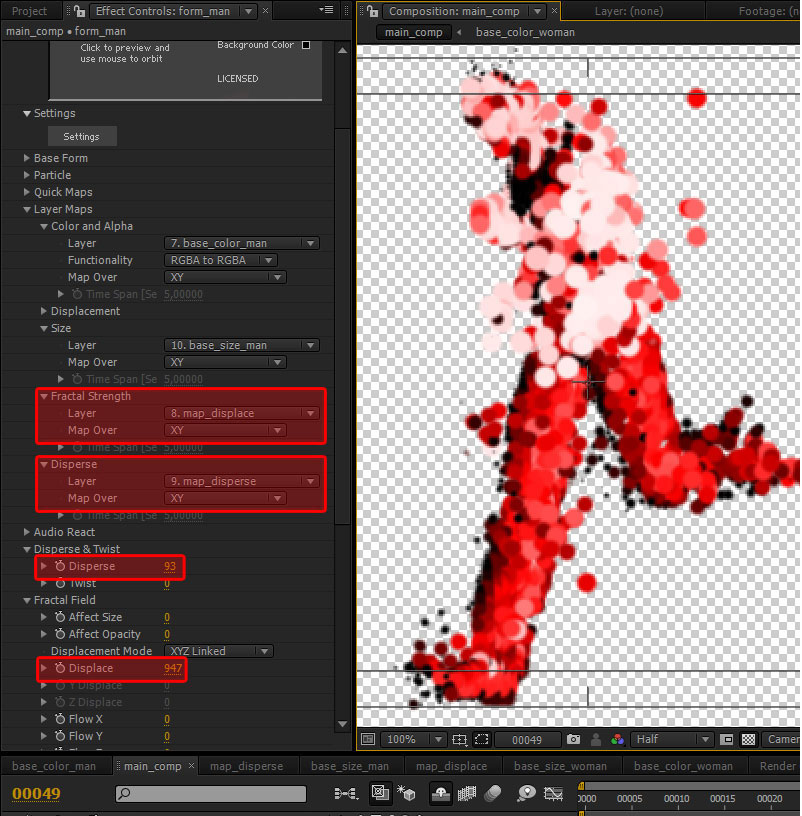
Go to "main_comp" composition, add the "map_displace" and "map_disperse" and hide them. Select "form_man" layer and in Effect Controls window make the following settings:
- Fractal Strength
- layer: map_displace
- Map over: XY
- Disperse
- layer: map_disperse
- Map over: XY
- Disperse: 93
- Displace: 947
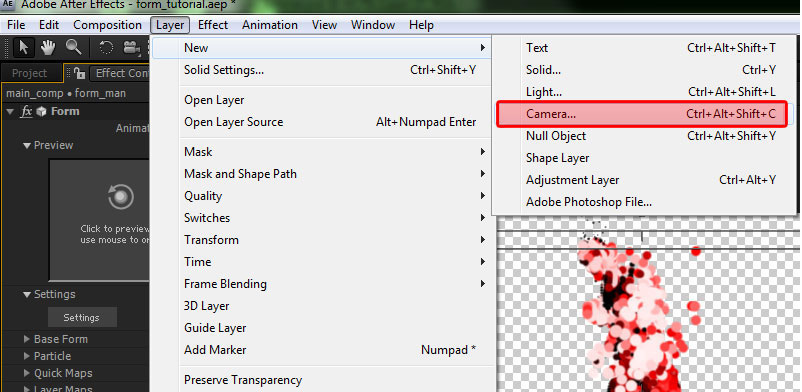
Step 26
Now add in "main_comp" a new camera. Go to Layer > Camera…
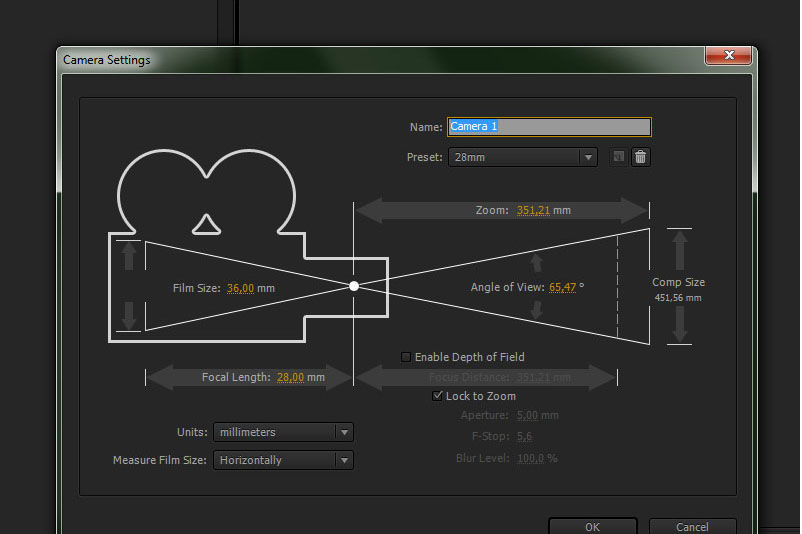
Step 27
In Camera Settings window make the following settings:
- Preset: 28mm
- Click Ok
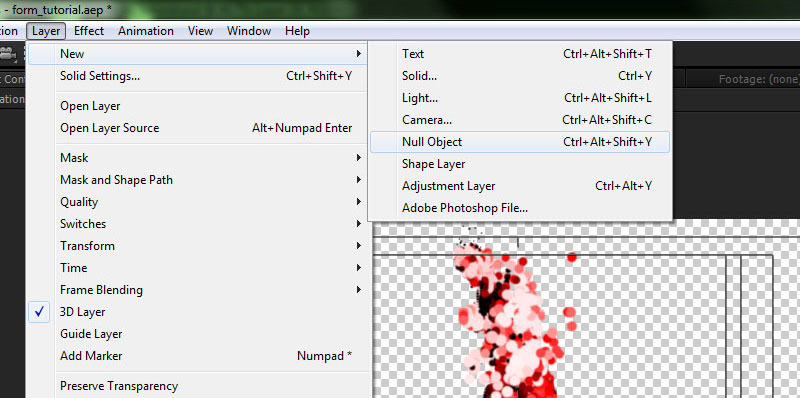
Step 28
Add new Null Object to control the Camera. Go to Layer > Null Object
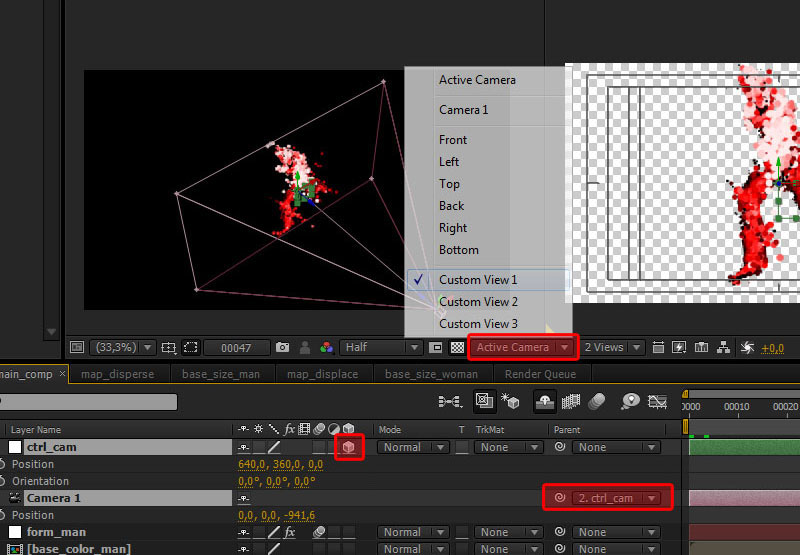
Step 29
- Rename the Nul Object in "ctrl_cam".
- Enable the property "3d Layer" ( Layer > 3D Layer).
- Parent the Camera 1 to ctrl_cam
If you enable "2 views" and in left view you change point view from "Activate Camera" to "Custom View 1", you can see how the 3d scene is structured.
Step 30
Now animate the camera using the "Position" and "Orientation" of "ctrl_cam" and the "position" of "camera 1".
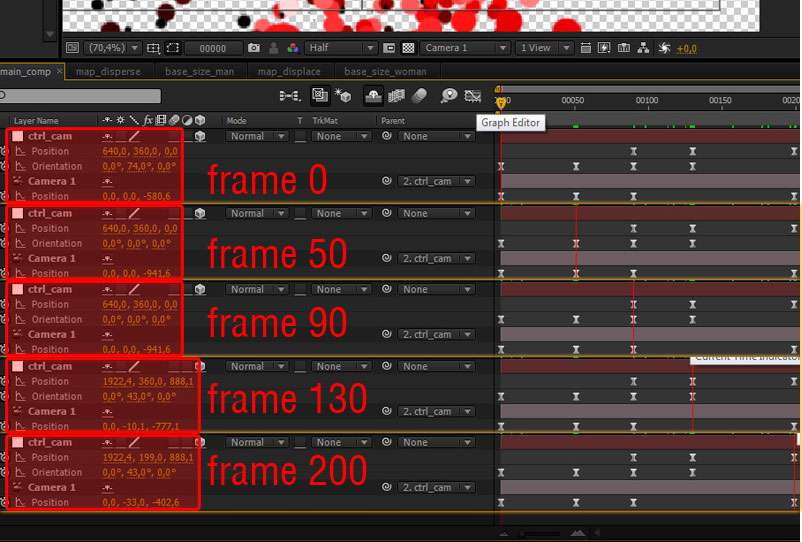
Step 31
In "Custom View 1" you see the animated path that we created in previous step.
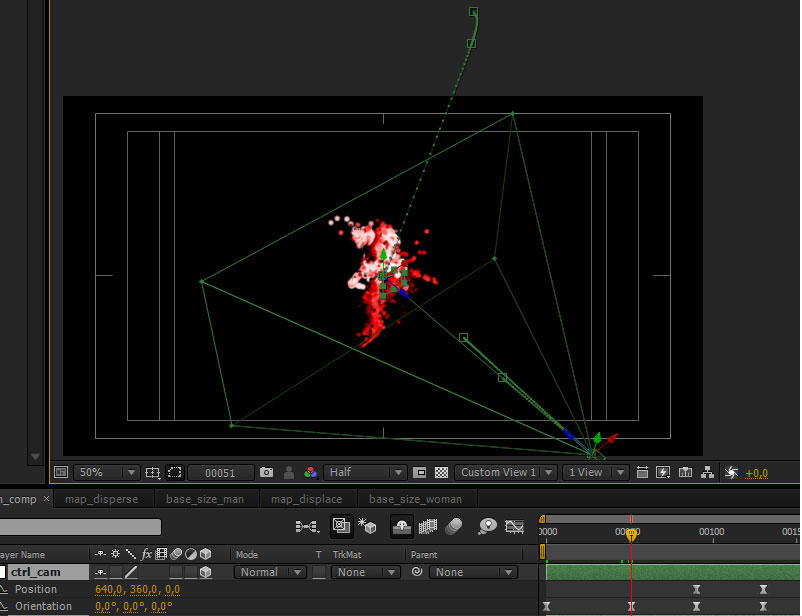
Step 32
In Project window select "base_color_man" and "base_size_man" and duplicate them. Now rename respectively in "base_color_woman" and "base_size_woman" and add them in "main_comp".
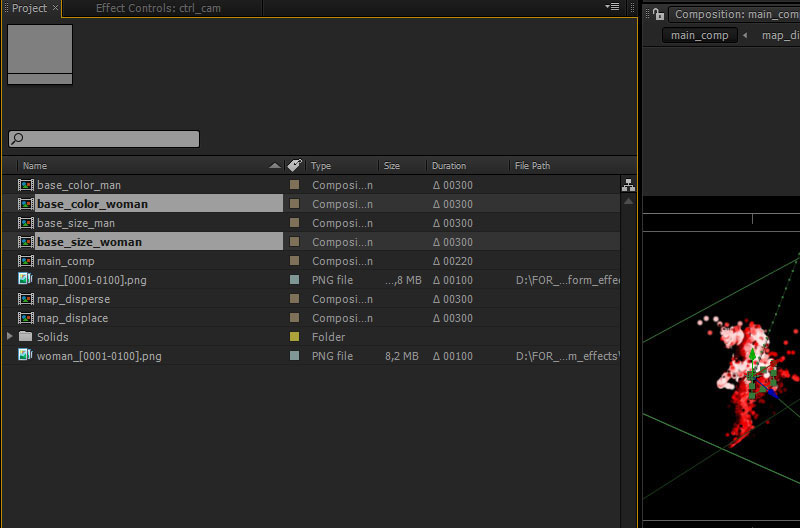
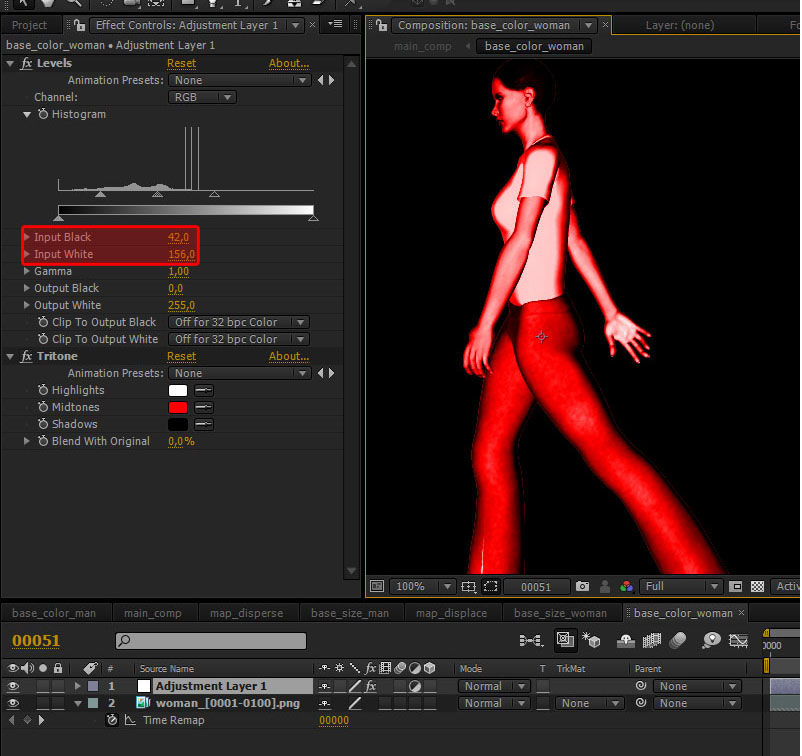
Step 33
Go to "base_color_woman" and select the adjustment layer. In Effect Controls make the following settings:
- Input Black: 42
- Input White:156
Step 34
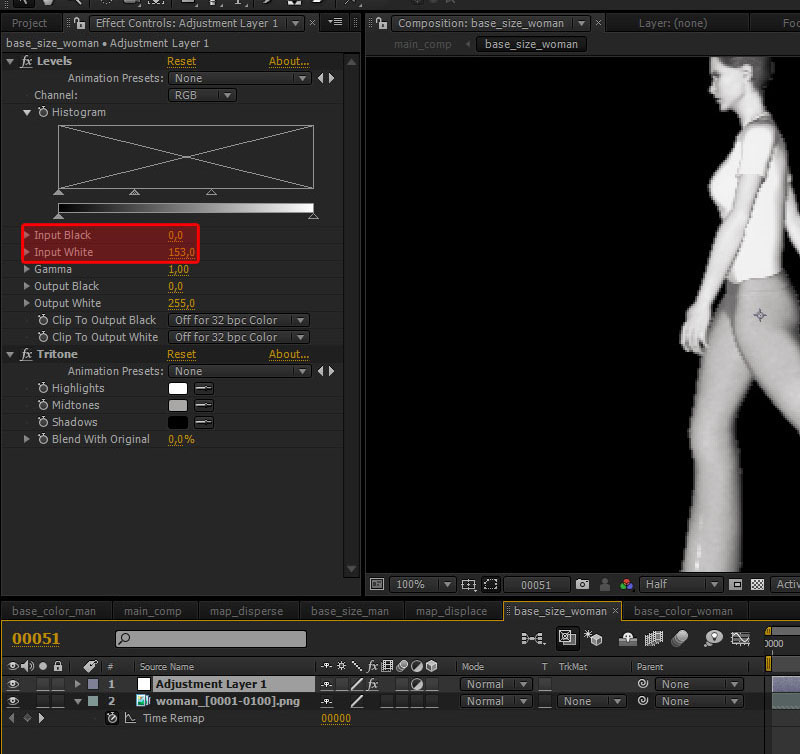
Go to "base_size_woman" and select the adjustment layer. In Effect Controls make the following settings:
- Input Black: 0
- Input White:153
Step 35
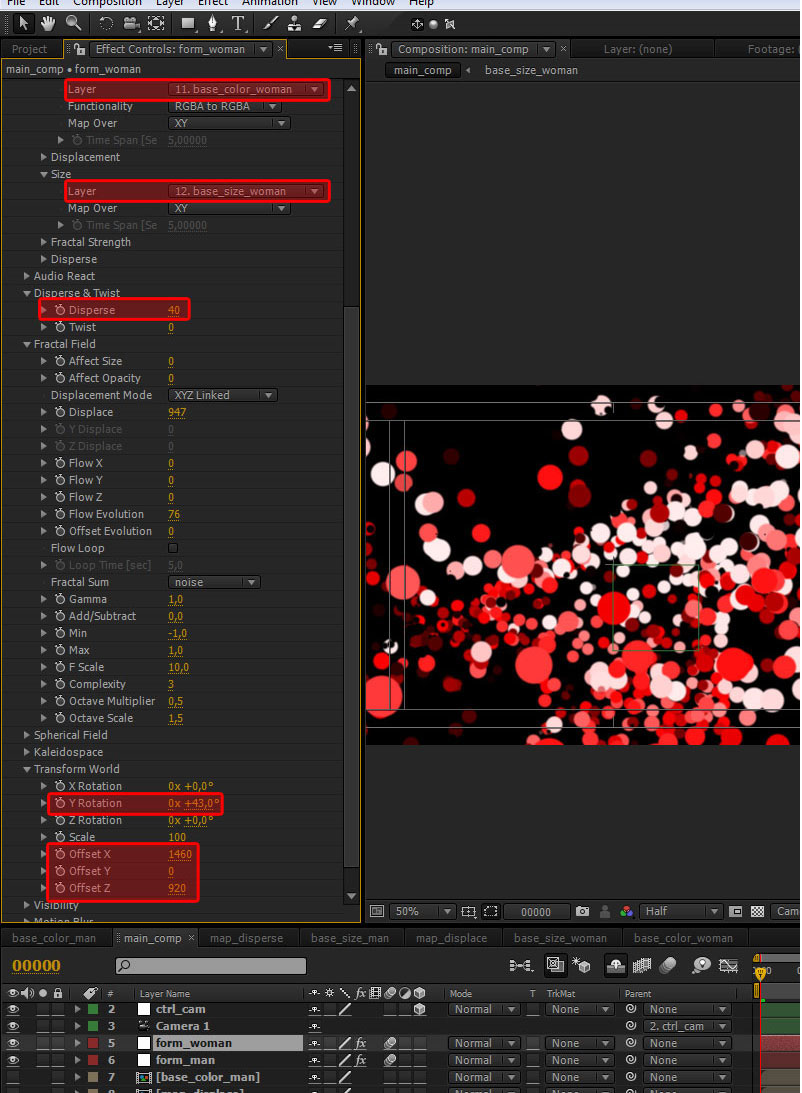
Go to "main comp" and duplicate the "form_man" layer and rename in "form_woman" and make the following settings:
- Layer: base_color_woman
- Layer: base_size_woman
- disperse:40
- Rotatio:43
- offset X :1460
- offset Y:0
- offset Z:920
Step 36
Now it’s possible to see the preview of the animation. Changing the view in "Custom view 1" or "Top", you can see how the 3d scene is structured.

Step 37
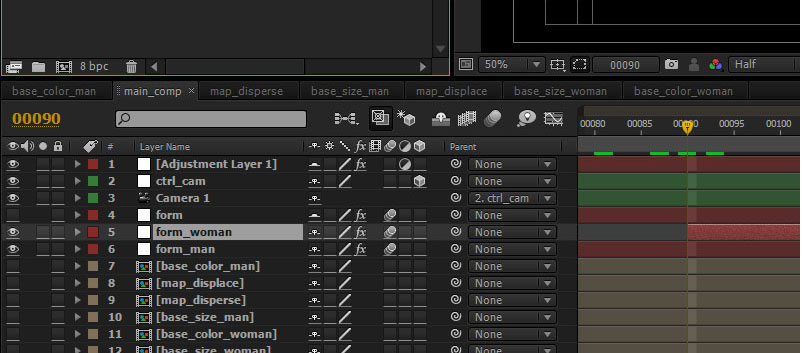
From frame 0 to frame 90 the "form_woman" layer should not show. Then select the"form_woman" layer, go to frame 90 and press Ctrl+Shift+D. Now we have split the layer into two parts. Delete the first part.
Step 38
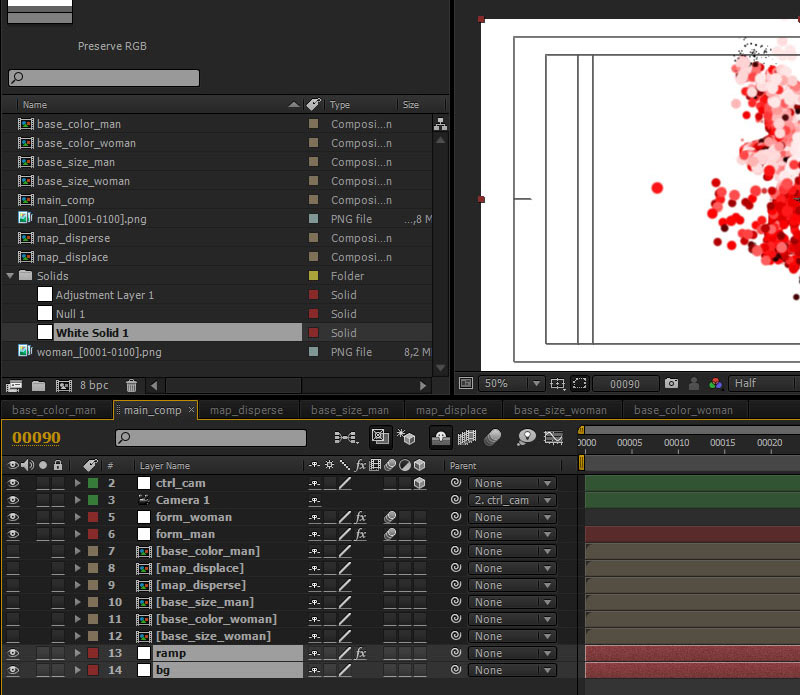
Add two "White Solid 1" into" maincomp", and rename them in "ramp" and "bg".
Step 39
Select "ramp" layer and draw a mask using the Ellipse tool.
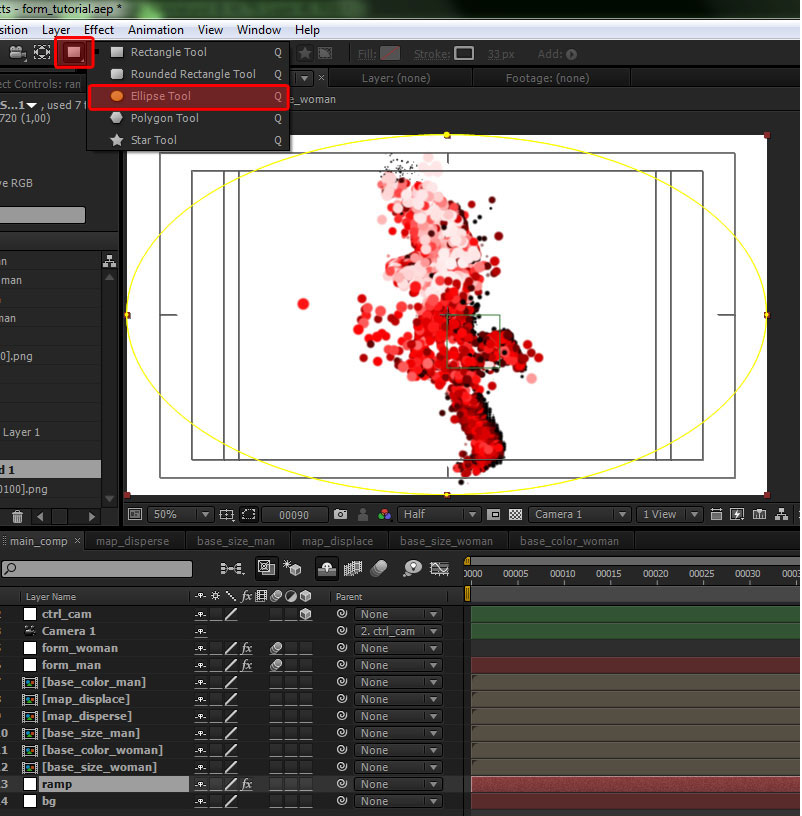
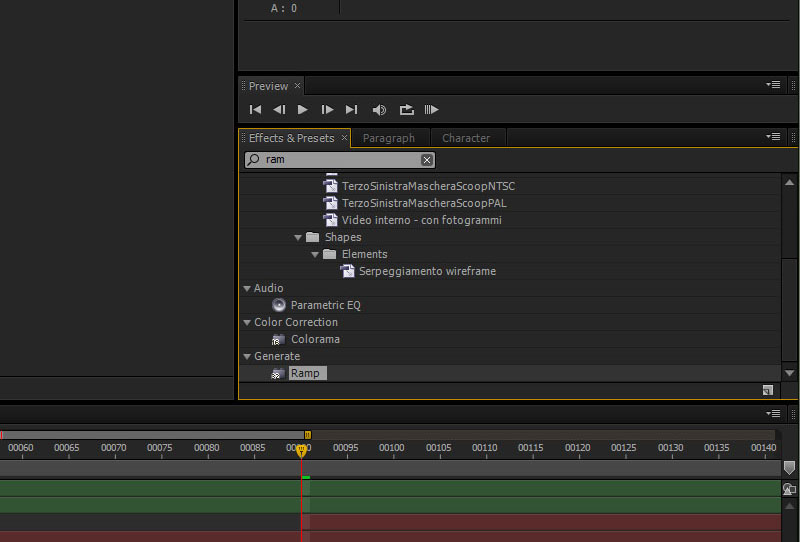
Step 40
Apply the Ramp effect.
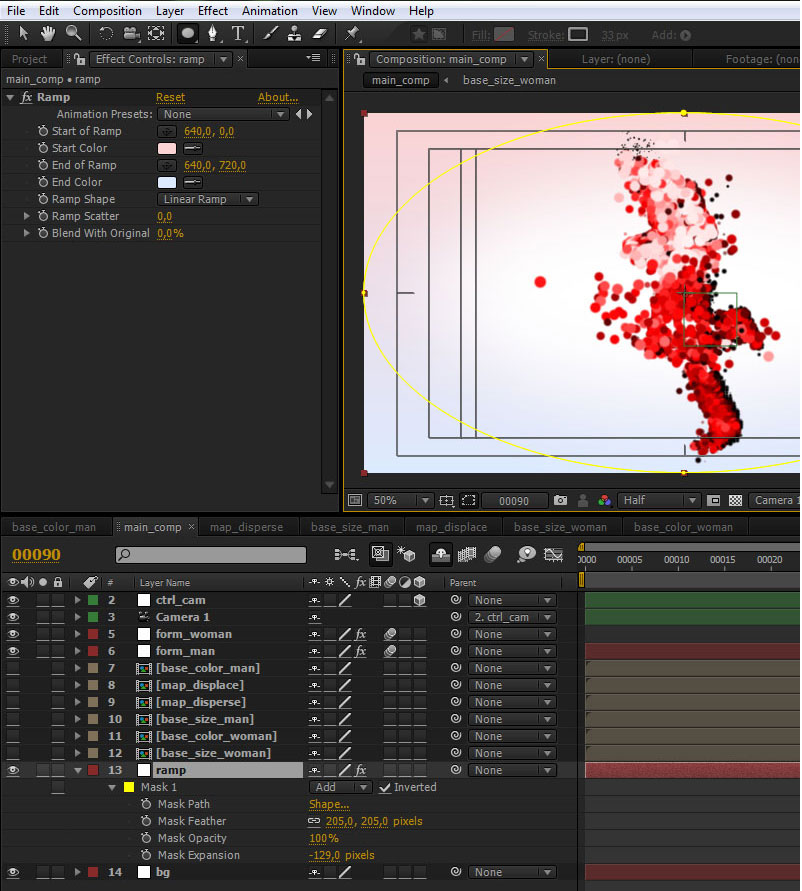
Step 41
In Effect Controls window make the following settings:
- Start of Ramp: pink (R:251 G:211 B:211)
- End of Ramp: turquoise (R:220 G:234 B:255)
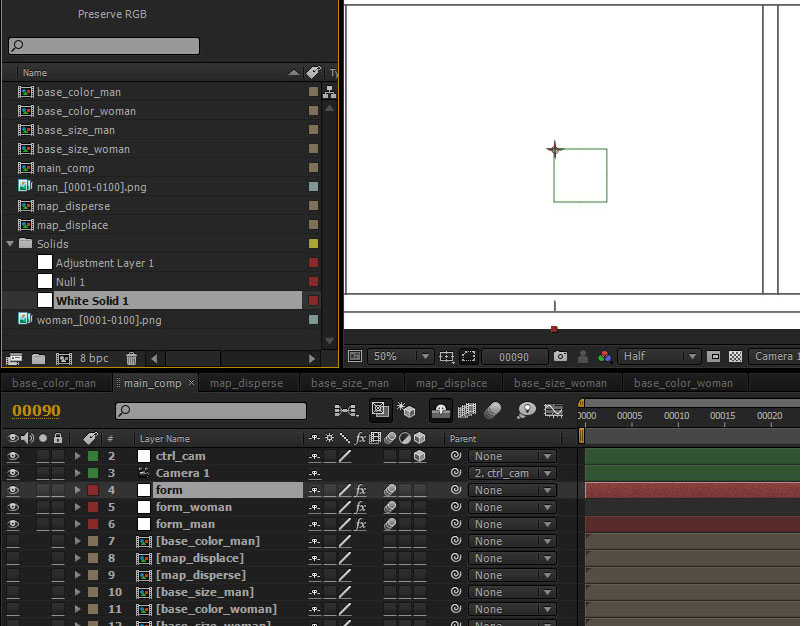
Step 42
Add another "White Solid 1" into "main_comp", rename it in "form" and apply the "Form" effect.
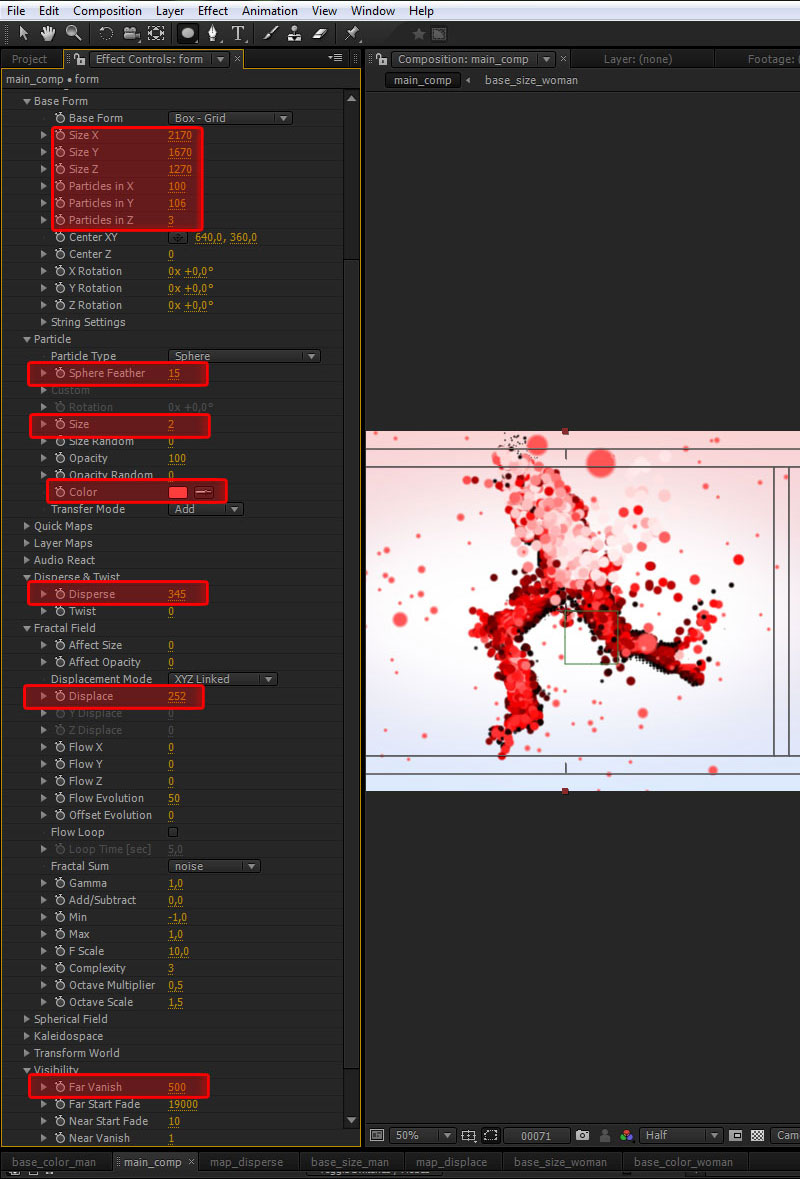
Step 43
Select "form" layer and make the following settings:
- Size X: 2170
- Size Y: 1670
- Size Z: 1270
- particles in X: 100
- particles in Y: 106
- particles in Z: 3
- Sphere Feather: 15
- Size: 2
- Color: pink (R:255 G:85 B:85)
- Disperse: 345
- Displace: 252
- Far Vanish: 500
Step 44
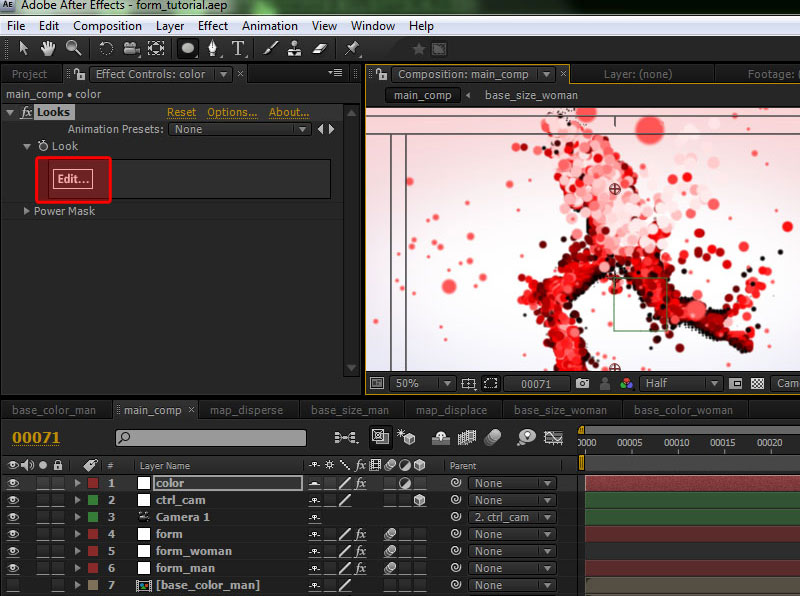
Now let’s make some color corrections. Add a new "Adjustment Layer", rename it in "color" and apply the "looks" effect. In Effect Controls window click on button "Edit…"
Step 45
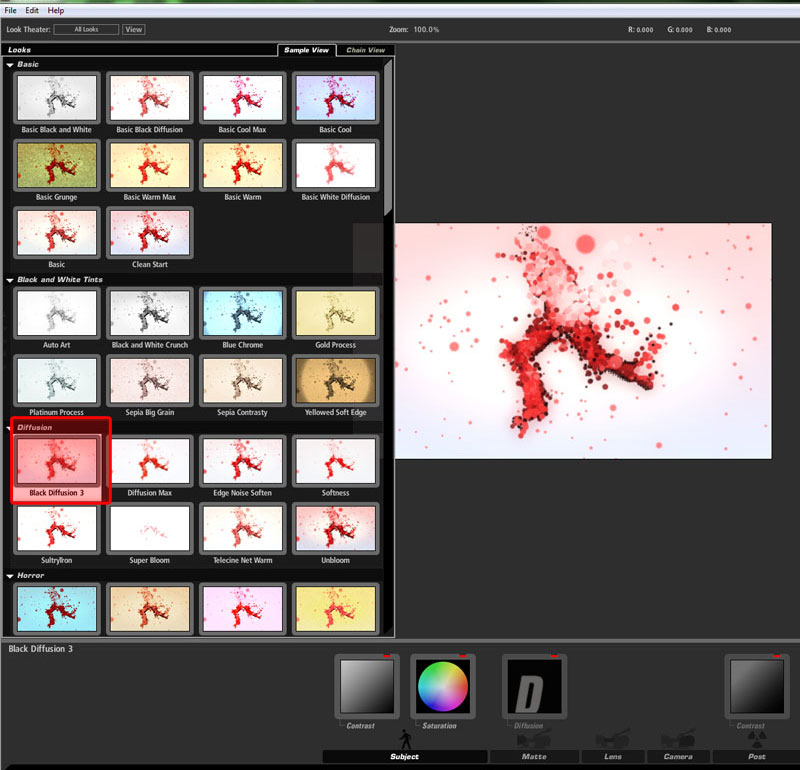
In LooksBuilder window move the mouse on the left side. This will open a sliding window named "Looks". Select the preset "Black Diffusion 3" and click ok.
Step 46
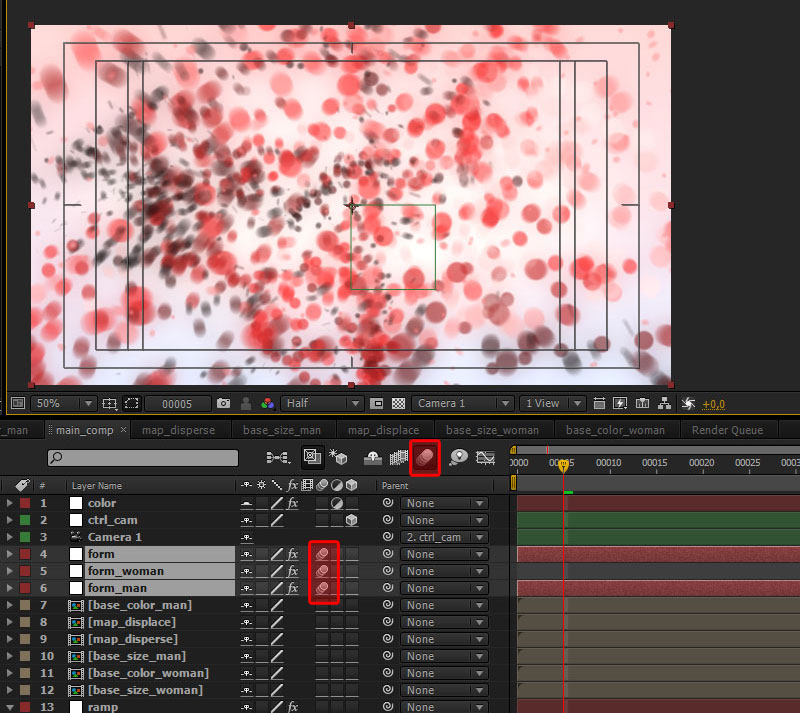
Enable the motion blur and switch motion blur in the "form" layer, "form_woman" layer and in "form_man" layer.
Step 47
That’s all. The project is ready to final render. I hope you enjoyed the tutorial, and if you have any questions just tell me. Bye!