<section>
- About
- Welcome
- Features
- Live demo
- Getting Started
- Technology Features
- Inside the Project
- Launch the Application
- Configuring
- Email Settings
- SMTP Settings
- Captcha Settings
- Changelog
- v1.0
About
Welcome
This contact form is one of the safest forms of email sending that you can integrate into your application,
it is complete, correctly developed, and respects the known best practices in order to guarantee its maintenance and its evolution.
Features
- Full ASP.NET MVC with Razor view
- Based on Bootstrap responsive style
- You can send email with one or more attached files
- The option to receive a copy of the email sent
- Use of Google’s new reCAPTCHA “I’m not a robot” to protect you from spam
- Download the email sent in PDF format
- JQuery Client side validation
- Validation for required fields
- Validation for email address
- Validation of the number of characters entered in the message min and max
- Summary validation form
- Confirmation email message
- Full code library to send email with System.Net.Mail name space
- Easy configuration of email and SMTP settings in the “web.config” file
- Source code full documented
- Layered development
- Clean code with defensive coding concept
- Turnkey email sending form
- Respect the web standard
- Easy install; 100% integration
</section>
Live demo
Getting Started
Technology Features
- ASP.NET MVC 4
- C# language .NET Framework 4 or above
- Visual Studio 2012/2013 or above
- Must have Nuget package manager installed in Visual Studio if lower than VS2017
- For Visual Studio 2010 you must install MVC4 package
- MS IIS 6/7
- Rotativa library for converting HTML to PDF
Inside the Project
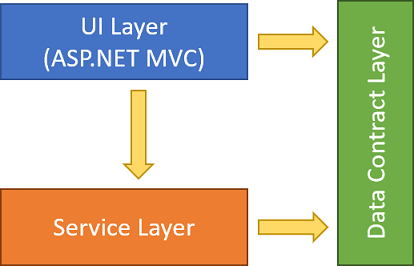
The project is developed in layer, it contains 3 layers :

- UI Layer: that represent the ASP.NET MVC project
- Service layer: that represent the email sending class library
- Data contract layer: that represent data transfert object used to pass message between layers
Launch the Application
- Unzip project file
- With MS Visual Studio, Launch the *.sln file
- Right-click on ContactUs project and click on Set as startup project menu
- Rebuild the solution
- You must configure email and SMTP parameters befor test sending mail, go to Configuring section to make
Configuring
Email Settings
In order to send email to recipient, you must set the correct value in configuration file :
- Open Web.config file in ContactUs web project
- In appSettings section set the correcte value for nameTo and emailTo Keys
- nameTo key : Set the recipient’s Name
- emailTo key : Set the recipient’s email address
<appSettings>
    <!--Email Settings-->
    <!--Specify the correct value of each key bellow -->
    <add key="nameTo" value ="Dupont"/>
    <add key="emailTo" value ="[email protected]"/>
    <!--End email settings-->
</appSettings>
SMTP Settings
Here it’s very important step, you must set SMTP parameters to allow application send email, you can use Gmail SMTP service through your Gmail account, click here for more details.
- Open Web.config file in ContactUs web project
- Go to smtp section under system.net>mailSettings section
- host attribute : Set your host(mail server) name
- port attribute : Set host port number that allow you send email
- userName attribute : Set your mail server account/userName/login that let you to connect to your mail server provider
- password attribute : Set your mail server password that let you to connect to your mail server provider
<system.net>
    <mailSettings>
        <smtp deliveryMethod="Network">
        <network defaultCredentials="false" enableSsl="true" host="smtp.sample.com" port="123" userName="[email protected]" password="PASSWORD" />
        </smtp>
    </mailSettings>
</system.net>
Captcha Settings
On this version we use the google reCaptcha V2, please refer to this link for more details click in following link What is reCAPTCHA?.
- Register your website on Google recaptcha and get your two keys : Site Key and Secret Key. Click here form more details
- Integrate Google reCAPTCHA JS API in your website
- Put your Site Key in the HTML, Figure 1
- Put your Secret Key on web config file, Figure 2
- You can Enable or Disable Captcha by setting the value “EnableCaptcha” key value on web config file, true to enable captcha and false to disable it. Figure 3.
Figure 1
<div class="form-group">
    <div class="col-md-offset-2 col-md-10">
        <div name="Captcha" class="g-recaptcha" data-sitekey="6LffSToUAAAAAGm2hvf3qWyDqokNKJjqmFovn6Pq"></div>
        @Html.ValidationMessageFor(m => m.Captcha)
    </div>
</div>
Figure 2
<add key="captchaSecretKey" value="6LffSToUAAAAAESDO6Avf8FD-wJWZA1QUfhYiPcF"/>
Figure 3
<add key="EnableCaptcha" value="false" />
Changelog
v1.0
v1.0 it’s the initial version of the project