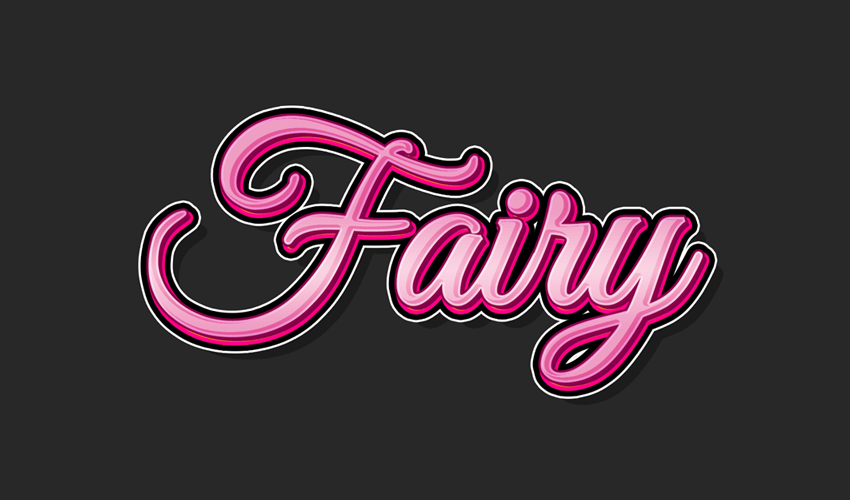
In this tutorial I want to show you how to create a fairytale text effect in Adobe Photoshop. If you want to get the final result without any effort, you can buy it on GraphicRiver.
This pack includes different text effects and works with shapes and text.

Tutorial Assets
The following assets will be used during this tutorial:
- Great Vibes font
Before you start creating this text effect, download and install the font.
1. How to Create the Layer Styles
Step 1
Open Photoshop, and go to File > New to create a new document.

Step 2
Fill the document using #282828 color. Pick the Type Tool (T) with these settings:
- Font: Great Vibes
- Font Size: 127 pt
- Color: White
- The tracking for the selection characters: -25

Step 3
Write “Fairy” (the first letter should be capital) and place it in the center of the Photoshop document (press Control-A to select the document, and then pick the Move Tool (V) and click on the Align Vertical Center and Align Horizontal Center icons).

Step 4
Double-click the text layer to apply the following layer style.
Add a Stroke with these settings:
- Size: 7 px
- Position: Outside
- Blend Mode: Normal
- Opacity: 100%
- Fill Type: Color
- Color:
#ff0084

Then click OK to save changes.
Step 5
Select the Fairy layer, go to Layer > Duplicate Layer, and name the layer “Middle”. Click OK to create the layer. Pick the Move Tool (V) and move it up and left by 7 px. Go to Layer > Layer Style > Clear Layer Style to clean the layer styles. Change the color to #c6c6c6.

Step 6
Then double-click with your mouse on the text layer to open the Layer Style window.
Add a Stroke with these settings:
- Size: 4 px
- Position: Outside
- Blend Mode: Normal
- Opacity: 100%
- Fill Type: Color
- Color:
#8c054a

Step 7
Now add an Inner Glow:
- Blend Mode: Overlay
- Opacity: 50%
- Noise: 0%
- Color:
#ffffff - Technique: Softer
- Source: Edge
- Choke: 100%
- Size: 4 px
- Contour: Linear
- Uncheck Anti-aliased
- Range: 100%
- Jitter: 0%

Step 8
Add a Gradient Overlay with these settings:
- Blend Mode: Normal
- Opacity: 100%
- Gradient: from
#f6b6ceto#e35b9b - Style: Reflected
- Angle: 90°
- Scale: 46%
- Uncheck Reverse and Dither
- Check Align with Layer

Step 9
Add a Drop Shadow with these settings:
- Blending Mode: Normal
- Pick the color
#840048 - Opacity: 100%
- Uncheck Use Global Light box before setting the Angle: 135°
- Distance: 10 px
- Spread: 100%
- Size: 0 px
- Contour: Linear
- Uncheck Anti-aliased
- Noise: 0%
- Check Layer Knocks Out Drop Shadow

Click OK to save changes.
Step 10
Select the Middle layer and duplicate it. Double-click on the name and change it to “Front”. Press Enter to apply the settings. Pick the Move Tool (V) and move it up by 5 px and left by 1 px. Go to Layer > Layer Style > Clear Layer Style to clean the layer styles.

Step 11
Make sure that the Front layer is selected. Double-click with your mouse on the layer to apply the following layer style. Set the Fill Opacity to 0%.

Step 12
Add a Stroke:
- Size: 7 px
- Position: Inside
- Blend Mode: Normal
- Opacity: 0%
- Fill Type: Color
- Color:
#000000

Step 13
Add a Color Overlay with these settings:
- Blend Mode: Normal
- Color:
#ffffff - Opacity: 40%

Then click OK to save changes.
Step 14
Select the layers Fairy, Middle and Front, go to Layer > Merge Layers (or press Control-E) to merge them into one.

Step 15
Double-click the text layer to apply the following layer style.
Add a Stroke:
- Size: 10 px
- Position: Outside
- Blend Mode: Normal
- Opacity: 100%
- Fill Type: Color
- Color:
#000000

Step 16
Now add an Outer Glow:
- Blend Mode: Normal
- Opacity: 100%
- Noise: 0%
- Color:
#ffffff - Technique: Softer
- Choke: 100%
- Size: 14 px
- Contour: Linear
- Uncheck Anti-aliased
- Range: 100%
- Jitter: 0%

Step 17
Add a Drop Shadow with these settings:
- Blending Mode: Normal
- Pick the color
#000000 - Opacity: 30%
- Uncheck Use Global Light box before setting the Angle: 135°
- Distance: 35 px
- Spread: 0%
- Size: 0 px
- Contour: Linear
- Uncheck Anti-aliased
- Noise: 0%
- Check Layer Knocks Out Drop Shadow

Click OK to save changes.
Congratulations, You’re Done!
In this tutorial you learned how to create a piece of fairytale text. Hope you like it. Don’t forget to share your result with us.

This text effect we have just created is a part of my text style pack on GraphicRiver.

{excerpt}
Read More