Animating using expressions can be a big timesaver, especially when it comes to mechanical objects such as a merry-go-round! In this tutorial, Stephen Ko walks us through a simple expressions-based project, creating a simple UI with sliders to control the different parts of his model. Let’s get started!
Step 1
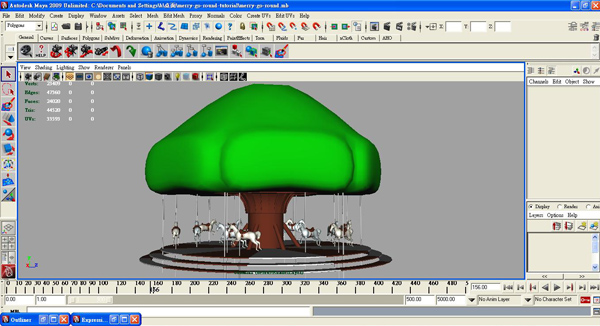
Let’s start! First, open Maya, and if you want to follow along exactly, open the scene-file provided.
Step 2
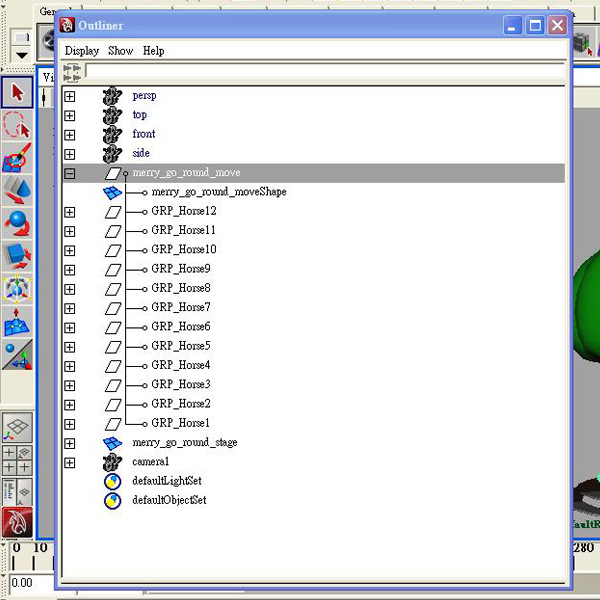
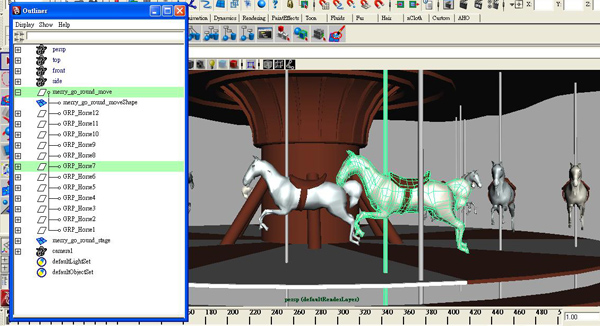
I’m going to briefly describe my model before we start. I’ve divided the model into 2 parts: the merry_go_round_move and the merry_go_round_stage. All the horses are grouped inside the merry_go_round_move group, and are named GRP_Horse1 to GRP_Horse12.
Step 3
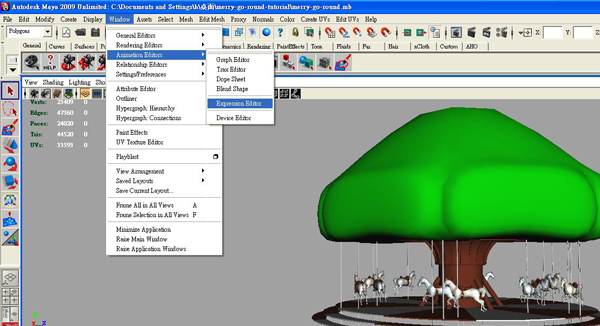
Now we understand the model, lets start writing our expressions. Start by going to Window > Animation Editors > Expression Editor.
Step 4
The Expression Editor is divided into the selection section and the expression section. After finished typing anything in the expression section, we name the expression in the Expression Name field, and then click the “create” button to save the expression. It will then appear in the selection section ready to be used, recalled or edited.
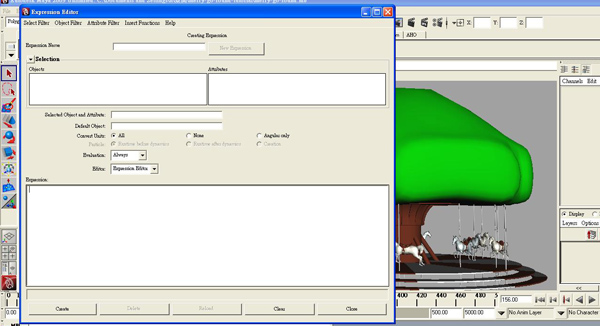
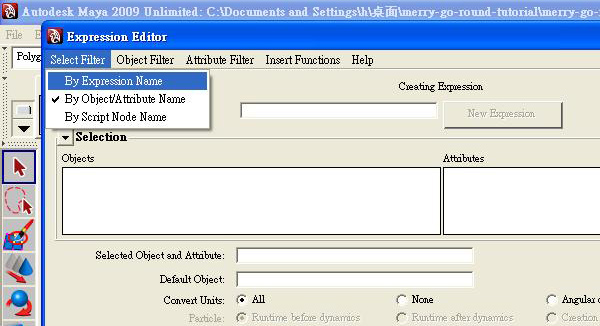
NOTE : If you can’t see the expressions you create, go to Select Filter>By Expression Name. This will show all of the expressions you have previously created, ordered by their name (which is why naming our expressions is so very important!)
Step 5
First of all, we need to rotate the merry_go_round_move group. Type the following into the expression section :
merry_go_round_move.rotateY = merry_go_round_move.rotateY-1;
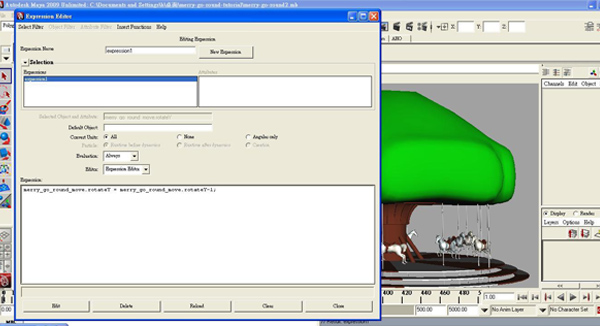
Now give your expression a name, and hit Create to save it. So what is this code doing? Well on every single frame of our animation, this expression will look at the merry_go_round_move group’s current Y rotation, subtract one from it, and make that the new rotation Y value. It’s clear to see that as this repeats on every frame as we play through our animation, the group will slowly but surely rotate in the -Y direction, at a speed of 1 degree every frame. Which is not quite fast enough!
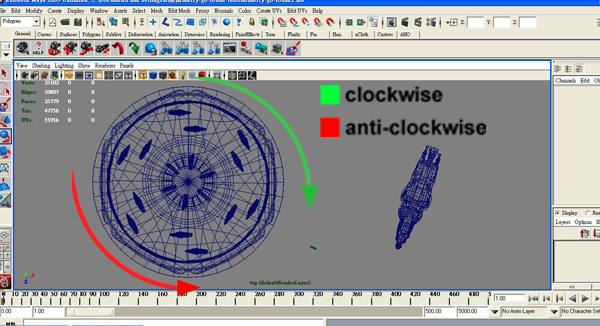
NOTE : This model is designed to rotate clockwise, which is why we’re subtracting 1 degree from the Y rotation value on each frame. If we added 1 degree on each frame instead, the group would rotate in the opposite direction!
Step 6
In order to give us more control over the rotation speed, we’re going to add a new attribute to the group. To do this, first select the merry_go_round_move group, and then in the channel box click Edit > Add Attribute.
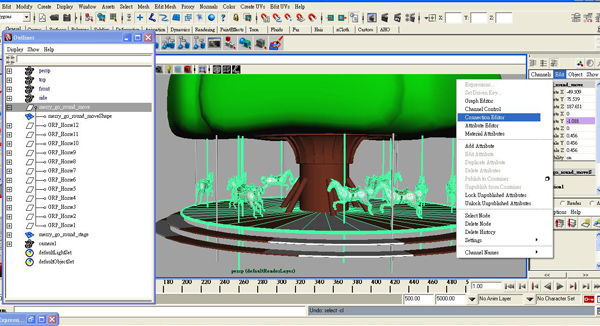
In the Add Attribute dialog box, add in the settings shown in the image below :
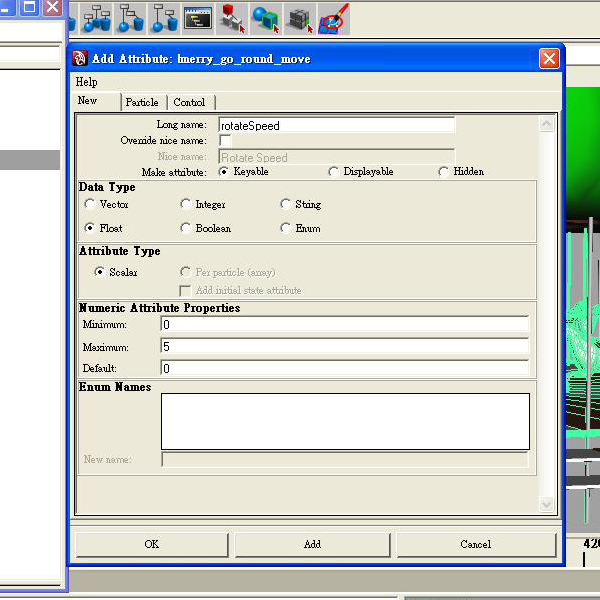
- Long name : This is the name of our new attribute.
- Data Type : Setting the data type to floats allows us to use numbers with decimal places (e.g., 1.7) for the rotateSpeed value.
- Minimum : This is the smallest value we’ll allow for our rotateSpeed.
- Maximum : This is the largest value we’ll allow.
- Default : Finally, this is the default value of the attribute.
Step 7
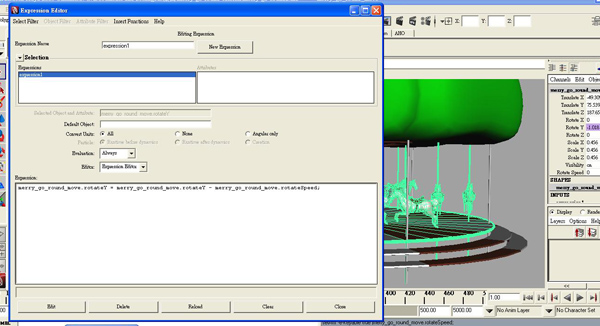
If you click OK you’ll see that our new attribute is in place at the bottom of the channels box. However, right now it’s not connected to anything and therefore doesn’t have any effect on the speed of our rotation. To connect it up, we need to go back to the expression editor and edit our expression. So open the expression editor, choose your expression from the selection section, and change it to :
merry_go_round_move.rotateY = merry_go_round_move.rotateY -merry_go_round_move.rotateSpeed;
Now make sure to click the new Edit button that has replaced the Create button at the bottom of the window. This saves any changes you’ve made to your expression.
As you can see we’ve replaced the -1 value with a link to our new merry_go_round_move.rotateSpeed attribute, but what does this do? Our newly altered expression will now subtract whatever value we put in the rotateSpeed channel from our group’s Y rotation value, on each frame.
For example, imagine our rotateSpeed value is 1. On each frame, our group’s Y rotation value will decrease by the same value – 1 degree. If we were to increase our rotateSpeed value to 10, the rotation value will decrease by 10 degrees on each frame – in other words it’ll rotate 10 times faster! We could also stop it rotating entirely by setting the merry_go_round_move.rotateSpeed to 0.
Step 8
Whilst changing values in the Channel Box is relatively easy, it might be fun for us to put together a very basic GUI from which we can control the Merry-Go-Round. Whilst this isn’t a comprehensive Maya UI tutorial, this should give you enough info for you to start experimenting a little!
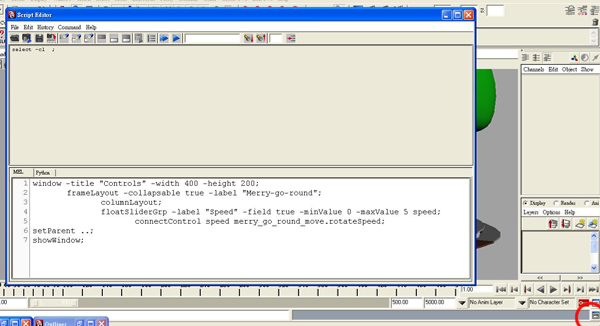
We’re going to make a single window, containing one slider which will control our rotateSpeed attribute. So start by opening the Script Editor by going to Window > General Editors > Script Editor, or by clicking on the Script Editor button in the bottom right of your Maya window. Once opened, type the following into the input box :
window -title "Controls" -width 400 -height 200;
	frameLayout -collapsable true -label "Merry-go-round";
		columnLayout;
		floatSliderGrp -label "Speed" -field true -minValue 0 -maxValue 5 speed;
			connectControl speed merry_go_round_move.rotateSpeed;
setParent ..;
showWindow;
Ok, let’s take a look at that line by line. This first section creates a new UI window 400x200px in size, and sets the title bar to display the text Controls. It won’t appear just yet however, as we have to specifically tell it to show later on in the code.
window -title "Controls" -width 400 -height 200;
This section of code adds something called a layout inside of our window. Essentially a layout is required in order for you to add sliders and buttons into your GUI, and this one, being a Frame layout, will add a frame around everything that we add inside of it. You’ll notice that we’ve also added a label called Merry-go-round, and set the frame to be collapsable, meaning we can fold up our sliders for neatness if our GUI becomes more complicated further down the line.
frameLayout -collapsable true -label "Merry-go-round";
This line adds another layout inside our frame layout. Why? A column layout is very useful for quickly and easily adding controls one above the another into your UI, and it’s often used for easy UI creation! If we didn’t add it in, we’d have to manually position each control, which would take a lot longer!
columnLayout;
This line is where we add in our first control! It’s a floatSliderGrp which is a combination of a slider and an input box, both of which update the connected value. We’ve labelled it Speed, set the minValue of the slider to 0 and the maxValue of the slider to 5. Very importantly, we’ve named the control speed. This is how we’ll access the slider through MEL – if it didn’t have a name, it would be extremely difficult to track down and utilise in our code!
floatSliderGrp -label "Speed" -field true -minValue 0 -maxValue 5 speed;
This is where we connect our brand new slider up to the rotateSpeed attribute we created earlier. It’s a very simple process, and is covered in a lot of detail in the help. Essentially we’re saying to use our speed slider control, to set the value of the rotateSpeed attribute (which in turn controls the rotation speed of our merry-go-round. Simple!)
connectControl speed merry_go_round_move.rotateSpeed;
Finally, we use the SetParent.. command, which, due to the two dots, jumps us from working with the ColumnLayout, up to the FrameLayout, and then to the Window itself, after which we show the window!
setParent ..;
showWindow;
With that done, select all of the code and hit Ctrl+Enter to run it. A window named “Controls” should pop up containing a single slider. If you now hit play, you can move the slider to interactively change the speed of rotation! Awesome!
Step 9
So that’s the main body rotating, now let’s move onto the horses. They’ll be moving up and down, so we’re going to have to write an expression to alter their translate Y value.
Step 10
So open the Expression Editor back up, and let’s create a new expression. Write the following into the text field :
GRP_Horse1.translateY = sin(time);
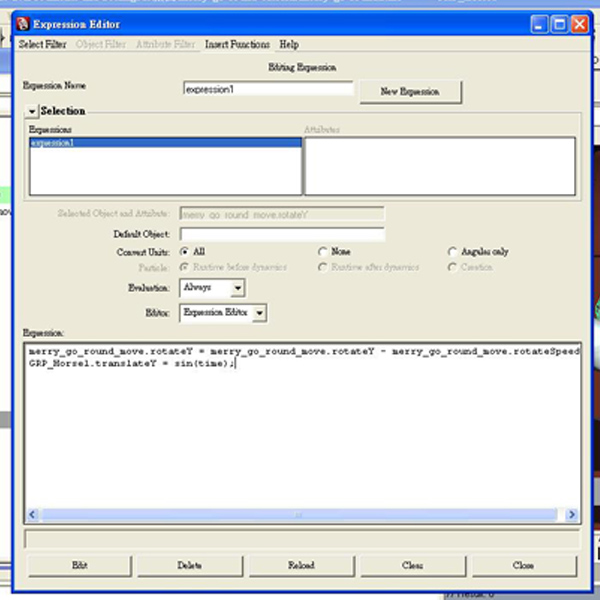
Sin is one of Maya’s built-in mathematical functions, and when it comes to oscillating motion, it’s a very useful one! A sine curve (as shown in red at the top of this page, ) is a smooth curve that goes up and down over time. With a little editing, we can use this smooth up and down movement to drive the movement of our horse.
With the above code entered, click Create to activate it. If you play back now, the horse will move up and down but not how we want. We need to add in some custom attributes!
Step 11
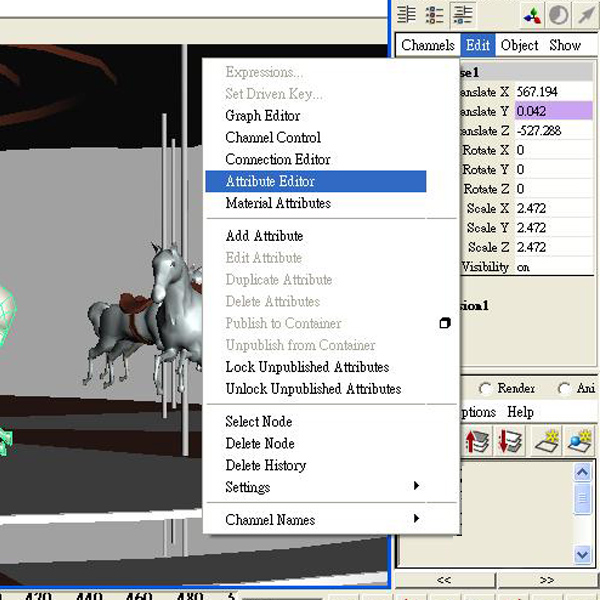
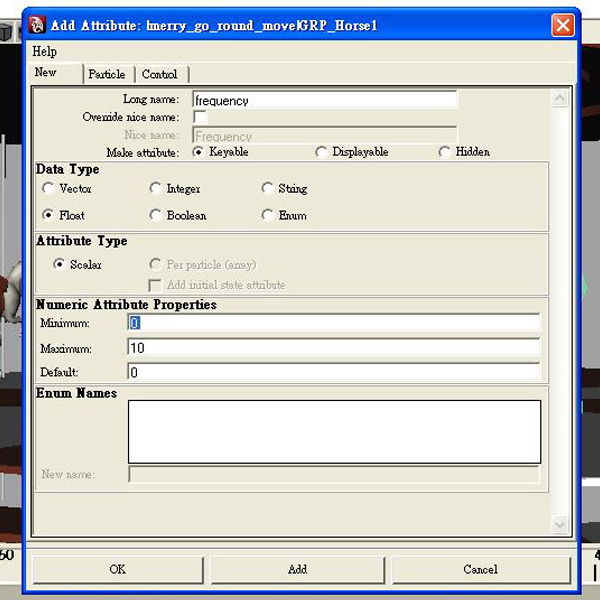
We’re going to add an attribute to the very first horse grp, to change the frequency of it’s up and down motion. You could add this attribute to any object in the scene, or even a locator if you’d prefer, but remember that you’d have to update the expressions below so that they contained the correct path to the attribute, otherwise they won’t have any affect!
Select GRP_Horse1, and in the channel box click Edit > Add Attribute. Give it the settings shown in the below image :
Step 12
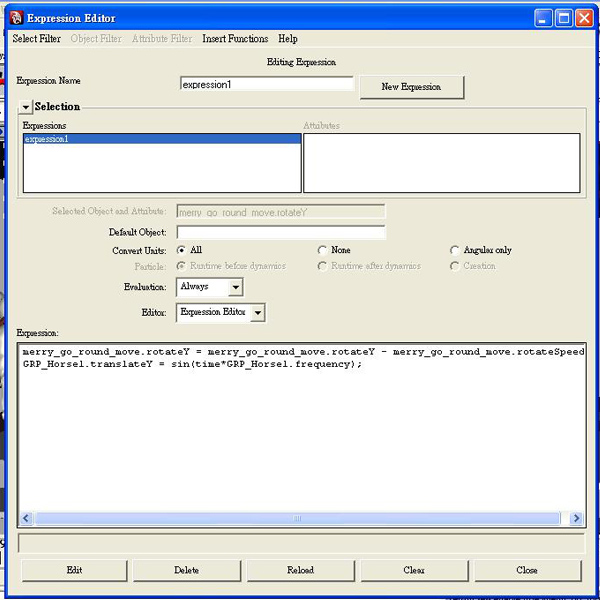
With our new attribute created, we need to go back to the expression editor to alter the Sin expression. Edit the expression so it matches the code below :
GRP_Horse1.translateY = sin(time*GRP_Horse1.frequency);
As you can see, we’re multiplying the time value by our new frequency attribute, which has the affect of speeding up or slowing down the speed of the oscillating motion. Pretty cool.
Step 13
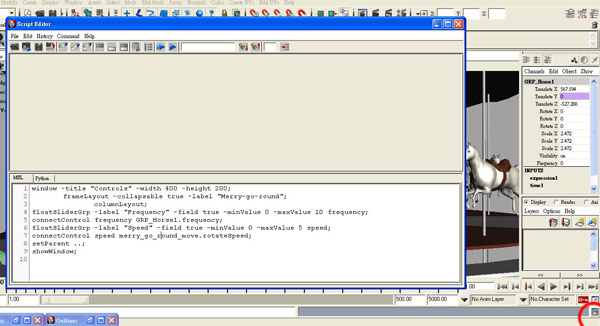
With our second attribute in place, we’re going to need another slider in our UI! Open the script editor back up and edit the mel script as shown below :
window -title "Controls" -width 400 -height 200;
	frameLayout -collapsable true -label "Merry-go-round";
		columnLayout;
floatSliderGrp -label "Frequency" -field true -minValue 0 -maxValue 10 frequency;
connectControl frequency GRP_Horse1.frequency;
floatSliderGrp -label "Speed" -field true -minValue 0 -maxValue 5 speed;
connectControl speed merry_go_round_move.rotateSpeed;
setParent ..;
showWindow;
As you can see we have two new lines. The first creates a new slider called frequency, and the second connects this frequency slider to our new frequency attribute. Both lines use the same commands as the Speed slider. If you now hit play, you can interactively alter the speed of the Horse’s up and down motion. We’re getting there!
Step 14
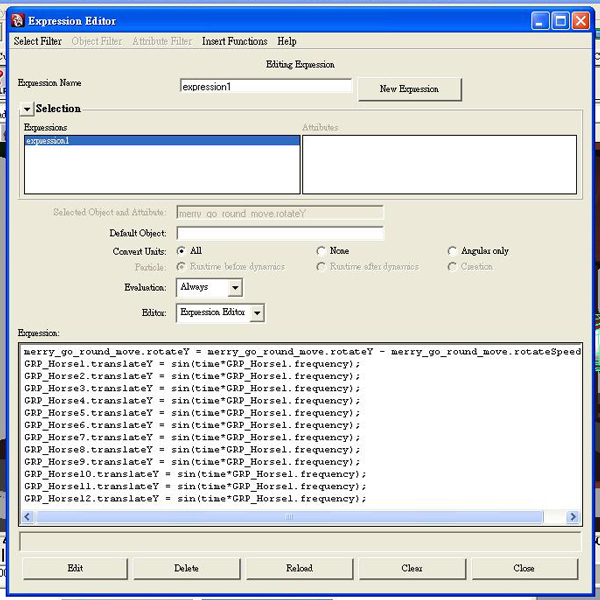
Time to make the other horses move as well! Make 11 more copies of the previous Sin expression, remembering to update the name of the HorseGrps as shown below. As we want to control the speed of all of the horses from the single frequency attribute, the last part of each expression remains the same. Remember to hit Edit when you’re done, and then hit play and move the slider to see the result!
Step 15
Brilliant! Except the horses are all moving up and down together which isn’t very realistic. We need to offset the time value for some of the horses, so that they reach the top of their jump at different times. Lets see what it looks like :
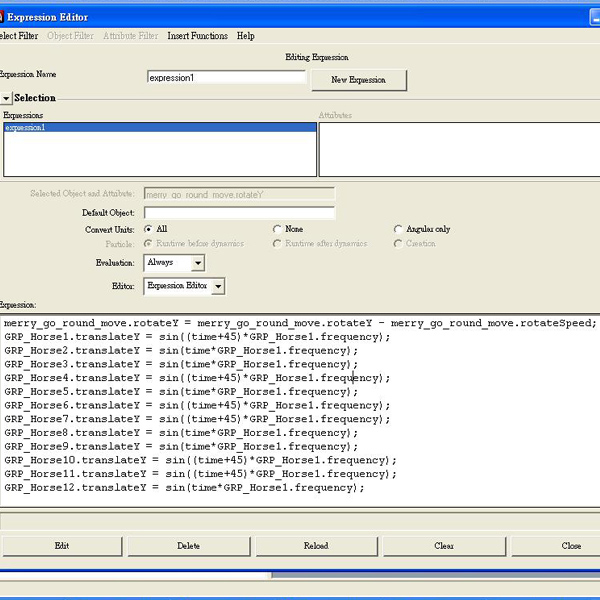
As you can see I’ve added 45 to some of the horse’s Time values. This can be a random value, however I’ve used 45 as it offsets those horses’ movement by exactly half – they’ll be at the bottom of their jump whilst the rest are at the top! An example for one of the horses is given below :
GRP_Horse2.translateY = sin((time+45)*GRP_Horse1.frequency);
NOTE : Be careful that you add the extra brackets in!
Step 16
Finally, open the script editor back up, select all of the code, and middlemouse-drag it to an empty spot on your shelf! This saves the script as a shelf button, allowing you to open the window easy without re-writing all of the code. Now click the button, hit play and see the results of your expressions-work.

And that’s it! I hope you liked this tutorial. If you have any questions, let me know and I’ll try to get back to you. Thanks!
Don’t miss more CG tutorials and guides, published daily – subscribe to Cgtuts+ by RSS.