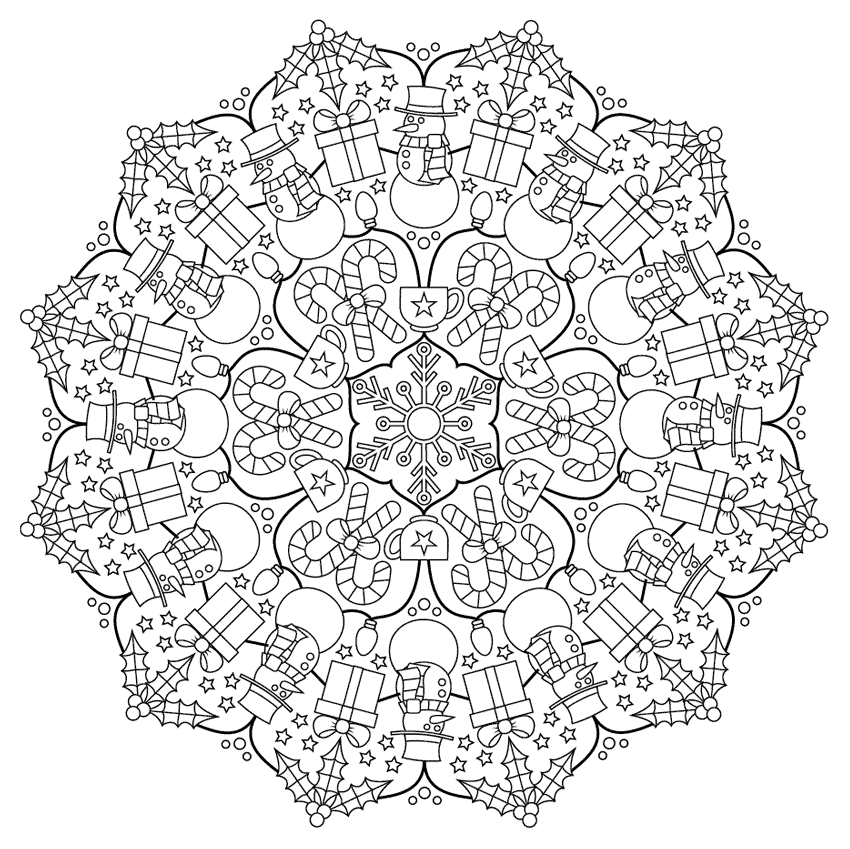
Adult coloring books are everywhere these days, but wouldn’t it be nice to be able to stay warm indoors and create your own?
In this tutorial, I will show you just how fun and easy it is to create a festive mandala coloring page in Adobe Illustrator. We will be using symbols, simple shapes, and a variety of tools and effects to create our coloring page.
You can also browse GraphicRiver to find coloring book pages, mandalas, or even winter icons to use in your design.
Let’s get started.
1. Set Up the Document and Create the Guidelines
Step 1
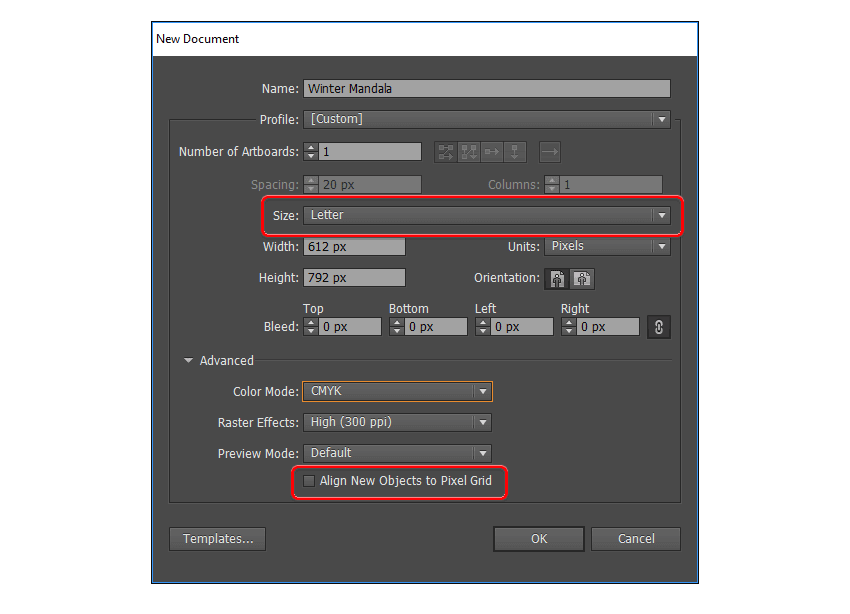
Open Adobe Illustrator and create a new Letter sized document. Make sure Align New Objects to Pixel Grid is not checked.

Go to Edit > Preferences > General, and make sure Scale Strokes and Effects is not checked. Turn on Smart Guides by going to View > Smart Guides (Control-U).

Step 2
Using the Line Segment Tool (/), find the center of the page with the Smart Guide, hold down Shift, and pull a line straight down the center of the page. With the line segment still selected, double-click on the Rotate Tool (R) to bring up the dialogue box. Type 15 degrees into the Angle field and click Copy.

Press Control-D (this shortcut repeats the last transformation you made) 11 times to fill in the full circle.

Step 3
Select the lines as shown in the image below, and Copy (Edit > Copy (Control-C)) and Paste (Edit > Paste in Place (Shift-Control-V)) them onto a new layer. Lock and hide this layer for now.

Step 4
Select all the line segments on Layer 1, and go to View > Guides > Make Guides (Control-5) to convert the line segments to guidelines. Rename this layer Guides and lock it.
2. Create the Symbols and Move Them Into Place
Step 1
Unlock and unhide Layer 2. With the Ellipse Tool (L), click on the point where all the guidelines meet in the middle of the page and hold down Shift and Alt to a circle that fills the page. Open the Pathfinder panel (Windows > Pathfinder), select everything on the layer and click Divide on the Pathfinder panel.

In the group that was created, find the two triangles in the same position as the ones in the image below and pull them out of the group layer stack. Delete the remaining shapes.

Step 2
Select the triangle on the right side (the one on the center guideline) and Copy (Control-C) and Paste in Place (Shift-Control-V) on a new layer. Rename the layer with two triangles Double Slice and the layer with one triangle Single Slice.
Open the Symbols panel (Windows > Symbol) and with both of the triangles on the Double Slice layer selected, click New Symbol. Name the symbol Double Slice and click OK. Do the same with the triangle on the Single Slice layer, but this time name it Single Slice.

Step 3
With both of the symbols selected (select everything on the Double Slice and Single Slice layers), double click on the Rotate Tool (R) to bring up the dialogue box. Change the angle to 180 degrees and click Copy.
With the two symbols still selected, use the guidelines to move them into place below the original symbols (as shown in the image below). You’ll want to zoom in so you can line them up perfectly on the guidelines.

Step 4
Lock and hide the Double Slice layer. Select everything on the Single Slice layer, and double-click on the Rotate Tool (R) to open the dialogue box. This time enter an angle of 30 degrees and click Copy. Press Control-D four times to fill in the rest of the circle. Lock and hide this layer.

Unlock and unhide the Double Slice layer. Select both symbols and double click the Rotate Tool (R). Enter an angle of 60 degrees and click Copy. Press Control-D once to fill in the rest of the circle.
3. Create the Snowflake Center Piece
I will be using a Black 1 px stroke throughout the whole tutorial unless otherwise stated. All shapes have a White Fill.
We will be creating all of the elements of our mandala inside the Symbol Editor panel. To enter the Symbol Editor panel double-click on a portion of the symbol on the Artboard, not the Symbol Panel. Always click on the same piece of the symbol (I’m working on the top center symbol throughout the tutorial). Clicking on any other instance of the symbol will rotate it into the original symbol’s position, making it harder to work on. To exit the Symbol Editor panel, click on the arrow on the top left-hand side of the document.
Step 1
Double-click on the top middle triangle on the Double Slice layer. From inside the Symbol Editor panel, delete the triangle shape as we no longer need it.
To create the snowflake, use the Rectangle Tool (M) to make a 3 x 50 px rectangle, and line it up on the center guideline. Use the Ellipse Tool (L) to create a 10 x 10 px circle, and line it up on the center guideline on top of the rectangle, overlapping it slightly. With the circle still selected, go up to Object > Path > Offset Path, and enter an Offset of -3 px to create a smaller circle inside the previously created circle.

Step 2
Select everything and create a copy (Edit > Copy (Control-C), Edit > Paste (Control-V)). Select the copy of the rectangle and change the height to 25 px. Nudge it into place under the circle so there is a slight overlap between the two shapes.

Step 3
Select the larger circle and the rectangle you just created and click Unite on the Pathfinder panel. Select this new shape and the smaller circle and click Minus Front on the Pathfinder panel. With this new shape still selected, use the Rotate Tool (R) to rotate it 30 degrees. Move it into place on the guideline as shown in the image below.

Step 4
Use the Rectangle Tool (M) to create a 3 x 16 px rectangle and a 3 x 12 px rectangle. Rotate both of them 40 degrees using the Rotate Tool (R) and move them into place as shown in the image below. Select both new rectangles and double click on the Reflect Tool (O) to open the dialogue box. Select Axis > Vertical and click Copy. Use the Right Arrow key to nudge the reflected copy into place on the other side of the long rectangle.

Step 5
Select all the rectangle shapes and the large circle and unite them by clicking Unite on the Pathfinder panel. Next, select the smaller inner circle and the shape you just made and click Subtract from Front. Your image should now look like the image below.

Step 6
Using the Ellipse Tool (L), create a 30 x 30 px circle, and line it up so the center of the circle is exactly where all your guidelines meet in the middle of the page. Create a smaller circle inside this one by going to Object > Path > Offset Path and entering -3 px into the Offset field. Select the larger circle and both pieces of snowflake, and click Unite on the Pathfinder panel.

Step 7
With the new compound shape still selected, use the Scissors Tool (C) to delete the parts of the circles that are outside the boundary of the Double Slice symbol, by clicking on the path where it crosses the guideline (refer to the image below). Give this shape a Fill of None. Do the same to the smaller inner circle.

Step 8
Select all of these shapes and group them by going to Object > Group (Control-G). Exit Symbol Editing Mode by clicking the arrow at the top of the panel. As you can see, by setting up and rotating our Symbols in Step 2, we ensure that Illustrator automatically fills in the whole mandala for us.

4. How to Create the Mug of Hot Chocolate
Step 1
Go back into the Symbol Editing panel by double clicking on the section of snowflake you were just working on.
To make the main part of the mug, use the Ellipse Tool (L) to create a 35 x 35 px circle, and line it up on the center guideline. With the Direct Selection Tool (A), move the bottom anchor point up 2 px by pushing the Up Arrow on your keyboard twice.
While holding down Alt, use the Eraser Tool (Shift-E) to erase the top portion of the circle, just above the anchor points.
With the Direct Selection Tool (A), select the top anchor point on either side of the half circle, hold down Shift and push the Up Arrow key once to move them up 10 px.

Step 2
To make the base of the mug, use the Ellipse Tool (L) to create a 20 x 7 px ellipse. Move it behind the half circle by going to Object > Arrange > Send backwards (Control-[), and nudge it into place behind the half circle.

Step 3
Create the handle of the mug by making a 16 x 24 px ellipse using the Ellipse Tool (L). Create another smaller ellipse inside by going to Object > Path > Offset Path and entering -4 px into the Offset Field. Select both ellipses, rotate them -30 degrees, and send them to the back (Object > Arrange > Send backwards (Control-[ )). Move the ellipses into place, as shown in the image below.

Step 4
Finish off the mug by adding a decorative star using the Star Tool. Then Group (Object > Group (Control-G)) all of the pieces.
To view your mandala, exit the Symbol Editing Mode. It should now look like the image below.

5. How to Create the Candy Canes
Step 1
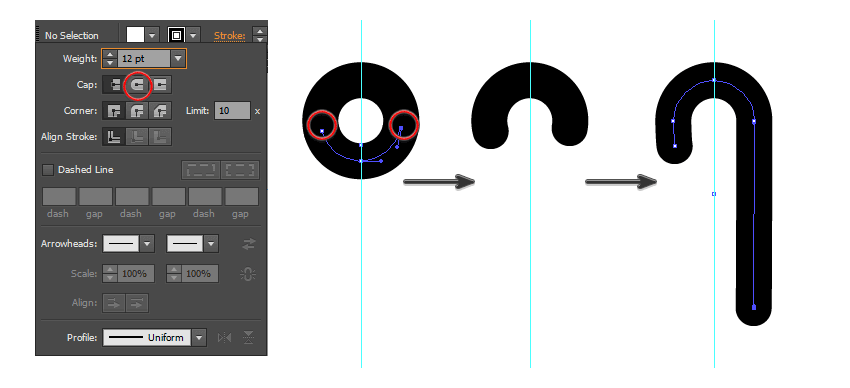
To make the candy cane, use the Ellipse Tool (L) to create a 27 x 27 px circle. Open the Stroke panel and change the Stroke Weight to 12 px and the Cap to Round Cap.
With the circle still selected, use the Scissors Tool (C) to remove the bottom portion of the circle just below the anchor points, as shown in the image below.
With the Direct Selection Tool (A), nudge the bottom anchor point on the left side of the half circle down 5 px by pressing the Down Arrow key five times. Do the same on the right side, but this time nudge the anchor point down 60 px by holding down Shift while pushing the Down Arrow Key six times.
Create a copy of the candy cane shape (Edit > Copy (Control-C), Edit > Paste in Place (Shift-Control-V)). Hide and lock this copy for now.

Step 2
With the original candy cane shape selected, go to Object > Expand. Change the Fill Color to White and the Stroke Color to Black.
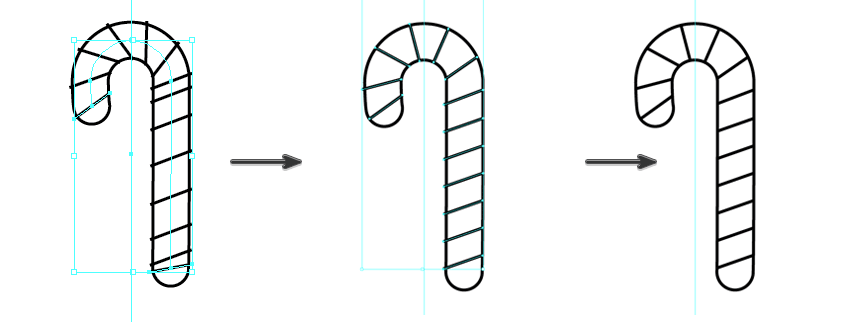
Use the Pen Tool (P) to create a line on a slight angle across the candy cane. With the line still selected, hold down Alt and pull up with your mouse to create a copy of the line. With both lines selected, go to Object > Blend > Blend Options and enter the information shown in the image below.
With both lines still selected, go to Object > Blend > Make (Alt-Control-B).

Unlock and unhide the copy of the candy cane you made in Step 1. Select the Blend (the group of stripes) and the copy of the candy cane path and go to Object > Blend > Replace Spline.
Go to Object > Blend > Expand to make the lines editable. Move the stripes and anchor points around with the Direct Selection Tool (A) to make them even. You may have to delete some of the stripes.
Use a clipping mask to hide the ends of the stripes that are now outside the boundary of the candy cane shape. To do this, create a copy of the base candy cane shape (Control-C, Shift-Control-V) and move it to the front (Shift-Control-]). Select this copy and all of the stripes, and go to Object > Clipping Mask > Make (Control-7).

Then Group (Control-G) all the pieces of the candy cane.
Step 3
Select the candy cane and use the Rotate Tool (R) to rotate it 20 degrees. With the candy cane still selected, use the Reflect Tool (O) to reflect it Vertically and create a Copy. Move the new candy cane 20 px to the right using the Right Arrow key.

Select both candy canes, rotate them 30 degrees using the Rotate Tool (R), and move them into place on the guideline, as shown in the image below.

6. How to Create the Snowman
Step 1
Unlock and unhide the Single Slice layer. Double click on the top-middle triangle to enter the Symbol Editing Mode, and delete the triangle we created earlier.
To make the snowman’s body, use the Ellipse Tool (L) to create a 50 x 50 px circle, a 40 x 40 px circle, and a 30 x 30 px circle, and line them up as shown in the image below.
On each circle, nudge the bottom anchor point up 2 px using the Up Arrow key. This just gives the snowmen a more organic shape.

Step 2
To create the brim of the hat, use the Rectangle Tool (M) to create a 45 x 2 px rectangle. With the rectangle still selected, go to Effect > Warp > Arc, choose Horizontal, and enter -12% into the Bend field.

To create the rest of the hat, use the Rectangle Tool (M) to make a 28 x 17 px rectangle. With the rectangle still selected, go to Effect > Warp > Squeeze, choose Horizontal, and type 25% into the Bend field.
Use the Pen Tool (P) to create a hat band. Group all the hat pieces (Control-G), and rotate them 5 degrees.

Step 3
Create the carrot nose using the Rectangle Tool (M) to make a 17 x 4 px rectangle. Delete the top anchor on the left side to create a triangle.
Select both anchor points on the right side of the triangle and convert them to smooth.

Step 4
To create the scarf, use the Rectangle Tool (M) to make a 34 x 7 px rectangle. With the triangle still selected, go to Effect > Warp > Arc, choose Horizontal, and enter -15% into the Bend Field. Expand the path by going to Object > Expand Appearance.
Use the Direct Selection Tool (A) to nudge the anchor points around until the scarf fits your snowman.

To make the scarf tails, use the Rectangle Tool (M) to make a 15 x 30 px rectangle. Nudge the top anchor points on either side 4 px toward the center. With the triangle still selected, go to Effect > Warp > Flag, choose Vertical, and enter -25% into the Bend field.

Use the Pen Tool (P) to add some stripes and group that piece of the scarf (Control-G). Use the Rotate Tool (R) to rotate it -10 degrees, and then reflect it Vertically, and create a copy. Nudge the scarf tails into place.
Create a knot by using the Rounded Rectangle Tool to make a 10 x 10 px shape with 2 px corners. Finish the scarf by adding some stripes with the Pen Tool (P).

Step 5
Finish off the snowman by adding two 4 x 4 px circles for eyes and two 5 x 5 px circles for buttons. Create straight stick arms with the Pen Tool (P), and give these paths a Stroke Weight of 2 px.

Group (Control-G) all the snowman pieces, and place him above the mug of hot chocolate, making sure to leave enough room for the candy canes.

7. How to Create the Present
Step 1
Still in the Single Slice Symbol Editor panel, create the present by using the Rectangle Tool (M) to make a 40 x 30 px rectangle. Create another rectangle for the lid, make this one 45 x 10 px. Create two more rectangles for the ribbon: one that’s 8 x 10 px for the lid, and one that’s 7 x 30 px for the box. Place the rectangles as shown in the first image below, and line them up using the Horizontally Align Center Tool.
Step 2
Make the bow by first creating a 12 x 12 px circle with the Ellipse Tool (L). Nudge the top anchor point down 1 px, the left anchor point right 1 px, the right anchor point left 1 px, and the bottom anchor point up 1 px.

With the Ellipse Tool (L) make a 20 x 15 px ellipse. With the ellipse still selected, go to Effect > Warp > Fish and enter a Horizontal Distortion of -40%. Then go to Object > Expand Appearance. Rotate the shape -25 degrees. Move the bow into place and Send Backwards (Control-[ ) so it’s behind the knot.

Use the Pen Tool (P) to create depth and to add two small wrinkles in the ribbon. Change the stroke on the wrinkles to Width Profile 4 from the Variable Width Profile drop-down menu.
Select all the pieces that make up the left-side of the bow, and use the Reflect Tool (O) to create a copy that is reflected Vertically, and nudge it into place on the other side of the knot. Send Backwards (Control-[ ) so it’s behind the knot.

Step 3
Group (Control-G) all the pieces of the bow and make a copy. Hide and lock this copy of the bow for now.
Step 4
Select all the present shapes (but not the copy of the bow you made in Step 3) and Group (Control-G) them. With the Rotate Tool (R), rotate it 15 degrees and move it into place on the guideline as shown in the image below. You may have to adjust your snowman’s arms so they line up with the edge of the present.

Step 5
Take the copy of the bow you made in Step 3 and Reflect (O) it Horizontally. Cut (Edit > Cut (Control-X)) and Paste (Control-V) it onto the Double Slice Layer. Use the Rotate Tool (R) to rotate it 30 degrees and move it into place on the candy canes.

8. How to Create a String of Lights
Step 1
In the Single Slice Symbol Editor, create the light bulb using the Ellipse Tool (L) to make a 15 x 21 px ellipse. With the Direct Selection Tool (A), nudge the left and right side anchor points down 3 px using the Down Arrow key.
To create the base of the light bulb, use the Rounded Rectangle Tool to make two shapes that are 8 x 3 px with a Corner Radius of 2 px and line them up as shown in the image below. Group (Control-G) all the shapes. Rotate the light 15 degrees and place it on the guideline under the present and between the snowmen.

Step 2
In the Double Slice Symbol Editor, use the Pen Tool (P) to create the wires. Start at the top of the mug on one side, and line it up with the edge of the snowman on the other. Use the Reflect Tool (O) to create a copy that’s reflected Vertically and nudge it into place on the other side, as shown in the image below. Change the Stroke Weight to 2 px.

9. How to Create the Holly
Step 1
In the Single Slice Symbol Editor, create one half of the holly leaf with the Pen Tool (P). Use the Reflect Tool (O) to create the other side by creating a Vertically reflected Copy.
Nudge the two sides of the holly leaf together, and Unite them using the Pathfinder panel.
Use the Pen Tool (P) to create veins on the holly leaves, and then Group (Control-G) all the leaf pieces.
Use the Rotate Tool (R) to create two copies of the holly leaf. Rotate one copy 50 degrees, and rotate the other -50 degrees. Move them into place as shown in the image below.

Step 2
Finish the holly by using the Ellipse Tool (L) to create three small 10 x 10 px holly berries.

Step 3
Use the Rotate Tool (R) to rotate the holly 15 degrees and move it into place on the guideline above the present.

10. Add the Finishing Touches
Step 1
In the Single Slice Symbol Editor panel, use the Pen Tool (P) to create a curvy line that goes from the holly leaves to the snowman’s hat (as in the image below). Give it a Stroke of 2 px and reflect (Reflect Tool (O)) a copy Vertically, rotate it 30 degrees and move it into place on the other side. Select both lines and send them to the back (Shift-Control-[) so they are behind the holly.

Step 2
Use the Star Tool to make three small stars to fill in the space around the snowman. Reflect (Reflect (O)) a copy Vertically and move them into place on the other side of the snowman.
Step 3
Use the Ellipse Tool (L) to make three small circles to add a decorative touch above the curvy line you created in Step 1.

Step 4
In the Double Slice Symbol Editor, use the Pen Tool (P) to create a curvy line that goes from the base of one mug to the base of another, as shown in the image below. Give it a Stroke of 2 px.

Step 5
Create three small circles with the Ellipse Tool (L) and move them into place under the snowman in the Double Slice Symbol Editor.
In the Single Slice Symbol Editor, create another small star on either side of the snowman to help fill in the space.

Awesome Work, You’re Done!
Congratulations on finishing your festive mandala coloring page. I’m sure by now you’re an expert at using the rotate and reflect tools, and I hope you will consider using symbols to speed up your workflow in the future.
Please feel free to share your finished project or ask a question in the comments.
Now print out your design, grab a mug of your favorite warm beverage, and get coloring.

{excerpt}
Read More