It’s official—summer has arrived! In many countries around the
world, this time of year is associated with a view of the beach with palm
trees around it. In my country, summer is associated with seasonal
fruits such as peaches.
Today, I would like to invite you to draw a sweet, juicy peach by using basic shapes in Adobe Illustrator. You’ll
probably be surprised, but we will draw this peach using only one
shape—the ellipse! As usual, we will use a rectangle to draw the
background and the Pencil Tool (N) once to add roughness on the seed.
During this tutorial, you will learn how to move certain anchor points and make them sharp, and how to cut shapes using the Minus Front button on the
Pathfinder panel. We will also use some Warp and Pucker & Bloat
effects.
At the end of this tutorial, you will be able to create not just peaches, but also other fruit or maybe even vegetables! Just think of it. Keep thinking and browse Envato Market to get some ideas.
1. Draw the Peach Shape
Step 1
After opening your Adobe Illustrator, create a new document with 850 x 850 px
Width and Height.
Now we will start by drawing the main shape of the
peach. Using the Ellipse Tool (L), draw an ellipse. Delete the stroke
color and set the fill color presented in the image below. Make a copy
of this ellipse in front (Control-C, Control-F) and move it slightly to
the right. Select both ellipses and, using the Unite button on the
Pathfinder panel (Window > Pathfinder), unite two ellipses.
Select
the bottom anchor point using the Direct Selection Tool (A), and move it
down as shown in the image below. Make this anchor point pointy by clicking
on it using the Convert Anchor Point Tool (Shift-C). Voila! We already
have our main shape of the peach.

Step 2
In these next few steps, we will add some volume to our peach.
Let’s create a copy of the peach in front of the original image
(Control-C, Control-F). Now, make a large ellipse that overlaps the
peach shape, as shown in the image below. Select the large ellipse and the copy you just made and press Minus Front on the Pathfinder panel.
With this action, we will create the crescent shape. Make the color of
this shape lighter.

Step 3
Now let’s add a little bit more volume on our peach.
Create a copy of the peach in front again (Control-C, Control-F). Holding the
Alt button, move the top peach shape in an 11 o’clock direction. This
action will create a third copy of the peach. The color of the newly
created front shape plays no role. In the image below, it is presented
without fill just to show you the positioning.
Select the two upper peach
shapes (the diagonally moved one and the second one from the top) and
press the Minus Front button in Pathfinder. This action will create a
cut of the peach on the bottom. Make the color of this part darker
compared to the color of the whole peach.

Step 4
Continuing with the volume effect, let’s add a groove to the peach—the one that’s going down in the middle.
Make
two ellipses of different sizes using the Ellipse Tool (L), filled with a
color similar to the bottom cut of the peach, which we created in the previous
step. Make them overlap as shown in the image below. Notice that the
smaller one is covered by the larger one. Select both objects and
press Minus Front in the Pathfinder panel for the crescent shape. We will
use this crescent shape to show the groove on the peach.

Step 5
Place the crescent shape from the previous step on the peach as in the image below.
Create
another ellipse and place it on your peach.
The color of this ellipse should be lighter (choose on your own) compared to the main peach
color. To finalize the volume effect, add two tiny white ellipses on the top of this ellipse. Now we have a nice plump peach.

Step 6
In this step, we will create a stem for the peach. Draw an ellipse filled with a brown color. Choose
the Direct Selection Tool (A) and select the right and left anchor
points. Slide them up to create a stem similar to the one presented
below.

Place the stem on the top of our peach, but behind it. To place the stem in the back, use the combination: Control-X, Control-B.

Step 7
Let’s create a leaf for our peach. Draw a
light green ellipse. Select the shape you created and, using the Convert
Anchor Point Tool (Shift-C), make the top and bottom anchor points sharp
by clicking on them. After that, add a stem to our leaf. To do so, take
a copy of the stem (Control-C, Control-V) created in the previous step,
but make it longer and narrower. Place the stem on the front of the
leaf, as shown in the image below.

Step 8
Now, let’s warp the leaf to make it more realistic. Select the leaf with the stem and group them: right-click > Group or
(Control-G). Keeping the grouped objects selected, go to Effect >
Warp > Arc. Use the Warp options shown below. Then expand the warped
leaf: Object > Expand Appearance.


Attach the warped leaf to the stem of our peach. Here we go—our juicy and tasty peach is all ready.

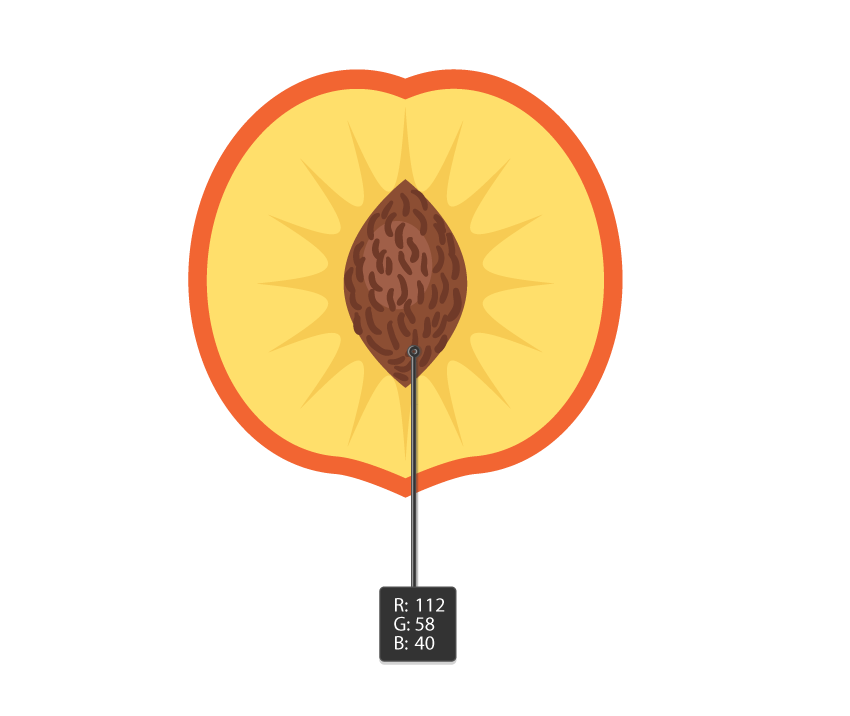
2. Create Half of the Peach
Step 1
To give some contrast, let’s cut our peach in half and see what’s inside.
First, take a copy of the main shape of our peach, which we created in the very
first step of this tutorial. Inside this shape, place a smaller,
yellow copy of the shape. To make it perfectly centered, go to Object
> Path > Offset Path. Set the parameters Offset: -10 px, Joins:
Miter; Miter limit: 4. All these values are approximate and depend on
the size of your original shape. Try to keep the shell thin.

Step 2
Draw an ellipse inside the main shape.
As you can see when it’s selected, there are four anchor points on the ellipse (top, bottom, left and right). We need to add more
anchor points to this ellipse for later modifications.
To add four more
anchor points, go to: Object > Path > Add Anchor Points. You will
find that four anchor points are added symmetrically around the ellipse.
Add four more anchor points by repeating this action to have 16 anchor
points in total. After that, go to Effect > Distort & Transform
> Pucker & Bloat and set the slider to -45%. You can see how a simple ellipse has been transformed into a nice, sun-like shape. Expand this
shape.


Step 3
Let’s make a seed by drawing a brown ellipse, placed inside the sun-like
shape. Select this new ellipse and transform the top and bottom anchor
points by clicking on them using the Convert Anchor Point Tool
(Shift-C). To add a volume effect to the seed, draw a small light
brown ellipse.

Step 4
Let’s add some roughness to the seed. Using the Pencil Tool (N), draw a
bunch of small curves on the seed. Remember to remove the fill color and
choose a dark brown stroke color. Before drawing, check the Round Cap
button on the Stroke panel.

3. Create a Peach Slice
Step 1
In this part of the tutorial, we’ll cut down the peach further, making a peach slice.
First,
take a copy of the half peach without the seed. As you remember, the
half of the peach contains three parts: the outside shape (orange color), the middle
shape (yellow), and the sun-like shape, which is in the front of the image.
Now we will cut these three layers, one by one.
Draw an ellipse (no
fill, any stroke) and place it on top of the half peach image, as
presented below. Since we’ll be using this ellipse to cut three layers, make
two more copies of it by selecting this ellipse and clicking Control-C,
Control-F twice.
Select the ellipse and half peach, and press Minus
Front in Pathfinder. You will cut the very first layer (the orange one). It
will automatically come to the front of the image. Therefore, you need
to send it to the back by pressing Control-X, Control-B.

Step 2
Now select the ellipse again, together with the half peach shape. Press Minus Front in Pathfinder again. You will cut the second layer
(yellow), which will automatically come to the front of the image. Place
it in the back position. In this case you need: right-click >
Arrange > Send Backward (Ctrl-[).

Step 3
And finally, cut the third layer of the half peach by selecting the ellipse
together with the sun-like shape. Press Minus Front in Pathfinder.

Step 4
To make the peach slice a bit more realistic, we will make a tiny cut where the seed was.
This
process will be a simple repetition of the previous steps, where you
cut the half peach by using three ellipses.
First, draw a small
ellipse (no fill, and stroke doesn’t matter) and place it on top of the
half peach image, as presented below. Make two more copies of this
ellipse by selecting this ellipse and clicking Control-C, Control-F
twice.
Now, using the Minus Front button in Pathfinder, cut the three layers
of the peach slice and place them all back in their original
places by using Control-X, Control-B for the orange one and right-click
> Arrange > Send Backward (Ctrl-[) for the yellow shape.

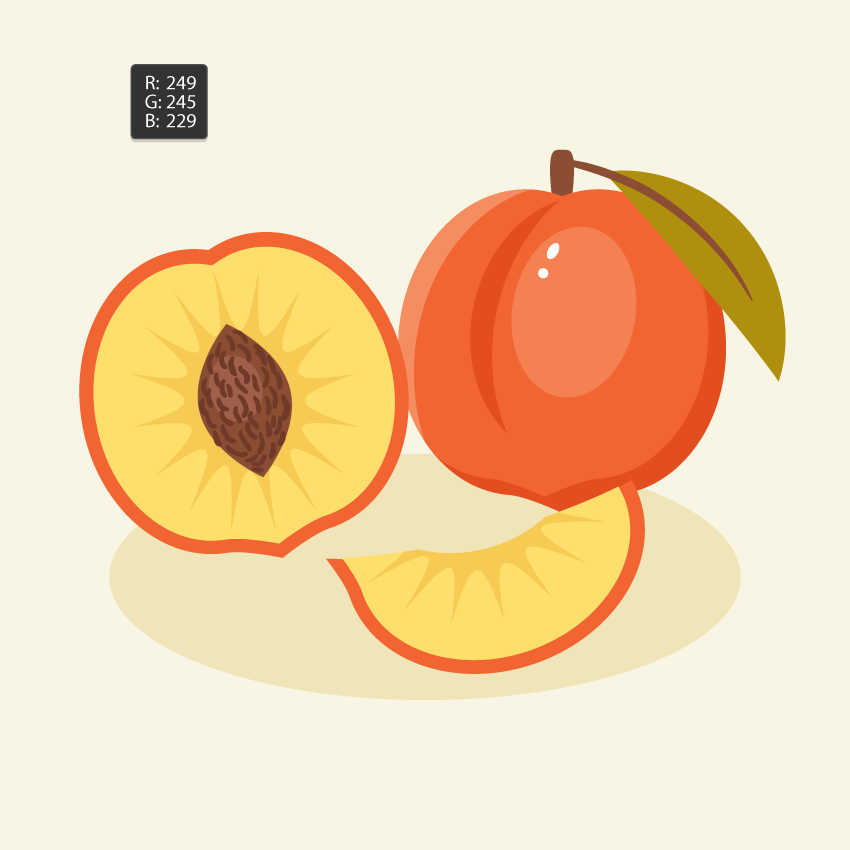
4. Place All the Objects Together and Create the Background
Step 1
Arrange all three objects—the full peach, the half peach, and the peach slice—in any way you like.

Step 2
To enhance the volume of the image, draw a shadow under the peaches. Draw a horizontal ellipse and send it to the
back layer of the image (Control-X, Control-B).

Step 3
We’re almost there—we will now create the background for this image.
Pick
the Rectangle Tool (M) and click on your art board to open the
Rectangle window. Enter 850 in the Width and Height boxes, and click OK. Make sure that the resulting shape stays selected, and send it to back (Control-X, Control-B).

Conclusion
My congratulations to everyone who made it this far! You did an awesome
job, and I’m sure you ended up with a great result.
You learned how to
create various cuts of a peach by using just one shape and manipulating
them. I hope you have learned something new in this tutorial. Oh, and I’m
certain that you can now easily create other fruits such as the apricot,
plum, apple, and pear! Right?

{excerpt}
Read More