
If
you have an interest in architecture, or you just like houses or icons
in general, then this tutorial is for you! You’ll learn how to
create a house mock-up icon in Adobe Illustrator which consists of
three main parts: the blue folder, the architectural plan of the
house, and finally, the house mock-up with the roof under
construction.
If you are interested in other icon designs, Envato Market has a great selection of icons by categories,whether it’s Technology, Development or Business, to help you save your time. Let’s have fun with this one!
Tutorial
Assets
To
complete the tutorial you will need the following assets:
1.
Start a New Project
Launch
Illustrator
and
go to File
> New to
open a blank document. Type a name for your file, set up the
dimensions and then select Pixels
as
Units
and
RGB
as
Color
Mode.
Make sure that Align
New Objects to Pixel Grid is
not checked.
Next,
go to Edit
> Preferences > General and
set the Keyboard
Increment to
1
px and
while there, go to Units
to
make sure they are set as in the following image. I usually work with
these settings and they will help you throughout the drawing process.

2.
Create the Blue Folder
Step
1
Use
the Rectangle Tool (M) to draw a 1200 x 830 px rectangle and then use
the linear gradient shown to fill this shape.

Step
2
Take
the Add Anchor Point Tool (+) and add two extra points as indicated.
Next, use the Direct Selection Tool (A) to select the two points from
the bottom right side and go to Object > Transform > Move. Type
70 px in the Vertical field and hit OK.

Step
3
Use
the Direct Selection Tool (A) to select the two corner points and go
to File > Scripts > Round Any Corner. Run the script using a
Radius of 35 and you will get the rounded corners.

Step
4
With the folder-shape selected, go to the Appearance panel and add a New
Fill above the first. Use the color indicated and then go to Effect >
Texture> Grain. Apply the settings shown and then set this fill to
Blending Mode Overlay and 66% Opacity.

3.
Create the Sheets of Paper
Step
1
Create
a new rectangle in the center and fill it with the linear gradient
shown (the colors are grayscale).

Step
2
Let’s
create the shadow. Copy and Paste in Back (Control-B) the first sheet
of paper; then using the Direct Selection Tool (A) move the corner
points in the direction of the arrows to obtain a bigger shape (1).
For visual purposes, I’ve changed the fill color of the copy to green
so you can see the difference in size between the two (2) but you
should keep the existing gradient.
Copy
and Paste in Back (Control-B) the first sheet again and set the fill
color to black. Now, select the bigger copy and the black copy and go
to Object > Blend > Blend Options. Choose 15 Specified Steps,
hit OK and then go to Object > Blend > Make (Alt-Control-B)
(3). Set the resulting group to Blending Mode Multiply and 25%
Opacity (4).

Step
3
Use
the Rectangle Tool (M) and the gradient shown to draw the second
sheet of paper. Rotate it as in the following image.

Step
4
Copy
and Paste in Back (Control-B) the second sheet of paper; then use the
Direct Selection Tool (A) to move the corner points outwards in order
to obtain a bigger shape. For visual purposes, the copy is purple but
you should keep the existing gradient (1).
Copy
and Paste in Back (Control-B) the second sheet of paper again and
change the fill color to black. Now, select the bigger copy along
with the black copy and go to Object > Blend > Make
(Alt-Control-B) (2). Set the resulting group to Blending Mode
Multiply and 25% Opacity (3).

4.
Add Details and Shadow to the Blue Folder
Step
1
Grab
the Pen Tool (P) or the Line Segment Tool (\) and draw two straight
paths as shown below. Give them a 2 pt black Stroke. Next, type
“NAME” and “No.” using Myriad Pro, size of 27 pt.

Step
2
To
create the shadow, first Copy and Paste in Back (Control-B) the
folder-shape and then make this copy bigger by moving the anchor
points outwards with the Direct Selection Tool (A). Focus mainly on
the bottom right side (1). Set the fill color for the bigger shape to
white.
Copy
and Paste in Back (Control-B) the folder-shape again and set the fill
color to black. Now, select the bigger copy along with the black copy
and go to Object > Blend > Make (Alt-Control-B) (2). Set the
resulting group to Blending Mode Multiply and 40% Opacity (3).

5.
Create the Architectural House Plan
Step
1
Grab
the Rectangle Tool (M) and draw all the rectangles shown in the next
image.

Step
2
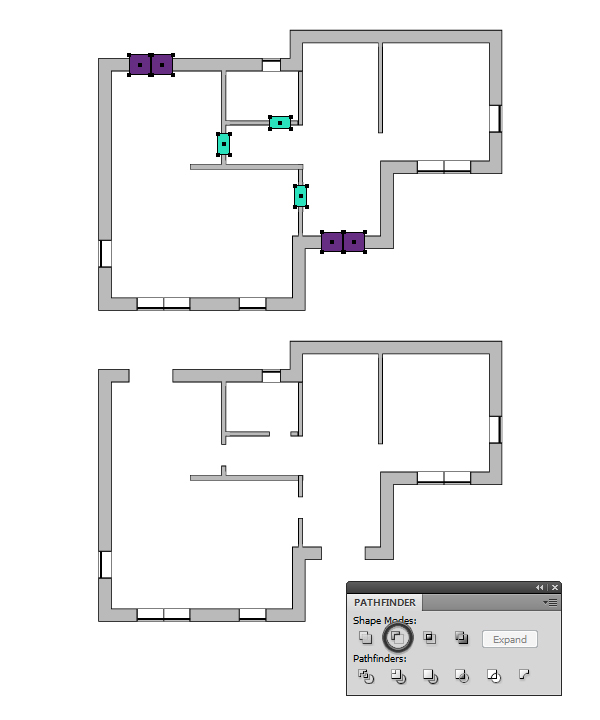
Select
all the rectangles and press Unite in the Pathfinder panel in order
to get a single shape. Set the fill color to gray and the stroke to 1
pt black but check the Align Stroke to Inside option in the Stroke
panel. I will name this shape “exterior edge”.

Step
3
Next,
draw the six rectangles shown below and apply the same appearances.
Group (Control-G) these rectangles and name the group “interior
edge”.
Before
you continue, make a copy of “exterior edge” and a copy of
“interior edge” for later use. Move them out of the way for the
moment or hide them.

Step
4
Draw
a few small 6 x 12 px rectangles filled with the same shade of gray.
Their purpose is to cover the black stroke between the walls in some
areas.

Step
5
It’s
time to create the windows. First decide how many windows you want
and then draw the rectangles over the “exterior edge”. You can
create single windows or double windows. After you are done, Group
(Control-G) all the rectangles.
Select
“exterior edge” along with the group of rectangles and press
Minus Front in the Pathfinder panel. With the resulting group still
selected, go to Object > Compound Path > Make (Control-8).

Step
6
In
the empty areas obtained in the previous step, we need to create the
actual windows. Draw new rectangles with the same thickness as
“exterior edge” and then give them a 0.5 pt Inside Stroke. The
last thing is to draw a very thin black rectangle near the outside
edge of each window.

Step
7
Let’s
create the doors. First decide where you want the doors to be and
then draw the rectangles with the same length. You can create
single doors and double doors.
Group
(Control-G) only the rectangles arranged over the “exterior edge”
(purple ones) and then select this group along with “exterior edge”
and press Minus Front in the Pathfinder panel. Repeat the same thing
with the green rectangles and the “interior edge”.
Step
8
To
create a single door, first zoom on one of the empty areas that you
have obtained in the previous step. Draw a very small square next to
the wall (1); then draw a thin 2 x 30 px rectangle in front of the
square (2). Grab the Pen Tool (P) and draw a curved path between the
rectangle and the opposite wall (3). These three shapes have a 1 pt
black Stroke and you can see the end result below (4).
Group
(Control-G) the three shapes that compose the door; then multiply,
rotate and arrange them to create the other doors. A double door is
composed of a single door, a copy of the single door that has been flipped horizontally and a thin rectangle between them.

Step
9
Use
basic shapes like rectangles and rounded rectangles to create a
dining table and a couch. All these shapes have a 0.5 pt black
Stroke.

Step
10
Follow
the sequence of images and use basic shapes like ellipses and
rectangles to create the elements in the bathroom.

Step
11
Use
rectangles to define the kitchen area; then draw four circles as the
stove top and three rectangles to create the sink. All these shapes
have a 0.5 pt black Stroke.
Arrange
the furniture and the other elements inside the rooms as shown in the
following image.

Step
12
To
create the stairs, draw four straight paths between the walls with
the Pen Tool (P) or the Line Segment Tool (\). Next, draw two black
rectangles and the up and down arrows (triangle + line).

Step
13
Let’s
define the outside area at the entrance. Take the Pen Tool (P) and
draw two paths between the corners of the “exterior edge”. Select
a 1 pt Stroke; then check Dashed Line in the Stroke panel and type 10
pt in the first dash field.

Step
14
Now,
draw a path to define the deck area followed by the oblique lines.
After you are done, Group (Control-G) all these lines.

Step
15
You
are almost done. Grab the Type Tool (T) and type the name of each
room on the plan using Calibri, size of 23 pt. Also type random
numbers as the surface area using Calibri, size of 16 pt.

6. Create the Folded Blueprint
Step
1
First
let’s create the appearance of a folded sheet of paper. Grab the Rectangle
Tool (M) and draw a rectangle with the same length as the second
sheet of paper. Use the black to white linear gradient shown to fill
this shape and then set the Blending Mode to Screen (black becomes
transparent).

Step
2
Select
all the shapes that compose the house plan and Group (Control-G)
them. Go to Object > Expand Appearance and Object > Expand a
few times until your group has no stroke. Now, you can scale the
house plan as much as needed, rotate and arrange it over the second
sheet of paper. Reduce the Opacity to 80%.

Step
3
Draw
another rectangle right above the previous one and use the black to
white linear gradient shown to fill it. Set to Blending Mode Multiply
(white becomes transparent) and 8% Opacity.

Step
4
To
create a paper clip, draw a path like in the next image with the Pen
Tool (P). Use gray as the stroke color and increase the Stroke Weight
to 3 pt. Rotate and arrange the paper clip over the blueprint.

7.
Create the House Mock-Up
Step
1
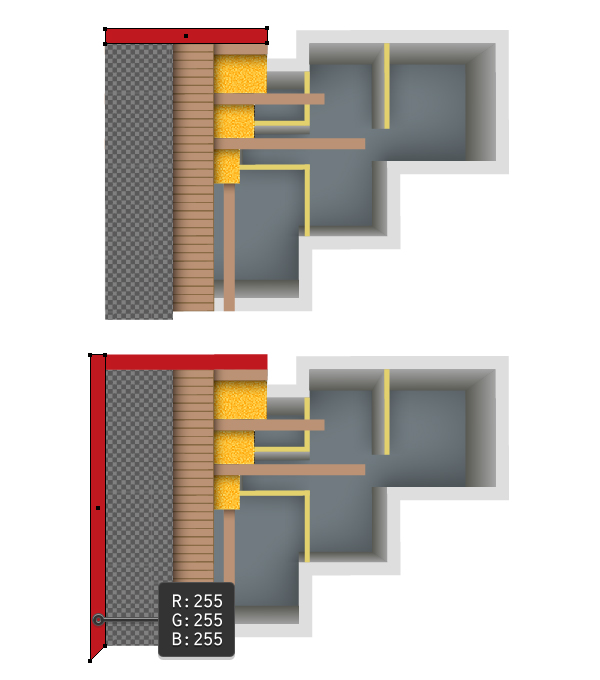
Grab
the copy of “exterior edge” and the copy of “interior edge”
that you made earlier in the tutorial, because we will use those to
create the house mock-up. Remove the existing appearances and use the
colors indicated to fill them.

Step
2
Use
the Pen Tool (P) to draw a new shape as the floor of the house, and
select dark gray as the fill color. While the “floor shape” is
still selected, go to Effect > Stylize > Inner Glow and apply
the settings from the next image in order to add the shadow.

Step
3
Grab
the Pen Tool (P) or the Line Segment Tool (\) and draw the three blue
paths right next to the “exterior edge”. While the blue path from
the left is selected, go to Object > Transform > Move, type 45
px in the Horizontal field and then hit OK. As a result you will get
the orange path from the next image.
Apply
the Move effect again for the blue path at the top, type 30 px in the
Vertical field and hit OK. Do the same thing for the blue path at the
bottom but this time, type -30 px in the Vertical field.

Step
4
Use
the blue and orange paths from the previous step as guide lines to
create the “exterior walls”. Grab the Pen Tool (P) and simply
click on the corner points indicated (1) to draw the first wall on
the left side (2). In the same way, draw the wall at the top and the
one at the bottom (3). You can see the end result in the image below
(4).

Step
5
Draw
two new blue paths right next to the kitchen edge. Move the path at
the top 35 px Vertical and the path from the right -50 px
Horizontal. As a result you will get the orange paths (1). Use these
guide lines to draw the exterior walls of the kitchen as explained in
the previous step (2). Following the same technique, draw the last
two walls at the entrance (3).

Step
6
Now
that all the exterior walls are ready, you can delete the guide
lines. Use the linear gradient shown to fill all of them but adjust
the angle accordingly (0, 90 and -90 degrees).

Step
7
Next,
draw the four walls using the same technique with the guide lines.
Fill them with the gradient shown in the previous step. Group
(Control-G) these walls and name the group “interior walls”; then
send it behind the group “interior edge”.

Step
8
Let’s
add some shadows. Focus on the kitchen and draw a rectangle in the
right side of the wall. Use a black to white linear gradient to fill
it and then set to Blending Mode Multiply and 20% Opacity. As
indicated by the arrow, the shadow is not smooth at the bottom, but we
will fix that with an opacity mask in the next step.

Step
9
Copy
and Paste in Front (Control-F) the last rectangle and then use the
gradient shown to fill this copy. Now, select both rectangles and
from the fly-out menu of the Transparency panel choose Make Opacity
Mask.

Step
10
Focus
on the living area and draw a new rectangle next to the wall. Fill it
with the black to white linear gradient shown and then set it to
Blending Mode Multiply and 20% Opacity (1). As you can see, the shadow
is not smooth on the left side (2), but that can be fixed with an
opacity mask.
Copy
and Paste in Front (Control-F) this rectangle and then use the second
gradient shown to fill the copy (3). Now, select both shapes and from
the fly-out menu of the Transparency panel choose Make Opacity Mask
(4).

Step
11
As
explained above, you can create the shadow for the other interior
walls.

Step
12
Next,
draw a rectangle about the size of the bathroom and select dark gray
as the fill color. Apply the Inner Glow effect using the settings
shown in order to add the shadow.

Step
13
In
the next image you can see the “before shadows” and “after shadows” images:

8.
Create the Roof
Step
1
First
draw a 18 x 446 px rectangle filled with brown (1). Next, draw a 271
x 18 px rectangle above the first one and a 95 x 65 px rectangle in
the bottom right side (2). The following shapes have the dimensions
366 x 18 px and 73 x 57 px (3), respectively 433 x 18 px and 49 x 57
px (4).

Step
2
Select
the three blue rectangles from the previous step and fill them with
yellow. Add a new fill above the first, change the fill color, and
then go to Effect > Sketch > Reticulation. Apply this effect
using the settings shown and set the Blending Mode to Overlay.

Step
3
Let’s
add some shadows as we go along. Draw four new rectangles above the
yellow ones like in the next image (1). Fill all of them with a black
to white linear gradient.
Move these shapes behind the brown
rectangles but in front of the yellow ones, except for the shape at
the bottom which is behind the yellow rectangle but in front of the
first brown rectangle (2). Set the Blending Mode to Multiply and 65%
Opacity (3).

Step
4
Draw
another brown rectangle in the left side and then go to Object >
Path > Split into Grid. Apply the settings shown and hit OK.

Step
5
Group
(Control-G) all the resulting shapes, select brown as the fill
color, and add a 0.75 pt Inside Stroke.

Step
6
To
add the shadow, draw a new rectangle on the right side of this group,
just to cover the yellow rectangles. Send it behind; then fill it
with the gradient shown and set to Blending Mode Multiply and 60%
Opacity.

Step
7
Draw
another rectangle that covers the last portion of the roof (1).
Select gray as the fill color and then add a new fill above. Use a
pattern called Checkers from the Swatch Libraries menu under Patterns
> Decorative > Decorative_Geometric 2.
Next, go to Object >
Transform > Scale, type 50% in the Scale field, uncheck Objects,
check Patterns and only then hit OK (2). Set this pattern fill to
Blending Mode Multiply and 35% Opacity. You can see the final result
in the image below (3).

Step
8
Now,
draw a rectangle with the same height as the group of brown
rectangles and send it behind the pattern-shape. Use the gradient
shown and then set it to Blending Mode Multiply and 60% Opacity like the
rest of the shadows.

Step
9
Next,
draw the two rectangles and fill them with red.
Step
10
Draw another two rectangles behind the red ones and use the same settings to
create the shadows.

Step
11
Let’s
add more shadow. Draw a few smaller shapes where needed, using the
same settings. Don’t forget to send them behind.

9.
Finalize the House Mock-up Icon
Step
1
The
house mock-up is ready at this point, and you can Group (Control-G)
all the shapes that compose it. Rotate and arrange the house as you
like on top of the blueprint.

Step
2
Use
the Direct Selection Tool (A) to select only the “floor shape”
and under the existing appearances, apply the Drop Shadow effect
twice.

Here
are the settings for the two Drop Shadow effects:

Congratulations!
You’re Done
The
house mock-up icon is ready. I hope this tutorial was different
but fun, and that you learned some new techniques. Don’t forget to
share your re-creation with us.

{excerpt}
Read More