Setting up templates for your book projects is a great time saver that allows you to use the same document again and again. This tutorial will walk you through the basics of setting up a book template in InDesign including the cover, spine and inside pages. Once you master the techniques, you should be able to apply them to any size book including eBooks and paperback novels.
After you have the template set up, be sure to check out my complete course on Book Layout in InDesign.
The Outside Book Covers
It’s a good habit to build the outside covers in a separate InDesign file than the inside pages. Not only are the covers printed differently, there is also the matter of creating the spine for the book. You don’t have to build the spine into the inside pages, but you will for the outside covers. This is much easier to do in separate files.
Step 1
First up, you need to determine what size you want the book to be folded. For standard novels, that is 6×9 inches and what we will use throughout this tutorial. Once you know the book size you can determine the size you need for your InDesign document by doubling the width. This accommodates the front and back cover and is the size of the book unfolded.
Step 2
- Next, you need to know your book’s final page count and paper stock. This is super important for calculating the spine’s width. Once you know the page count and paper stock, you can apply a simple formula and figure out the spine width.
Take the number of pages in your book and divide that figure by your text paper’s PPI (Pages Per Inch). Where do you get the PPI? It depends on what kind of paper you’re using and you can get this from your printer.
Let’s say your book has 150 pages and you are printing it on an offset press using a standard 60# paper that has a PPI of 300. Then the width of your book’s spine will be 150 ÷ 300 or half an inch. That’s for a paperback. For a hard cover book, you have to add the thickness of the boards used on for the covers. The best way to get this formatted accurately is to have your printer provide you with a template, but you are now equipped to calculate a basic spine setup.
Step 3
Start by opening any version of InDesign and navigating to File > New > New Document. We are going to create a standard 6×9 inch paperback that has 150 pages. Make sure Intent is set to Print, Number of Pages is set to 1 and Facing Pages is unchecked. Next, set the Width to 12 in and the Height to 9 in. Remember you want to double the width to accommodate both covers on one page.
This set up gets you the front and back cover, but we haven’t figured in the spine width. For that, you’ll need to change the Width to 12.5 in. This uses the half an inch spine width we calculated as an example in Step 2.
Columns and margins can remain the default settings and finally make sure you build in a bleed for your covers of .125 in on all 4 sides. Then press OK to create your new document.
Step 4
Perfect. Now we have our blank outside covers document. Next, let’s draw out some guides for the spine.
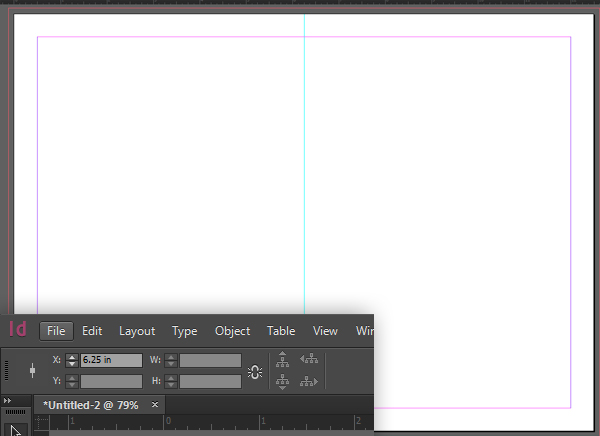
Activate the ruler by pressing CMD+R/CTRL+R. Then on the left side ruler Click and Drag a guide and drop it anywhere on the page. There are several ways to calculate where to place your guides, but the easiest is to work from the center of your document. With the guide selected, go to the top just beneath the menu bar and change X: to 6.25 in. This places a guide in the center of your document. The right side is for the front cover and the left side is for the back cover.

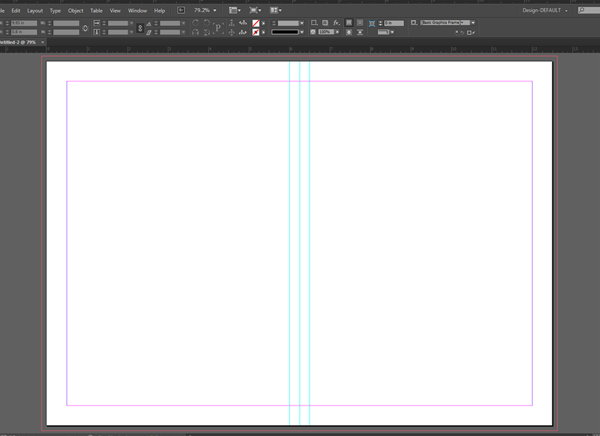
Now draw out 2 more guides and place one on the left and one on the right side of the center guide. Make sure the left guide is selected and change X: to 6 in. This is one quarter of an inch to the left of the center guide. Next, select the right guide and change X: to 6.5 in. This is one quarter of an inch to the right of the center guide. Together, that creates the half an inch spine we calculated. Click and delete the center guide.

Sweet! Your book cover template is ready for designing. Be sure to Save (CTRL+S/CMD+S) your document as 6x9_BookCoverTemplate or something similar so you can use it as a base for future book covers.
The Inside Pages
Next up it’s time to create a new document and set up the inside pages for your book. Start by opening any version of InDesign and navigating to File >New > New Document. This time set Number of Pages to 150 and make sure Facing Pages is checked. Next, set the Width to 6 inc and the Height to 9 in. You do not need to accommodate the spine for the inside pages and you’ll be working on each page individually in this file. This means you calculate the inside page size based on the folded size of your book.
Columns and margins can remain the default settings and make sure you build in a bleed for your inside pages of .125 in on all 4 sides. While your inside pages may not utilize a bleed, it’s a good idea to plug it in at the beginning just in case. Text novels won’t have a bleed on the inside, but picture books and education eBooks might. It depends on the content, so it never hurts to include bleeds at the beginning. Click OK to create your new document.

Be sure to Save (CTRL+S/CMD+S) your document as 6x9_BookInsidePagesTemplate or something similar so you can use it as a base for future books.You’re inside pages are now ready for content! Before you dive in, there’s one more setting you should know about.
Setting Start Page #
The printed page numbering of most books doesn’t start on the first page of the book. There is usually a few pages of content prior to the actual first page. You can set this at the beginning under New Document if you know what page you’d like to start on. Otherwise, you can set it from the Pages Palette.
Step 1
Make sure the pages palette is open (Windows > Pages) and click on the arrow at the very top right. Then click on Numbering & Section Options. There is a lot of power in this option menu. You can set your first page, number your first pages as roman numerals, etc.

Step 2
By default, Automatic Page Numbering is selected. This means that Page 1 starts on Page 1 of the InDesign document. If you want to start Page 1 on say Page 5, make sure Page 5 is selected in the Pages Palette, select Start Section at the top of the Number & Section Options window and then select Start Page Number at: and enter 1. Bypass the warning, we’ll address that next. This will create a new section for your book. You’ll see Pages 1-4 at the beginning remain the same, but Page 5 is now Page 1.

You probably don’t want to keep the first pages as 1-4 anymore. Instead, click Page 1 and hold down Shift and click Page 2, 3 and 4 to select them all. Then, go back to Numbering and Section Options and change Style under Page Numbering to the last option i, ii, iii, iv… Click OK.

Pages 1-4 should show roman numerals instead of numbers. Why go through all of this? When you start to create master pages, you can fine tune your printed page numbering at the bottom of each page automatically. When you place a text box and set it to show the Current Page Number, it will show the corresponding number you see in the Pages Palette. If you want to go even further, you could set a master page for the first four pages that don’t show any page number. Then create a new master page and start showing the page numbering on Page 5 onward. There’s a lot of opportunity here. This is just a preview of what is possible with Numbering and Section Options for books.
Conclusion
Now that you have your book template setup, it’s time to start filling it with content and design! Be sure to check out my complete course on Book Layout in InDesign. You’ll learn how to design the entire book cover to cover including Master Pages, Chapters, Table of Contents and more.
Happy designing!
{excerpt}
Read More
