Metronomes have been in use in the music field for a long
time. They help you to stay in time and feel the tempo of the song. Even
though mechanical metronomes are still in use, digital metronomes found in our DAWs are just as useful. Learning to use them effectively will help you prevent problems in your projects. In this tutorial, I will show you how to use the metronome (aka Click) in Cubase, and properly set up the features it offers.
What Is Precount?
As the name suggests, Precount is adding a few counts just
before you start any real recording. Think of it as the revving of the car
engine before you hit the clutch. You can activate it by pressing the Precount
On button on the transport panel, or by selecting Precount On from the
Transport menu. Once Precount is activated, that number of bars will be played back before recording starts.
This function can be really useful in situations where you
need to establish the tempo of the song to the player or the vocalist, but
don’t want to waste any time playing the track with just a click track.
Therefore the player can feel the tempo of the song, but doesn’t have to leave
gaps in the recording. Precount can also be used in situations where you want
to give some time to the player to get ready for the recording.
Tweaking the Settings
Cubase has a few metronome settings that
can be tweaked. To view them, Ctrl + click on the
“Click” area in the transport panel, or select Metronome Setup from the
Transport menu.
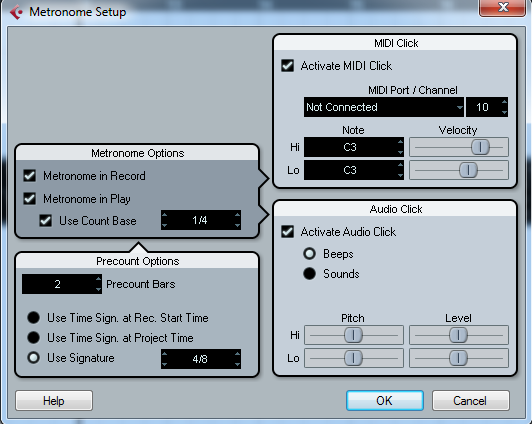
On the left hand side of the dialog box, you can change the metronome and Precount options.
Metronome & Precount Options
In the metronome options, you have three
checkboxes that will help you to determine when you want the metronome to be
played. If you activate Metronome in Record, the click will be played while
any audio is recorded into the project. Metronome in Play will activate the
click while you are playing back the project. Make sure that the click is
activated in the transport panel, else you won’t be able to hear the metronome.
The first option is to set the
number of Precount bars. As explained in the above section, this value
determines the number of bars that will be played before recording or playback
is activated. The Use Time Signature At Record Start Time checkbox will make
the Precount use the tempo and the time signature of the cursor location when
you start recording. This is important in orchestral music and movies where
time signature may be different in different parts of the score. The Use Time
Signature at Project Time will use the tempo and the time signature that is
specified in the tempo track.
You can also manually override the time signature of the Precount
by changing the Use Signature value field. The time signature specified here
will be followed by the Precount irrespective of the time signature specified
in the transport panel or the tempo track.
MIDI Click & Audio Click
On the right hand side of the dialog box you can see the
options for changing the tone and volume of the clicks. You can change the
value of the notes that are being played and the velocity of each note. Let’s
see what these settings do.
The Activate MIDI Click can be used to specify whether the
metronome’s audio will be played through a MIDI device or not. This option will
come in handy if you are using an external MIDI device to record and want to
listen to the metronome through that device.
MIDI Port/Channel helps you to select the channel number
for the MIDI output. If you have set up a VST instrument previously for the
project, you can use VST as a channel for the MIDI. Use this option if you want
your VST instrument to read the metronome for its performance, however most VST
sync up automatically to the host’s clock.
The Hi Note and the Lo Note determines the MIDI note number
for the metronome clicks. The Hi Note value will change the sound of the first
beat in a bar and the Lo Note value will change the value of the sound for the
rest of the beats. You can also adjust the velocity of the Hi and Lo notes. The
value of the note field ranges from C2 to G8. This way, you can determine the
notes that are sent to your VST instrument and can control the notes that are
being played through your VST.
Audio Click helps you to choose the sound of the clicks of
the metronome. You have the option to select custom audio files as the tones
for each click. You need to activate the Audio Click option for this to work.
The first option is to select Beeps. You can adjust the sliders to change the
pitch of the clicks. Drag the Hi slider to change the pitch of the first beat
in a bar and drag the Lo slider to change the rest of the beats. The velocity
of each note can be changed here by dragging the Level meter left or right.
In order to select a custom sound for your metronome, select
the Sounds option and click on the Hi and Lo fields to select any type of audio
file as your metronome sound. Click on the empty field and a file locator will
pop up, here you can navigate to your custom audio file and select it. The
levels of each file can be adjusted using the Level sliders.
Conclusion
In any recording scenario, metronomes or clicks have become
a standard. Many musicians feel that playing alongside a metronome will help
the performance become tighter and more enjoyable. However, there are people
who say it doesn’t matter.
In either case, metronomes will help you make better recordings. It’s not just the power of the metronome,
it’s also your creativity that will help you make wonderful music. Next time
you are working on a recording project, try using a metronome. You might be
amazed how much better it makes your performance.
{excerpt}
Read More