In this tutorial, we are going to learn how to create explosions. This is a very interesting subject, because we can’t define one certain process to create an explosion. As much as you will use your creativity and tools, you will find different types of explosions every time. So it very much depends on your own understanding of the tools and techniques.
Introduction
In this tutorial, I’ll show you how I created
the explosion shown in the preview above using 3ds Max and the FumeFX plugin. There are different
types of techniques to achieve this effect in FumeFX, but we are going to use
particles to create this explosion.
For that purpose we are going to use three Particle Flow systems, a FumeFX Particle Source, three standard lights (a Target Spot
and two Omni lights), and the default Scanline Renderer. So get ready for this exciting tutorial!
Editors Note: If you’d prefer to follow along using high resolution Images. You can download them below:

1. Create the Particle Flow Systems &
Gravity
Step 1
To create an explosion, particles are a very good option, because we can
control the particle’s motion easily and particles will generate fire and smoke
based on their birth timing. Also the particle count and speed will determine how big and fast the explosion is. So to create a proper Particle Flow
simulation follow these steps:
There are two ways to open the Particle Flow
window:
- Press 6 on the keyboard.
- Go to Graph Editors > Particle View.
To create a Standard flow, follow these steps: Right Click on the center part of the Particle Flow
window and go to New > Particle System > Standard Flow.
Step 2
Position the first Particle Flow source (PF Source 01) at the following location:
Position: X : 0.0 | Y : 0.0 | Z : 6.543
Rotation: X : 0.0 | Y : -5.358 | Z : 0.0
Step 3
Create a second Standard Flow (PF Source 02) following the above steps and position it as follows:
Position: X : 0.0 | Y : 0.0 | Z : 6.543
Rotation: X : 0.0 | Y : 0.0 | Z : 0.0
Step 4
Finally create a third Standard Flow (PF Source 03) and position it:
Position: X : 0.0 | Y : 0.0 | Z : 6.543
Rotation: X : 0.0 | Y : 13.213 | Z : 0.0
Step 5
Now create the Gravity Space Warp. To create the Gravity Space Warp, go to the Create Panel > Space Warps > Forces, click on the Gravity button and generate it in viewport by clicking and dragging.
And then position it as follows:
Position: X : 50.0 | Y : 0.0 | Z : 0.0
Rotation: X : -180.0 | Y : 0.0 | Z : 0.0
Step 6
Select the Gravity space warp and go to the Modify panel and make the following
changes to its parameters.
Under Force, set the Strength to 1.0 and the Decay to 0.0.

2. Edit the Particle Flow Systems
Step 1
Now let’s modify each of the Particle Flow systems.
Select PF Source 01, go to the Modify panel and make the following changes to its parameters.
Emission:
- Logo Size: 10.0
- Icon Type: Circle
- Diameter: 20.0
Quantity Multiplier:
- Viewport 100.0%
- Render 100.0%
Tip: If you keep the Viewport value at 50.0%, it will only show 50% of the particles in the viewport and because of that FumefX, will only generate smoke from that 50% of Particles. So always keep it at 100%.
System
Management:
- Upper Limit: Keep it at the Maximum.
- Viewport (Integration Step): Frame
- Render (Integration Step): Frame
Tip: A smaller integration step can improve accuracy, at the cost of
calculation time. But I am not worried about it here, because our
particle system is not very complicated.
Script: Keep as it is. (Frankly speaking, this is not my cup of tea.) 😉
Step 2
Press 6 to open the Particle View window and make these changes.
Birth 01:
- Emit Start: 2
- Emit Stop: 3
- Amount: 11
- Subframe
Sampling: Keep it Ticked.
Position Icon 001: Keep it as is.
Speed
01:
- Speed: 300.0
- Variation: 50.0
- Direction: Along Icon Arrow
- Reverse: Checked
- Divergence: 21.0
Add a Force and Delete operator into the event by dragging and dropping them from the depot. Adjust the parameters as follows:
Force 01:
Under Force Space Warps, click the By List button and pick Gravity001 from the list. Set the Influence% value to 200.
Delete
01:
- Remove: By Particle Age
- Life Span: 30
- Variation: 35
Display
001:
- Type: Ticks
Step 3
Select PF Source 02, go to the Modify Panel and edit the parameters to match the settings we used for PF Source 01.
Now Press 6 to open the Particle View window and make the following changes:
Birth 02:
- Emit Start: 2
- Emit Stop: 3
- Amount: 9
- Subframe
Sampling: Keep it Ticked.
Position Icon 02: Keep it as is.
Speed
02:
- Speed: 320.0
- Variation: 100.0
- Direction: Along Icon Arrow
- Reverse: Checked
- Divergence: 16.0
Force 02:
- Force Space Warps: Add the Gravity.
- Influence: 200
Delete
02
- Remove: By Particle Age
- Life Span: 30
- Variation: 50
Display
02:
- Type – Ticks
Step 4
Select PF Source 03, go to the Modify panel and again edit the parameters to be the same as PF Source 01.
Now press 6 to open the Particle View window, and make these changes:
Birth 03:
- Emit Start: 2
- Emit Stop: 3
- Amount: 8
- Subframe
Sampling: Keep it Ticked.
Position Icon 03: Keep it as is.
Speed 03:
- Speed: 300.0
- Variation: 200.0
- Direction: Along Icon Arrow
- Reverse: Checked
- Divergence: 8.5
Force 03:
- Force Space Warps: Add the Gravity.
- Influence: 100
Delete
03:
- Remove: By Particle Age
- Life Span: 30
- Variation: 50
Display
03:
- Type – Ticks

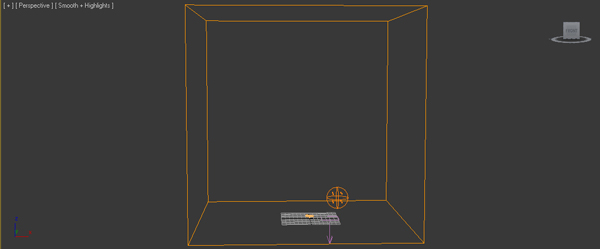
3. Create the FumeFX Particle Source
Step 1
We are going to use a FumeFX Particle Source to create the Explosion.
To
Create the FFX Particle Source, go to the Create panel, click on Helpers and select FumeFX from the dropdown list.
Click
on the Particle Src button and generate it in the viewport by clicking and dragging. And then rename it from FFX Particle Scr01 to “FFX Explosion Src“.
Step 2
Position it at the following location:
Position: X : 0.0 | Y : 0.0 | Z :
0.0
Rotation: X : 0.0 | Y : 0.0 | Z :
0.0

4. Create the FumeFX Container
Step 1
Now it’s time to make the Fumefx Container. To create the container go to the Create panel, click on the Geometry tab and select FumeFX from the dropdown menu.
Click on the
FumeFX and generate the container by clicking and dragging in the viewport. Now rename the container from FumeFX01 to “Explosion-Container“.
Step 2
Position the Explosion-Container at this location:
- X: -20.559
- Y: -12.908
- Z: 0.0
5. Edit Fumefx Container
There
are Five Important Sections in the FumeFX Container we are going to
modify.
- A.
Gen – General - B.
Sim – Simulation - C.
Rend – Rendering - D.
Illum – Illumination - E.
Obj/Src – Objects & Sources
Step
1
Open FumeFX, go to the Gen tab
and set the following parameters for each section.
General
Parameters:
- Spacing:
0.7 - Width:
500.0 - Length:
500.0 - Height:
500.0 - Adaptive:
On
Output:
- Start:
0 - End
Frame:
100 - Exporting
Channels:
Fuel,
Smoke. - Output
Path:
Click on the small button next to Output
path,
make a New
Folder
on your Storage
Drive
and save your cache file (fxd)
as “Explosion_test_”
in that Folder.
Playback:
- Play
From:
0 - Play
to:
100 - Start
Frame:
0

Step 2
Go to the Sim tab and set the following
parameters for each section.
Simulation:
- Quality:
5 - Maximum
Iteration:
200 - CFL
Conditions:
5.0 - Maximum
Simulation Steps:
1 - Advection
Stride:
0.5 - Time
Scale:
1.0
System:
- Gravity:
0.05 - Vorticity:
0.7 - X
Turbulence:
Animated*
NOTE:
We
are going to animate the Turbulence
because we want to slow down the turbulence after Frame 20.
So what we’ll do is keep the Turbulence
set at 2.0
from Frame 0
to 14,
and
on frame 17,
we’ll set the Turbulence
to 0.5.
And on frame 20,
we’ll make the Turbulence
0.1.
Turbulence Noise:
- Scale: 3.0
- Frames: 2.0
- Detail: 5.0
Blocking Sides:
- X : None | Y : None
| Z : Both
Simulate Fuel:
- Fuel Buoyancy: -0.1
- Ignition: 100
- Burn Rate: 18.1
- Burn Rate Variation: 1.0
- Heat Production: 10.0
- Expansion: 1.5
- Fire Creates Smoke: Unchecked
Note: Don’t
Change any Parameter from Smoke or Temperature, keep them Default.

Step 3
Go
to the Rend tab and set the following parameters.
Rendering Parameters:
We
are not changing anything under this tab.
Fire:
- Color: Gradient
- Opacity: 1.0
Editor Note: You can download the Color Gradient file from the Attachments section at the top of this page.
Smoke:
- Ambient: R: 0 | G: 0 | B: 0
- Smoke Color: R: 66 | G: 66 | B: 66
- Opacity: 0.2
- Cast Shadows: Checked
- Receive Shadows: Checked
Note:
Keep
all other parameters at default.

Step 4
Before
starting work in the Illum tab, we need to add some lights to the
scene. We will use the following three lights:
- Target Spot
- Omni
- Omni
Create
a Target Spot by going to Create > Lights > Standard
Lights > Target Spot.
Click and drag in the
viewport to create the light, then position it at the following
coordinates:
Light Position: X: 642.252 | Y : -486.928 | Z: 932.155
Target Position: X: -13.825 | Y: 0.0 | Z: 200.066
Step 5
Next,
go to the Modify
panel and adjust the light’s settings:
- Turn
On
Shadows. - Go
to the Shadow
Parameters
rollout and turn On
Atmosphere
Shadows. - Multiplier:
0.6 - Light
Color:
R: 255
| G: 255
| B: 255
Note
–
Keep
everything else default.
Step 6
Create
an Omni
light by going to Create >
Lights > Standard Lights > Omni,
and click in the viewport to create the light, then position it at
the following coordinates:
Position: X: 657.659 | Y: -557.434 | Z: 178.75
Step 7
Next,
go to the Modify
panel and adjust the light’s settings:
- Turn
On
Shadows. - Go
to the Shadow
Parameters
rollout and turn On
Atmosphere
Shadows. - Multiplier:
0.3 - Light
Color:
R: 255
| G: 255
| B: 255
Note
–
Keep
everything else default.
Step 8
Create
a second Omni light and position it at the following
coordinates:
Position: X: 425.011 | Y: -677.873 | Z: 130.717
Step 9
Again,
go to the Modify panel and adjust the light’s settings:
- Turn
On
Shadows. - Go
to the Shadow
Parameters
rollout and turn On
Atmosphere
Shadows. - Multiplier:
0.15 - Light
Color:
R: 255
| G: 255
| B: 255
Note
–
Keep
the rest of the light’s settings default.
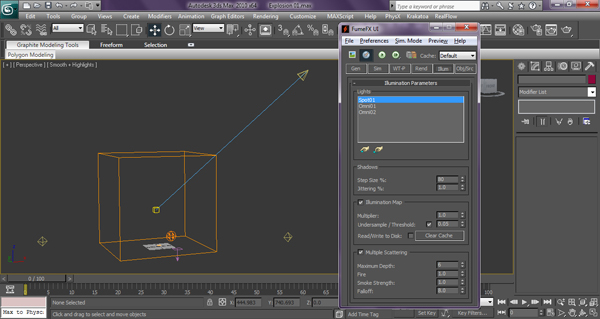
Step 10
Back
in FumeFX, go to the Illum
tab
and add the lights to the Lights
list by picking them, then change the following values:
- Turn
On
Multiple
Scattering. - Maximum
Depth: 6 - Fire:
1.0 - Smoke
Strength:
1.0 - Falloff:
8.0
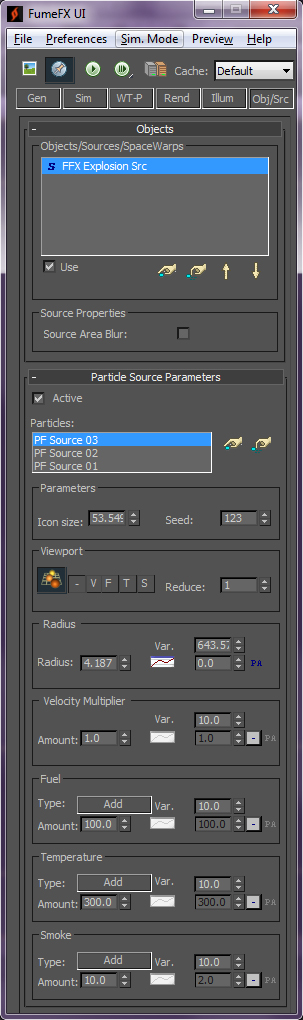
Step 11
The final step
before we hit the simulation button is setting up the Obj/Src Tab.
Add
the FFX
Explosion Src
to the Objects
list. When you select the FFX
Explosion Src,
another tab will appear called Particle
Source Parameters.
Now add all the Particle
Flow Systems
into the Particles
list. And change the parameters as follows:
Radius:
- Radius: 4.187
- Variation: 643.572*
You
can see the Particle
Radius
Button, exactly below the Var
Text. Right
Click
on it and choose Enable.
Now you can see that the parameter text window has been Activated,
change the parameter to 0.0.
If you use this option, the particle radius will animate
automatically. You’ll see that from emission to deletion, the
particle radius size will animate from big to small.
Velocity
Multiplier:
- Amount: 1.0
- Variation: 10.0
Fuel:
- Amount: 100.0
- Variation: 10
Temperature:
- Amount: 300.0
- Variation: 10.0
Smoke:
- Amount: 10.0
-
Variation: 10
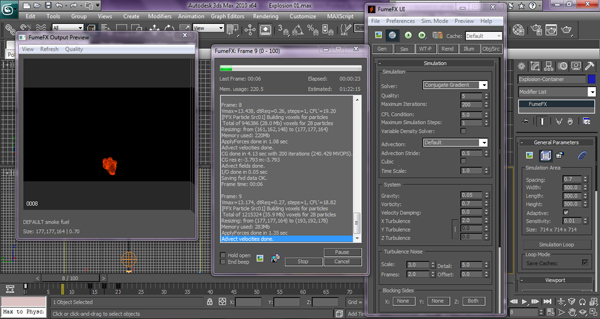
6. Start the Simulation
Hit the Simulation Button. It will take around 10 to 12 Hours
for the 100 frame simulation to complete.
I want to share one important thing
with you. If you want to work with plugins like FumeFX and RealFlow, you need a very high end machine, because if
you are working on a big scene and you don’t have such a machine, the software
will crash every time and you won’t be able to deliver the project on time, or maybe not at all.
I’m using an Intel Core i7
– 2700K CPU @ 3.50GHz and 16GBs of Ram, and it still takes 10 to 12 minutes to simulate a single frame of this explosion.
7. Rendering
After the simulation finishes and you setup your scene, go to Render Setup (F10). Add the FumeFX Fire & FumeFX Smoke Elements in the Render Elements Section, and render the sequences at a HD
resolution (1280 x 720).
8. Basic Compositing
Step 1
Open
After
Effects and
load the image sequences you rendered from 3D Studio Max.
You
can add
the following effects to the Fire layer.
- Color Balance
- Sharpen
- Glow (Sapphire_Glow)
Step 2
Add
the Smoke Layer and apply these effects to it.
- Brightness & Contrast
- Sharpen


Conclusion
The most important thing to remember when creating such effects, is always try different parameters again and again. First, try this tutorial, but then try your own ideas. Use more than one particle system, add simple sources, change the parameters and see what happens. I would like to see your tests when you finish this tutorial, but not the same as I have made. I want to see your own effects.
So good luck… keep working.
{excerpt}
Read More