Learning how to design interfaces can be an enduring journey if you have to do it alone. My name is Tim Silva, and I have been attempting to design these types of interfaces for over 5 years now, and I have lots of valuable information to share with you to speed up and ease the learning process. Here is what I have come to understand about designing detailed, realistic, and cool looking interfaces: You have to be great in many areas of Photoshop to be good at interface design. So along with the actual steps needed to create this particular interface, in this series I will also provide as many references to other tutorials, resources and concepts as possible. That way, you can have access to some of the tools that will allow you to create completely original interfaces utilizing the same methods I teach in collaboration with your own creativity. Let’s get started with Part 1 of this two part series.
Introduction
Earlier this year, we published an inspirational article featuring a large collection of fantasy interfaces created by myself and many of my peers at Encide, GUI.Station, Area01 and other related communities. While there was a mixed reception for the project, I received many emails asking about the community and interfaces in general. As a response to those requests, I am sharing this tutorial with anyone who is interested in getting started with interfaces or is wanting to improve their existing skills.
This tutorial will teach you a methodology and a way of thinking about pixels that will allow you to create anything in high quality. This tutorial will function a lot like an Algebra course. It builds on concepts and continues to use what you learned earlier on in the later steps. This also means that if you skip steps, you will probably miss important information.
Personally, I am not just an interface designer, I am skilled in web design, basic web development, video production, interactive design and other digital genres. Digital media is my passion, and I view the mastery of highly detailed interface design as the holy grail of education for new media. I see everything in pixels, and it relates to what I perceive in the real world as well. If you can master it well, everything else is much easier.
Much of what I will be covering in Part 1 will be Layer Style settings and usage of the Selection, Pen and Gradient Tools. The truth is, these tools can be a trap at first because of the “default” looking results they can produce. But after playing with all of the options, you can really move away from cheap computer graphics into creating objects that people initially believe to be a Photograph.
Part 2 of this tutorial will cover a combination of methods used to produce a futuristic looking screen as well as refining and polishing tips that will bring any interface from good to great.
Step 1
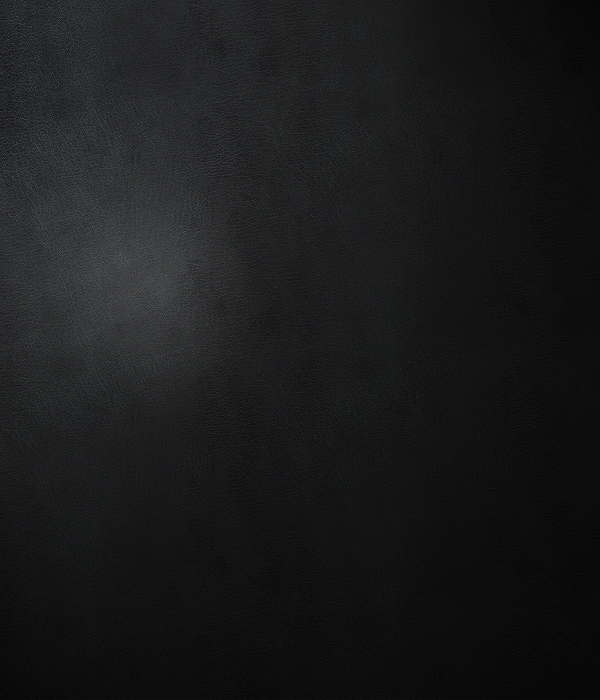
First, open a New Document with a Canvas Size of 900×700. Fill it with a dark, custom background, or the black leather image provided here. If you do choose to use a custom background, make sure that you select one with a similar light source so that it makes sense with the reflections on the interface later on. For this environment, we will have a light source coming from the top-left (130 Degrees).
Darker backgrounds and environments tend to be used more frequently with advanced fantasy interfaces. I do not know exactly why this is, but I have always speculated that people choose this because darker backgrounds actually serve a multitude of useful functions. It can hide pixelated edges more effectively, it draws more focus to the actual interface, and it makes exaggerated lighting effects pop out more due to the differences in contrast against the dark background. Not all interfaces have to exist in dark environments, but I just want you to understand that this approach does have advantages, especially for beginners.
Step 2
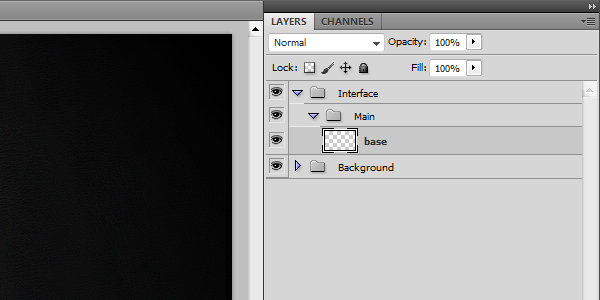
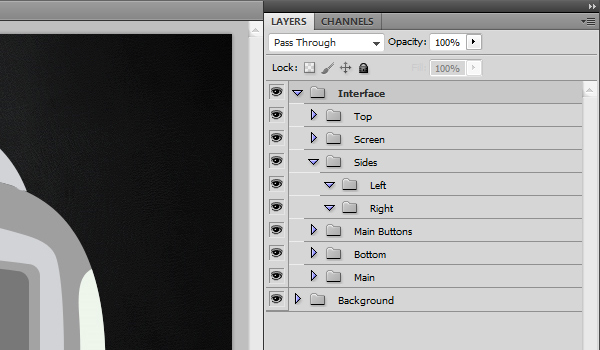
Organize your layers, you will regret it later if you don’t. Create a Folder called “Background,” and place everything related to the background inside of it. Collapse the folder so that it appears closed and it doesn’t take up any extra vertical space in your Layers Panel.
Create another New Folder at the top of the panel and call this “Interface.” Inside of this folder, create another New Folder called “Main” with a New Layer called “base” inside of it. For the rest of the project, get into the habit of naming similar items the same exact way. The extra time you spend now will save you lots of time later.
Each basic shape of this interface should have a “base” layer that contains the unaltered shape itself. Each button, plate, screen and shape should have its own properly named folder with a layer inside of it called "base." You may also shorthand these layers with something simple like “b” instead. This won’t make your file sizes much smaller, but your Layers panel will need less horizontal room.
Step 3
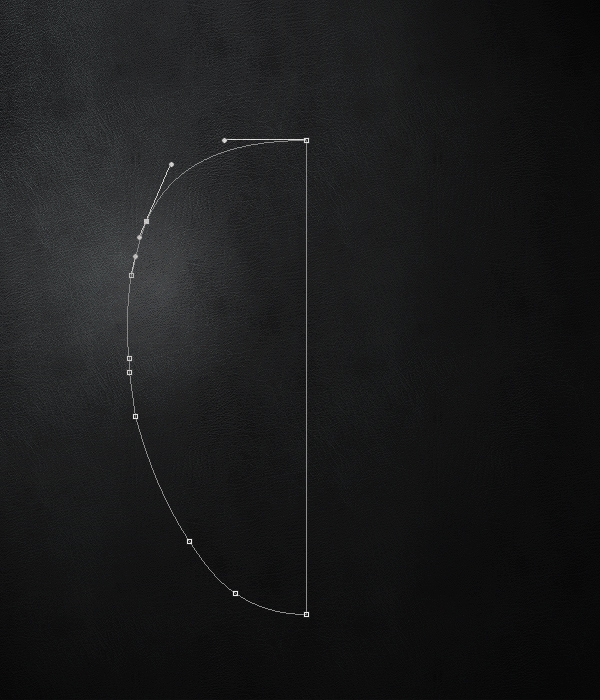
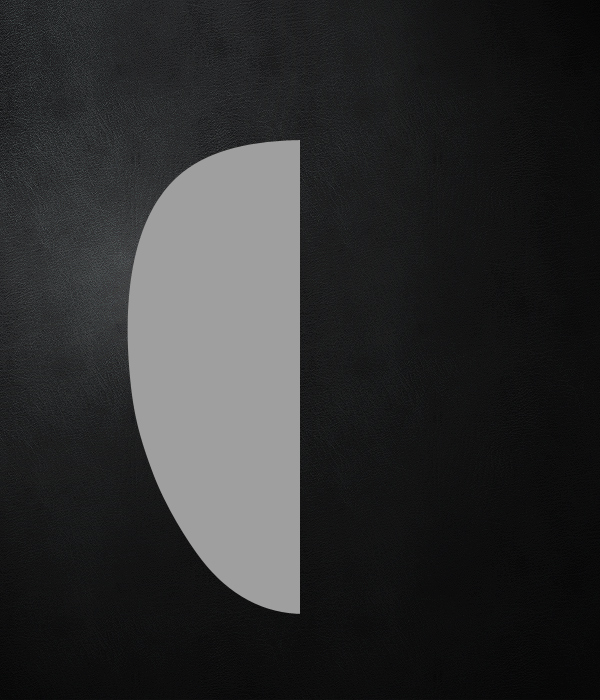
The next step is to actually create a main shape for our interface. At this stage, we will use nothing but the Pen Tool to create one half of the interface that we can then duplicate and flip in order to have a perfectly symmetrical shape to work with.
Before starting with this step, I highly advise that you educate yourself with The Comprehensive Guide To The Pen Tool. Once you are familiar with how to use the Pen Tool to create whatever shapes you’d like, then you can move on to the next step. Since this is an intermediate level tutorial, I will not explain how I made each of the following curves. If you know how to use the Pen Tool, this shape will be very easy to create.
Select the “base” Layer, before using your Pen Tool. Always make sure the Layer you want to work on is highlighted/selected, understanding how Layers work is also important. Make sure “Paths” and “Pen Tool” are selected in the Options. Using the Pen Tool, create an oval-like shape with smooth edges and a perfectly horizontal top and bottom as shown below. Please note that we are only creating one half of the shape for now.

Step 4
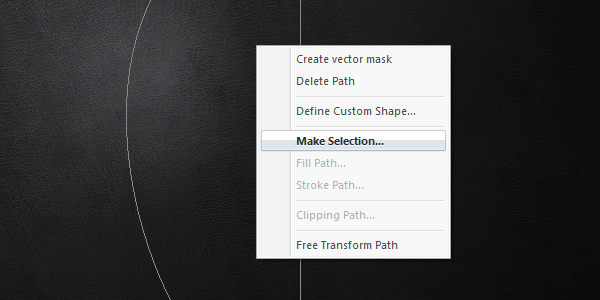
With the Pen Tool selected, right-click on your canvas and click Make Selection. With the Feather Radius set to 0 and the Anti-Alias box checked, press OK. Select a Foreground Color of #9f9f9f, and press Alt + Backspace to fill the selection. Press Command + D to Deselect the shape. Become familiar with this Shortcut if you aren’t already. We will be dealing with selections a lot in this tutorial and you should be proficient with them.
Step 5
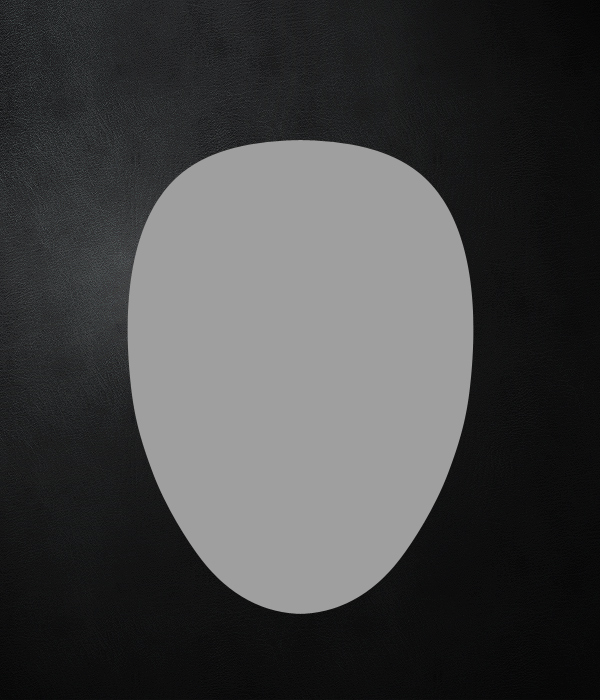
Duplicate the “base” layer. While the duplicated layer is selected, press Command + T to Transform the contents of the layer. Right-click on your canvas, and choose Flip Horizontally.

Step 6
Now you have to shift the horizontally flipped, duplicated layer over to the right so that the edges align. Select the Move Tool (V) and while holding down Shift, press the Right Arrow Key over and over again to shift the layer in segments of 10 pixels. Once you get close to making to edges match, released the Shift key, and continue to press the Right and Left Arrow Keys to move the layer 1 pixel at a time until the half edges match up perfectly.
You should see something like what I have below. If the flat part is too wide, trim the pixels off with the Selection Tool (M) and the Delete key. Try to avoid this by using the Pen Tool correctly in the first place though. Once the two halves are where you want them, you can flatten the layers into one. To do this, Command-click the two layers names once each and press Command + E. Now you should have the base shape all on one layer named “base.”
Step 7
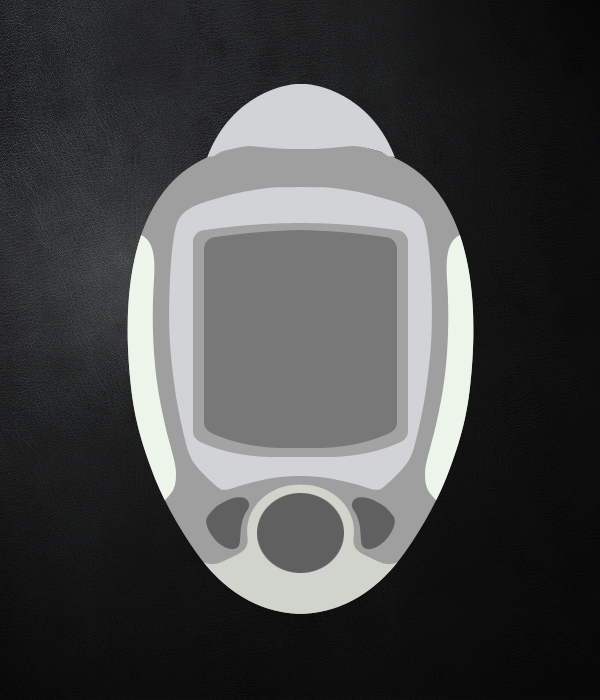
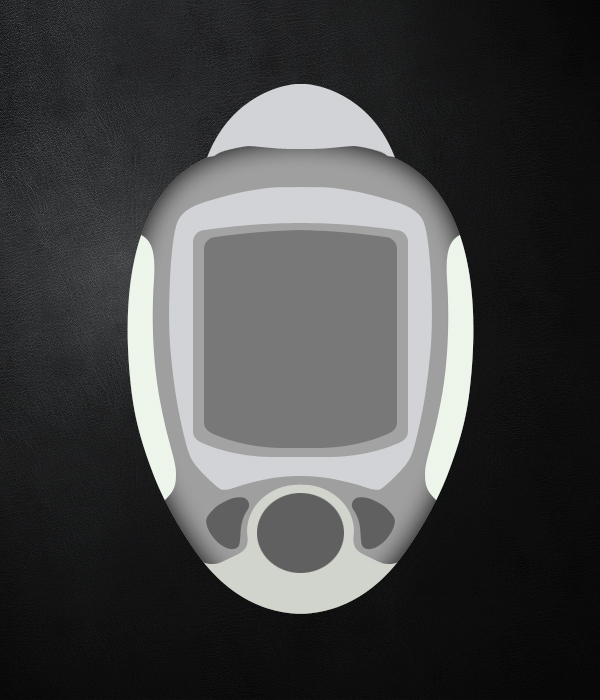
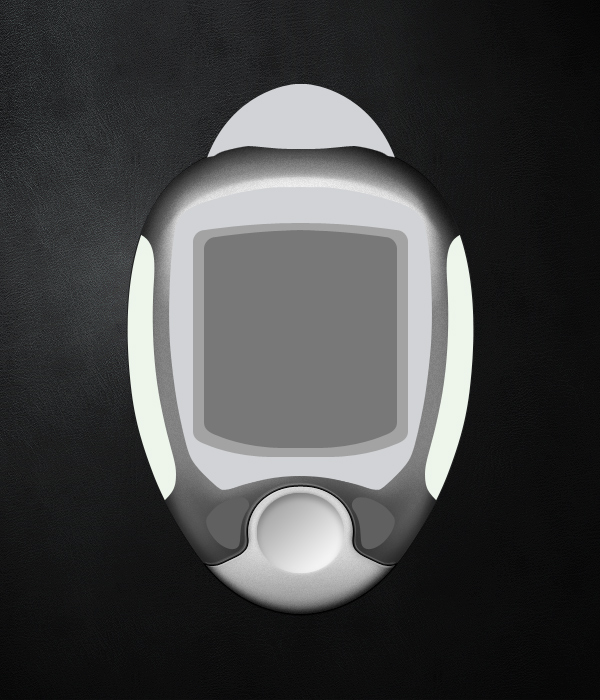
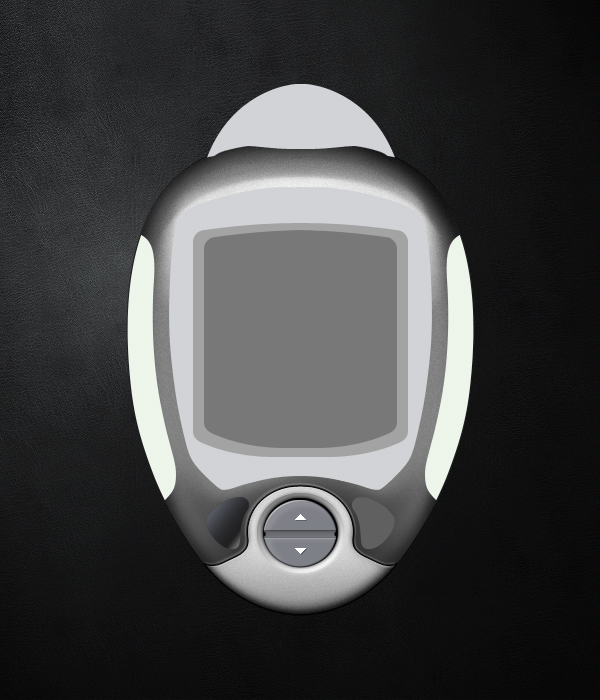
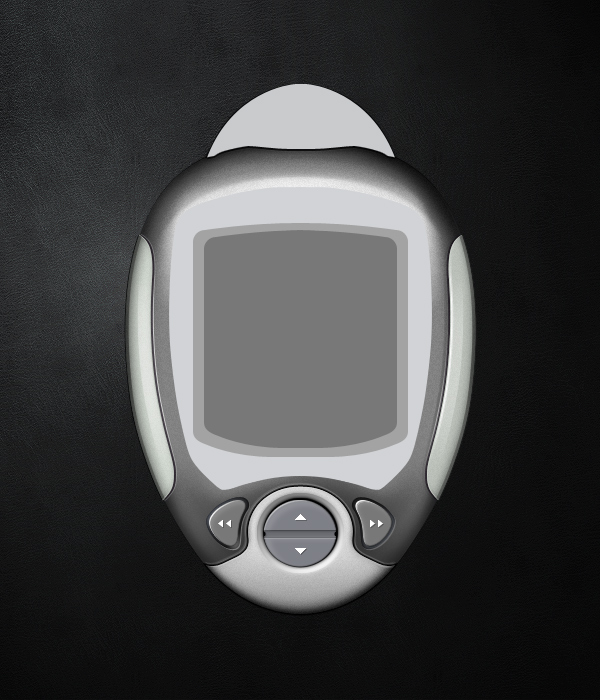
Repeat steps 3 – 6 to create some more shapes on top of the main interface’s base. My shapes are inspired by a handheld device that I found in an old storage box. My brother said it was some toy device he won from school that was broken. I’m not sure what it is, or where it came from exactly, so it was a perfectly mysterious specimen to work with. I suggest looking towards hand held video games, controllers, phones, stop watches, mp3 players, stereos, clocks, and all other technological devices as sources of inspiration for shapes and general ideas.
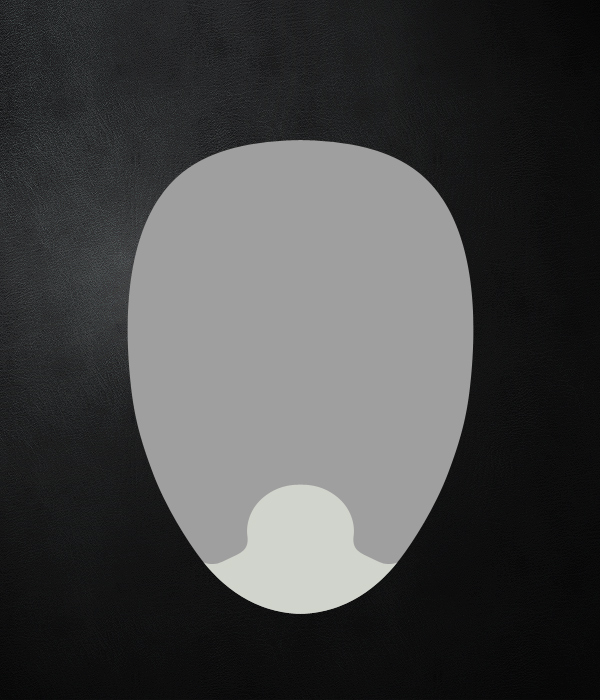
I will start off with a bottom plate that will contain a button later on it. Using the methods from Steps 3 – 6, create this new “base” layer and fill it with a lighter grey color (#d4d4d4). Now place it into a New Folder called “Bottom” to keep everything organized.
Step 8
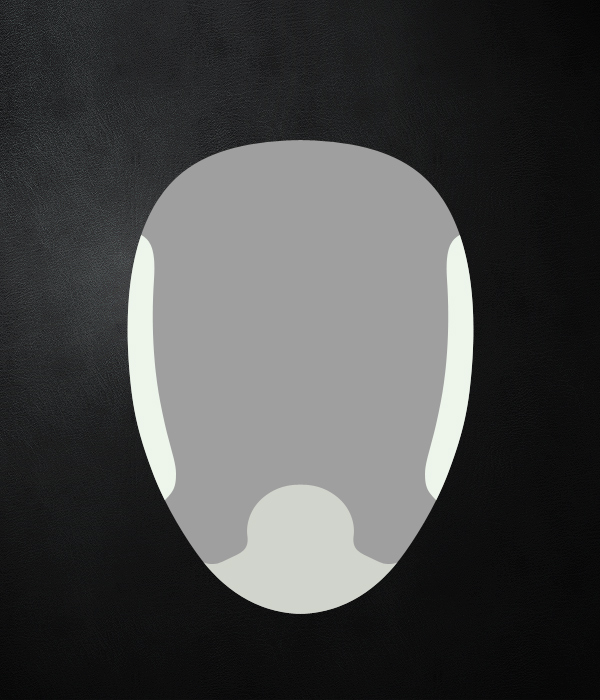
Now we are going to create the side plates. We want these to act as grips for the user’s hands. Repeat steps 3 – 6 again, only this time, you don’t want to flatten the layers like in the second part of step 6. Instead, place each half section into it’s own sub folder all within a folder called “Sides.” You may organize this however you’d like to, I am just explaining how I do it for efficiency.
An extra tip on the side shapes is to delete anything that goes outside of the main base. To do this, Command-click the layer icon on the “base” layer within the “Main” folder, and press Command + Shift + I to inverse the selection. With one of the side layers selected, press Delete on your keyboard. This will make it so that the edges of your side shapes will cut off where the main base does. You only have to do this once, since you can repeat step 5 again from here to have clean, matching side shapes.
Step 9
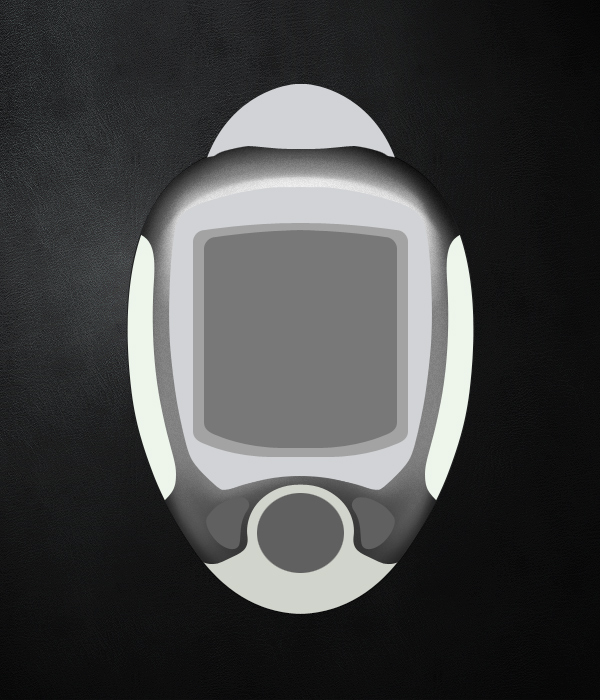
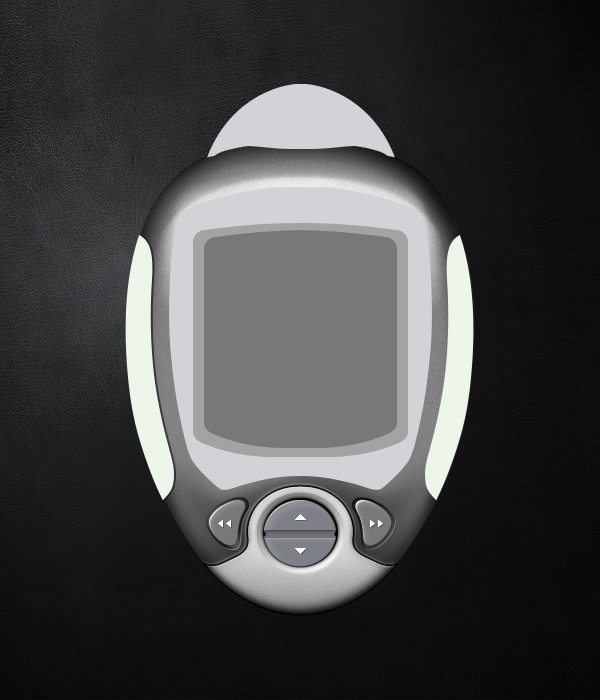
Using what we have learned up until this point, create a top piece, some button outlines, and 3 layers of screens which we can create the illusion of depth with later on. Here is what I came up with.
While these shapes look very simple, flat and boring right now, everything else that comes from this point on is what will really bring it to life. With that said, starting with good shapes is an essential step towards creating something amazing. My good friend Lance Thackeray from GUI Station released a package of 5 interface templates for people to experiment with. After completing this tutorial, feel free to read the usage terms and experiment with the beautiful shapes Lance has in that package. Once you are comfortable with the methods taught here, try to create your own shapes.
Step 10
Now that we have the shapes created, let’s make sure our layers are nicely organized. Here is what I have now with all of the shapes in place. Now you don’t have to follow this structure exactly, but make sure you are clean, careful, and organized. This will pay off later. From this point on, I won’t emphasize much with the layers since it will take up too much time. Make sure you pay attention to it on your own.
Step 11
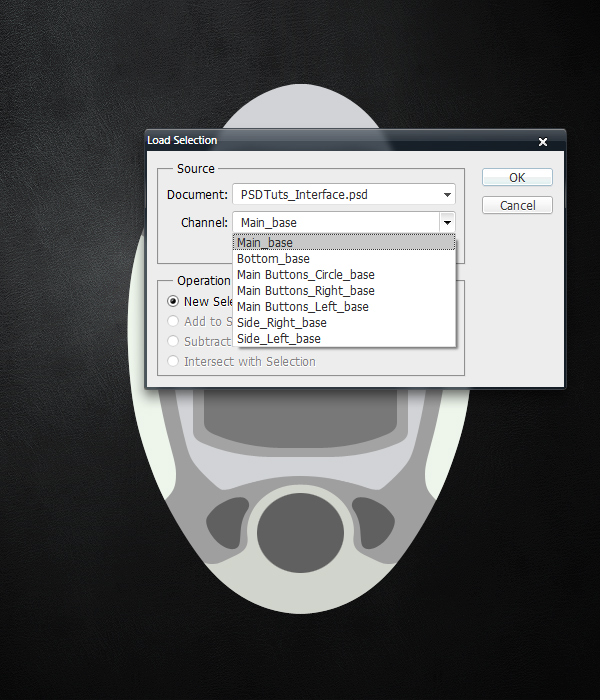
Also, this is a great opportunity for you to save all of your selections. In the coming steps we will add effects to each of these shapes. We will need to quickly load these selections. Photoshop offers a great selection memory system, which will save you time if you use it.
Command-click on the “base” layer’s Icon inside of the Main folder. The shape’s selection will appear selected. From the menu bar, click Select > Save Selection. Type in “Main_base” for the Name of the selection. After making sure the Channel is set to New, press OK. You have just successfully saved the selection.
Repeat this for each “base” layer. To retrieve the selections, simply to go Select > Load Selection. Choose the Channel Selection you want, and press OK. Below is a rough example of what you should see from the Load Selection interface. The list isn’t completed yet in the screenshot, there would be several more shapes if I did it for all of them. Notice the naming of the selections. It is very clean and organized which I always appreciate later on.
Step 12
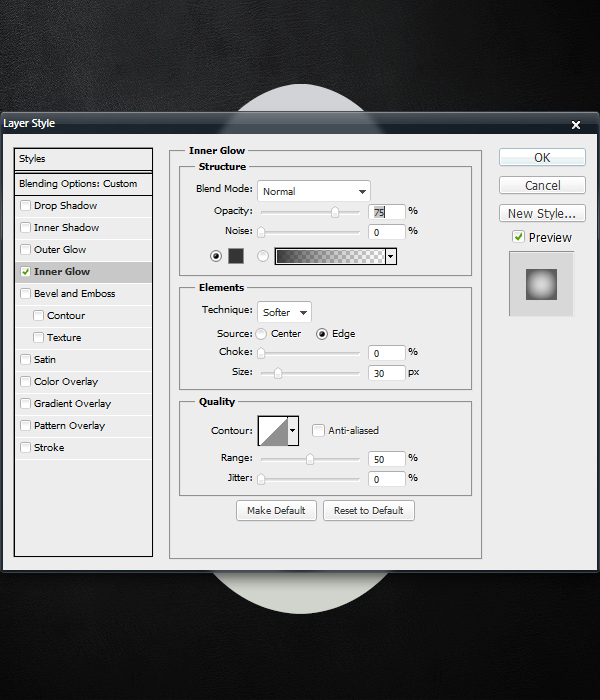
We will now create our first illusion of depth. Duplicate the the Main “base” layer and rename it to “innerGlowDark.” Open the Blending Options, and set the Fill Opacity to 0%. Click on the Inner Glow tab. Set the Blending Mode to Normal with the Opacity at 75%. Set the Color to #353535. Use a Size of 30px.
Step 13
Now we need to add some customized gradients from the edges inward. Load the “Main_base” selection. Press D to set the Foreground and Background colors to the default settings of Black and White. Select the Gradient Tool, and in the Options Panel, click on the Gradient Editor to open up the options for it. In the Presets area, click on the second icon. If you hover your mouse over it, a tool tip will pop up saying “Foreground to Transparent.” Once this is selected, start clicking and dragging from the outside of the interface and releasing when you have dragged it about 10-40 pixels into the interface. Do this multiple times from the top down, left in, right in, and bottom up. Make sure to keep these gradients on separate layers, and experiment with lowing and raising the Opacity of each layer to get a realistic looking effect for each gradient layer.
After you finish, grab the Eraser Tool with a Size of 35px and a Hardness of 20% and clean up any parts that are too dark and too messy. Again, experiment with those settings, and just make sure you give this step the time it deserves.
This step will require a lot of patience and experimenting. You must understand the basics of lighting, the Gradient Tool and the Eraser Tool to be successful here. One tip I can give you for now is to make sure that the right edge of your interface is darker than the left side, overall. This is generally because of where the light source is coming from (the top-left). Try to match my result (as seen below) as closely as you can. To give you a little perspective, I used about 15-20 gradient layers total to create all of those extra shadows. Once you are happy with your result, you can definitely Merge (Command + E) all of the layers together to minimize your PSD file size.

Step 14
Now we need to add some lighter parts to contrast the darker parts. First, we will start with the bottom section, right next to the left and right button shapes. Using the Brush Tool, make both a darker and and a lighter area to the top left of the left button. Create something like what you see in the after image. Once you are happy with your result on the left side, repeat the basic ideas behind Steps 5 – 6 to duplicate the effect on the right side. To maintain realism, make the right side slightly darker than the left side to match the light source.
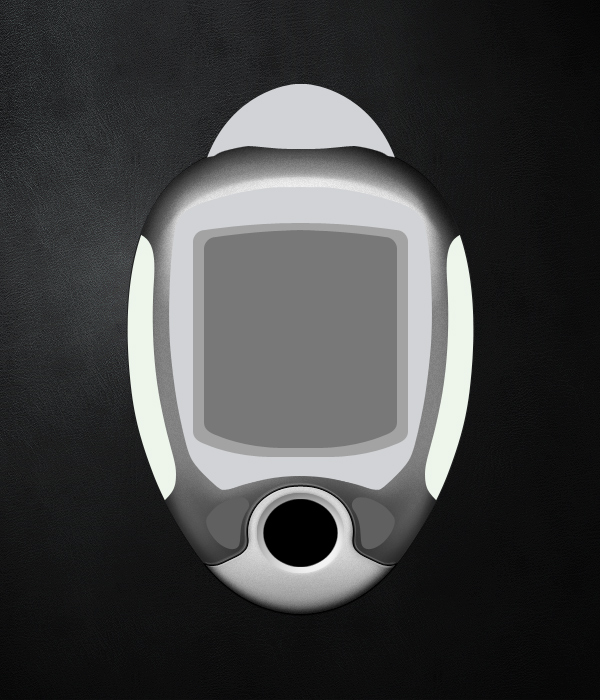
Please note that dark button shapes will be changed later on. It only looks odd because there are no insets around the edges of it, yet.
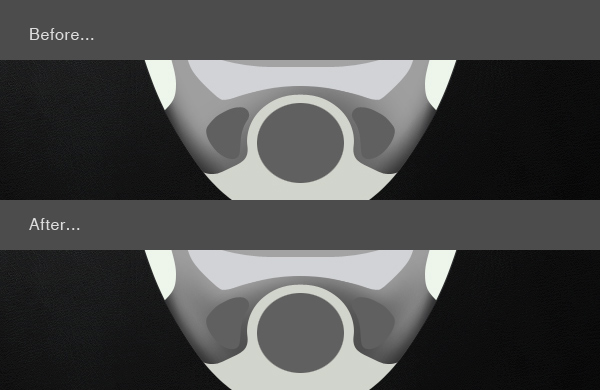
Step 15
The interface is starting to look more 3D now, let’s continue by adding some white shines and highlights to the top of the Main shape. Using the Brush Tool, manually create the effect shown below. You may also use the Selection Tool to start off with. You can create the basic shape, and then use the Blur Tool and the Smudge Tool to fade the edges out. There are at least 10 ways I can think of to create the result I here. I would recommend using the Selection Tool, the Gradient Tool, and the Brush Tool all together. Here is a quick Before and After example for you to follow. Again, make sure to apply more of the effect to the left side of the interface.
Step 16
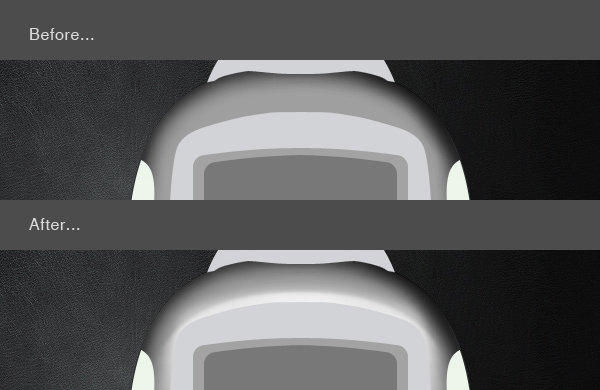
Now that we have some nice shading and highlights, we can start to see a metal/plastic effect developing. I prefer a glossy metal look for my interfaces. The most effective way to create this effect is to use the Noise Filter. First, collapse the “Main” folder that we have been working in this whole time. Create a Duplicate of this folder, and Flatten it by pressing Command + E. Move this flattened layer back inside the original “Main” folder, and move it to the top-most layer slot within the folder. Rename this layer to “Flat_Noise.” Load the “Main_base” selection, and go to Filter > Noise > Add Noise. Type in 5 for the amount, select Gaussian, check the Monochromatic box and then click OK. Lower the “Flat_Noise” Opacity to about 25%. You want the noise effect to be subtle, and not overpowering. If some parts are too strong or grainy, use the Eraser Tool with a low Opacity and Flow percentages to clean up the areas you don’t like.

Step 17
Let’s make the contrast even stronger by darkening the entire Main shape. Duplicate the original “base” layer. Fill the shape with solid black by pressing D, loading the “Main_base” selection, and pressing Alt + Backspace while the layer is selected. Once you have a solid black duplicate, move it to the very top of the folder, on top of the “Flat_Noise” layer. Rename this layer to “blkCover,” which is short for Black Cover. Using little abbreviations for your layer names will save you lots of time. Set the Blending Mode to Overlay, and lower the Layer Opacity to about 30%.
Step 18
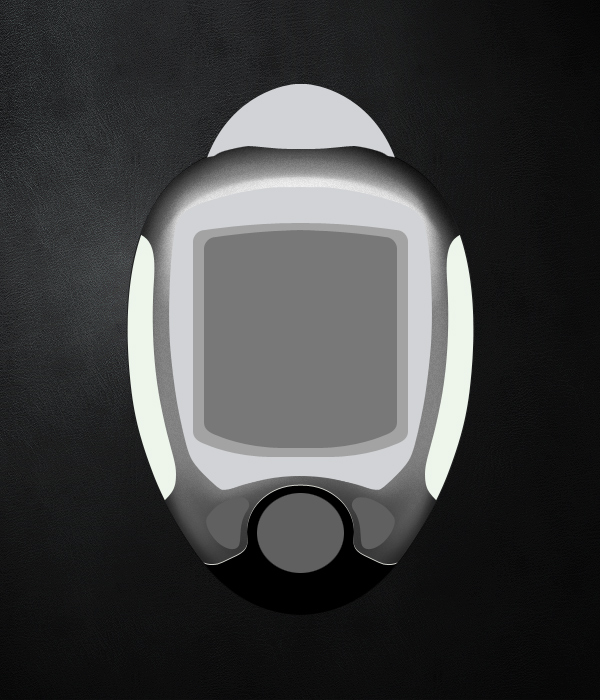
The main shape is now very well developed. Next, we will add effects to the bottom piece of the interface. As of now, this bottom part, the screens, the side chunks, and the top section are all flat. Once we add effects to these parts, the interface will start to look more realistic.
To begin, we will duplicate the “base” layer, fill it with solid black, and move it down 1 pixel by pressing the down arrow on the keyboard once.
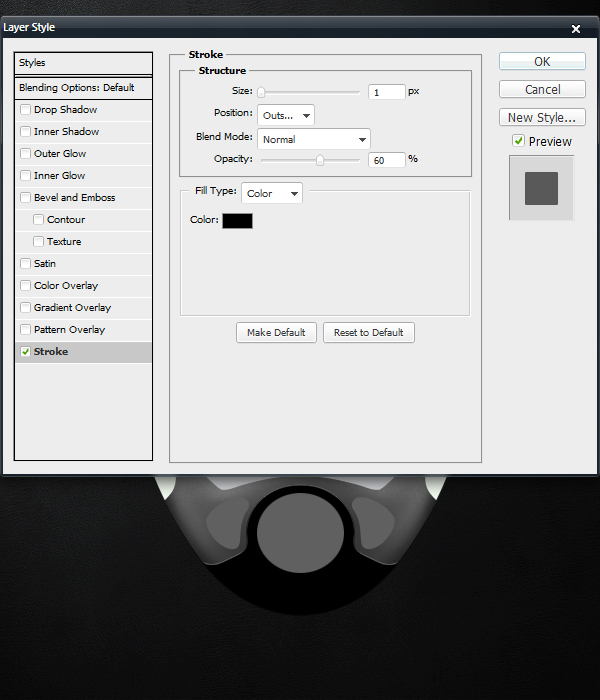
Step 19
This effect resulted in some pixelation around the new black layer. To make this more smooth looking, we will add a Stroke to the Blend Options. Double Click on the Layer to open the Blending Options. Click on the Stroke Tab. Fill out the following settings to get a nice looking result as seen below. Press OK when ready.
Step 20
Repeat Step 18 again. This time, we will make the plate lighter.
Step 21
To avoid any pixelation, add some more white strokes and outlines around the base shape. Try using a 2 pixel, white stroke. Flatten the layer, load the “Main_base” selection. Also, let’s start adding some shading to the bottom part. Repeat the broad directions behind Steps 12 – 17, and be sure to experiment with different options and settings. You want the results to mirror my example.
Since the bottom part is light and not dark, calibrate for those differences. Keep the noise very subtle on this part, I used 10% for the Layer’s Opacity. In total, I used about 10 layers of what I showed you before to accomplish this next step. It is not hard to create these effects, it just takes some trial and error to make them look good. Time and experience will yield fewer mistakes and more minor refinements.
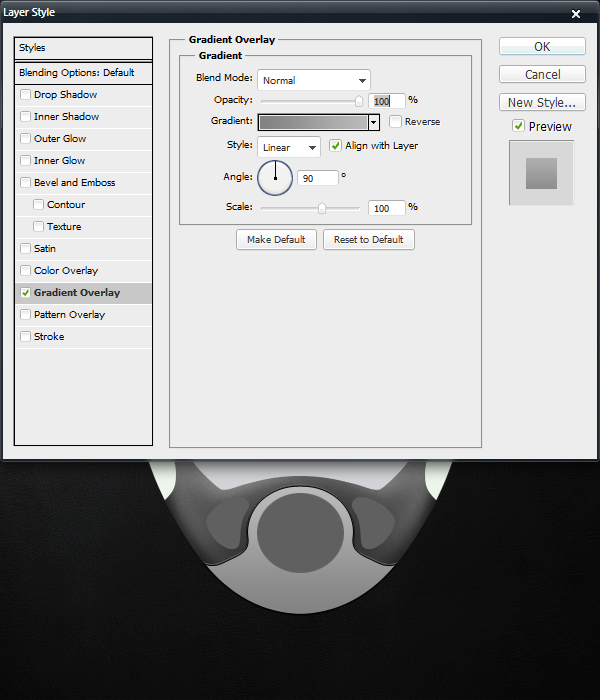
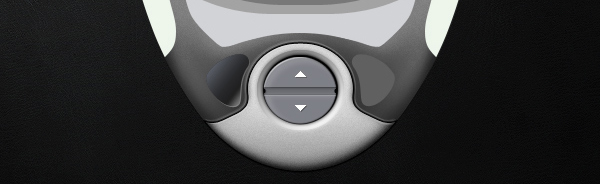
Step 22
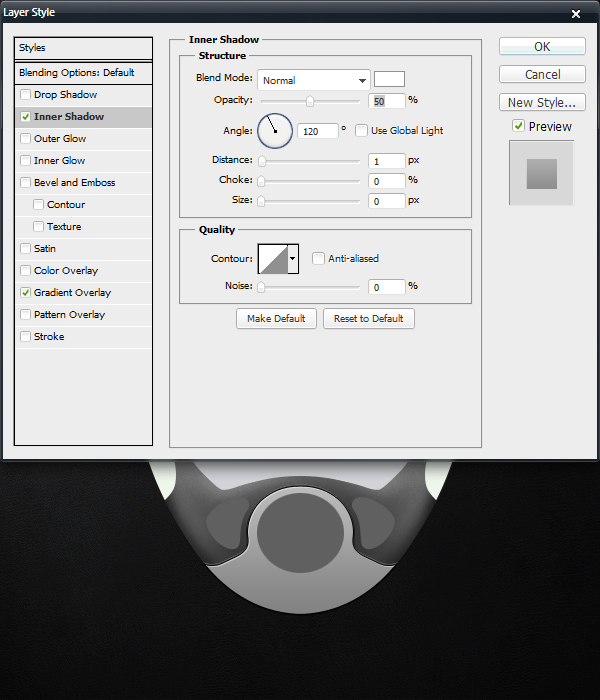
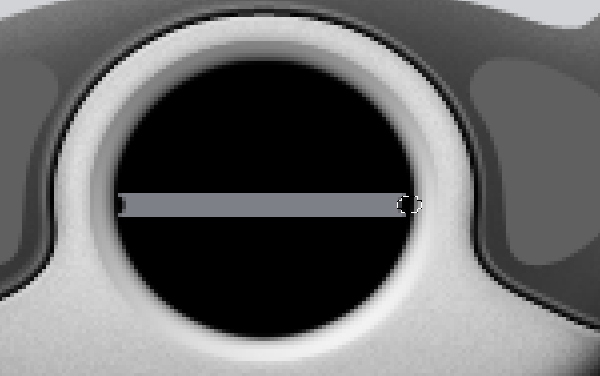
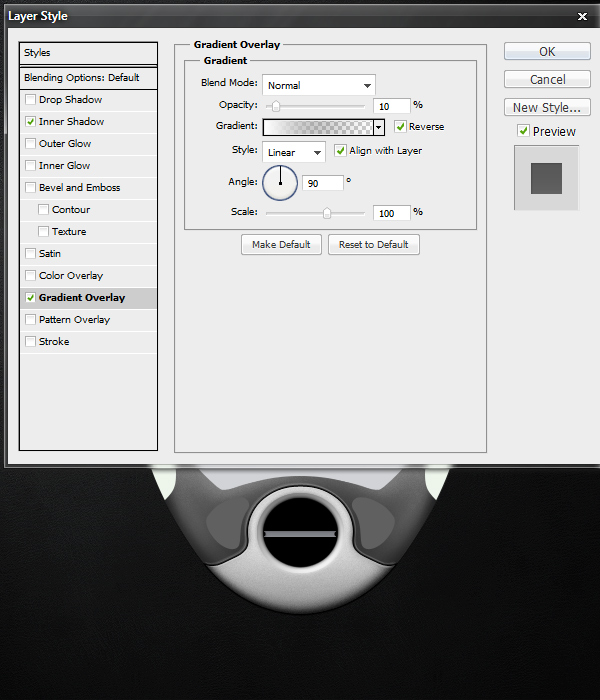
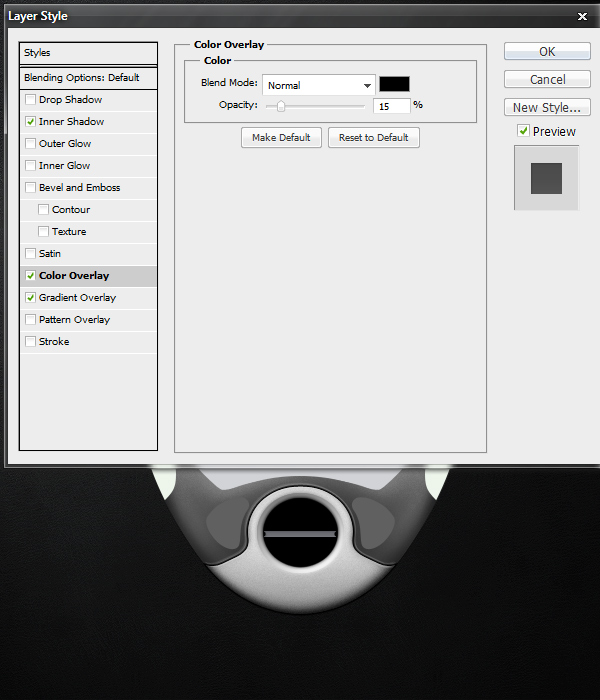
Next comes the center button that we will call “Circle.” Open the Blending Options for the circle’s “base” layer. Apply a Gradient Overlay with the following settings:
Step 23
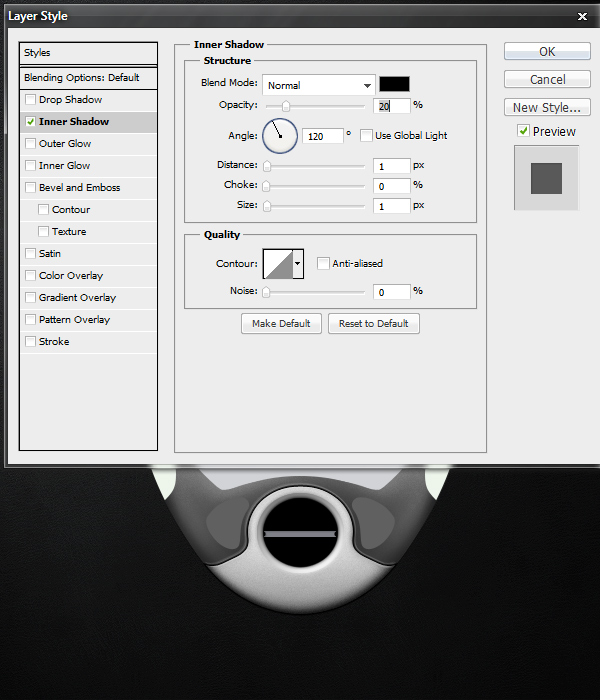
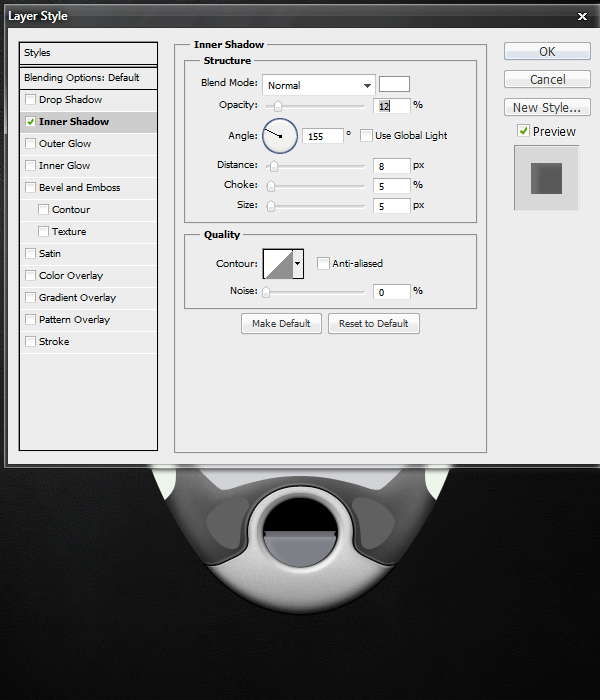
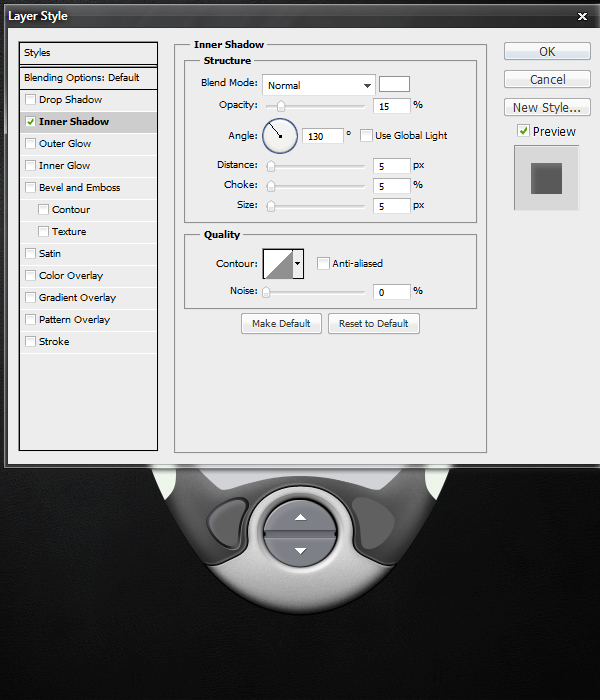
Additionally, we can add an Inner Shadow to make our button container look more realistic. Creating the illusion of depth is the key goal here.
Step 24
In order to make the depressed area realistic, we need to blur the edges around it slightly. Duplicate this layer. Create a new layer on top of it. Shift-click the layers to select both of them, and press Command + E to flatten them into one layer. The point of these last steps to retain the effects created by the Blending Options in a way that we can manipulate with Filters. With the new, flattened layer selected, go to Filter > Blur > Gaussian Blur. Type in 4.0, and press OK. Lower the Layer Opacity to 75%.
Step 25
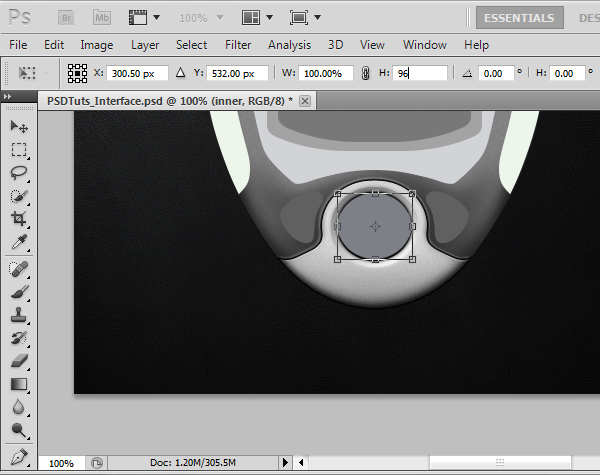
We must create the basic inner shape for our actual buttons. If you saved your selections as I advised in step 11, you can load your Circle’s base selection quickly. Create a new Layer, and fill it with black. Press Command + T, and in the Options Panel, choose a Width of 85% and a Height of 85%. Press Enter on your keyboard. You should have a result like mine. If your circle is slightly pixelated, you can recreate the shape manually with the Elliptical Marquee Tool. You want to have a smooth, round circle to work with.
Step 26
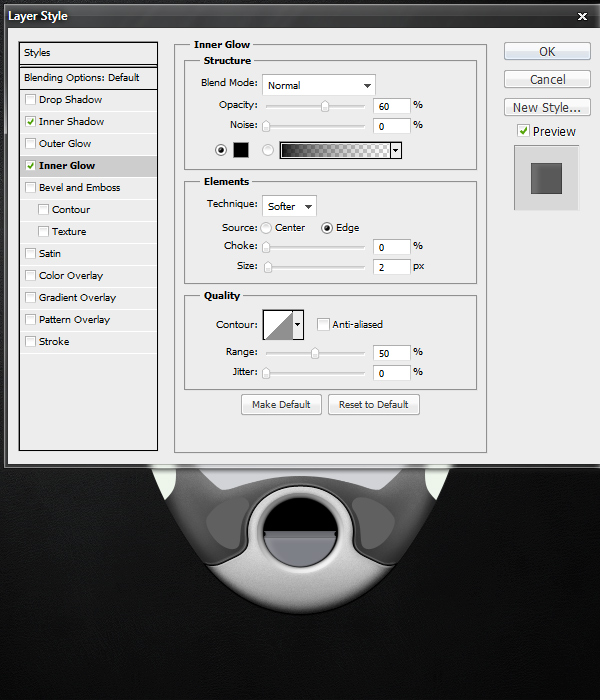
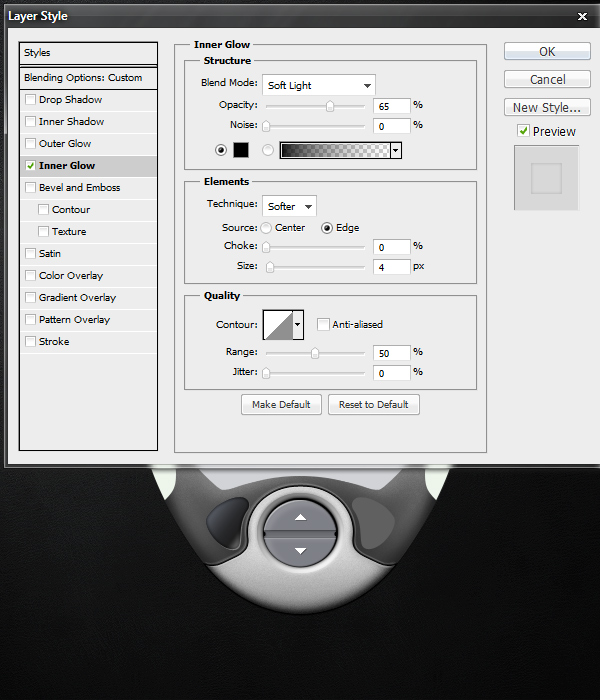
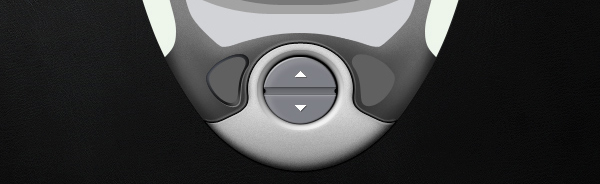
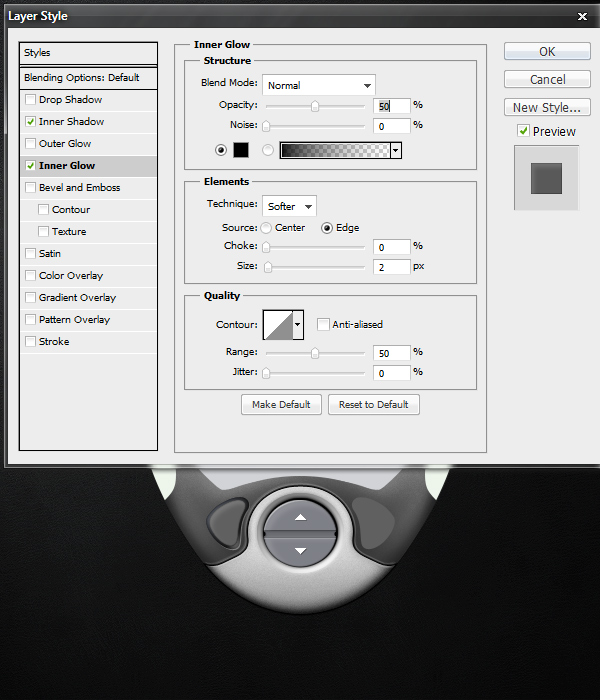
Open the Blending Options for this black circle’s Layer and add an Outer Glow with the following settings.

Step 27
Now that we have our basic inner shape with an appearance of depth, we need to create the button outlines. Adding additional layers that do just what they need to do and no more is the key to efficient realism. Get the selection of the inner black circle, and fill it with this color: #7e8087. Next, press Command + T, and in the Options Panel type in 96% in the Height field. Press Enter to save the transformation changes.
Step 28
Since height transformations from the Options Panel centers the shape vertically, we need to shift the shape down several pixels so that there is a distinct black spacing at the top of the button container. For my source file, I had to move it down 2 pixels. Again, just like in Step 25, make sure you end up with a clean and smooth shape to work with. Recreate it with the Elliptical Marquee Tool if needed.
Creating smooth shapes can take a very long time to master, and it is completely worth your time if you are interested in design. I ended up with this result, try to match this as closely as possible.

Step 29
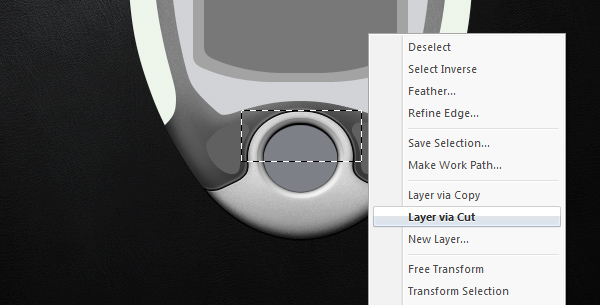
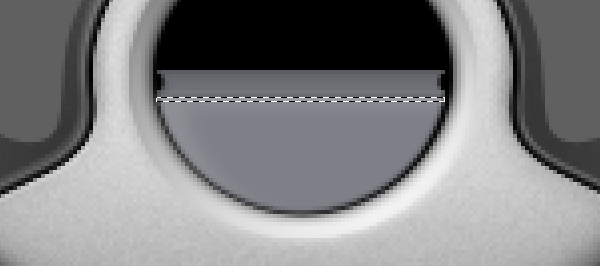
We will divide this button into three sections: the top, middle, and bottom. Using the Selection Tool (M), grab a little more than the top half of the circle. While the new circle layer is selected, right-click on the canvas, and choose “Layer via Cut.” This will essentially cut that selection out and place it onto a new layer while keeping the pixels in the exact same place.
Repeat this again with a selection that covers a little bit less than the top half of the circle. You should now have three layers that make up the same circle visually. Hide and unhide each layer to figure out which layer covers which part, and be sure to rename them to include “top,” “middle,” and “bottom” in their names. Also, try your best to make the top and bottom button equally sized.
Step 30
For this next step, hide the top and bottom parts of the circle. We will be creating little cutouts of the middle piece. This is easy enough to accomplish. You can use the Eraser Tool if you’d like, but I prefer the Elliptical Marquee Tool above all else because of how clean it is. Create a small circle that is slightly horizontally stretched. Move it over the left edge of the middle layer’s content, and press Delete on your keyboard. Move the selection over towards the right side and press Delete again. Make these cutouts perfectly symmetrical for cleanliness.
Step 31
Add the following Layer Styles to the Blending Options of the middle layer.
Step 32
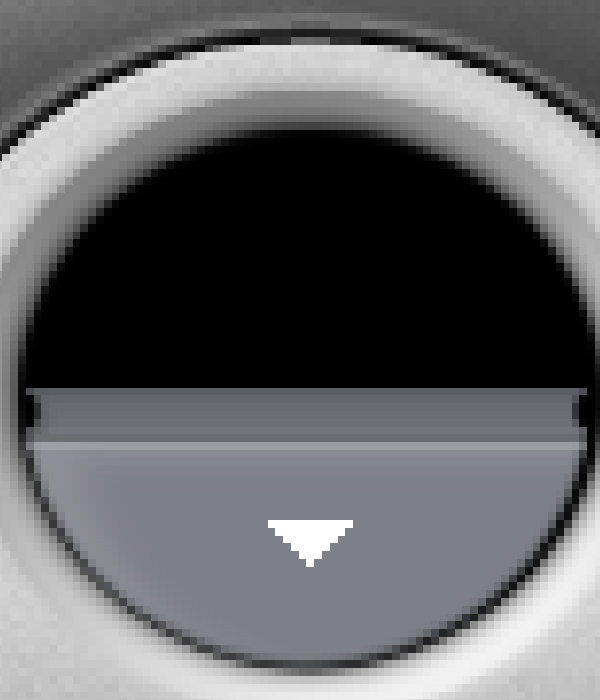
Unhide the bottom layer. Add the following Layer Styles to the Blending Options of the bottom layer.
Here we are actually just creating a New Layer, and filling a 1 pixel tall selection with white. I lowered the New Layer’s Opacity to about 15%. This is to create a sharper edge to the top of the button.
Step 33
Next we will create a down arrow icon for the button. It is actually 11 pixels wide and 6 pixels tall. You can zoom in and create this one pixel at a time. Additionally, add a subtle Drop Shadow to the layer by applying the Layer Styles shown below.
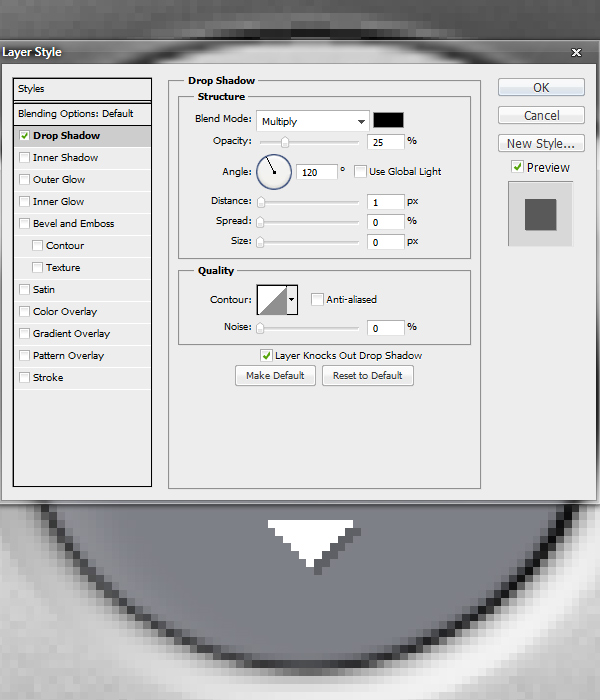
Step 34
Unhide the top button. Repeat Steps 32 and 33 again but for the top part. Obviously, you must calibrate for it to make sense visually. Add a 1 pixel shine on the top-left corner to match the lighting, make the arrow point upwards, etc. If you have followed the steps up until this point and you understand the basics of Photoshop, it should be very clear how you can accomplish an outcome like mine.
Step 35
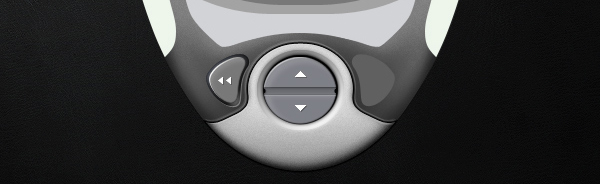
Next we will create the left button. Start off with the basic ideas behind Steps 18 through 21. I will go through each step just to be clear though.
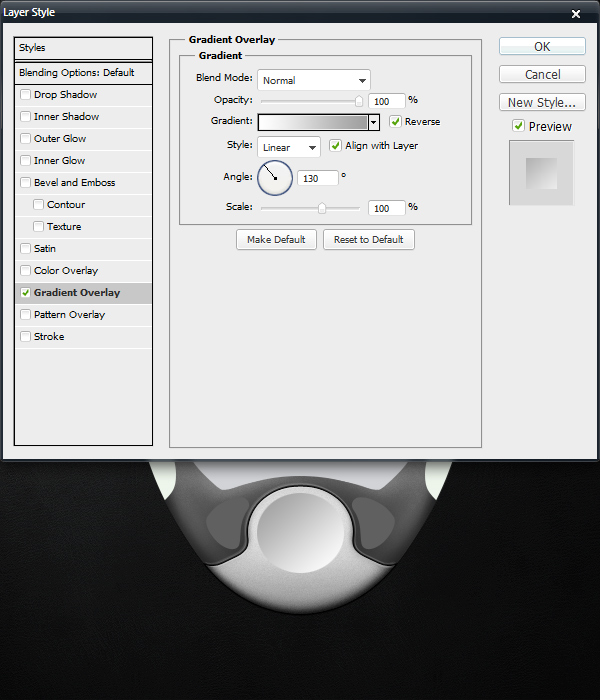
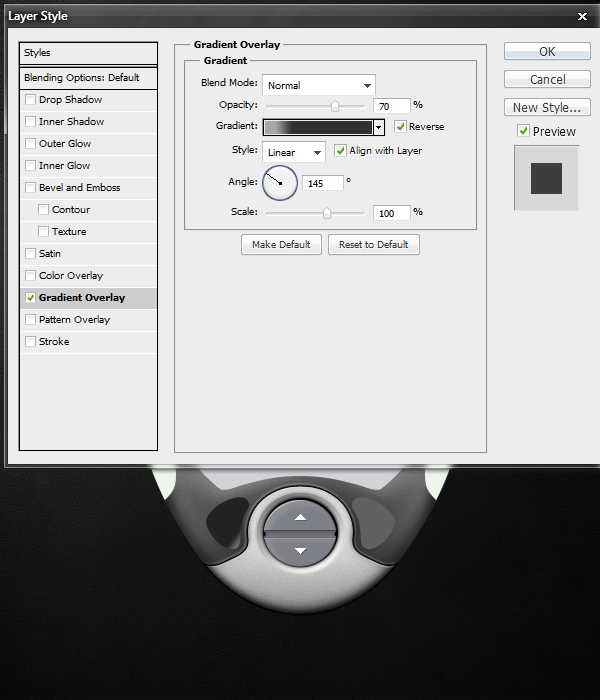
First, open the Blending Options for the base layer of the left button’s shape. Apply a Gradient Overlay with the following settings.
Step 36
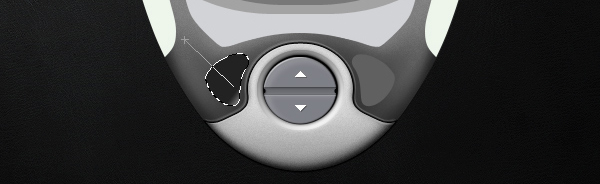
Now let’s add a blue Radial Gradient from the top left corner at an angle of about 130 degrees. First, load the left button’s selection to isolate the gradient’s outcome. Choose #6f7480 as your Foreground color, and select the Gradient Tool (G). In the options panel, set the Gradient Editor to “Foreground to Transparent” just like we did in Step 13. Also, make sure the Radial Gradient option is selected. Experiment with different outcomes and look to my result for guidance.
Step 37
Next, add a 1 pixel reflection on the bottom left region of the shape. To do this, load the left button selection, create a New Layer, and fill the selection with white (#FFFFFF). Press Command + D to Deselect, and press V to select the Move Tool. On your keyboard, press Down once and Right once. Reload the left button selection, and with the Selection Tool (M) active, press Delete on your keyboard to trim the button area off. Lower the Layer’s Opacity to 40%. This will leave you with a clean, 1 pixel reflection at the bottom right corner of your left button’s container.
Step 38
Duplicate the original base layer that you added the Gradient Overlay too, and move it on top of the 1 pixel reflection Layer. Set the Layer’s Fill to 0%, and add the following Inner Glow to the Blending Options.
Step 39
Next create the actual left button that will fit inside of our container. The lighting effects we have made will make more sense after we fill in this button. Load the left button’s selection again, and go to Select > Modify > Contract. Type in 3 and press OK. On a New Layer, fill in your selection with #606060.
Step 40
Apply the following Layer Styles to the base layer created in Step 39.
Step 41
Repeat Step 37 to create a reflection at the top left region of the button’s shape. With this reflection, I left the Layer’s Opacity at 100% rather than at 40% like we did in Step 37. Additionally, repeat step 33 to create the double arrows. These are 1 pixel size smaller, and are pointing to the left instead. Remember to add the subtle 1 pixel Drop Shadow as well.
Step 42
While respecting the lighting, reproduce a mirrored version of steps 35 through 41 for the right button. If you feel confident, you can duplicate the organized Folder that you kept your right button’s Layers in, and press Command + T > Right Click > Flip Horizontally. Then you can use the Move Tool (V) to shift the button into place. With this method, you will have to go back through your Folder and delete/edit most of the Layers to create lighting that matches the outcome shown below. The advantage is that you have all the original layers intact, so you can get away with just modifying some of them.
Don’t simply duplicate and flip it though, a pixel-perfect symmetry will ruin the realism of the interface. I learned this mistake by doing that for many years. If you haven’t learned this lesson yet, now is a great time. Take the time to make the realistic lighting effects, it brings your work to a whole new level of quality. Realistic lighting will yield non-symmetrical results, unless the source is coming from directly above. That is visually boring though.


Step 43
Now we will design the side grips. For the purpose of this tutorial, I will teach you the left side, and you can recreate the right side on your own as you did in the previous step. It is the same basic setup, just with different lighting effects and minor details that make a major influence on the final product’s ability to be perceived as a realistic interface.
First, we will add a 2 pixel indent to the right of the shape. To do this, create a New Layer under the original “base” Layer, load the left button’s selection, and fill it with black (#000000). Lower the Layer’s Opacity to 60%. Deselect your selection (if you haven’t already), and Move (V) the original “base” layer two pixels to the left so it is slightly hanging off the interface.
Step 44
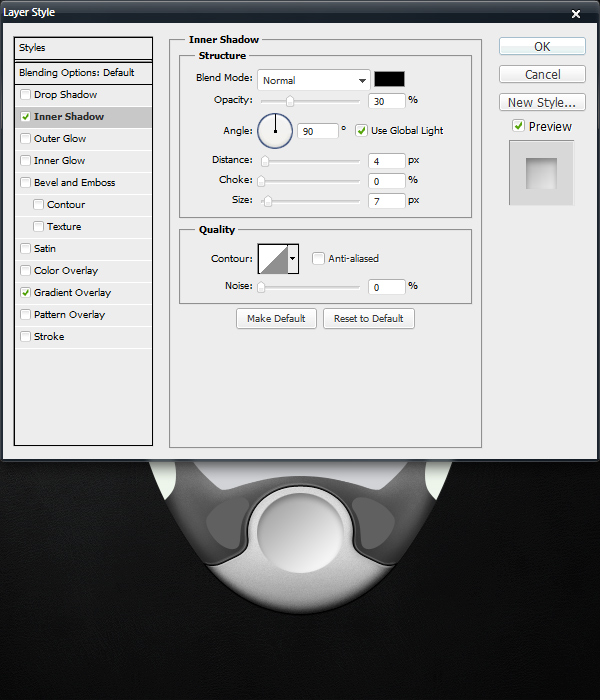
Open up the Layer Styles for the original “base” Layer, and add an Inner Shadow with the following settings.
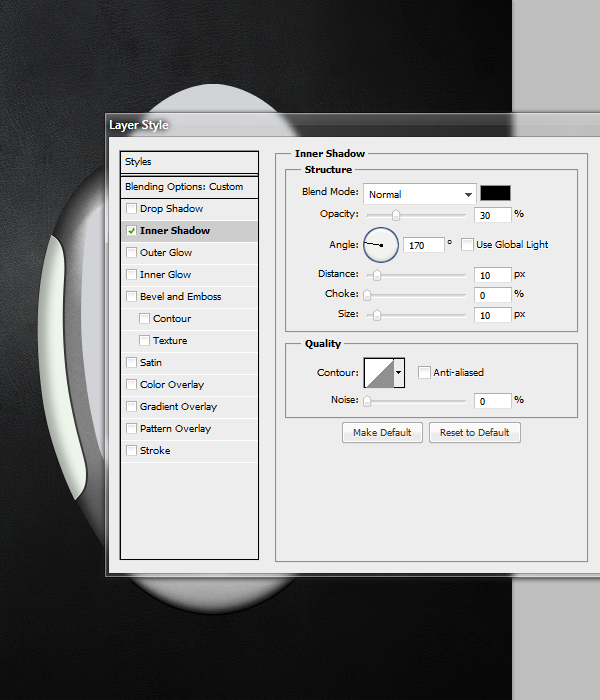
Step 45
Create a New Layer, load the left side’s selection, and fill it with any color (it doesn’t matter, but I usually choose white or black). Set the Layer’s Fill to 0%, and open the Layer Styles. Apply another Inner Shadow, but this time with these finer settings.

Step 46
Next we must create a highlight, some additional dark edges, and a slight grain effect. Create a New Layer, Load the Selection, and fill it with white. Load the Main base’s Layer, Inverse the Selection, shift it 10 pixels to the right, and press Delete on your keyboard. Lower this Layer’s Opacity to 60%. Using the same method in Step 37, create a 3 pixel, black edge to the left of the screen’s shape. The black indent needs a 1 pixel white highlight to compliment it, using methods explain in Step 37, create a 1 pixel reflection again. Also, repeat Step 16′s basic method to add some noise/grain to these handles. I kept my Layer’s Opacity at 20%.
Since these handles are meant to be a rubber-like material, we will keep the grain to a minimum in comparison to the metal-like parts that we made before. Additionally, I darkened the entire grip slightly more by putting a black layer on top of everything with a Layer Opacity of about 10%. After all of these effects, you should see the something along these lines.
Step 47
Repeat Step 42. Pay attention to the lighting. Try to match these results.
Step 48
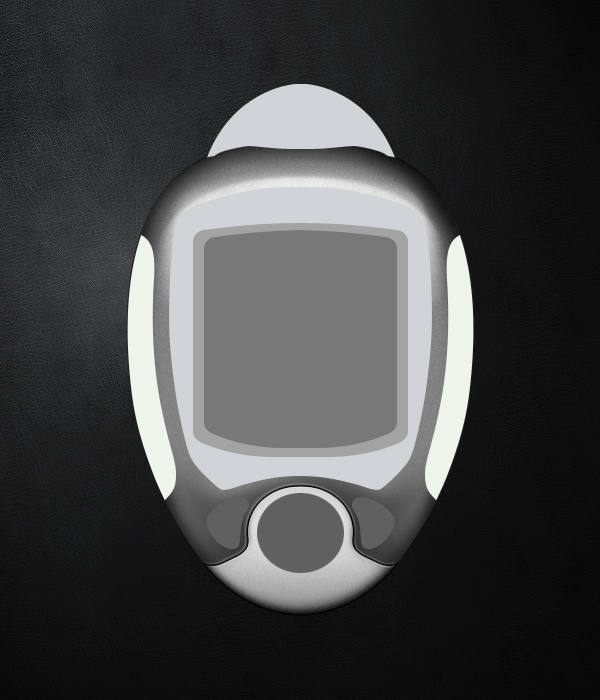
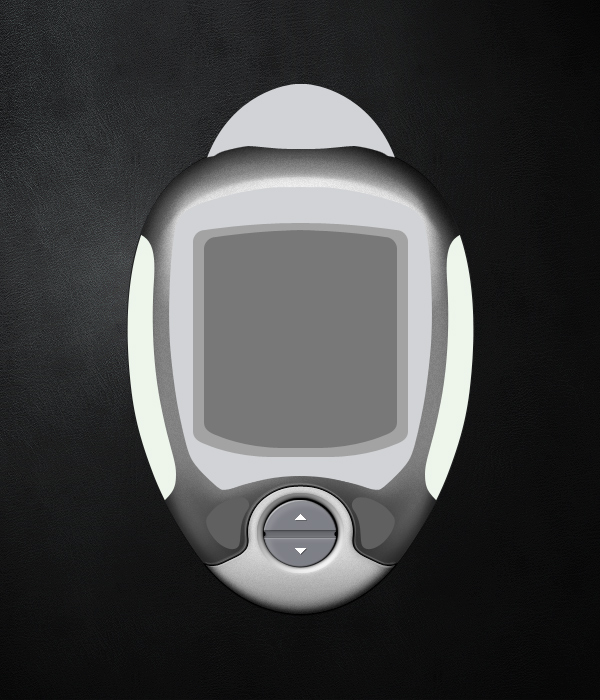
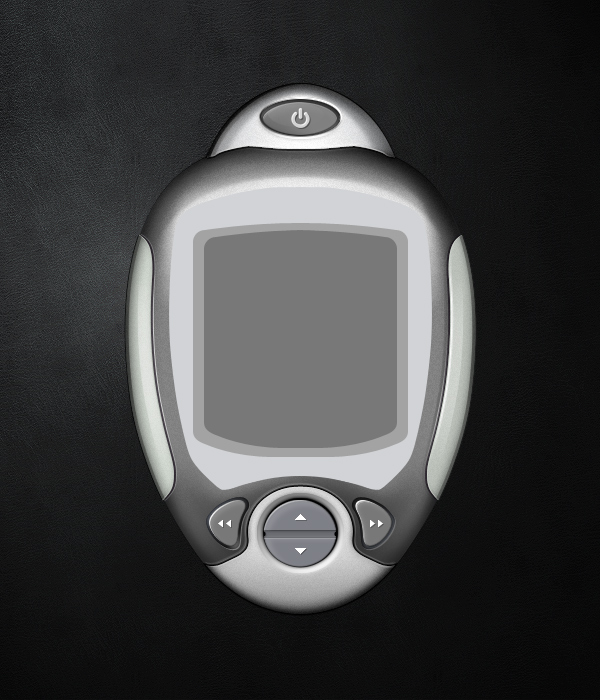
Now that we have the bottom parts and the sides taken care of, let’s move on to the egg-shaped attachment at the top. We will turn this into a power button for the device. Let’s change the color to #a7a9ab, which is slightly darker. We can also add a 2 pixel indent underneath the shape and add a soft black glow to that indent. This area will be much darker than the rest of the interface, so extra details are almost always safe.
Step 49
Repeat the methods behind Steps 12 through 16 to create depth, texture, and reflections. Be patient, and take your time with these steps. Again, they aren’t hard to complete, they just take time. You can see my progressive results below. First I added the dark shadows and edges, then I added the bright areas and highlights. I used about 20 Layers to accomplish this. Don’t be afraid to take breaks when working on highly detailed work. It can take a lot out of you at first, especially when you are still in new mental territory.


Step 50
Lastly, repeat Steps 35 through 41 to create a new button at the top. At this point, it would be overkill to explain each step, you have the tools and information you need to make it. I literally used the exact same methodology with no additional tricks to pull this button off. I found the power icon shape from a google search. Just take your time, create a button container, use appropriate lighting, add shadows, indents, highlights, reflections, and use the Add Noise Filter to create the metallic look.
This concludes Part 1 of this tutorial. I would honestly suggest taking a huge break before moving on to the next part. Many of these steps are repetitive, so you have to condition yourself into pushing through them quickly. Also, be sure to not sell yourself short for being able to create highly detailed designs like this afterwards. This is an incredibly valuable skill that can enhance and compliment your understanding of pixels and graphics in general.
In Part 2, you can expect detailed instructions about the creation of screens. Also, we will be doing some heavy refining to our interface. We will shrink it down, sharpen it, darken it, add contrast, and polish it up with some signature final touches and details that are easy and effective to do.