If I were (and I am not) a gushing
computer audio geek, I would probably go all out (on a not-so-very
long limb) and say Audio Ease’s Altiverb plugin is the best and
possibly only reverb plugin anyone could ever need. I would use a
lot of clichéd modifiers like ‘lush’, ‘gorgeous’ and the omnipresent
‘powerful’ to describe its sound and functionality, and probably speak
on the ‘painstaking’ or ‘intricately detailed’ development process.
But, I am not a gusher and avoid much of that type of language –
yet do find extreme difficulty in doing so
here, as Altiverb is simply just that good.
What Is Altiverb?
Altiverb is an ultra-high quality
convolution reverb plugin made by the Dutch company Audio Ease. A
convolution reverb is a purely digital type of reverb that works by
imparting a pre-recorded room response (impulse response, or IR) on a
stream of incoming audio. In other words, the room reflections of a
specific space are recorded and then imparted onto a piece of digital
audio, resulting in the illusion of that audio event occurring in the
pre-recorded space.
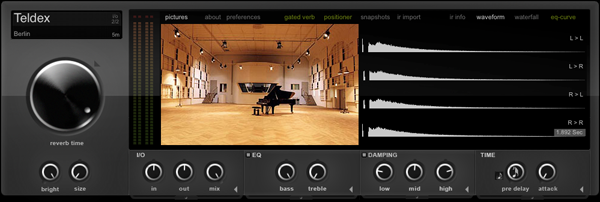
Main Interface
Altiverb’s interface can be broken down
into six basic sections. The library section grants access to the
extensive and ever growing impulse response library. The main
control section contains the more brute force controls, while the
secondary control section deals with fine tuning. The visualizer
menu dictates what is seen in the two visualizer areas below. This
can range from pictures of the recorded room all the way to hidden
sound shaping parameters.
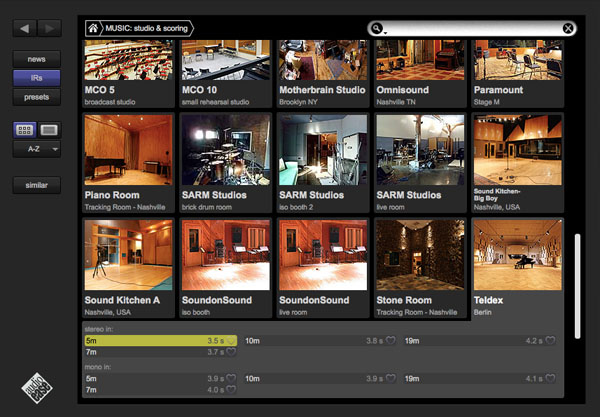
The Library
The Audio Ease team has spent years
traveling the world recording the reflections of iconic spaces
throughout Europe, Australia and North America (primarily). Clicking
on the library area will reveal the fruits of this labor in the form
of a detailed and well organized stock library of impulse responses.
This library is periodically updated by Audio Ease with free IR
downloads.
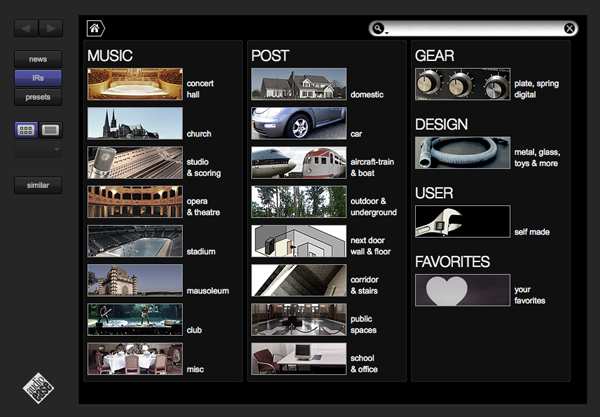
Within each of these categories and sub
categories are hundreds of individual impulse responses of everything
from stadiums to stairwells to nuclear cooling towers. The music
column on the main page consists primarily of spaces where one might
expect to hear music being played. The post column is geared
towards those working in film and consists of spaces where one would
have a conversation or expect to hear everyday ambient sounds. The
final column is more geared towards sound design and leaves space for
user created IR’s as well.
The Controls
Anyone who has used a reverb unit
before should find the controls pretty straightforward. The main
controls to the left deal in the more overarching aspects of the
effect while the secondary controls along the bottom serve to fine
tune things. Below is a brief rundown.
- The reverb time knob adjusts the level
of the reverb tail, thereby making it shorter or longer. - The size knob effects the apparent room
size by adjusting a combination of reverb tail length, early
reflections, and resonance frequency. - The bright knob glues a synthetic
higher frequency reverb to the already existing organic IR to create
the illusion of a brighter tail. - The Input/Output section to the
immediate right contains control for input and output level, as well
as wet/dry mix control. The disclosure triangle opens up a small
menu of test sounds which can be activated and modified to sound
whenever a parameter is changed. - The EQ is a fairly straightforward two
band EQ (clicking the disclosure triangle reveals further parameters)
which effects the wet signal only. The EQ bands themselves are
Baxandall EQs, which limit phase shift and all but eradicate frequency
cancelations when the wet and dry signals are summed. - The damping controls shorten or
lengthen the IR time according to specific frequency bands. The
width of the affected bands can be adjusted in the disclosure menu. - To the far right are the Time controls.
The pre-delay separates the time between the dry and wet signals and
the attack modifies the onset of the wet signal. The disclosure
triangle unveils direct, early and late reflection gain controls as
well as a reverse button and color and modulation controls.
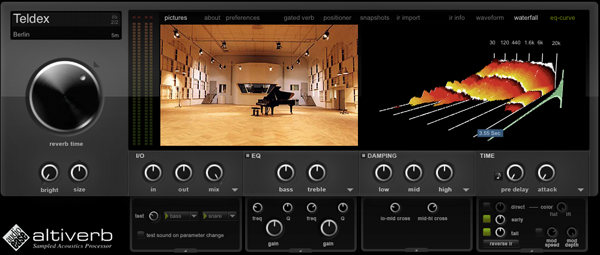
The Visualizer & Menu
The menu across the top of the
interface dictates what is made available in the two visualizers
below. I’ve listed the more unique menu options below.
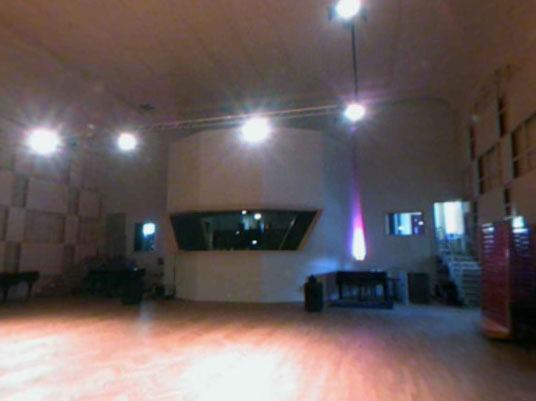
The pictures option displays the
available images related to the selected IR. In the case of the
Teldex Studio, there are a few images of the studio, a diagram of the
recording setup and a surround picture of the space (similar to what
you would find in Google Maps). These different views can be
scrolled through and expanded with controls located at the bottom of
the visualizer window.
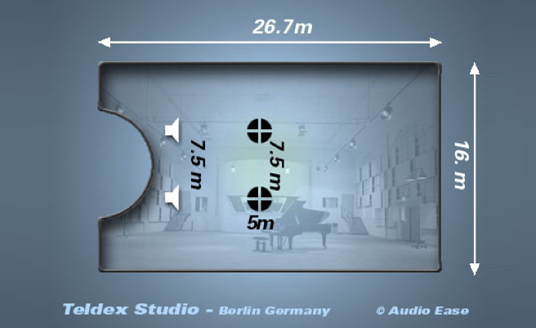
The positioner section reveals a 3D
soundstage in which the user can position the input sound source(s)
within the virtual room. The speakers can be moved anywhere on the
grid and can even be uncoupled to create an asymmetrical stereo
field.

The waveform section is worth noting as
it illustrates the four recordings (one of the reasons this plugin
sounds so great) which make up the impulse response. In this
instance two speakers were used to create the initial sound and two
microphones were used to capture the reflections. Each left to
right/right to left microphone and speaker combination was recorded
and combined to create this particular IR.
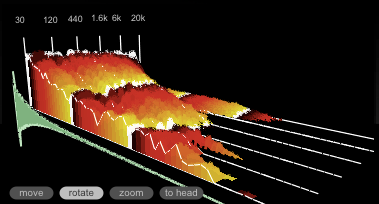
The waterfall, probably Altiverb’s most
distinguishing visual feature, plots amplitude vs. time vs. frequency of the
reflection. This 3D diagram can be moved, rotated and zoomed in on
from any angle and is constantly updated to reflect all pertinent
parameter changes.
The Sound
I’ve just grabbed a few fairly dry
stock loops to test things out. They are all mono (dry and mono tend
to go hand in hand) but will serve as a good indicator of just what
Altiverb can do. Each recording consists of a dry pass and then one
with an Altiverb preset. The only adjustments I made were to the mix
ratio.
Playing some guitar in a Nashville studio.
Altiverb does gear too; a house vocal
run through the wall sized EMT 140 plate.
The same loop with a similar plate
setting in Logic’s Space Designer convolution reverb; harsh, digital,
thin, etc, etc.
An old school drum loop run through an
old school space echo.
If you were ever curious what an
upright bass would sound like in an Austrian forest, this is it.
Another Space Designer comparison. No
contest.
Funky guitar club verb.
That annoying baby sitting next to you
on the plane… put in a metal trash can.
Final Thoughts
In my experience, this is the best
reverb out there. It is a joy to work with and produces great
results every time with very little tweaking necessary. It has an IR
suited for every type of program material and has an extensive
library of sound design and post production effects that I barely
have had time to touch on.
The one draw back is that it costs
$600. Fairly high for a plugin, but a justifiable expense when taken
in perspective—cost vs. quality, importance of reverb as an effect,
the fact that it makes most other units irrelevant, and it’s cheap compared to
hardware. I tend towards the school of thought which promotes
using only a few high quality pieces of gear well so the price,
although still somewhat painful, was one I could live with.
It may
not be for everyone, but I highly recommend consideration towards its
purchase if you are looking for a high quality reverb that will
remain a prominent and cutting edge tool for years to come.
{excerpt}
Read More