The transport tanel is one of the most accessed panels in any DAW. It has the controls that help you to move along in your project, adjust the tempo and timing, move to markers, and, most importantly, control the playback. In this tutorial, I will show you the different functions that it provides and explain how to use them.
Activate the Transport Panel
The transport panel can be accessed by using the Transport
option from the Transport menu, or by pressing the F2 shortcut key. Once it’s
activated, you will be able to see almost all the items in it. It contains items
such as Virtual Keyboard, Record, Performance, Jog/Scrub, and Arranger.
Some of these items may not be activated when you start your project. You can activate
each one by right-clicking the Transport Panel and activating the ones that you
need, or select the option to Show
All the controls at once, or to show the default view.
The default view has
everything activated other than the Virtual Keyboard, Jog/Scrub and Arranger
items. There are also preset views such as the Transport buttons view, Buttons
and Time Display views, and Virtual Keyboard views etc.
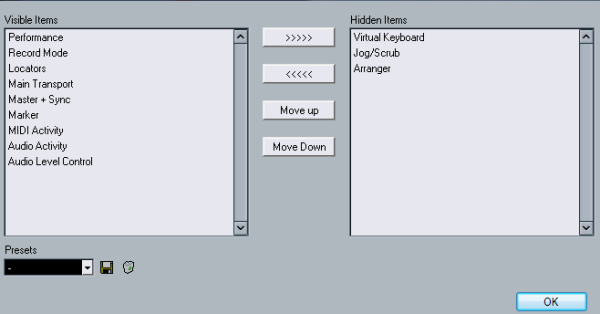
You can manually adjust the items in the panel by clicking
on the Setup menu. Here you have the option to adjust the visibility and the
position of each item. Click on the required item in the Visible Item section, and click on the right arrow to move that item to the Hidden Items section. You
can also add the items to the visible group by using this same method.
Move the
items from the Hidden Items list to the Visible Items list by pressing the
arrow pointing to the left. For changing the position of the items, click on
the Move Up or Move Down button.
In order to save your custom view, click the Save button
near the preset list, or select Save from the right-click menu of the
transport panel.
The Main Transport
This is the part of the panel that helps you control the overall
playback of the project. A few of the functions of this item can be seen in the
toolbar, which will help you to easily access them in the window.
Here is a
list of all the items that belong to the main transport:
- Go To
Previous Marker/Zero: This will bring the cursor to the start of the
project if there are no markers set up in the project or it moves to the location
of the left locator. The shortcut key can be accessed by pressing 1 in
the numeric keypad. - Rewind:
As the name suggests, this button will let you rewind by small amounts or by large
amounts, relative to how long you press the button. The – in the numeric keypad
is the shortcut key. - Fast
Forward: This button lets you to fast forward the playback of the project
relative to the how long you press the button. The + on the numeric keypad is the
shortcut key for this function. - Go To
Next Marker/ Project End: This will move the cursor to the next marker on
the project, if you have markers set up in it. Otherwise it will move to the location
of the right locator. You can access it by pressing 2 on the numeric
keypad. - Cycle:
This will loop the area between the left and right locators when played. This
can be viewed if the left locator is before the right locator. However, if the
left locator is positioned after the right locator, the area between the
locators will be skipped and not played. You can activate this option by
pressing / in the numeric keypad. - Stop:
This will stop the playback, or bring the cursor to the last marker in the
project, if markers have been set up. The 0 on the numeric keypad can be used
to easily access this function. - Play: This
will start playback of the project from the current location of the cursor. You
can use the Spacebar or the Enter key on the numeric keypad to activate this. - Record:
This is one of the most important button in a recording engineer’s DAW. This
button is used to record all types of audio data into your project. The
shortcut key for this button can be accessed by pressing the * button on the
numeric keypad. - Nudge
Cursor: This will move the cursor by one frame. The + will move the
cursor to the right and – will move it to the left. - Project
Time Position Slider: This slider can be really useful for large projects
like movies or orchestras performances. You can move to long sections in your
project by clicking or dragging on the position slider. - Display
Formats: The main transport also has primary and secondary time
displays. They are independent from the time display on the ruler, so you can set one format on the ruler, another format on the primary display, and
yet another format on the secondary display. Since the primary display is the
main display, if you change the main display, the format for the ruler will
also be changed. You will have to change the format for the ruler separately if
you want it to show different time format. You can change the time formats of
each by selecting the drop-down arrow on the right hand side of each displays.
If you have to swap between the primary and the secondary time displays, press
the Exchange Time Formats button.
Arranger Track Controls
This item in the transport panel will help you to control
the playback of the Arranger track. It has function for moving between various
arrangements, last repeats, and different parts.
You can move between the different chains by using the up
and down arrows that are on the panel. You have the controls to change between
the first repeat of the current chain and the last repeat of the current chain.
If you have more than one arranger chain set up, you can switch between them by
using the drop-down menu. This can be done for choosing between different chain
steps as well.
If your current chain step has repeats on them, the Current
Chain Step Repeat will show you the current repeat that is being played. You
can move between individual repeats by clicking on the required repeat button.
To know more about the Arranger track and how to properly
set it up in your project, check out my previous tutorial, Improve Your Arrangement With the Arranger Track.
Conclusion
In Part 2, I’ll explain the other important items on Cubase’s transport panel, such as the jog panel, locators, and record mode. Stay tuned.
{excerpt}
Read More