D# Fat is a collaboration made by two trance giants last year. It has a strong modern EDM influence from W&W, and a piano part probably by Armin van Buuren. In this tutorial I’ll show you how to make a rough version of the intro block. We’ll program the synths, bass and drums in MIDI using Ableton plugins
and one shot samples.
Listen to the clip from 1:07 till 1:35.
The a Project in Ableton Live
For this musical part the basic settings are:
- Tempo 128 BPM
- Time signature 4/4
- Scale F minor.
I coloured the synth channels green, the bass brown, and the drums blue.
I also created a group for the synths and the two claps.
1. Attack (Synth)
This is the first sound, for the first mega reverb sound.
It is implemented with only one F note (the first note in F minor).
I used a harmonically rich wave in Operator effected with reverb.
The EQ Eight gives it lot of top end to add impact and cut through in the mix. Furthermore, I saturated the sound with a bit of Dynamic Tube.
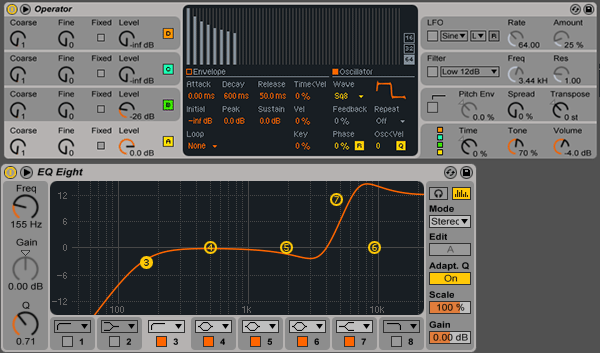
- Operator: default algorithm, Op B (sine, -26 dB) modulates Op A (square8, 0 dB), main tone 70%, main volume -4dB
- Dynamic Tube: tube mode A, dry/wet 100%, out 2.38 dB, drive 15 dB, tone 0.51, bias 82%, envelope 4.8%, medium attack, long release
- EQ Eight: 155Hz cut, 5kHz 12dB shelf boost
- Reverb: maximum size 500, decay 20 sec, dry/wet 44%, stereo 100, medium predelay, default lo cut, default hi cut
- Limiter: default settings.
2. Response (Synth)
This is the second sound, for the second mega reverb melody.
All the notes are F notes.
Unlike the attack synth, its top end isn’t boosted,
but cut with a shelving filter.
It is important that this sound uses glide,
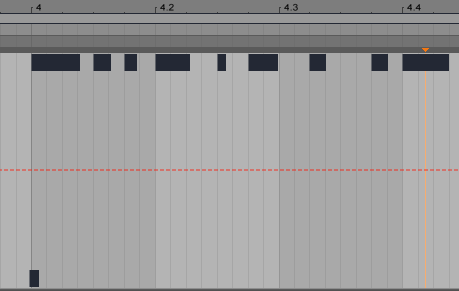
which is switched on and programmed with an F not an octave below the higher F note.
This lower note is very short, and placed precisely before the section.
I made the sound wider in stereo with a Simple Delay set in time mode with a short time set in milliseconds.
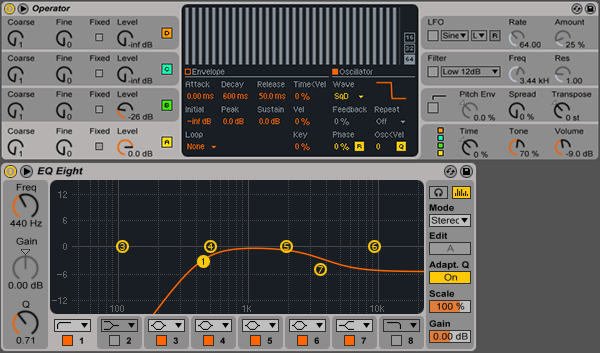
- Operator: default algorithm, Op B (sine, -26 dB) modulates Op A (square D, 0 dB), main tone 70%, main volume -9 dB, glide is on
- Simple Delay: time mode on both sides, left 1ms, right 24ms, dry/wet 100%
- Reverb: maximum size 500, decay 7.5sec, dry/wet 44%, stereo 100, medium predelay, default lo cut, default hi cut
- EQ Eight: 440Hz lo cut, 3.71kHz shelf cut -5.48 dB with Q 0.59
These are the MIDI notes. Please be careful, we need the small first note as well.
3. Little (Filler Synth)
For this part I programmed a plain basic two note melody with a square wave.
This goes into the background, so there is a dose of EQ cutting.
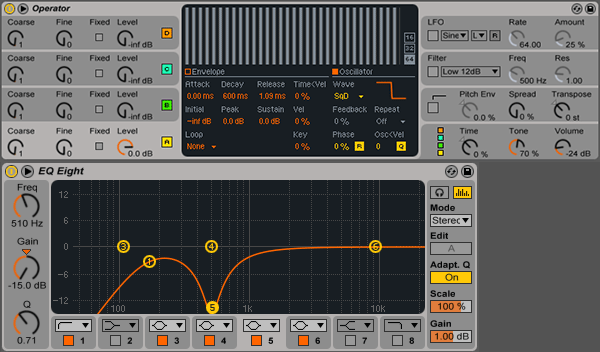
- Operator: default algorithm, Op A (square D, 0dB), main tone 70%, main volume -24dB
- Reverb: medium size 9, decay 2.76sec, dry/wet 30%, stereo 47.62, medium predelay, default lo cut, default hi cut
- EQ Eight: 160Hz lo cut, 510Hz notch cut -15dB with Q 0.71
4. Noisy (Filler Synth)
After the little, we’ll create a simple filler part for the background.
I used the last algorithm and some feedback with Operator. This sound gets some rough movement from the Auto Panning effect.
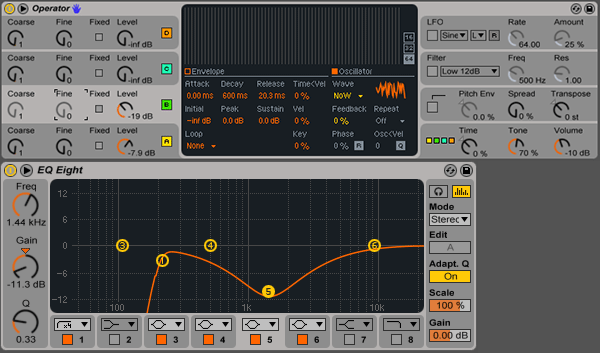
- Operator: last algorithm, Op B (white noise, -19dB), Op A (square D, feedback 90%, -7.9dB), main tone 70%, main volume -10dB,
- Auto Pan: amount 77%, rate 1/4, phase 180°, LFO waveform sine,
- EQ Eight: 201Hz lo cut, 1.44kHz broad bell cut -11.3dB with Q 0.33.
5. Bass (Synth)
With the bass, two things are important: the sound is heavily sidechained to the kick,
and the synth is using a rich waveform—a saw wave in this instance.
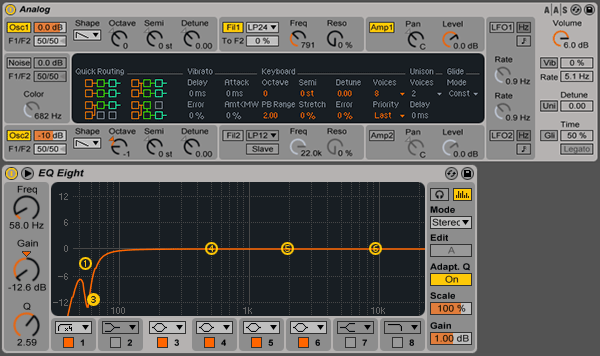
- Analog: Osc1 saw 0dB octave 0, Osc2 saw -10dB octave -1, filter LP24 freq 791Hz 0 reso, amp envelope attack 5 ms, decay 626 ms, sustain 1, release 626ms, main volume 6dB
- Compressor: sidechained to the bassdrum, ratio 2:1, medium attack, short release, strong threshold -21dB
- EQ Eight: 50Hz lo cut, 58Hz notch cut -12dB
- Limiter: default settings.
6. Kick (Sample)
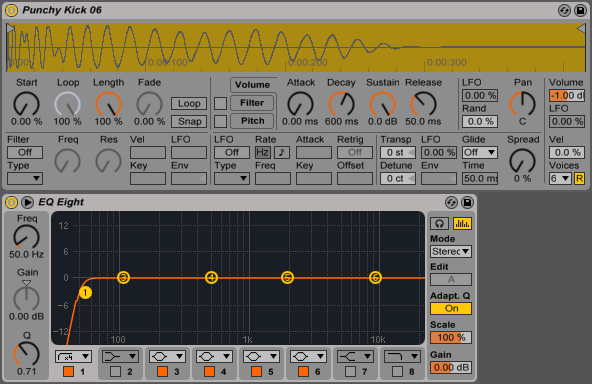
I used a punchy kick drum loaded into Simpler with a touch of EQ removing the very subs.
The exact settings are:
- Simpler: main volume -1dB,
- EQ Eight: 50Hz lo cut with 4x times curve.
7. Clap, Left (Sample)
I loaded a stereo clap sample into Simpler with -1dB main volume.
8. Clap, Right (Sample)
We can use a mono clap sample with Simpler with -1dB main volume.
9. Clap Group Channel
We can hear from the original track that the claps are stereo, and probably very different on both sides.
So I used a group channel, and two samples.
Before that I panned them 26 left, 50 right,
because of the sample differing in mono and stereo content. Optionally we can enhance it more with distortion and saturation.
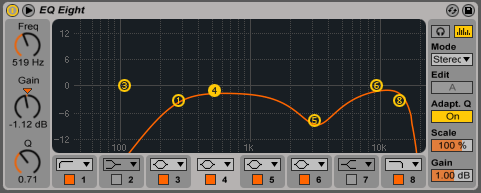
I put an EQ Eight on the group with the following settings:
- 271Hz lo cut,
- 519Hz -1.12dB broad cut,
- 3.23kHz -8.55dB bell cut,
- 15.2kHz high cut.
10. Synth Group Channel (for Attack, Response and Little)
For these three sounds I used a group channel.
Then I added EQ Eight with a 130Hz lo cut and then a Compressor
(with a medium strong feel) sidechained to the kick,
which is compressing about 4-5 decibels.
11. Master Channel
I used this standard (at least in my sessions) chain on the master channel. The Spectrum is there to see what is happening with the frequencies, and EQ Eight for removing low frequency content on the sides (in mid/side mode). The Limiter is to catch any peaks above 0dbFS, and Utility to check mono compatibility width 0%. (We can switch this on and off when testing.)
The exact settings are:
- Spectrum: default settings
- EQ Eight: 200Hz cut from the sides in mid/side mode
- Limiter: default settings
- Utility: 0% width (I’m using it in off mode for rendering and sound checking).

Mixing Workflow
As you can see from this tutorial, I used mainly subtractive EQ,
except for the attack synth sound, where I directly intended to make it bigger
and more pronounced. For the other instruments I removed the bits to make space
for other instruments.
I also decided to remove the audio content around the dominant notes or frequencies.
These were either spikes or crossing each other, when you check them in frequency
analyzers.
Conclusion
That ends our session of recreating D# Fat.
The main part was the attack and response synth, treated with lots of reverbs.
Then there were the filler synths, bass and drums sidechained together in a
strong pumping style.
If you’d like a more detailed sound and increased depth, add chorus and plenty of unison, or consider using other synth plugins—maybe some wavetable or additive instruments as well. Let us know your experiences in the comments.
{excerpt}
Read More