In this quick tip, I’m going to show you a neat way of implementing a low/high pass filter using the Auto Filter device in Ableton Live. By that, I mean that we are going to be able to construct a filter that goes from a full low pass to a full high pass with the turn of one knob, leaving the unprocessed signal to pass in the middle position.
Setting Up
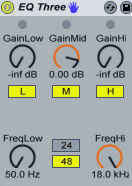
Quick tip before we start. I am going to show you a way of implementing a low pass and a high pass filter in one EQ3 device as two separate controls, though. On the EQ3, turn the GainLow and GainHi all the way down and set the GainMid to 0dB.Set FreqLow all the way down to 50.0 Hz and FreqHi all the way up to 18.0kHz. FreqLow acts now as a high pass filter and FreqHi as a low pass one.
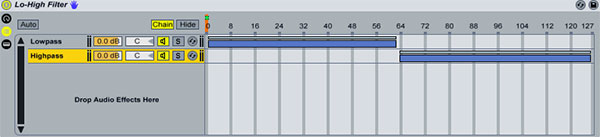
Now, let’s start again by dragging an Auto Filter device, then grouping it so that is occupies a place in a chain inside an Audio Effect Rack. Rename it to Lo-High Filter. Set the Filter Type to Lowpass and map the Filter Cutoff and Filter Q to Macro 1 Macro Control. Hit Map Mode and set the Auto Filter’s Resonance Min value to 0.40. Hit Map Mode again to exit the Macro Mappings.
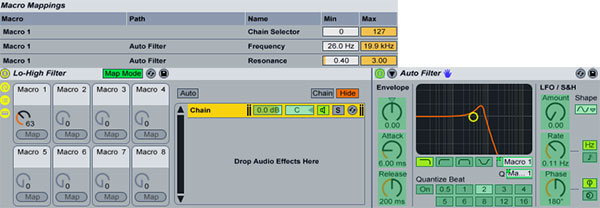
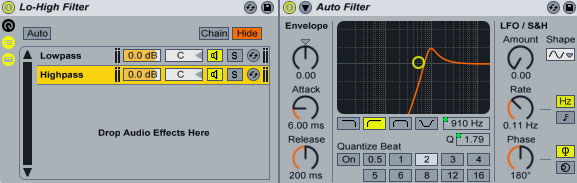
Copy the existing chain to create another one and set the new Auto Filter’s Filter Type to Highpass. Notice that all Macro mapping are also copied from the initial rack. Rename the first chain to Lowpass and the second to Hipass.
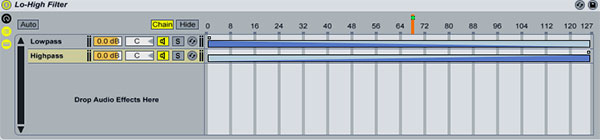
Hit the Chain button to show the Show Chain Selector Editor. For both racks define a range between 1 and 126. Click the first rack’s right Fade Range handle and drag it all the way to the left. Click the second rack’s left Fade Range handle and drag it all the way to the right. Finally, map the Chain Select Ruler to Macro Knob 1(by right-clicking and selecting Map to Macro 1).
Turning the knob from left to right executes a full filter sweep from low pass to high pass. What we are doing is morphing or crossfading between the two filter types. The Macro knob at 0 setting prevents any audio from passing through, same thing happens by turning the knob all the way to the right after the high pass has been executed. We need to do that since extreme highpass and lowpass Auto Filter’s settings don’t silence the audio completely. Since audio is not passing through the filters, we also save on CPU resources.
Listen to a sample:
Download audio file (sweep1.mp3)
Fine-tuning the Effect
Although the effect sounds good, there are certain issues that could be addressed. For once, when the 2 filter types are being mixed into each other, there is never a clean lowpass or highpass signal since there will always be an opposing signal fading in or out. Also, on the middle Macro knob 1 position with the value of 63, we don’t get a clean, unprocessed signal, instead the signal is still affected from both filters.
On the first chain, set a zone range from 1 to 63. Drag the right edge of the Fade Range all the way to the right. On the second chain, set a zone range from 63 to 126. Drag the right edge of the Fade Range all the way to the left.
Make a copy of the first chain and rename it to LowpassFadeOut. Drag a Utility plugin to the newly created chain and select the Invert preset. Set a zone range between 48 and 62. Drag the left side of the Fade Range all the way to the right. Make a copy of the second chain and rename it to HighpassFadeOut. Drag a Utility plugin to the newly created chain and select the Invert preset. Set a zone range between 63 and 78. Drag the right side of the Fade Range all the way to the left. Finally, create a fifth empty chain with no effects and rename it Dry. Set a zone between 48 and 78. Drag the left Fade Range edge towards the right to a value of 63. Drag the right Fade Range edge towards the left to a value of 63.
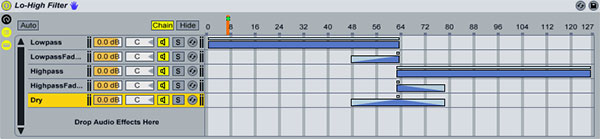
Let me explain: As we turn the knob to the right the low pass filter is activated from range 1 to 48. From 48 to 63 its inverted signal(LowpassFadeOut rack) is gradually mixed in meaning that at the mid point of 63 the low pass signal is going to be cancelled out completely(silence). Meanwhile le the dry unprocessed signal is mixed in(bottom rack). At point range of 63 we get only the dry signal playing. Then as we continue turning the knob the high pass filter is activated but is initially also cancelled out by its inverted one(HipassFadeOut rack) allowing the dry signal to fade out completely at point 78 and the highpass one to be mixed in as well.
Listen to a sample:
Download audio file (sweep2.mp3)
I think, once you see the source files you will get what’s going on. The good thing about the whole setup is that you are able to make use of the Auto Filter’s filter modulation capabilities, as well. Finally, you can use any filter or EQ plugin of your choice.