Don’t you hate to see the CPU overload indicator light up?
Everything sounds distorted, and vocals resemble like Darth Vader on a bad day. Well, Cubase has an option called Freeze, which will
definitely help.
When VSTs are played,
they’re usually processed in runtime, increasing the load on the CPU. The
same with audio tracks that have a lot of processing and plugins on them. Freezing
is done by rendering the track to an audio file, reducing the demands placed on
the CPU.
In this quick tip, I’ll explain the process of freezing a track.
When to Freeze
Freezing frees up the CPU, allowing it to allocate its
resources to more important processes. Freezing is best effective when your
system is under a lot of load, causing your sound to get distorted or making
the sound feel like its gurgling water.
When you face these kinds of problems,
identify the tracks that have many plugins on them, or VST instruments which
are large or using many samples. These tracks are usually the
culprits, and they are the ones that need to be frozen.
How to Freeze a VST
The first step in freezing a VST is to set up the track
in the way you want it to be played. This includes editing the MIDI tracks
associated with the VST, and making changes to the instrument channel related to
the VST. If you have added any automation to the tracks, make sure that the
Read button is activated for the tracks.
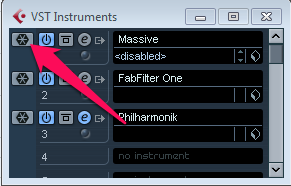
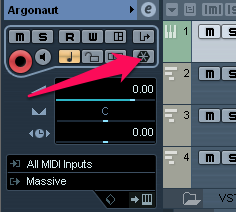
The second step is to select the VST’s instrument window from
the Devices menu (or press F11). If you’re using an instrument channel, open up
the inspector of that channel. Then click on Freeze.
The following dialog box appears:
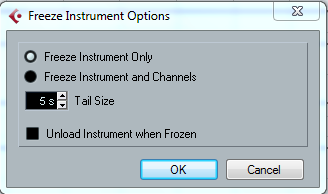
- Freeze
Instrument Only will freeze only the instrument channel, meaning that
any insert effects that are on the channel will not be frozen. If you feel you may have to edit or change the settings of the effects on this channel,
select this option. - Freeze
Instrument and Channels is used for freezing all the pre-fader insert
effects on the channel. Use this option if all the effects and
edits are finished on this channel. The tail size lets the sounds complete their
normal release cycle. If you set it too low, the sounds and effects (such as
delay) might get cut off. - Unload
Instrument When Frozen will removed the frozen VST from your computer’s memory. This frees up the RAM if the VSTs were using a large amount of
it.
Now press OK, and the track will be rendered and the
resources freed up. Playback will be the same as before, but less resources will be used, and the CPU will be less loaded.
How To Freeze Audio Track Effects
If an audio track has too many plugins or effects on it, you can freeze that track, reducing the overall load on the CPU. The method is similar to the one above.
Tip: You can only freeze audio tracks, not group channels or FX channel tracks.
Select the Freeze Channel option in the audio track’s inspector. Here you can adjust the Tail Time in seconds, which will define
how much time is allowed for the effects—such as delay and reverb—to completely fade
out. Press OK and the track will be frozen and locked from further editing. You
will still be able to adjust the levels, panning, EQ and effect sends.
Remember that the last two insert effects on the track will not be frozen, as
they are post-fader insert slots.
How To “Let It Go”
In case you want to edit the file again, or if you want to
unfreeze it altogether, press the Freeze button again. You will have the option
to delete the frozen files completely, or to Keep The Freeze files, which
will let you freeze the file again after making the necessary changes.
Conclusion
Freezing is a method that every engineer must know how and when to use. It allows you to reduce the load on your CPU
considerably, making it easier for you to perform your job and make better
music.
Make sure that the tracks that you select for freezing will not be
continually edited, because once the tracks are frozen, you will not be able to
make any major changes to it.
Next time you feel that one of your tracks is slowing you down, click on the Freeze button, and go build a snowman!
{excerpt}
Read More