One of the most subjective and hotly debated
techniques during mix-down is how to process your mix (or master) bus. When
used appropriately, processing the mix bus can bring together your mix in a way individual channel processing can’t achieve by itself.
There’s a fine line between using this technique for
effect and stepping over into the mastering engineer’s domain. It usually takes a
lot of experience to spot the difference between the two, and this can vary wildly
from project to project.
Regardless, here are some of the most commonly used mix
bus techniques, why they are used, and how you can creatively consider their use
for your next mix, bringing in new ideas you may not have previously considered.
Here is an extract we’re going to process creatively
throughout this tutorial:
1. Compression
Compression on the mix bus can take many forms. Let’s
look at two common uses and how we can begin to manipulate them.
Get Sticky! Compress to Glue
We often hear of engineers talking about using
compression to “glue” a mix. On a mix bus, this might not necessarily
mean using a compressor to dramatically control dynamic range. Just the sound
of a particular unit, or the act of routing 50 individual tracks through one
stereo compressor, can help to bring all the individual elements together as
one.
One of the most sought-after compressors for this task
is the SSL console bus compressor. There are various plugins available (notably
Waves and Universal Audio) that emulate this compressor extremely successfully,
as well as being available as separate pieces of hardware (even
available as a hardware unit by original designer Alan Smart).
In any case, the typical trick is to set the attack to
all the way slow (.30), make sure the threshold only just tickles the mix, and experiment with the release. Set the release slow,
fast or automatic. Now, play around with the results and see which works best for
you.
Don’t be afraid to crank the threshold level – take it to an extreme so you can hear exactly what is happening to your mix. Then, tone it down – tastefully. Working to that extreme gives you a perspective on the mix processing that isn’t possible at subtle levels, even if that’s where you end up later.
Here is the extract mixed into mild bus compression:
You could even be daring and use the side chain input to pump your mix
from another component. Check out how this might sound:
Be aware that using this type of compression over a mix bus can subtly change the perceived levels you have worked so hard to get right.
It’s radical, but if your mix calls for it… Be bold. Mix into the compressor.
It may sound controversial, but one commonly used technique is to mix
into the compressor itself. (You can always take it off later.) This can be
highly creative!
Both techniques are heavily debated, and neither are without their
flaws. So be creative and see what works well for you, and your mix.
Compress to Fix
Multiband compression is a much more heavy-handed
approach to processing your mix bus. It works on the principle of using
separate compressors on separate frequency ranges (hence multiband) to process
a very specific set of frequencies within your mix.
Take extra care when using multiband
compression on the mix bus. If you are using it to fix your mix, it might be
more worthwhile for you take a look at the individual channels.
However, used creatively, you can process your mix in a
way no one has tried before. You want a sizzlingly smooth top end? Try and
process the upper-range EQ and leave the rest of the mix untouched. The
possibilities are endless.
Again, you need to see what works for you but be wary
of wandering into a mastering engineers domain here.
2. Saturation
Saturation is the process of emulating the effects of
recording hotly onto tape, resulting in a warm soft-clipping effect, often
attributed to the days of analogue.
In the digital world, clipping is usually a no-go, but
if you tracked this way, or feel an older dirtier sound is appropriate, then
you can play around with soft clipping and see if you like the effect.
It’s important to be gentle and not overdo it. It
can’t be removed once mastered.
Tip: If you find saturation is too much for the mix, try a little on just the drum
bus.
3. Limiting
This is where we get to the tricky part!
If you’re sending your mix off for band/artist/A&R
approval, you will most likely limit the mix you have sent to get the track into
the “commercial level” zone. Many top-line mix engineers will not let
a mix out of their sight without at least some limiting applied to the master
bus.
Here is the mix, now with limiting added:
It’s usually good practice to steer well
clear from placing this kind of limiting on the master bus when sending your
mix to a mastering engineer. You may need to provide two mixes – a mix for
approval and a mix for the mastering engineer to master.
If you’re sending a mix for approval, you will probably add a limiter. If you are sending a mix for mastering, it’s pretty wise to leave this off.
Remember, louder is often perceived to be better, and
can play tricks on you if you simply strap a limiter across the bus. This is generally not an area to be wholly creative
in so be cautious.
4. EQ
Using EQ is an area I feel particularly strongly about. Be careful when using it on your mix bus.
Inevitably, a mastering engineer will apply their own
EQ to your overall mix. Unless you are going for a very specific effect, it is
best to leave corrective EQ to another person’s ears. Be careful not to EQ to
compensate for “duller” areas of your mix—they could be best fixed within the mix itself. Also, see multi-band compression above.
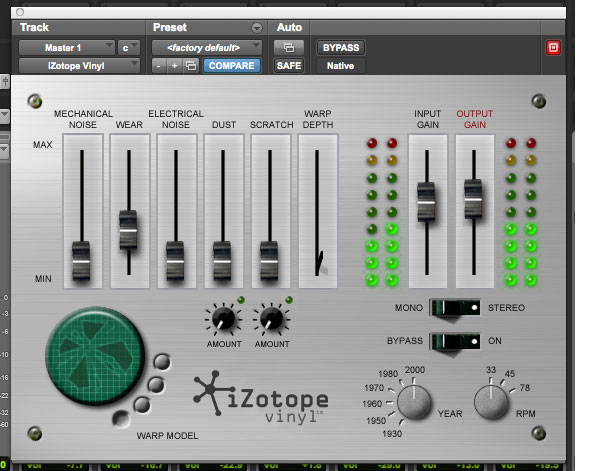
5. Specialist Effects
There are many specialist effects you can use
to really send your mix into a wildly different sonic spectrum. iZotope Vinyl
is a free plugin which creates the effect of your mix sounding like it has been
pressed to vinyl.
If you want to make a pop-project sound credible, this might
be an interesting route to take.
Here is the extract with iZotope Vinyl now added:
This may be a little extreme for some mixes, but gently processing your master bus in this way can really make your mix stick out from the crowd.
6. External Routing
If you’re working completely in the box, consider
routing your master bus out to hardware versions of the aforementioned parts of
the chain.
If you have access to the facilities, you could even
send your mix to a tape machine, or press your mix onto vinyl. (This has
been working particularly well for Arcade Fire over the past couple of albums –
Reflektor and The Suburbs are two albums processed in this way.)
You might also consider using one of these effects in
parallel mode. Simply put, take the signal from an external unit and blend it
with your own in-the-box mix. This can create a powerful sounding mix, but be
careful—less is usually more if you are going down this road.
7. Dynamic Range
It’s 2014, and the so-called “loudness wars” appear to
be over. With strict guidelines starting to appear worldwide on dynamic range, it can be extremely beneficial to check your mix in this way. The excellent TT
Dynamics meter does a sturdy job, and will give you a solid idea of how crushed
you have made your mix.
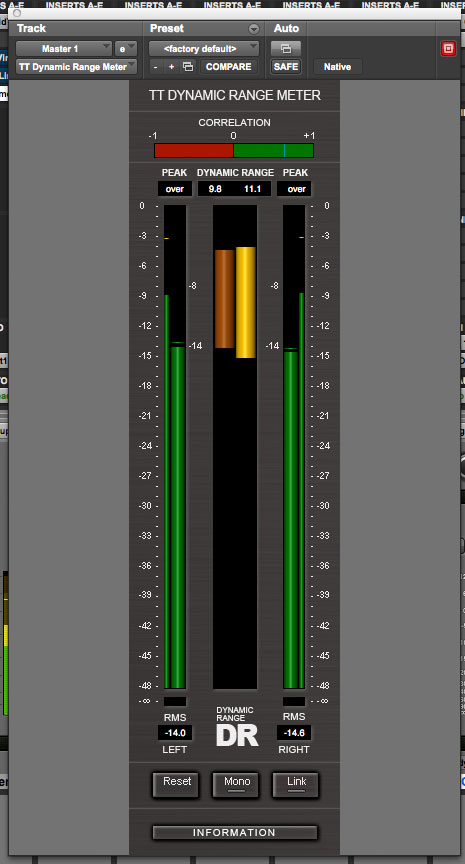
It’s worth considering that some of the creativity you may have employed on your mix bus may have given dynamic range issues, so before you commit to the master bus chain of effects, it’s well worth checking the dynamics range in the heavier parts of your mix.
8. Creative Problems
One final caution needs to be made before you make adjustments to your mix bus.
At some point, you may need to provide sub-mixes/stems to your mastering engineer or A&R, such as drum group, vocal group, backing vocal group, guitar group, etc, all as stereo files. For many recordings this is the case, as vocals may need to be dropped for TV performances, or a band may need to adjust the mix for live sampling—the possibilities are endless.
Remember: You won’t get the same effect from exporting stems as you will exporting the entire mix, if you wish to use the mix bus for effect.
Conclusion
It’s extremely important to remember that creatively
processing your mix bus is not the same as mastering—finishing a mix. There’s a big difference. If you’re trying to achieve a level increase or fix
a major mix issue, then you’re most likely in the wrong domain.
This isn’t meant to scare you. You can, and should,
be experimental and trust your instincts as to what is appropriate for your
individual mix. Properly processing your mix bus can create wildly impressive results. And it’s this stamp of creativity that can take a mix to a whole new level.
{excerpt}
Read More