If you ask me how to increase your fan base or make more
money out of your music business, I would give you a very important tip: sharing. Your music won’t spread if you don’t share it.
The best way to improve your
music is by sharing it, and receiving other people’s feedback and reviews. The tracks
that you create, edit, mix and master needs to be exported to a common format
for other people to listen to. This is where Cubase’s Export Audio Mixdown
function is handy.
In this tutorial, I will show you how to properly use this
feature so that your music will be accessible to many more people.
Types Of Channels
Before you get into exporting audio, you need to know about
the various types of channels that you have. They are:
Output
Channels
Output channel are where all the audio that is routed to the
Stereo Out bus is sent. Mixing this channel down will give you a file
containing all of the audio data that was sent to the output channel. It also
contains other types of output channels that you might have created, like Mono
channels, LRCS, 5.1, etc.
Audio Channels
Audio channels contains all the data from the tracks with effects and EQ added. You can select different channels via checkboxes. If you have enabled Channel Batch Export, you have the option to mix
each track to different files. You can also use them when you have an effect on a channel that takes up a lot of memory. You can
export the track, and then reimport it as an audio file with the effects
already added to it, which will greatly reduce the CPU usage. This is similar
to the Bounce option in Pro Tools.
Other
Channels
Other channels include FX Channels, VST channels, and ReWire Channels. You can use them to reduce CPU usage, or convert the VSTs
and ReWire channels into audio files.
Prepare for the Mixdown
The first step in a proper mixdown is to set the locators. You must set the left and right locators to the areas that you
need to be mixed. Use the shortcut keys Ctrl+Pad1 for the left locator and
Ctrl+Pad2 for the right locator. If you have a selection that needs to be
exported, select the section and press P, and the complete selection will be
within the range of the locators.
If you find that the color between the locators
turns red, it means that the location of the right and left locators are
reversed. Exporting audio like this will show the error, “Not enough space on
disk available for export.” Switch the positions of the left and right locators, and this problem can be avoided.
Once you have set the locators, you are ready to export.
Make sure that you are happy with the sound. This includes all the automation,
effects, inserts, etc.
Adjust The Settings
Now click Export > Audio Mixdown and select the channels you want to mix from the Channel selector.
Use Channel Batch Export if you want to export many channels at once. If you
have many channels and want to find a single channel, use the Filter to type in
the name of the channel.
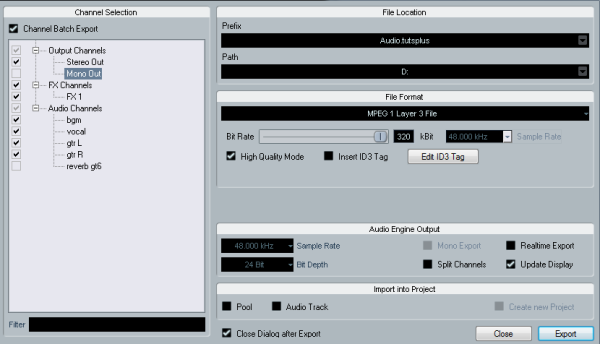
In the File Name section, you can specify the name of the
file and set the location for the file in the Path section. If you have
selected Channel Batch Export, the file name will the changed to the prefix
for the file names.
To the right of the file name, you will find two options
for naming:
- Set To
Project Name: This will set the file name as the name given to the project. - Auto
Update Name: This will automatically update the name of the files with each
export. It adds sequential numbering to the file each time it is exported. You
can switch off this function by select this option again so that the check box
besides it will go.
The next section is the File Path, where you will be able to
define the location of the file. Onto the right, you can find a pop-up menu.
This gives these options:
- Choose:
This opens up a dialog box where you can manually browse to the folder of your
preference and type in the name of the file. The name will be automatically
changed in the File Name field. - Use
Project Audio Folder: This exports the audio file into the location where
the project is stored. This is useful when you have to send the project files,
backups, and rendered audios to the client. - Recent
Paths: As the name suggests, you can select a previously used location for
the file to be stored. You can also clear this list by using the Clear Recent
Paths option.
Now select the file format from the drop-down menu. Each format
has different options that can be adjusted. The detailed settings of each of
these settings will be explained in the second part of this article.
You can activate the Mono Export option if you want to
export a channel as a single mono file. The Split Channels option can be used
to separate each channel of a bus into different files. For example, if you have a stereo channel, the files will be split into left and right files. Note that
the Mono Export option is not available if the Channel Batch Export is activated. If
you want to listen to your project in mono while mixing, read this quick tip.
Realtime Playback exports the file as it is played in
realtime. This function can be useful if certain plugins or VSTs need to be updated
correctly. Activate this option if you find any glitches or errors in the resultant
file. But using this option might increase the load on the CPU and can cause
errors. If an error occurs, the process is stopped and fewer number of channels
are selected and processed. This process is repeated until all the channels are
exported and thus can take a long time if there are many tracks and a not too
powerful CPU.
The Update Display option can be used to watch the meters
for any clipping or for other visual cues.
Import Into Project can be used to import the exported files
into the project. Use the Pool option to import the exported files into the audio pool of the project. Activating the Audio Track option will import the
files as an audio track into the project. The Create New Project will be activated
only for uncompressed audio formats, and if the Use Project Audio Folder
function option is deactivated.
Conclusion
With the knowledge you gained from this tutorial, you are at the point
where you understand the various options of Cubase’s Export Audio Mixdown feature. In Part 2, you will learn the different formats
that Cubase offers and which of them to choose for your project.
Practice with the various values of these
settings, and watch out for the next tutorial to learn how to choose the correct
formats and the changes and adjustments that you can make to them.
{excerpt}
Read More