
In this last session before we start putting faces on our characters, I’ll be introducing flexibility. Flexibility is the ability to stretch a joint to the limit of its range of movement, aka “how joints can and cannot move”. This material gathered from my own martial art and flexibility training is not frequently covered in books on drawing the human figure, but it complements the muscles in understanding the body in motion. It’s also necessary in order to articulate the body in a natural-looking way, rather than like a wooden manikin with screwed-on limbs!
Before plunging in, a word of warning: do not use this tutorial as a reference for physical activity. This is an art reference and some of the material is simplified for that purpose. Do not attempt anything physical without the guidance of a professional.
General Flexibility Facts
Before jumping into this, it’s worth keeping in mind some general flexibility facts which will help aid your learning.
- The female body tends to more flexibility, the male body to more muscle power.
- Flexibility in one joint does not necessarily imply flexibility in others.
- More muscles means less flexibility. Bodybuilders have the most limited range of movement for all the joints, first because they don’t stretch, second because the bulging muscles get in the way (remember Zangief in Street Fighter II?). Only athletes and performers who follow power workouts as well as stretching routines (Wushu athletes, gymnasts) can have both muscle strength and flexibility, and their muscles are fine and sinewy, not bulging (think Bruce Lee). In daily life, something like cycling will also decrease leg flexibility if not balanced by just as much stretching. So it’s very common for people not to even have the range shown below – look for the parts of their body they use most, and you’ll know where they are most stiff.
- The reverse is also true: more flexibility means less muscle, and those muscles are often very fragile because they are stretched so thin. For instance, some yoga practitioners who do extensive stretching but do not build the muscle, are extra vulnerable to muscle tear. Muscle power is actually essential for the active and dynamic types of flexibility, explained below.
- Some people who are exceptionally flexible, or double-jointed, or have undergone intensive flexibility training from a young age, and they can move beyond the range shown here. This in no way means it’s OK to ignore flexibility rules, as we all instinctively know what’s “normal” for a body and what’s exceptional. If you draw someone with limbs at an impossible angle, outside of a context that would allow suspension of disbelief (circus, gymnastics, the Exorcist), you risk coming across as a poor artist.
The Three Types of Flexibility
For drawing purposes, we need only be concerned with three kinds: passive, active and dynamic.
Passive flexibility is how much you can stretch when aided (either by the weight of your body, for instance when doing leg splits on the ground, or by a partner, fig. a). There is no muscle work in this case, and the extent of the stretch is determined by how much the muscles involved can elongate.
Active flexibility is how much you can stretch unaided, by stretching the joint and freezing in the position (fig. b). Raising your leg as high as you can (without kicking it) is one example. This is much more difficult and this range is always inferior to the passive range, because the resistance of the elongating muscles must be overcome by the strength of their antagonists.
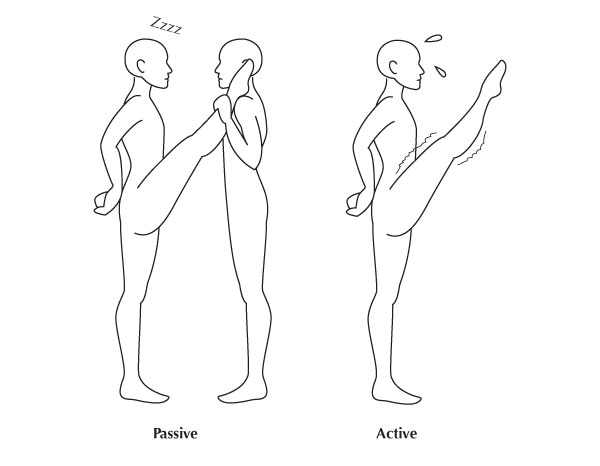
Dynamic flexibility is how much you can stretch using momentum to force the stretch, for instance swinging the leg. Doing so pushes it beyond what you could do either passively or actively, but only for a split second. This is what happens during fights or actions sequences because of the speed of the movements, so it’s quite appropriate to show extreme stretching in characters captured at the peak of the swing. In daily flexibility training, this can be used to gain more range – but the risk of tearing a muscle is very high and it must only be done after considerable warming up (absolutely do not try this at home).
Range of Movement For Each Joint
Here are the joints discussed below:

1. The Neck
The neck corresponds to the last seven vertebrae in the spine (the cervicals). They are like stacked cylinders separated by a "cushion", so their range of movement is limited.
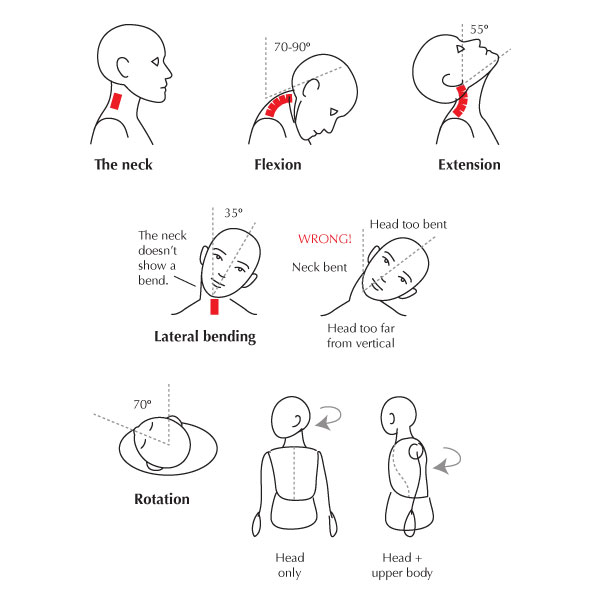
Flexion: The chin can touch the sternum. This creates a double chin and unsightly skin folds.
Extension: The neck and jaw lines merge into a single curve.
Lateral bending: The ear cannot touch the shoulder unless the shoulder is raised.
Rotation: The neck on its own turns less than we may think. To look further back, we engage the upper body as well.
2. The Lumbar Spine (Lower Back)
This "articulation" is made up of the five vertebrae that emerge from the pelvic bone. Its range of movement is quite limited, but, because we always use it allied to other stretches, it often looks as if it allowed considerable motion. The diagram below shows how the involvement of other joints can make it look like the lumbar bending varies, but in fact it is the same in all four positions.

3. The Shoulder Joint
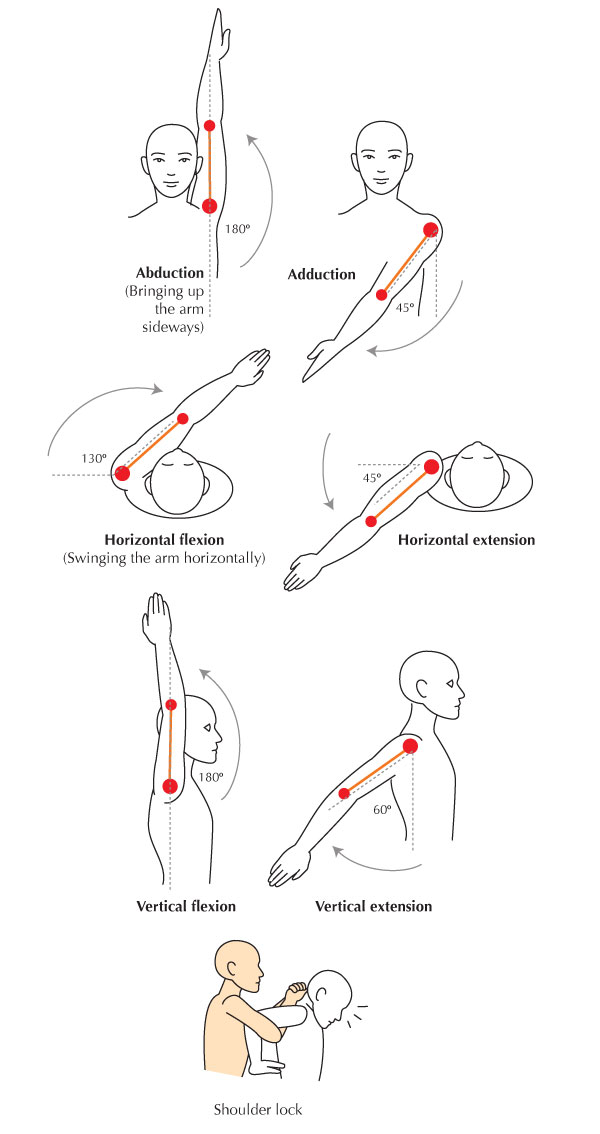
Of all the joints, this one has the biggest range thanks to its socket articulation: it can rotate 360º continuously. But that also means it can pop out of place if pushed too hard, which is why the well-known lock shown below is so effective: the shoulder joint is stretched to its limit by the pressure, and would dislocate if the muscles came into play.
4. The Elbow
In stark contrast to the shoulder, the elbow is like a door hinge – it opens in one direction and meets a stop.

Extension: Some people’s elbows overextend. Although not that uncommon, use discretion when representing it in drawing. It may look right on some characters and weird on others.
Flexion: Don’t take it for granted that the joint can close all the way! This movement is impeded by muscle mass, and we should be able to feel this in a muscular character, as it conveys the muscular bulk (as opposed to soft fat). If not taken into account, it will make the muscles look insubstantial and wrong.
Below are additional movements that don’t belong to the elbow proper, but can be treated here. The forearm being composed of two parallel bones, can twist in both directions when the wrist is rotated, to the degree shown below (this arm is seen from behind):

5. The Wrist
The wrist’s range of motion is almost all front and back; if you try to rotate it, you notice that it does not describe a proper circle, but more of an ellipse, because it can move so little to the sides.

Fingers can be quite flexible as well when they bend back (extension). Aided, some people’s fingers can bend back up to 90º. Unaided, they can only extend a little and it requires much tension (occasionally using this in illustration gives the hand life and fluidity). They can also bend back individually, but if the rest of the hand is relaxed, the neighboring fingers will always be pulled up slightly by the lifted one.
6. The Hip Joint
The hip is the key to leg splits, and, of course, to all kicks so essential to martial arts. It is the lower body’s mirror of the shoulder as it is also a socket articulation, though more limited.

Flexion: This range is valid when the knee is bent, or for a brief moment when the leg is kicked. When the knee is straight, it is much more difficult to raise and hold the leg above waist level. Achieving the full angle this way (through the sole power of the leg muscles) is nearly impossible, and athletes with this ability are extremely impressive.
Extension: Here the toes are aligned with the leg, but turning the foot slightly outward allows the leg to swing back a few more degrees.
Abduction requires some special attention, as the direction of the toes makes a dramatic difference: turning the toes outward permits a considerably bigger range than pointing them forward. This is due to the positioning of the joint in each case:

Because of the way the joint works, a middle split with toes pointing forward is impossible! A middle split should have the toes pointing up. If someone seems to be doing the former, check out their back: it’s probably arched. This means they’re really doing a toes-up split, but the pelvic bone along with the legs and feet are tilted forward.
7. The Knee
The knee is very much like the elbow:
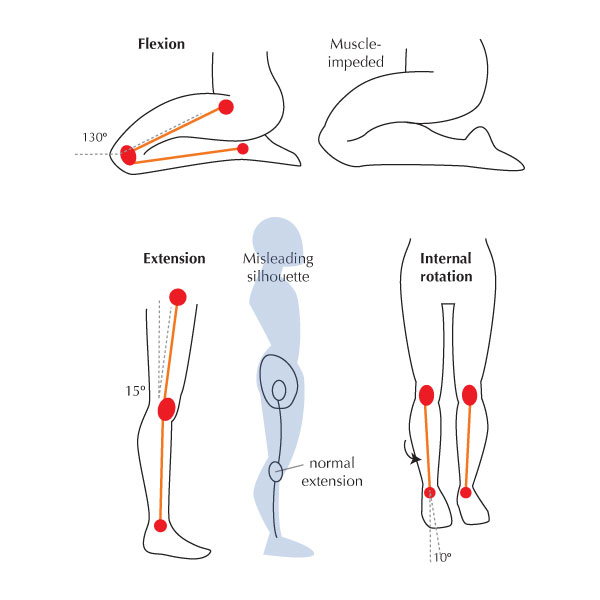
Flexion: Just as is the case in the elbow, muscles can impede the flexion. Someone with muscular legs won’t be able to sit on the heels this way. More muscles means sitting on the calves, the buttocks away from the heels.
Extension: The knee doesn’t hyperextend! Exaggerated, sweeping leg silhouettes are due to the combined lines of the quadriceps and calf muscles that disguise the straight line of a normal extended knee.
Internal rotation: This reaches a greater degree when the hip joint also rotates in.
8. The Ankle
The ankle joint, in turn, mirrors the wrist, but with a much more limited range of rotation.

9. The Upper Body (Thoracic Spine)
The thoracic spine was not included in the diagram of joints above, as it is not a joint and indeed included in most flexibility trainings. This part of the spine has very limited movement. Usage of it will make a character look particularly fluid (think Spiderman), but it’s easy to go too far and make them look like their back is broken!
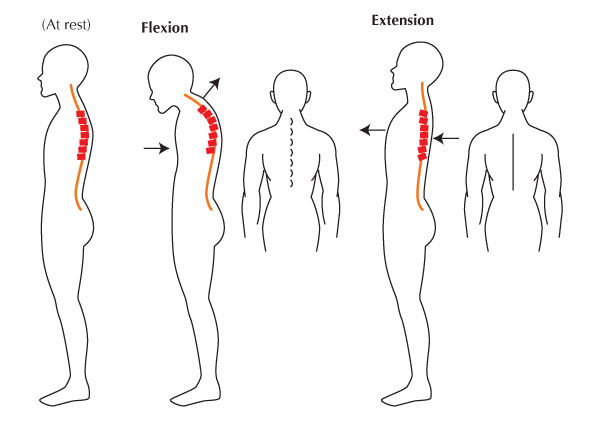
At rest: The spine in normal state has an S-shape.
Flexion: The sternum sinks in while the vertebra at the base of neck juts out. Individual vertebrae can be seen on the back as the spine presses against the skin.
Extension: The sternum juts out while the space between the shoulder blades sinks. The back shows a furrow as the spine recedes.

Don’t do this, the spine can’t bend this way! In the correct version, you can see that a number of joints engage so the body as a whole arches back.

Rotation: Rotating the upper body means keeping the hips fixed and rotating only the rib cage left and right. Only a small movement is possible this way, much smaller than if you allowed your hips to help. This ability is cultivated, for instance, in Taijiquan and belly dancing. The head can of course still turn further, but within the neck’s limits, so it can just reach 90º.
Composite Stretches
Now that we understand how the individual joints stretch, let’s examine some actions that require several stretches together, so you can see how understanding the joints makes for more natural-looking poses. The red arrows indicate the joints where stretching occurs.
Front Split
There are two ways of splitting the legs frontally.
Below is the classic way, which is and the more difficult one, because the position of the knee demands more hip extension from the rear leg in order to "sit" completely on the ground. The knee of the rear leg is down and the sole of the foot up. Note that the front foot is always pointed if relaxed: flexing it would mean stretching the calf, which is a lot of extra effort.
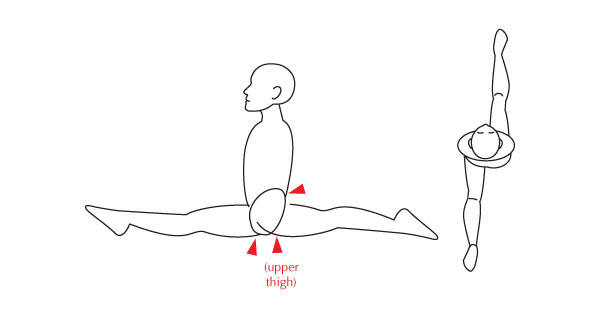
The other way below has the rear knee out with the toes pointing in the same direction. It’s a slightly easier position (easier on the knee as well), and favored in martial arts because it allows one to jump into a standing position (attempting to do so from a classic split would result in injury).

Side Kick
This specially popular action stance is a great example of how what you think you see A "side" kick is not truly given sideways, which would be the position of a middle split (we saw how limited that is), or even a hip abduction: it’s actually closer to the martial arts version of a frontal split:

Wrong kick: All the joints involved have laterally limited range, and the body has to compensate by leaning sideways. This is so precarious, not only will he topple over sideways when his foot makes contact, but it’s also going to be a very weak kick because there’s nothing to draw power from.
Low side kick: The "pure" side kick (watch those shins!) is used for low kicks and involves no stretching at all.
Correct, so-called side kick: This is closest to the frontal split, meaning the kick is actually directed backwards, using mostly a hip extension. This allows the body to take the form of a continuous arch firmly planted on the upright leg, which directs plenty of power into it. It only looks like a “side” kick because the upper body twists the way it does.
Bridge
A good bridge, where the feet and hands are distant by one forearm, requires almost all the joints to be extended. The heels push the ground so that the weight is mostly on the hands and the waist is pushed up – the only way to stretch the hip/lumbar areas enough. Elbows remain fully extended, or "locked", but knees can’t be straight without widening the bridge, which doesn’t work as you quickly start slipping!

Practice Time
Moving forward, there are some exercises you can do to help aid your understanding of our flexibility.
Gently and without forcing in any way, try each of the movements described in the section Range of Movements for Each Joint (do not try the composite stretches). Feel your limits and see if you can tell which can be overcome with training and which are anatomically set. The point is to understand the material from within your body (if you exercise and stretch, you probably already do).
Look up photos of gymnasts and others who use flexibility to the extreme. Make quick sketches of them, then translate that into an average person’s (or even a big muscular person’s) range. (There’s no scientifically accurate right answer so have fun, and keep an eye on what looks right or doesn’t.)

{excerpt}
Read More