In this series, I will give you useful information about perspective drawing. Further down the line we will take a look at a few examples, and learn some basic terminology that will help you understand how to correctly draw in various perspective styles. Before we can learn how to build the various perspectives, let’s have a look at the basics.
Perspective Styles
There are several perspective styles to consider. We’ll be covering most of them in this series:
- Zero Point Perspective: also known as Elevation, or basically just a 2D image from one side of your object
- One Point Perspective: the quickest means of displaying a three-dimensional object in two dimensions. It contains one vanishing point, therefore it is regarded as "one point perspective".
- Two Point Perspective: as above, it contains two vanishing points.
- Three Point Perspective: guess what, this one contains three vanishing points.
- Axonometry: this is 3D measured along an axis. A good example of this would be isometric graphics.
Our focus for this series will be one point, two point and three point perspective.
Perspective Terminology
The Horizon Line
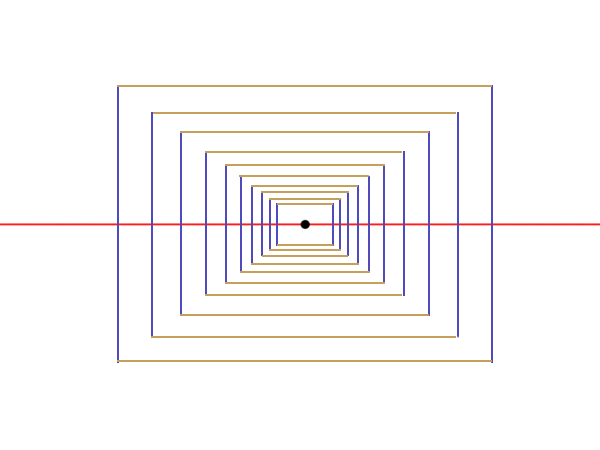
This is the line that represents the margin of your visual range. It is always 100% straight, but depending on the camera effect that you wish to mimic, it can be either skewed (from say the left side of your canvas, to the top margin). This gives you the effect of a twisted camera. You also have the liberty to draw it slightly curved if you wish to mimic a fish-eye lens…. but for now, we will focus on the straight option.
The position vertically is also quite important, as it affects what part of your object is visible (top/bottom). This becomes even more relevant with the increase of vanishing points, as this will affect deformation. In consequence, your composition is split between the two sides:
- Above the Horizon Line
- Below the Horizon Line

The Vanishing Point
The Main Focal Point, also called “Vanishing Point”, represents the point on (or off) your canvas, to which all the lines have to converge to. It’s called Vanishing Point for a good reason too! As the Horizon Line represents the most distant margin of your visual range, and all lines in your drawing will be converging to an imaginary point found on this line, everything constructed within will have a tendency to procedurally decrease in size, until “vanishing”. The black dot almost to the center of the canvas. The number of vanishing points varies, depending on the chosen style of perspective, and these can be placed on or off the canvas.

Horizontal and Vertical Lines
These are the lines you use to construct front-facing sides of your object. Using this style of perspective, do try to keep in mind that all vertical lines need to remain parallel to each other, and the same goes for the Horizontal Lines, when the object is facing you. They’re colored in Blue (vertical) and Gold (horizontal). This however only applies to one and two point perspectives.

Orthogonal Lines
These are the lines that run from your Vanishing Point to the margins of your canvas (or beyond). They’re colored in Purple. These lines are only relevant for the one point perspective.

When three of the above lines intersect, you effectively end up with the first corner of your object (in our case, for example of a box).

Things to Keep in Mind
Foreshortening and Maintaining Correct Proportions
The closer you get to the vanishing point, the smaller your objects appear to the viewer. This applies for all perspective styles. As such, this can get a little complicated, when you are trying to maintain correct proportions. To assist in this process, draw yourself as many orthogonal lines as needed. If working digitally, don’t hesitate to create a dedicate layer (or set of layers) just for the sake of having room to play with construction lines, which you can later hide, if your canvas gets too crowded.
Foreshortening represents the process through which objects that are closer to the viewer are represented much larger than those nearing the vanishing point, causing the viewers perception of depth to be dramatically affected. As such, a character holding his hand stretched towards you, while his back is turned towards the vanishing point, will appear to have a very large hand, a very short arm, and a comparably smaller body.
A cube drawn in perspective, can very much seem like a stretched object, depending on how extreme your chosen perspective is.
You can gauge proportionality by extending your lines to the point where they intersect with the closest front-facing plane as seen here:

The box on the right side of the canvas is smaller in height, but has the same width as the one on the left. By extending the construction lines, we can easily see this.
This method is applicable to all perspective styles. Whenever you need to ensure that two points located on the same plane are proportionally placed in perspective, all you need to do is connect them with the respective vanishing point.
The Diagonal Lines
Whenever you want to find the exact center point or identify the mid-section of any line in perspective, you can make use of the diagonals on the respective face. Intersect these diagonal lines, and the resulting point represents the geometrically accurate center. Project this point using construction lines, and you can easily subdivide the required face.
Get Your Pencils Ready!
Remember, the above style of perspective is mostly used for speeding up your rendering/drawing process. Absolute correct measurements are beyond the average usage scenario for a one point perspective, and a two and three point perspective is better suited for precision, but it also takes more time to complete.
Hope you enjoyed reading this, and if you have any questions, don’t hesitate to write in the comments below!
{excerpt}
Read More