To go along with our recent tutorial about script development workflow, we will go over the basic concepts and good practices necessary to start writing After Effects scripts. We will go over usual After Effects actions such as: creating a project, creating a composition, creating a layer, creating shapes, adding effects, changing values and expressions, using text and fonts, adding keyframes, using functions, etc.
Writing Your First Script
As stated in the After Effects Sublime Text build package installation and usage tutorial, scripts are files which use the Adobe ExtendScript language. ExtendScript is an extended form of JavaScript used by several Adobe applications such as Photoshop, Illustrator, and InDesign. ExtendScript is a good and efficient way to achieve anything you want in After Effects.
Scripts use the Adobe ExtendScript language, which is an extended form of JavaScript used by several Adobe applications such as Photoshop, Illustrator, and InDesign
This tutorial will go over the basic concepts and good practices necessary to start writing After Effects scripts.
Creating Our First Composition
We’ll start off by using the
newProject()
method of the
app
object and wrapping it between curly brackets.
{
  // Creating project
  app.newProject();
}
The
app
object is the root of almost everything as seen on this schema:
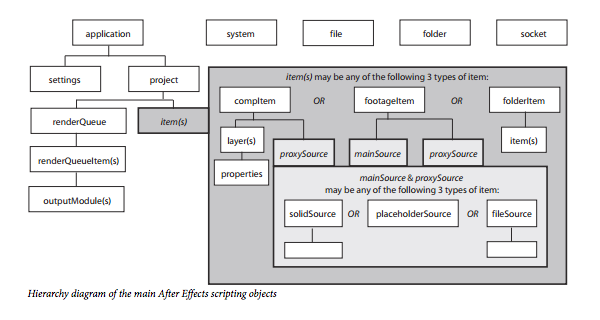
This schema can be found in the Adobe After Effects CS6 Scripting Guide like most of what I will explain in this tutorial.
We now create our composition by using the
app
object’s sub-objects
project
which contains the project created in the first line and the
items
sub-object which gives you access to the folders and compositions you see in your project window in After Effects.
{
  // Creating project
    app.newProject();
  // Creating comp
    app.project.items.addComp("Demo", 1280, 720, 1, 10, 24);
}
Cleaning Our Code
Writing clean and maintainable code is really important. We are not writing quick and dirty expressions anymore. Since we want our scripts to be easily scalable, we need to embrace the Javascript community’s conventions.
So, we will isolate key data into variables and name them accordingly to their content. Also, we will put conditions in case there would already be a project or a composition in our After Effects file.
{
  // Creating project
  var currentProject  = (app.project) ? app.project: app.newProject();
  // Creating comp
  var compSettings    = cs = [1280, 720, 1, 10, 24];
  var defaultCompName = "Demo"
  var currentComp     = (currentProject.activeItem) ? currentProject.activeItem: currentProject.items.addComp(defaultCompName, cs[0], cs[1], cs[2], cs[3], cs[4]);
  currentComp.openInViewer();
}
The
var
keyword indicates that the following variable is a new variable. That’s why, on line 9, we don’t use the
var
keyword anymore because we want to use
currentComp
’s value (which is the comp we’ve just created).
Here’s, line by line, what we did in plain english:
-
Line 3: Create new variable
currentProject
which will equal to
app.project
if
app.project
is not undefined and will otherwise equal to
app.newProject()
.
-
Line 6: Create new variables
compSettings
and
cs
which both equals to a new array of values.
-
Line 7: Create new variable
defaultCompName
which contains the name we will give to our comp.
- Line 8: Create new variable
currentComp
which will equal to the
activeItem
property of our
currentProject
object. If it’s not undefined and will otherwise equal to the result of the
addComp
method of the
items
sub-object of
currentProject
to whom we’ll send an array of arguments containing:
- Name of the composition
- Width of the composition
- Height of the composition
- Pixel ratio of the composition
- Time (in seconds) of the composition
- Frame rate of the composition
-
Line 9: Use the
currentComp
method
openInViewer
which will open the timeline for this composition.
Yes, that’s a lot of methods and properties. Again, you will have to take a look at one time or another to Adobe After Effects CS6 Scripting Guide to learn more about the objects and their available methods and properties. The guide is really well written and a quick search for Project object will immediately take you to the right information.
Quick Javascript Concepts
- Variable: Can store a value, an array of values or an object.
-
var myVar = "String value";
-
var myVar = 2;
-
- Array: Contains multiple values. Arrays can be declared in two ways.
-
var myVar = array("value1", "value2", 3);
-
var myVar = ["value1", "value2", 3];
-
- Function: Part of code designed to perform a specific task.
-
function myFunction(argument) {
// Do something
  }
-
- Object: The object is a little more complex but, for now, you must know it has properties and methods.
- Property: Similar to a variable
myObject.myProperty = "Value"
- Method: Similar to a function call
myObject.myMethod(argument)
- Property: Similar to a variable
Adding Undo Groups
Since a lot of operations will happen during your script execution, you’ll want to decide what will happen when you hit
â?? + Z
/
CTRL + Z
Doing so it pretty easy, we just have wrap our code between the
beginUndoGroup()
and
endUndoGroup()
methods of the
app
object. This method takes one argument which is the name that will be displayed in After Effects
Edit > History
menu.
{
  app.beginUndoGroup("Demo Script");
  // Creating project
  var currentProject  = (app.project) ? app.project : app.newProject();
  // Creating comp
  var compSettings    = cs = [1280, 720, 1, 10, 24];
  var defaultCompName = "Demo"
  var currentComp     = (currentProject.activeItem) ? currentProject.activeItem : currentProject.items.addComp(defaultCompName, cs[0], cs[1], cs[2], cs[3], cs[4]);
  currentComp.openInViewer();
  app.endUndoGroup();
}
Creating the Background Layer
To create our background layer, we will use the
layers
sub-object of our
currentComp
. Call the
addSolid()
method and send it these arguments :
- Layer color
- Array of floating numbers (between 0 and 1). To get that value you have to divide each of your RGB values by 255 or use this jsFiddle I made: http://jsfiddle.net/seblavoie/mezGe/43/embedded/result/
- Layer name
- Layer width
- Layer height
- Layer pixel ratio
{
  app.beginUndoGroup("Demo Script");
  // Creating project
  var currentProject  = (app.project) ? app.project : app.newProject();
  // Creating comp
  var compSettings    = cs = [1280, 720, 1, 10, 24];
  var defaultCompName = "Demo"
  var currentComp     = (currentProject.activeItem) ? currentProject.activeItem : currentProject.items.addComp(defaultCompName, cs[0], cs[1], cs[2], cs[3], cs[4]);
  currentComp.openInViewer();
  // Creating background layer
  var backgroundLayer = currentComp.layers.addSolid([93, 5, 2], "Background", cs[0], cs[1], cs[2]);
  app.endUndoGroup();
}
Adding the Grid Effect
The best way to create our centered cross is by using the Grid effect on our background layer. To do that, we will use our
backgroundLayer
variable which refers to
currentComp.layers.byName("backgroundLayer")
and we will use its
Effects
property.
  // Adding the grid effect
  backgroundLayer.Effects.addProperty("Grid");
  backgroundLayer.property("Effects").property("Grid").property("Anchor").setValue([0,0]);
  backgroundLayer.property("Effects").property("Grid").property("Corner").expression = "[width/2, height/2]";
  backgroundLayer.property("Effects").property("Grid").property("Color").setValue([0,0,0]);
  backgroundLayer.property("Effects").property("Grid").property("Blending Mode").setValue(2);
There are some things your should notice here. First, the
property()
method is chainable which means that you can call it multiple times to reach the sub-property you want to get.
-
backgroundLayer.property("Opacity")
: Layer’s opacity.
-
backgroundLayer.property("Effects").property("Grid").property("Opacity")
: Grid effect’s opacity.
Second, we use the method
setValue()
when we want to set a value but not when we want to set an expression.
Creating the Wipe Layer
To add the wipe effect, we’ll create a new layer and use the Radial Wipe effect.
  // Creating the wipe layer
  var wipeLayer = currentComp.layers.addSolid([0.1, 0.1, 0.1], "Wipe", cs[0], cs[1], cs[2]);
  wipeLayer.Effects.addProperty("Radial Wipe");
  wipeLayer.property("Effects").property("Radial Wipe").property("Wipe").setValue(2); // Counterclockwise
  wipeLayer.property("Opacity").setValue(50);
  // Setting wipe transition animation
  wipeLayer.property("Effects").property("Radial Wipe").property("Transition Completion").setValueAtTime(0, 100);
  wipeLayer.property("Effects").property("Radial Wipe").property("Transition Completion").setValueAtTime(1, 0);
  wipeLayer.property("Effects").property("Radial Wipe").property("Transition Completion").expression = "loopOut('Cycle')";
We used the method
setValueAtTime()
to set keyframes and a
loopOut("Cycle")
to make the animation loop (makes sense right?).
Adding the Text Layer
Playing with text is a little different since you have to change the source text value properties directly.
// Adding text layer
var textLayer                   = currentComp.layers.addText("Countdown");
var textProperty                = textLayer.property("Source Text");
var textPropertyValue           = textProperty.value;
// Changing source text settings
textPropertyValue.resetCharStyle();
textPropertyValue.fontSize      = 200;
textPropertyValue.fillColor     = [0, 0, 0];
textPropertyValue.justification = ParagraphJustification.CENTER_JUSTIFY;
textProperty.setValue(textPropertyValue);
// Adding expression to source text
textProperty.expression         = "Math.floor(10-time)";
// Adjusting text layer anchor point
var textLayerHeight             = textLayer.sourceRectAtTime(0, false);
textLayer.property("Anchor Point").setValue([0, textLayerHeight.height / 2 * -1]);
We changed our text value properties and used
setValue()
to resend it to our text layer. Also, we used a simple expression to make our countdown.
Math.floor()
is a Javascript function that will remove the decimal part of a number. After that we center the anchor point by using the
sourceRectAtTime()
method.
Adding the Ellipses
To add the ellipses we will use the
addShape()
method and give it a vector group and a vector shape. We’ll also make a little function to avoid code repetition.
// Adding shape layer for the circles
var shapeLayer = currentComp.layers.addShape();
// Adding circle shapes group
var shapeGroup = shapeLayer.property("Contents").addProperty("ADBE Vector Group");
// Adding circle shapes
createEllipse(shapeGroup, 200);
createEllipse(shapeGroup, 400);
// Adding black stroke to the shapes
var stroke = shapeGroup.property("Contents")
             .addProperty("ADBE Vector Graphic - Stroke")
             .property("Color").setValue([0, 0, 0]);
function createEllipse(shapeGroup, size) {
  var ellipse     = shapeGroup.property("Contents").addProperty("ADBE Vector Shape - Ellipse");
  var ellipseSize = ellipse.property("Size").setValue([size,size]);
}
Line 5 is really important since you won’t be able to find the
Contents
property in neither the documentation nor in your After Effects interface for the moment, thanks to Dan Ebbert for his help (http://forums.creativecow.net/thread/227/22280).
We used a custom little function instead of duplicating the ellipse creation. You can use functions as you wish.
Basic rule of thumb: If you’re copy-pasting lines of code, consider using a function.
For the rest we just modified the shape’s properties. You may want to refer to Adobe After Effects CS6 Scripting Guide to see them listed.
You may have noticed the
var stroke
line is looking a little different than what we’ve written yet. Javascript supports chaining across multiple lines. The result will be the same and there isn’t a good or bad way, it’s a personnal coding style choice you may or may not want to adopt.
Conclusion
The possibilities of scripting are endless and can make a really powerful tool once mastered. Here’s some more documentation about scripting and Javascript:
- Adobe After Effects CS6 Scripting Guide
- MotionScript
- Javascript on Codeacademy
- Introduction To Writing Scripts
{excerpt}
Read More