In this tutorial you will learn a simple technique on how to create a Mandala design. We will create a geometric Pattern Brush, which will then be used to create the Mandala itself. We will start by creating our seamlessly repeatable patterns for the brush. The patterns will consist of a variety of linear and circular shapes.
Step 1
First some theory! It is important that before you start creating the brush, you set the size for your final mandala. Any new brush that you create will have 1pt as its default width. If for example our pattern is 200px high, applying it to a 200px high and wide circle will create an element that is entirely "closed", meaning it has no empty space in the middle.
When creating a Pattern Brush like this, you have to keep in mind that when applied to a circle, the top part of the brush will be stretched, while the bottom part will be squeezed. To demonstrate I created a simple rectangular pattern with 3 circles of same size placed at the top. middle and bottom of the pattern.
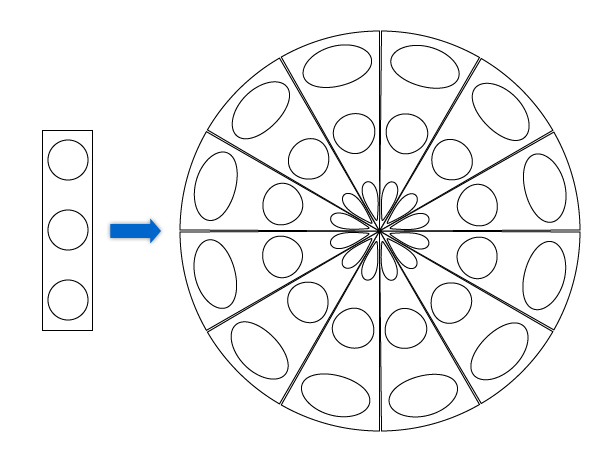
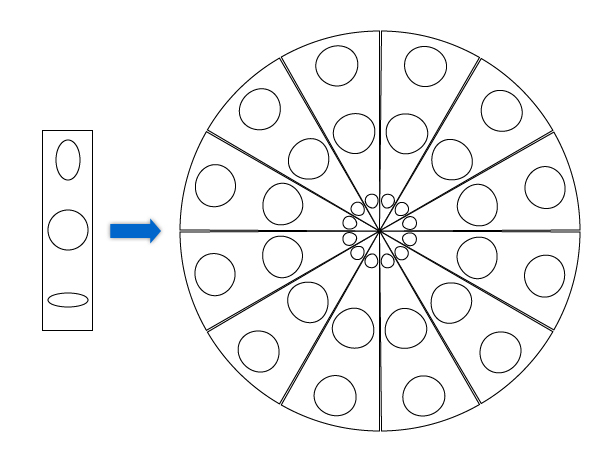
You can avoid these deformations in the brush application, by deforming the elements in the pattern beforehand. Basically: if you want a circular element in the center of the Mandala, it has to be an oval in the brush.
Step 2
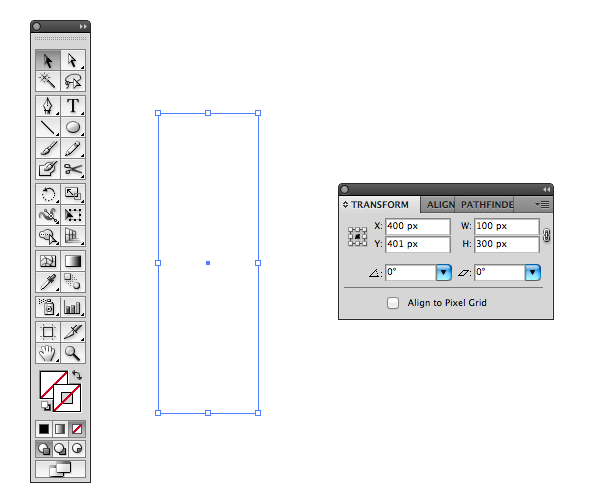
The base for the pattern will be a 100px × 300px Rectangle (M) with no fill or stroke. All our later pattern elements have to be inside this rectangle, as it gives the boundaries of our pattern. You can still “see” the shape when you are in View > Outline (Command + Y).
Step 3
The first pattern we create, will be a simple one with pointy ends. Start by creating a 100 × 100px square with the Rectangle Tool (M), in the middle of the canvas. Select one of the lower corner points and delete it with the Pen Tool (P). Select the other one and center it on the canvas by using the Align Panel. With the Direct Selection Tool (A) select the top line of the triangle and delete it. Duplicate this new path and move it up 10px, I prefer to do so by holding down Shift and using the arrow keys, which will move the path 10px by default.
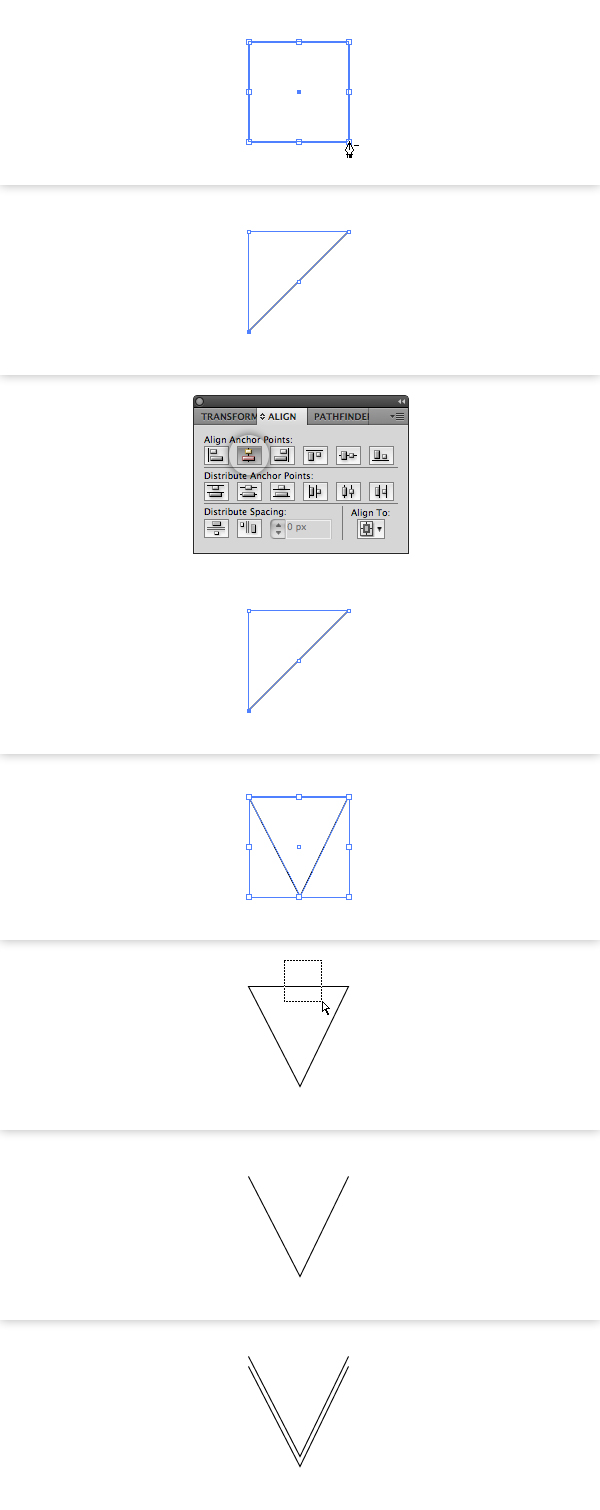
Now select the two paths and join them to one path (Command + J). Do so two times to close the path. Duplicate this shape (Command + C and Command + F) and flip it horizontally, using the Transform panel.
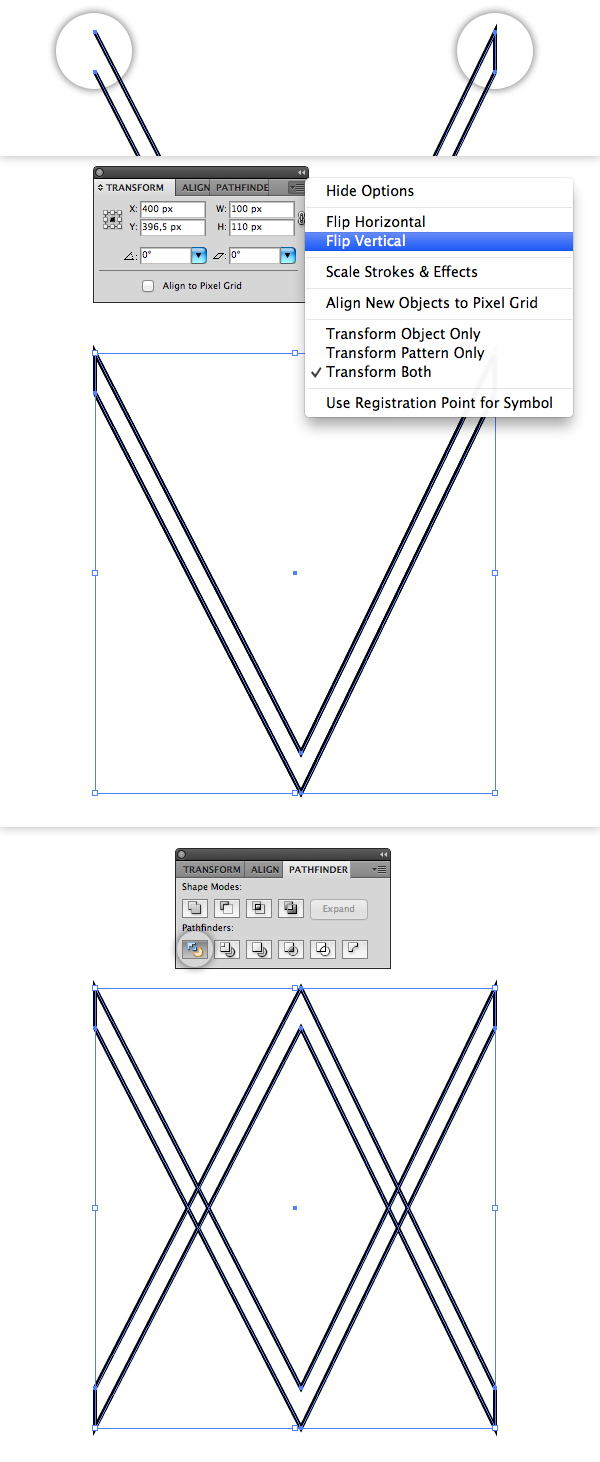
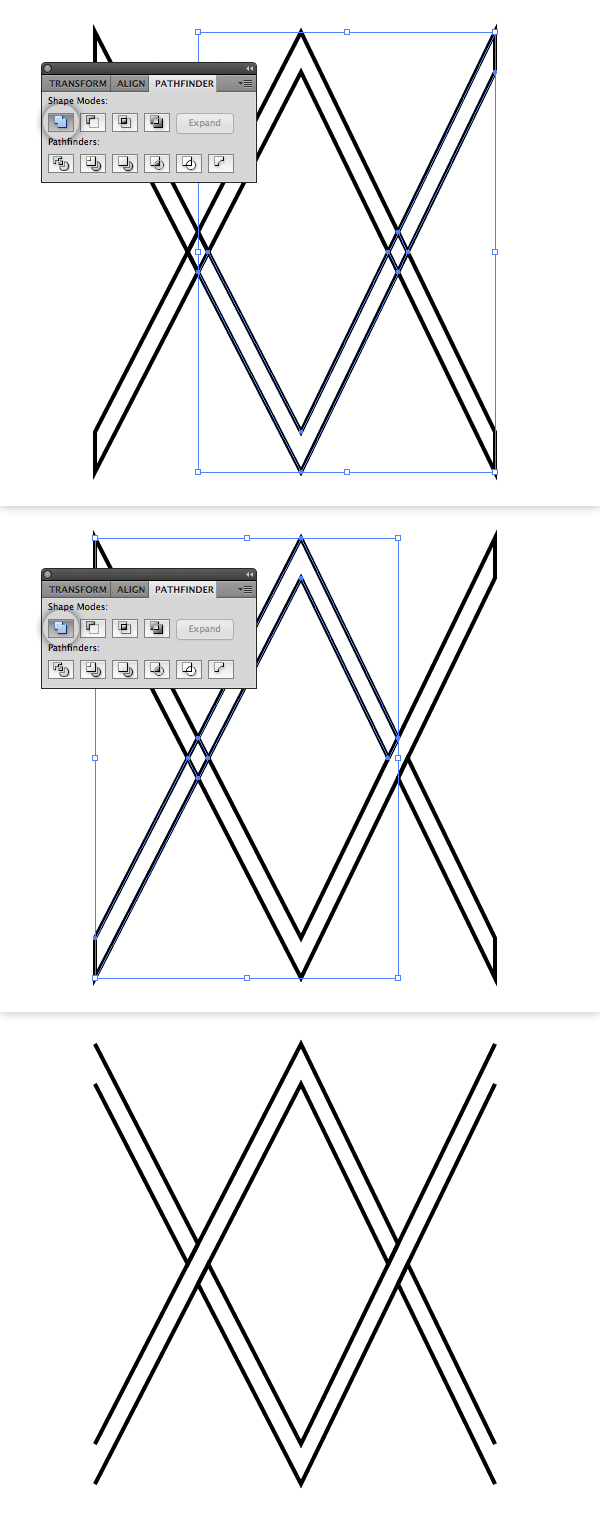
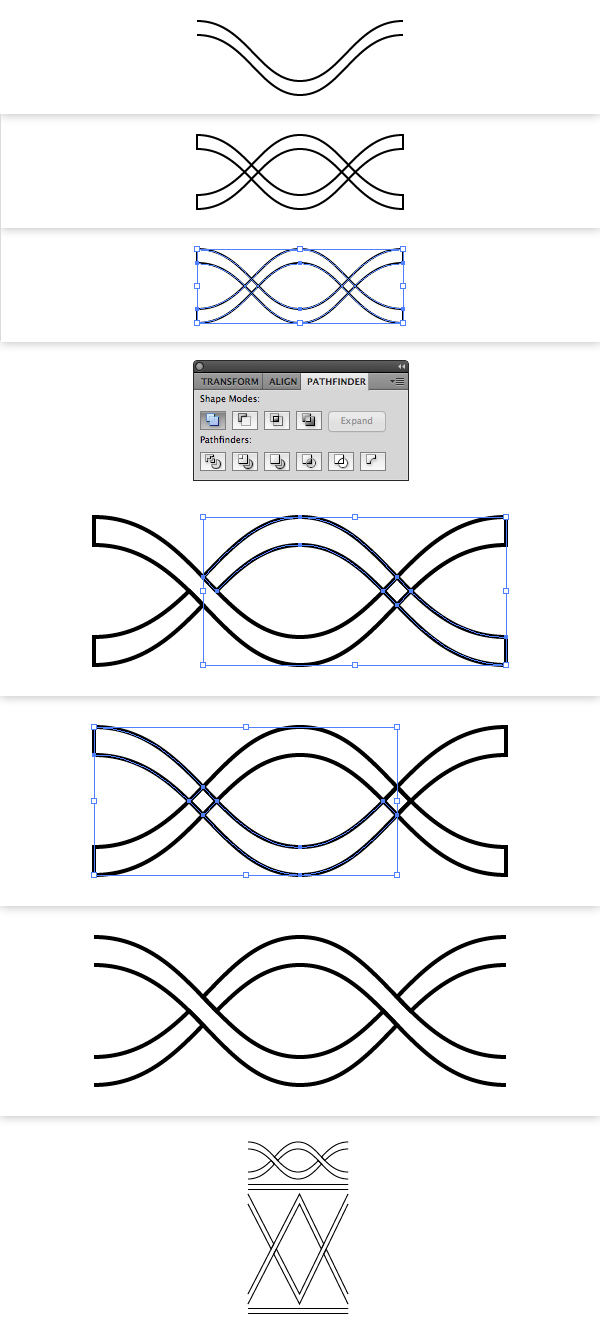
We want the shapes to appear of being weaved. Therefore we will use the Pathfinder > Divide. This will result in a group with eight shapes. Select three shapes from the right that you want to combine to appear to be on top (I picked the bottom V shape, the intersection on the right and the top right shape) and apply the Unite option from the Pathfinder panel. Do the same with the three opposing shapes.
The final touch for this pattern will be to leave it with "open ends", so it will repeat seamlessly later on. With the Direct Selection Tool (A) click on the four end lines and delete them.
Step 4
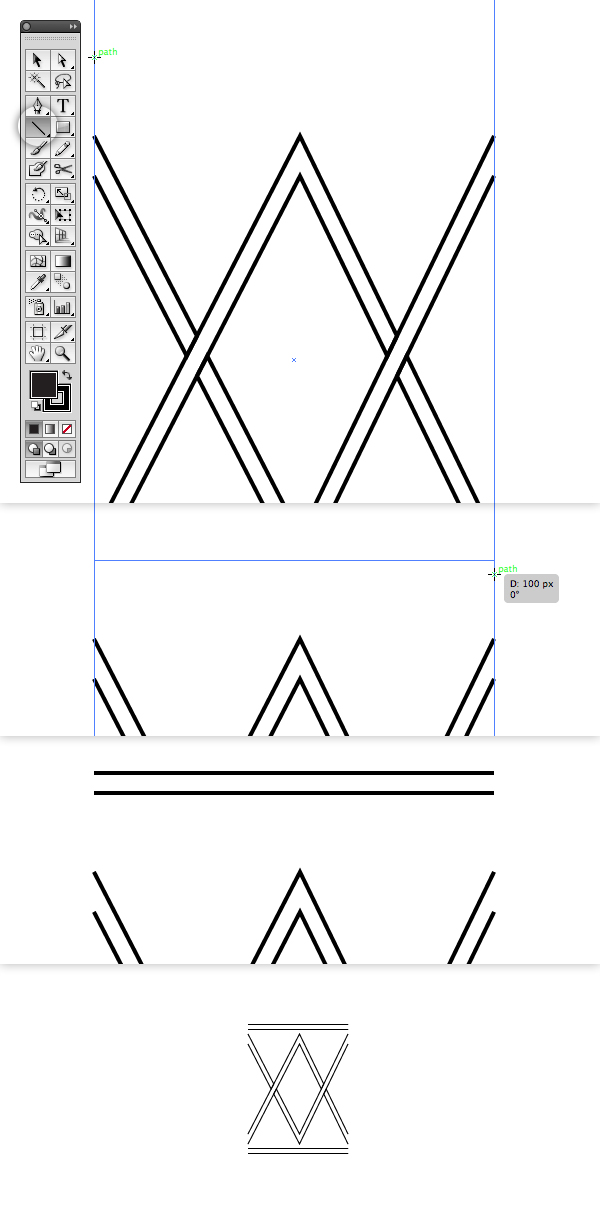
Another addition to our pattern will be lines in between different patterns, which will give the mandala more structure.
Simply draw a 100px wide line with the Line Segment Tool (\). If you have Smart Guides activated (Command + U) you can begin the line precisely at the left edge of the "invisible" rectangle shape. Hold down Shift while dragging and create a perfectly vertical line until you snap into the right edge of the rectangle.
Duplicate this line (Command + C and Command + F) and move it upwards 5px.
Group both lines (Command + G) and place them above the pointed elements we created earlier. Duplicate this group and place it under the pointy element as well.
Step 5
The next pattern is going to be a soft woven wave. Create a V shape the same way like for the pointy pattern. We will not create it as high, so make it 30px high.
Select the two left anchor points and choose "Convert Selected Anchor Points to smooth" in the Control window, located under the Menu and Application Bar. Adjust the anchor points to your liking, dragging the handles until the curve is smooth.
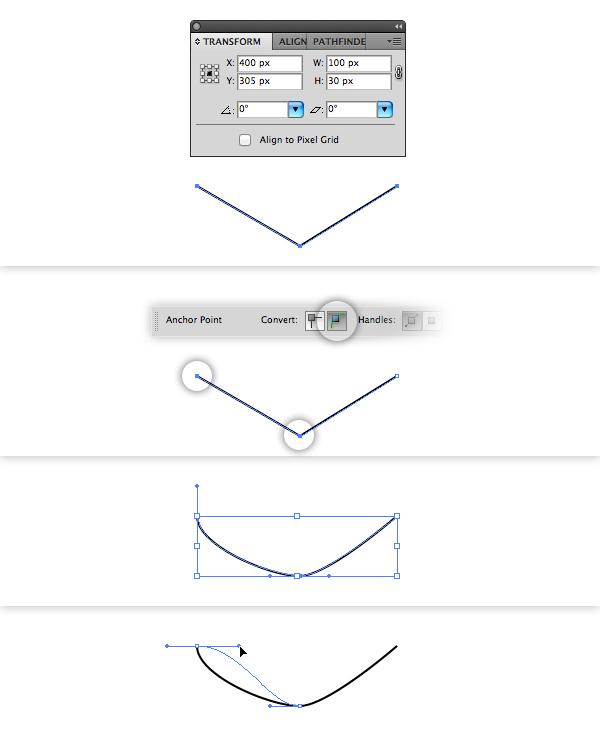
Delete the right anchor point, which should still be a corner. Duplicate the path and flip it horizontally. Select the two anchor points at the bottom and Join paths (Command + J).
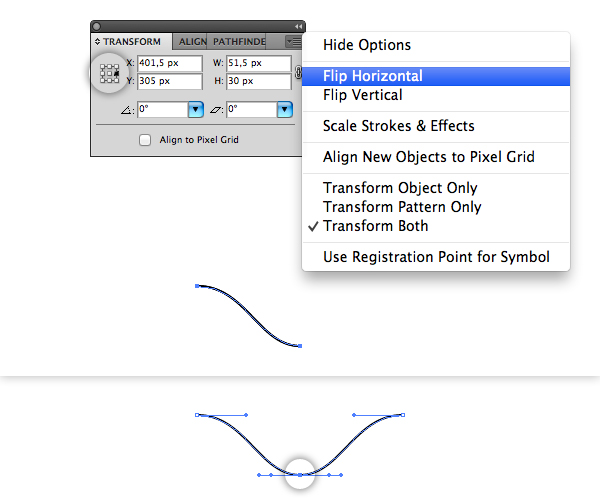
Duplicate this path and move it up 7px, or as far as you like. Connect those two paths again (Command + J) and close the path.
Now comes the same process like before for the pointy pattern: duplicate the shape, flip it horizontally, Divide the shapes and Unite shapes to create the weave and delete the lines between the end points.
Step 6
Next up we will create a pattern made from circles at the top of our brush. For an easier work flow, hide the other elements in your Layers panel except for the base rectangle. Create three circles of each 100px diameter and place them overlapping aligned with the top edge of the rectangle.
Duplicate the circles and decrease each to a diameter of 90px. Create Compound Paths (Command + 8) of the circles that are smaller duplicates using the Minus Front option of the Pathfinder panel.
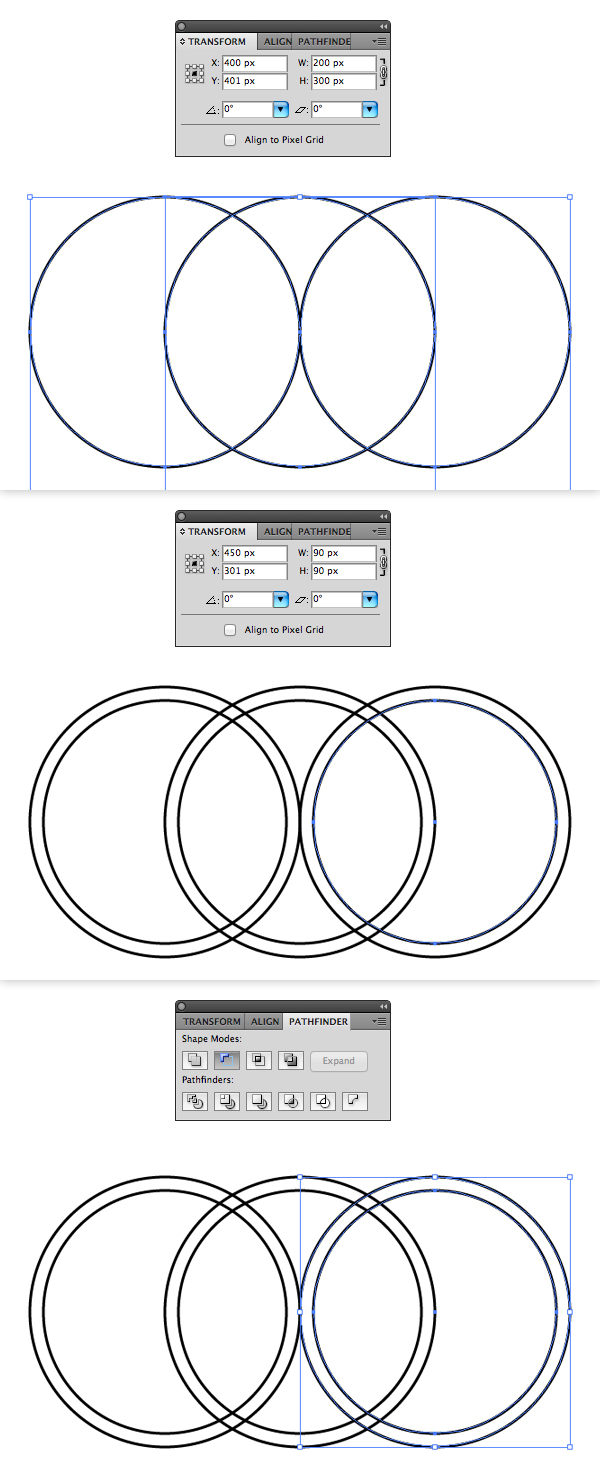
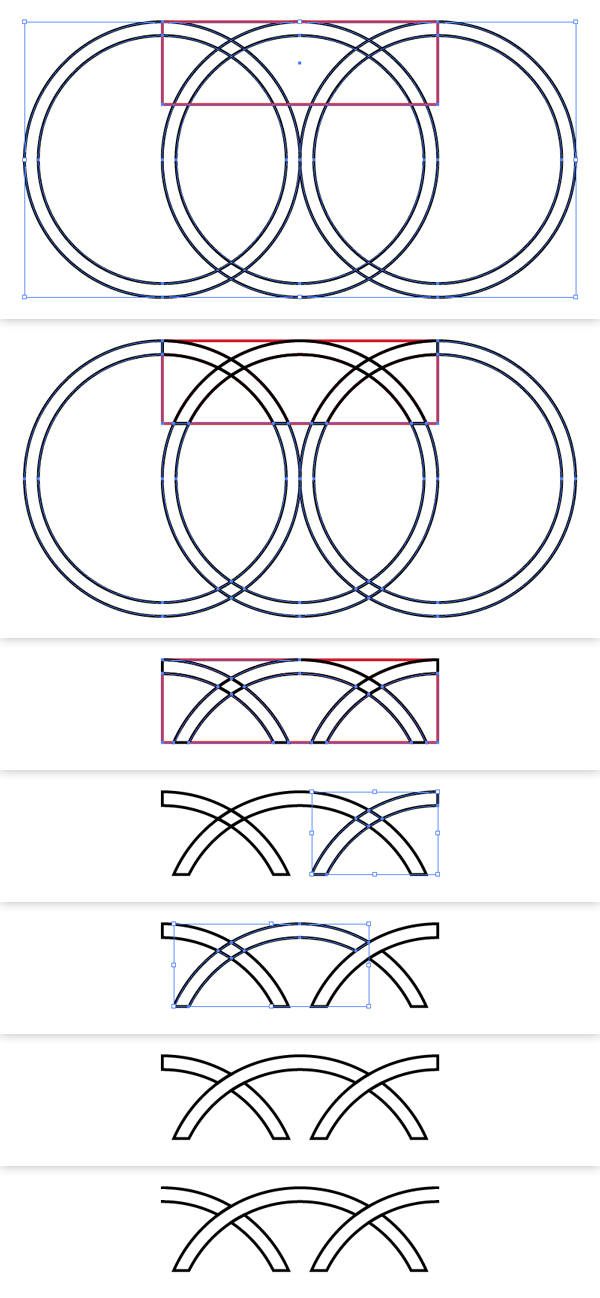
Make a copy of the base rectangle and place it in front of all elements. For better visualization I gave it a red outline. Change its height to 30px. Select the circles and rectangle and use the Pathfinder > Divide option again. Ungroup the result and delete all shapes outside of the base rectangle and the ones with a red outline.
Like before, Unite shapes to create a woven appearance and delete the lines at the end of each shape.
Step 7
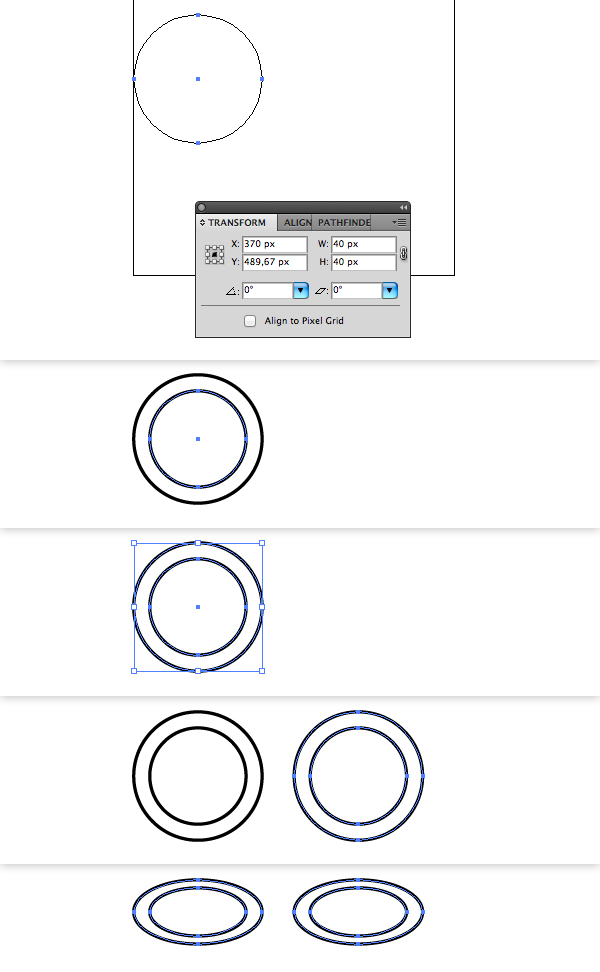
Create a circle with the Ellipse Tool (L) aligned to the left of the base rectangle. I gave it a diameter of 40px, which equals 40% the width of the rectangle, as I do not want the pattern here to "touch" the base at both sides, but leave some space.
Duplicate the circle and change its diameter to 30px, which will create a 5px thickness. Duplicate these two shapes and move them 50px to the left or half of the base rectangle’s width.
Because the circles will be located at the bottom of our pattern, we will change their height non-proportionally, so that when applied as a brush to a circle, they will appear round and not skewed.
Step 8
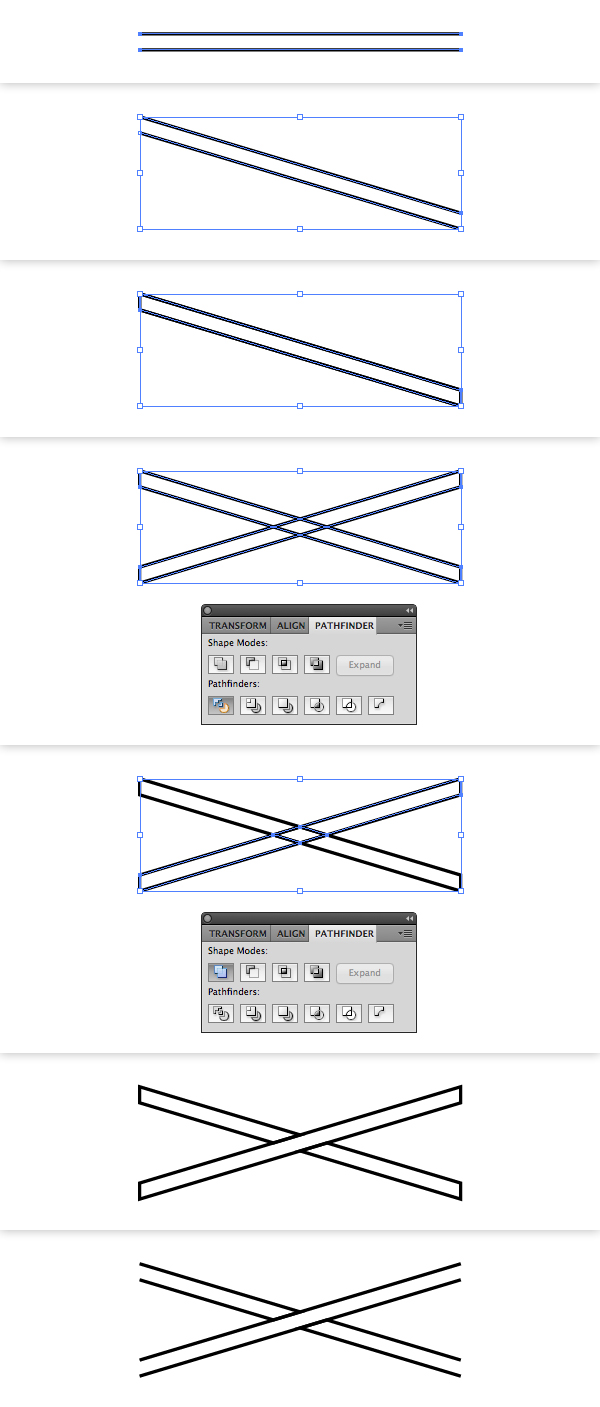
To make a simple crossing pattern, duplicate one of the line elements. Using the Direct Selection Tool (A), move the right two anchor points downwards. Join the paths, for easier workflow.
Duplicate this shape and flip it horizontally. Similar as before, we will Unite the shapes and create a woven appearance. Deleting the lines at the end of the shapes as last step.
Step 9
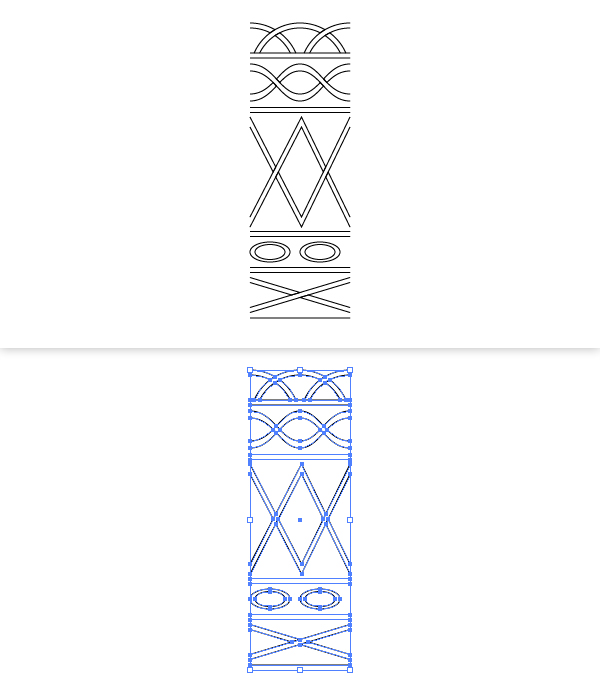
Here is a look at our final pattern. You can see where I added horizontal lines and also how elements are aligned. For example at the top, you can see the pattern touching the horizontal lines.
At the bottom I added a simple horizontal line, which is not aligned with our base rectangle but at a 5px distance from the edge. This will create a circle in the center of the mandala later on.
Step 10
Select the empty rectangle and all your patterns and open the Brush Panel (F5). Simply click on the "New Brush" Icon located at the bottom and choose a Pattern Brush. The default settings will work well with what we want to achieve.
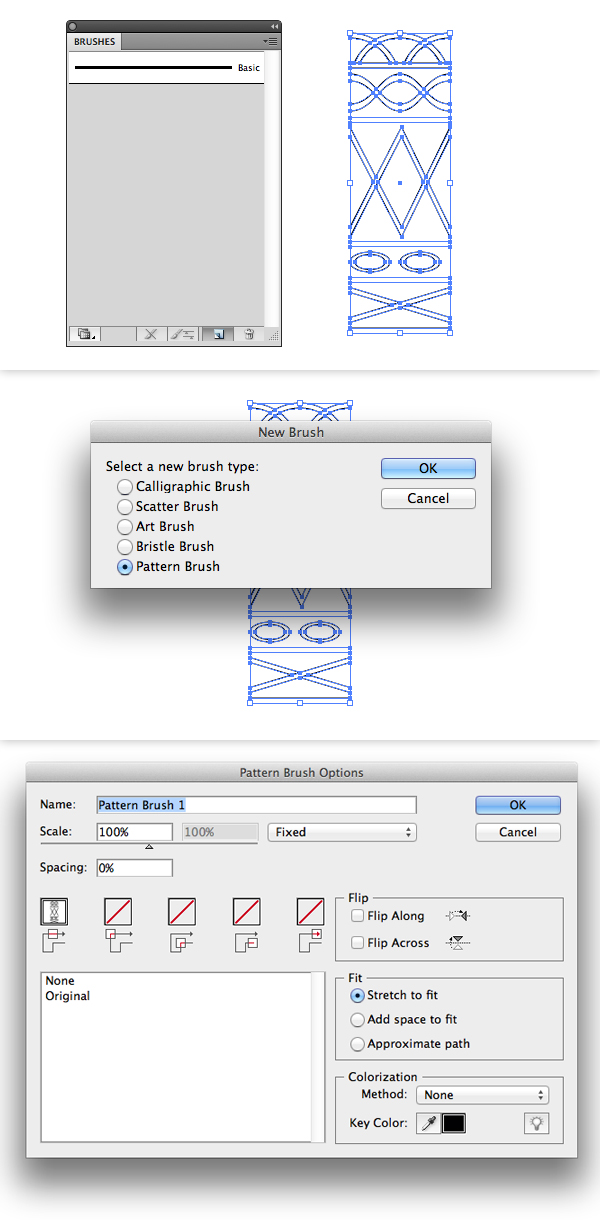
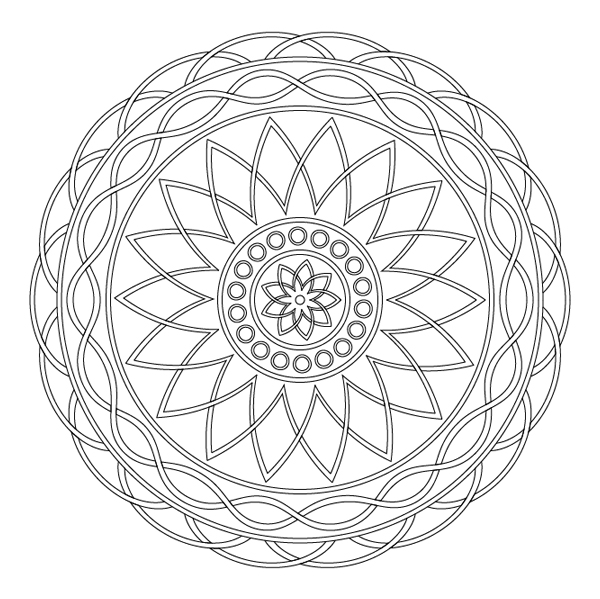
Create a circle with the Ellipse Tool (L) with 300px diameter, the height of our pattern brush and click on our newly created brush and it will be applied to our circle as a perfect, seamless mandala.
Step 11
If you want to continue and turn this into a Mandala filled with color, you will have to expand the brush on the circle. Go to Objects > Expand Appearance. The resulting line art can be easily colored using the Live Paint Bucket Tool (K).
Simply pick a color and hover over the line art to see which area will be filled and click to apply the fill.
Once all elements are colored to your liking, Expand the Live Paint. If you Ungroup the result, there will be one group with the line art and another with the filled shapes. You can edit them however you like, as you would regularly work.

Conclusion
Creating a mandala is easy when you know how. Remembering the theory behind one, you can create more complex mandala’s using a Pattern Brush and perhaps try with more colors.
{excerpt}
Read More