Today I will show you how to creatively use Ableton Live’s built-in MIDI effects. I previously demonstrated the power of MIDI effects and I promised to make more tutorials in this subject.
I assume that you have a working knowledge how MIDI effects. If not, then you should go back and read it again.
I realized that the arpeggiator, chord, note length mixed with a scale effect can be a really powerful combination for creating EDM music. EDM music is not like orchestral music so it is not important to create complex chord variatons. Often the songs contain only two-note chords and in some situations the producers double or triple some of the notes through different octaves to create illusions of complex chords.
In this exercise I will use a six-note chord which actually is only a four-note chord with some of the notes doubled in the higher and lower octaves. So let’s make some melody.
Step 1. Create a One-note Melody
First I will create a one-note melody. I’m using the C# major scale notes in order to create major chords later.
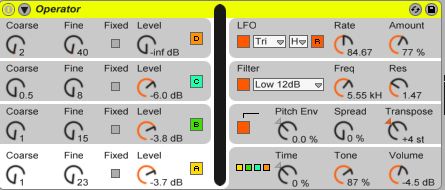
So you’ll be making a melody on a MIDI channel. But before you do that you have to create an instrument. I created my own programmed operator patch. You can do your own, or use my pre-set from the attached project file.
So listen first the basic melody:
Download audio file (melody.mp3)
It’s a really simple four-bar melody with five note changes. The basic BPM is 128 so later you can decide which style you would like to continue this melody. I used some delay and reverb on the return channels.
Here how is sounds:
Download audio file (melody.mp3)
Step 2. Use Scale and Chord MIDI Effects
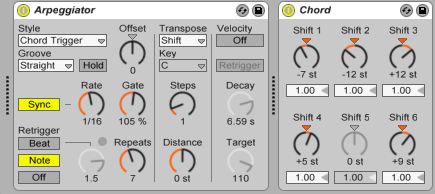
Now we have the basic melody, it’s time to make some notes. I used a Chord effect to create the basic chords:
- Shift 1 to -7 semitones, it’s a perfect fifth down to one octave.
- The next shift is a -12 semitones which is an octave lower.
- Shift 3 is a +12 semitones octave which is on octave higher than the root note.
- Next is a +5 semitone shift which is an augmented third – this note determines the quality of the chord which in case augmented.
- The last shift is +9 which is a diminished seventh.
It’s quite funny because diminished sevenths only occur on minor scales. So maybe I was wrong because this chord only exist on minor scales but we are using a major scale. Don’t panic we will fix that later on.
So after we calibrate the Chord plugin let’s listen the melody:
Download audio file (melody chord.mp3)
You can hear that is a really good melody. But the last chord isn’t quite the best, because it’s a hybrid chord.
In order to eliminate that we have to use a scale plugin. Now you must chose the C Major pre-set from the device browser which you can find underneath the scale effect. Turn the base pot meter to C#.
Now listen again. You can hear that is much more pleasant to our ears. Because the scale plugin changes the A# into a B note at the last chord so the perfect fifth become a diminished fifth.
Now listen the changed melody again:
Download audio file (melody scale.mp3)
Step 3. Use the Arpeggiator and Note Length
To create a more interesting melody I used an Arpeggiator. I used Chord Trigger Style so it will create only a rhythmic pattern.
I used the rate control on 1/16 and the gate on 106 percent. Now you can feel that every chord sliced to 1/16 pattern continuously. But I changed the rhythmic a bit more.
I turned on the Retrigger into Note and the repeats to 4 or 5 (depending on my taste). So we have a basic chord progression. But don’t stop right there use the note length in order to create some change on the rhythm.
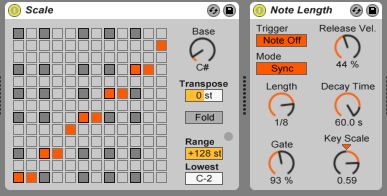
I used the note off button and I automated the decay time. I used the clip envelope mode and draw some columns on the decay parameter. Now you can decide how to automate you rhythm.
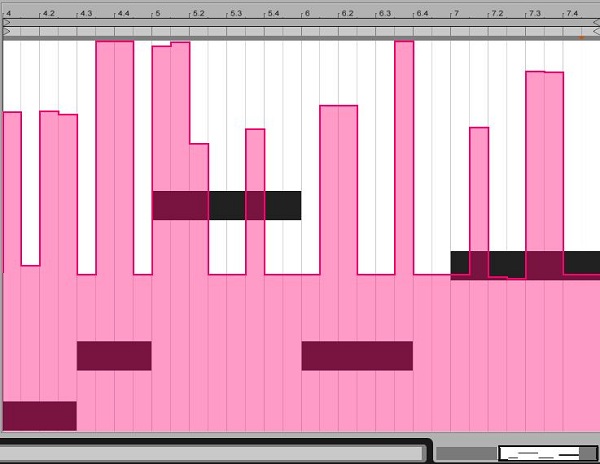
Now listen the whole melody:
Download audio file (final melody.mp3)
I hope I have helped you to write great melodies with these simple devices. Don’t forget to combine them in several ways.
See you in next time. Happy music making!
{excerpt}
Read More