Today we’ll be discussing the possibilities of shooting HDR video using a Canon DSLR (In my case, a Rebel T2i/550D) paired with a custom firmware made by Magic Lantern. We’ll start with how to shoot your video, talk about how to combine the clips and finally how to color correct to get a better result.
Tutorial
Shooting HDR Video
Now, you’ve already heard about HDR (High Dynamic Range), in the case of images all over the internet, but how about working with HDR footage? It’s not only possible, but also relatively easy to do. All you need is a camera that accepts the Magic Lantern firmware and said firmware.
So, how does it work? Magic Lantern (ML from here on) is a custom firmware that allows you more control over your Canon DSLR, with features such as ACG (Automatic Gain Control), Shutter lock, FPS override, bit rate control, zebra stripes and trap focus… to mention a handful. HDR Video is also among the features, and it’s what we’ll be focusing on in this article.
It should be noted that Magic Lantern is a CUSTOM FIRMWARE, that you take full responsibility for installing, and one that *might* brick your camera, but as far as I know, there’s not been reported a single incident thus far. I heartily recommend it to all looking for more control over video/photo on your EOS.
Before we begin, there’s a few factors to take into consideration before deciding to shoot HDR.
- HDR video will NOT work with fast-paced action. The process is basically shooting two ISO values rapidly, resulting in ghosting artifacts by even minor motion, effectively meaning you should use it mainly on static or slowly moving shots with little-to-no action.
- Be careful with your ISO brackets. Using a higher bracket, for instance 100/3200 won’t look as good as you may think, since higher a ISO means more noise. When composing the images, you’ll get one smooth part and the other will have really noisy bits. It’ll look ugly… Believe me.
Okay, assuming you’ve got ML loaded up, let’s move on to setting up your camera to shoot HDR. To enter the ML menu, start your camera in VIDEO mode, let it boot, and hit the recycling bin button. This should bring up the menu… which admittedly, looks awful.
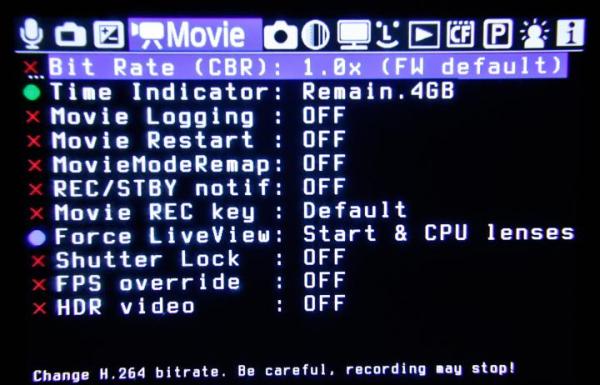
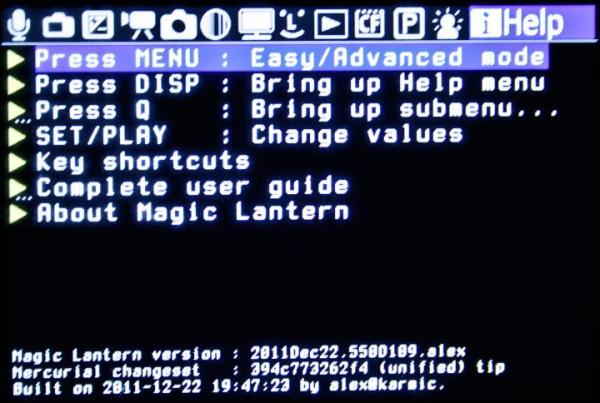
Luckily, it’s not about design, it’s about functionality. Use the directional buttons to navigate, ‘set‘ to change up, and ‘play‘ to change down. Navigate to ‘Movie’, and look for ‘HDR video‘ at the bottom. If it’s not there, it’s because you either installed an older version of ML, or you forgot to set ML to “Advanced Mode“. Go to “Help“, and press ‘menu‘ on the top choice.
It should open up a few more possibilities. Click on ‘HDR video‘ once to see what it does. It brackets the ISO based on what you’ve already selected outside ML. Depending on your lighting situation this varies, but I recommend setting the initial ISO to 100, and bracket up to 800.
Remember, if an ISO value of 100 seems to low, you can change the f-stop and Shutter. Depending on your lens, the f-stop could go as low as 1.2 (with a loss of focus depth) and the shutter will go down to 60 regardless.

Okay, so your camera should be set to shoot HDR video, but wait! If you already went ahead and clicked record, it might not be right yet. A little theory for you:
With what we’re doing today, HDR video willoverlap two ISO values, so shooting at 1080p24 will result in two 12fps streams, right? Right! This means that your final result will actually be 12fps.
To top it off… the less frames per second, the more ghosting artifacts there’ll be. Why? Because the camera obviously can’t shoot at two exposures simultaneously, so it tries it best to work fast enough, but 24fps really isn’t enough.
To fix it, you will have to shoot in 60fps, compromising resolution down to 720p. Does it really matter? No, not really. 720p is usually more than enough, and only hardcore geeks and nitpickers will really see the difference on a 24″ PC monitor. If you’re showing this on a 50″+ HDTV, however, It could be a problem.
But never mind that. The “theory/math” bit is taken care of now. You know how it works to a certain degree now, so get out there and start shooting HDR Video!
Splitting the Streams and Joining Them Again
By now you’ve probably noticed that the video isn’t completed in camera. You’re left with a weird-looking epileptic attack that leaves even the strong-minded people slightly insane. If the camera could complete the work for you, you probably wouldn’t be reading this article.
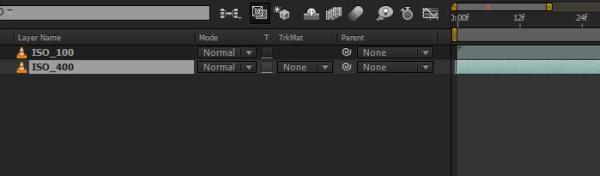
Let’s begin by firing up AE and dragging your footage into a new comp. Duplicate your footage once (Ctrl/Cmd-D). Now, offset the bottom layer by trimming the first frame
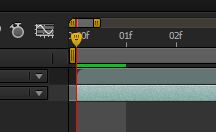
Then move the bottom layer back to the first frame of the comp. Now, take both layers and time stretch them to a value of 50% (Right-click/Cmd-click->Time->Time Stretch)
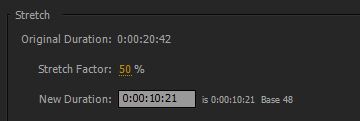
You’re telling AE to show the video at twice the speed, effectively eliminating every other frame. Since you offset the bottom layer by just one frame, we’re now left with two streams of nice-looking footage, as shot with ISO values of whatever it is you set it to be.
Are we done yet? Not quite, but we’re getting there. It’s time to render these streams out separated, and make sure they’re ready to be handled by Photomatix. To do this, we need to take some precautions.
Let’s solo the top layer.
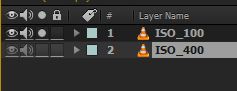
Then we’ll add our comp to the Render Queue. Make sure we render to a *.jpg sequence, and with that done, let’s take a look at the sequence name.
Since Photomatix won’t accept image sequences with the frame numbers at the back, we need to make our file names recognizable to Photomatix. It’s a simple fix. Instead of calling them “MVI_XXXX_[XXXX].jpg”, we’ll just flip it, and make it “[XXXX]_MVI_XXXX.jpg”. However, since we’re gonna render two streams, we need to make them separated in names as well. So name the files “[XXXX]_LIGHT_MVI_XXXX.jpg” and “[XXXX]_DARK_MVI_XXXX”, obviously matching your rendered footage. Make sure you put both image sequences in the same folder.

When you’re done rendering you’ve got two image sequences, very disorganized and ugly… but they’ll work with Photomatix, which is what we want.
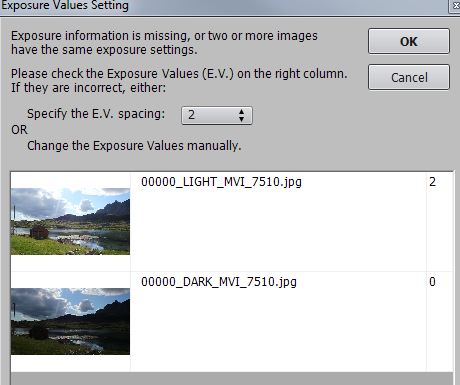
Now it’s time to open up Photomatix. At the initial screen, click on “Load bracketed photos“, and select the first frame of both your image sequences (Frame 0000 of both LIGHT and DARK). Why are we opening just a single image when we can batch process the entire sequence, you ask? Well, to ensure we get the exact result we want, we’re going to have to play around with some settings first. If you’ve used Photomatix before to make HDR images, you know what to do. The gist of it is to specify the E.V. Spacing according to your ISO settings. ISO 100 to 400, means 4 and 0, respectively, and ISO 100 and 200, means 2 and 0, and so on. This is obviously done at the first window after selecting your footage files. Hit OK, hit the next OK, and let’s move on to the next step.
Right about now you’ll be presented by an unattractive intermediate image. Don’t worry about it, we’re not done yet!
Hit the button names “Tone Mapping / Fusion” to be taken into the editing bit and you’ll be presented with a vastly improved image.
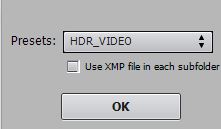
Select “Tone Mapping” as the process of choice and set the smoothing according to taste. Mid to Max will usually look best, but play around with it and the settings below. You can also choose a preset on the bottom of the window if you like, but let’s not right now. Find some settings that appeal to your taste. Down at the presets, select ‘Save settings‘ in the dropdown menu. Call it “HDR Video” or something similar and let’s exit the program.

You’ve now saved a preset that can be applied to all the frames creating an easier process and an improved pipeline.
Fire up Photomatix again, but this time, let’s click on “Batch Bracketed Photos“.
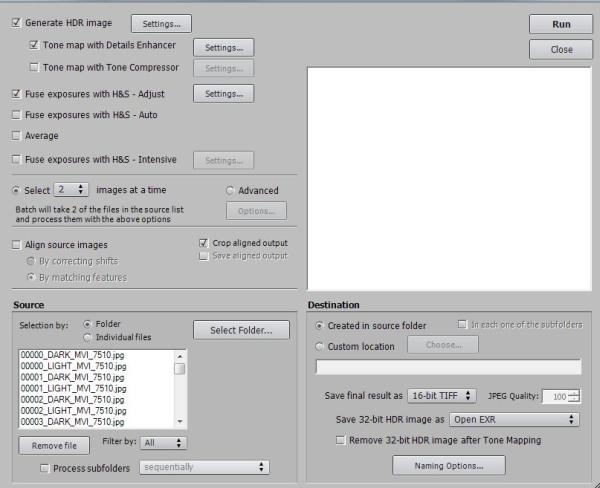
In the dialog window, select the folder you saved all the images to and make sure it’s set to select _2_ images at a time. In the Tone Map settings, choose your freshly saved preset in the dropdown menu.
Make sure to set the destination to a different folder and save final result as 16-bit TIFF then hit “Run“.
Depending on your computer and the length of your footage, this may take some time. Just like Rendering in AE, 60fps will take more than double the time than it would to render 24fps.
Once it’s done, you can look at your newly joined HDR stream and jump for joy. Feel free to take a break now, but we’re still not quite done.
Color Correction Using Color Finesse Pro
Okay, this is where the fun begins… the part where the joy of shooting HDR really comes into play.
Load up After Effects again and import the HDR EXR sequence (One should’ve been created alongside the TIFF-sequence). Drop it into a new composition and hit RAM preview to look at it as-is. It should, depending on your preset, look exactly like you’d think… like flat HDR footage. I say flat because even though it’s HDR by definition, it’s not the main purpose of this article.
A little theory again:
The reason shooting HDR is a good idea, is to get exactly that; a High Dynamic Range.
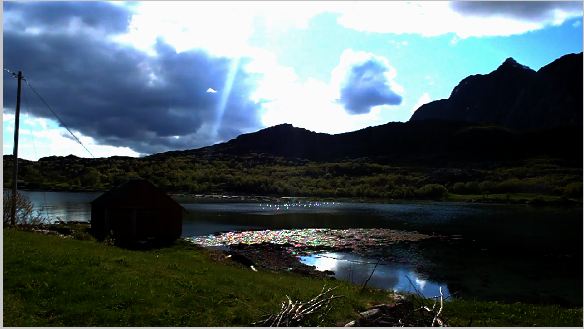
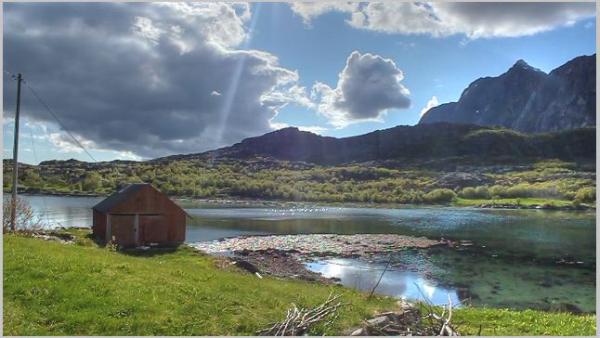
Instead of setting the ISO to 100 to get crisp looking images in bright sunlight, or shooting in ISO 800 to fetch details in darker shots, you get the best of both worlds without compromise. When shooting at ISO 800, you often lose detail in skies resulting in blown out footage where the sky is super-white while the rest of the image looks good. On the flip side, if shooting at ISO 100 to get the sky looking good, the rest is usually too dark,\ which means you’ll have to try and compensate by playing with levels and curves. It can be done, but personally, I usually wind up having to do sky replacement. Granted, HDR doesn’t work with fast-paced footage, but for those relatively static vista shots, it can be downright beautiful to look at.
Alright, you’ve imported your EXR-sequence. Now make a new comp from it, and behold the look that is well… ugly! Kidding aside, it doesn’t wield the result we’re hoping for, but thanks to EXR, all the information is hidden inside the image already. What we need to do is apply a neat plugin/effect called “Color Finesse Pro“. It’s hidden in ‘Effects->Synthetic Aperture‘, in case you’re not using the effects search function.
The plug-in loads fast, and you’ll be greeted by the simple menu right in the effects window where you’ve got a 3-way color correction with several options. If you only want to shift colors around and play with curves, that’s fine and dandy. We’re going to want to do a little more than that, so lets hit the button on the very top that says “Full Interface“.
Now, don’t become frightened by the fancy colors, graphs, lines and curves… it’s all very important information that you’re going to need at some point in time. This time around, however, we won’t be looking at them all so we’ll stick mainly to the one called “Luma WFM”. We’ll also be peeking into Histograms a bit, too. Looking around, it comes off a bit frightening and complicated, but once you get the hang of things, it’s really not. It’s natural and easy to use.
Looking around, it comes off a bit frightening and complicated, but once you get the hang of things, it’s really not.
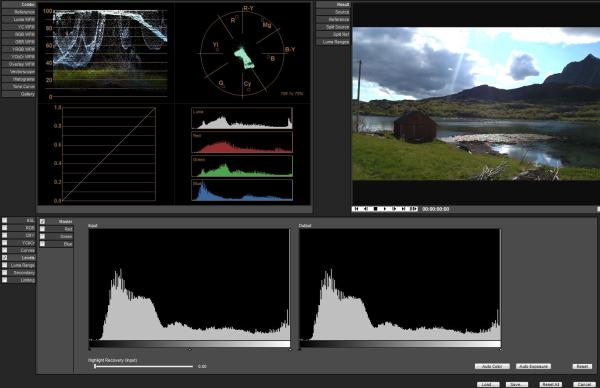
First, we’re gonna ignore the top parts here to head over to the bottom left menu and hit ‘levels‘. In here, we’re going to drag the ‘preserve highlights‘ slider to 100. Notice how the blown out portions of the footage are now completely reintroduced? This is what I was talking about when mentioning that the information is still in there. Suddenly we’re presented with a much better image, and one that lends itself to color correction far better than the previous one. This is one of the main reasons we’re using Color Finesse Pro instead of AE’s built-in tools.
With that taken care of, it’s time to click the Luma WFM on the top left menu to enable the waveform. It looks fancy, but all it does is show you what colors are in what parts of the image. The lower you go, the closer it is to black, and vice versa. Now, if some colors are dipping over 100 or below -100, it means they’ll be presented as super-whites or super-blacks. In short; they won’t have any detail whatsoever, regardless of what monitor you watch the footage on. If your footage does dip above/below these, you’re going to have to play with levels. Level Output/Input yield different results, but basically, the output limits the space while the input spreads the levels inside the allocated color/light space.
The highlight recovery slider can help you gain detail from the blown out whites in the EXR file. Give it a slide to max to see the difference. Also take note that the recovery will not work in all cases, and in some cases you’ll do just as well with adjusting the levels output.
Okay, we’re gonna adjust the levels output until our highlights/blacks aren’t dipping outside the top, or the bottom. In my case I had to move the slider quite a long way, but here’s the Luma waveform to better help you understand.
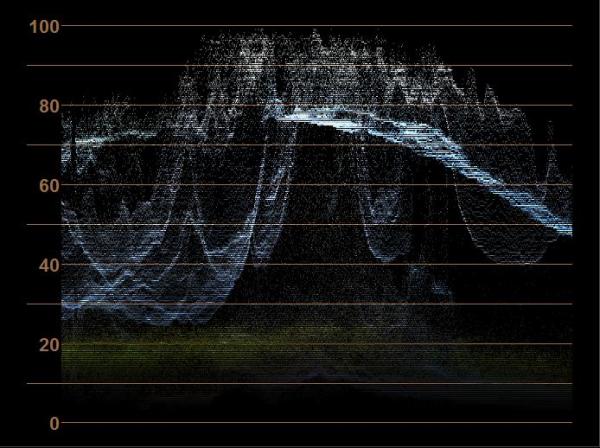
Notice how nothing is going above 100, and nothing is dipping below 0? This means we have no under- or overexposed areas in our footage. This essentially means it’s broadcast safe, and that we have way more detail than we used to have before shooting HDR. Now, if you were to close Color Finesse Pro now and apply adjustments like curves, you’d have plenty to go on. Instead of doing that, we’ll use the curves built in Color Finesse. Remember where we found the levels?… curves are in the same place.
The curves are pretty much exactly the same as in AE, but all 3 curves are in one window. You’re able to set them automatically using the color samplers on the bottom. They are Black, Gray and White, and you can automatically set the curves correctly for your footage. Now, this has never helped me achieve the result I want, so for now, just close the interface, and let’s delve into the simplified interface found in the plug-in’s window right inside of AE.
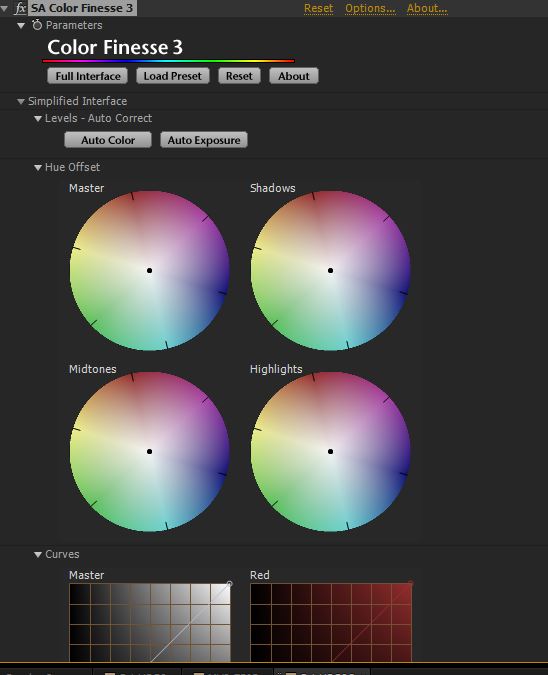
The simplified window allows you to do a lot of the same things as the full interface, and is home to one of my favorite features; hue offset. With it, you can tint the entire image (master), and shadows, mid-tones and highlights individually. This means that if you want a classic, standard film-like filter, you can tint the shadows towards blue, and the highlights yellow.
Okay, we’re just starting into the world of advanced color correction here so this is where we’ll wrap up. If you’re interested in doing some more advanced color correction, I highly suggest using Color Finesse Pro, bundled with AE.
Alright, that’s it for now! I hope you learned something here, and I look forward to seeing your results, have fun!
{excerpt}
Read More