In the following steps you will learn how to create a monitor icon. It’s a pretty simple quick tip that will help you understand the basic vector shape building techniques and some of the basic Illustrator effects. Don’t get discouraged by the number of steps. Every step is simple and as detailed as possible so that you can easily understand it.
Step 1
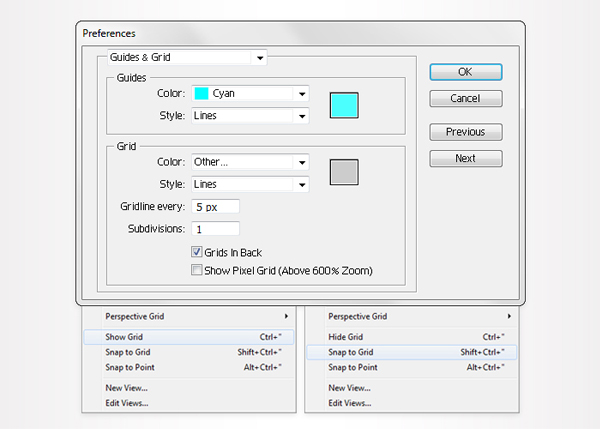
Create a 700 by 700px document. First, enable the Grid (View > Show Grid) and the Snap to Grid (View > Snap to Grid). Next, you’ll need a grid every 5px. Go to Edit > Preferences > Guides > Grid, enter 5 in the Gridline every box and 1 in the Subdivisions box. You can also open the Info panel (Window > Info) for a live preview with the size and position of your shapes. Do not forget to replace the unit of measurement to pixels from Edit > Preferences > Unit > General. Al these options will significantly increase your work speed.
Step 2
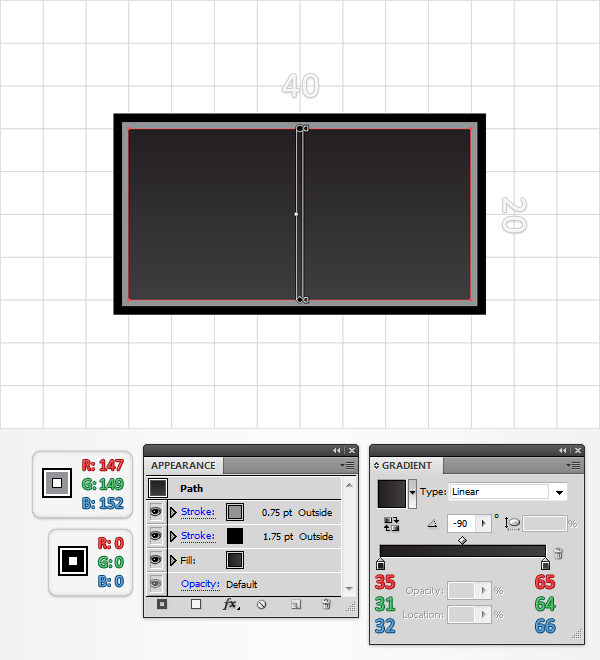
Pick the Rectangle Tool (M) and create a 40 by 20px shape. Fill it with the linear gradient shown below and add a black stroke. Make it 1.75pt wide and align it to outside. Go to the Appearance panel, select the existing stroke and click on the Duplicate Selected Item button from the bottom of the Appearance panel. This will add a second stroke for your shape. Make it 0.75pt wide, set its color at R=147 G=149 B=152 and make sure that it’s aligned to outside.
Step 3
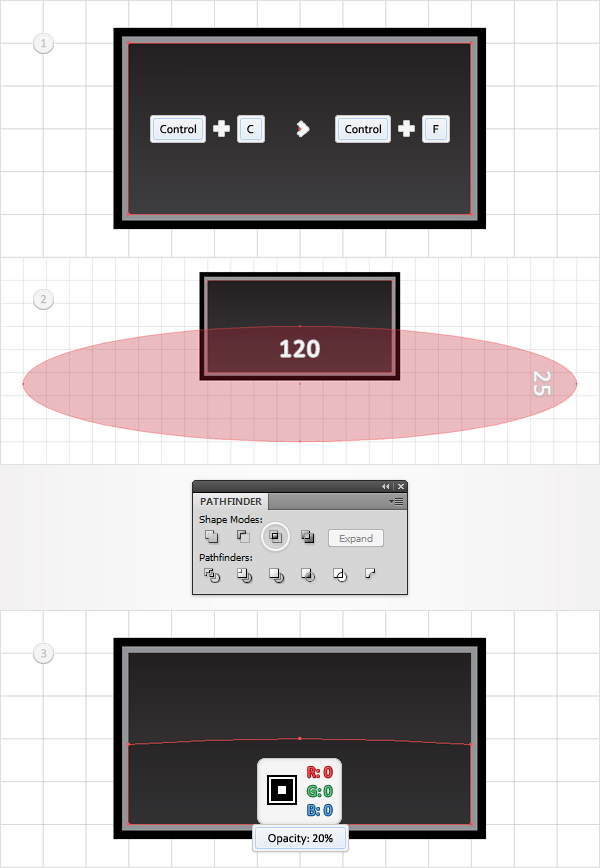
Select the shape made in the previous step, make a copy in front (Control + C > Control + F) and grab the Ellipse Tool (L). Create a 120 by 25px shape and place it as shown in the second image. Select this squeezed circle along with the fresh copy and click on the Intersect button from the Pathfinder panel. Fill the resulting shape with black and lower its opacity to 20%.
Step 4
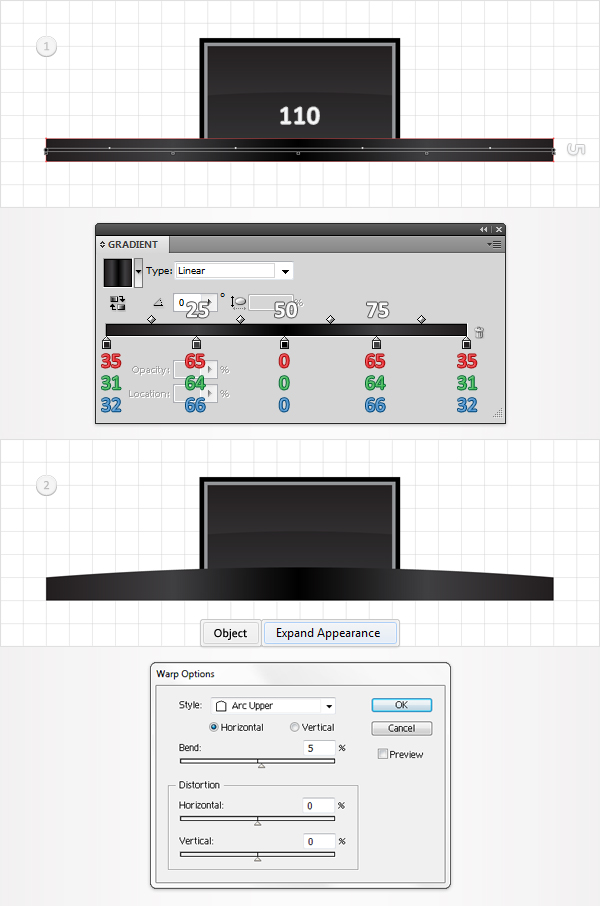
Pick the Rectangle Tool (M), create a 110 by 5px shape and place it as shown in the first image. Fill it with the linear gradient shown below then go to Effect > Warp > Arc Upper. Enter the data shown in the second image, click OK and go to Object > Expand Appearance.
Step 5
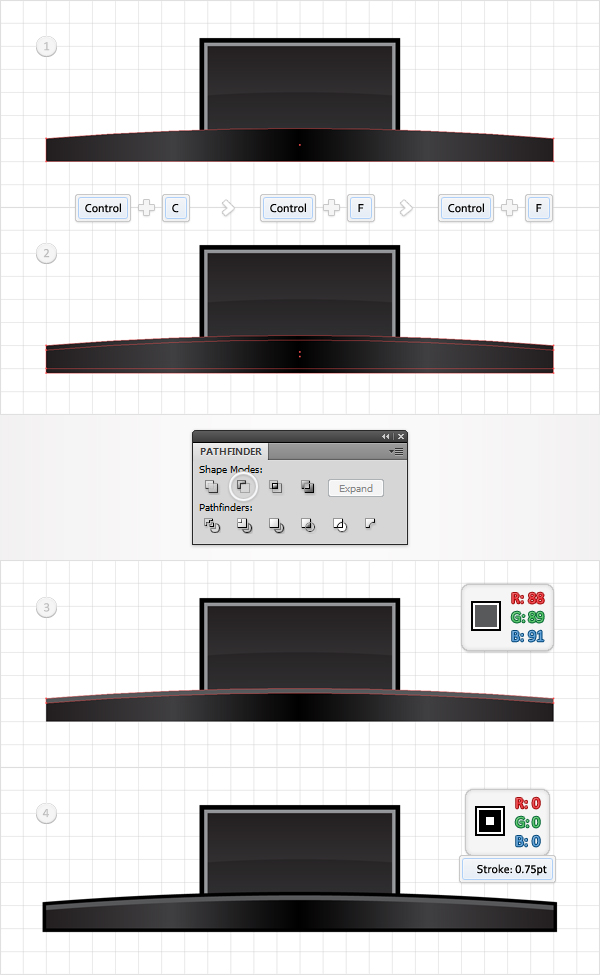
Disable the Snap to Grid (View > Snap to Grid) then go to Edit > Preferences > General and enter 1 in the Keyboard Increment box. Select the shape made in the previous step and make two copies in front (Control + C > Control + F > Control + F). Select the top copy and hit the down arrow once. Reselect both copies and click on the Minus Front button from the Pathfinder panel. Fill the resulting shape with R=88 G=89 B=91. Reselect the shape made in the previous step and add a black stroke. Make it 0.75pt wide and align it to outside.
Step 6
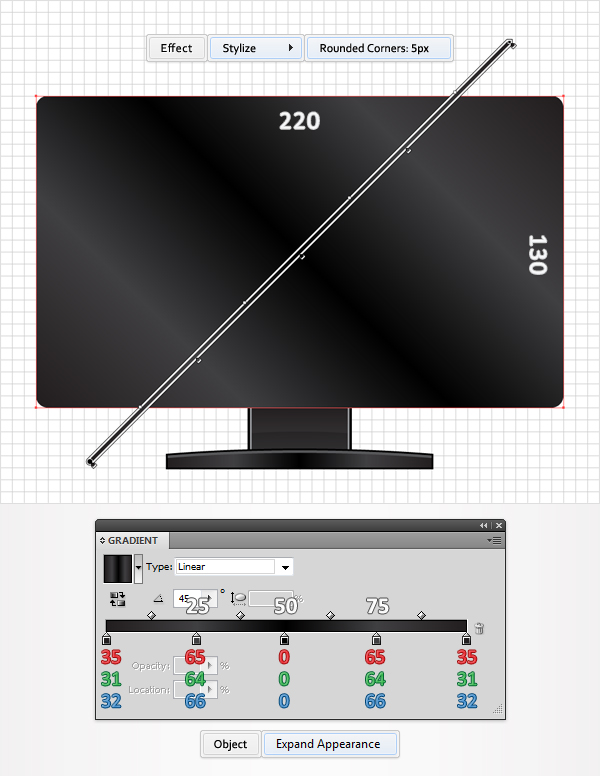
Re-enable the Snap to Grid (View > Snap to Grid). Pick the Rectangle Tool (M), create a 220 by 130px shape and place it as shown in the following image. Fill it with the linear gradient shown below and go to Effect > Stylize > Rounded Corners. Enter a 5px radius, click OK and go to Object > Expand Appearance. The white numbers from the gradient image stand for location percentage.
Step 7
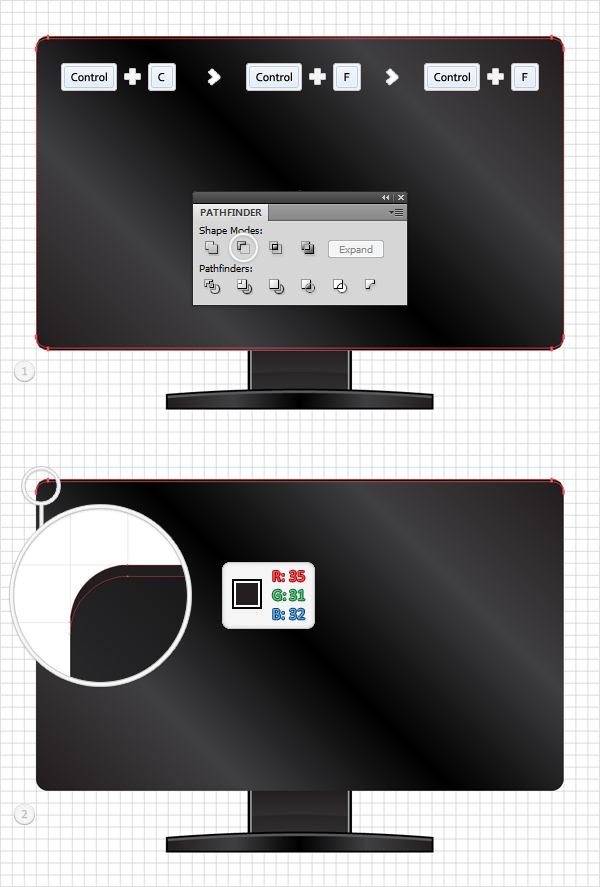
Disable the Snap to Grid, select the shape made in the previous step and make two copies in front (Control + C > Control + F > Control + F). Select the top copy and hit the down arrow once. Reselect both copies and click on the Minus Front button from the Pathfinder panel. Fill the resulting shape with R=35 G=31 B=32.
Step 8
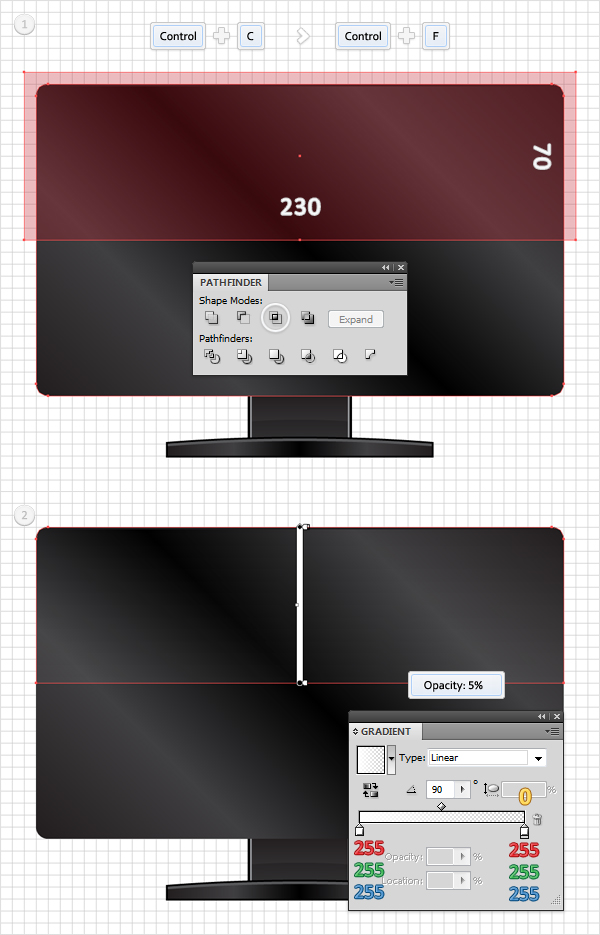
Re-enable the Snap to Grid then select the shape made in the sixth step and make a copy in front (Control + C > Control + F). Pick the Rectangle Tool (M), create a 230 by 70px shape and place it as shown in the first image. Select this new rectangle along with the fresh copy and click on the Intersect button from the Pathfinder panel. Fill the resulting shape with the linear gradient shown in the second image and lower its opacity to 5%.
Step 9
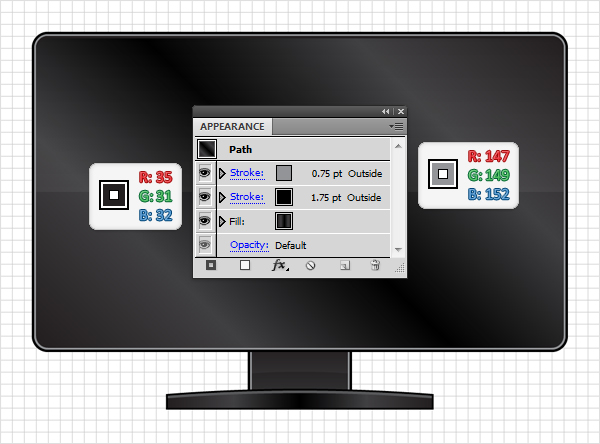
Reselect the shape made in the sixth step and add a black stroke. Make it 1.75pt wide, align it to outside then add a second stroke for this shape. Make it 0.75pt wide, align it to outside and set the color at R=147 G=149 B=152.
Step 10
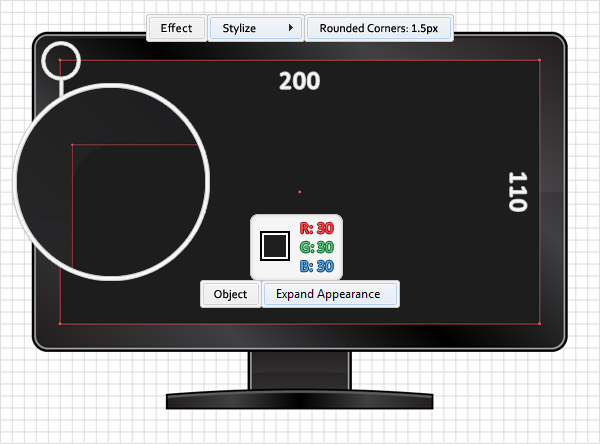
Pick the Rectangle Tool (M), create a 200 by 110px shape and place it as shown in the following image. Fill it with R=30 G=30 B=30 and go to Effect > Stylize > Rounded Corners. Enter a 1.5px radius, click OK and go to Object > Expand Appearance.
Step 11
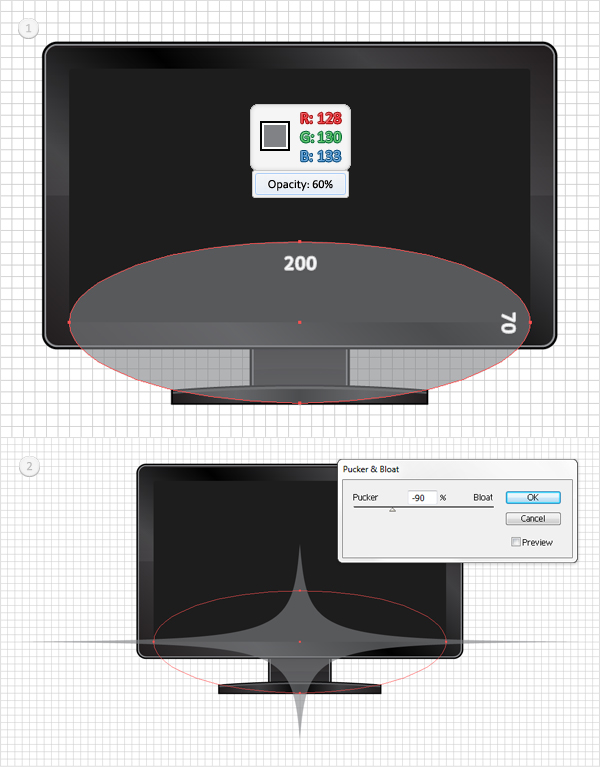
Pick the Ellipse Tool (L), create a 200 by 70px shape and place it as shown in the first image. Fill it with R=128 G=130 B=133, lower its opacity to 60% and go to Effect > Distort&Transform > Pucker&Bloat. Drag the slider at -90% and click OK.
Step 12
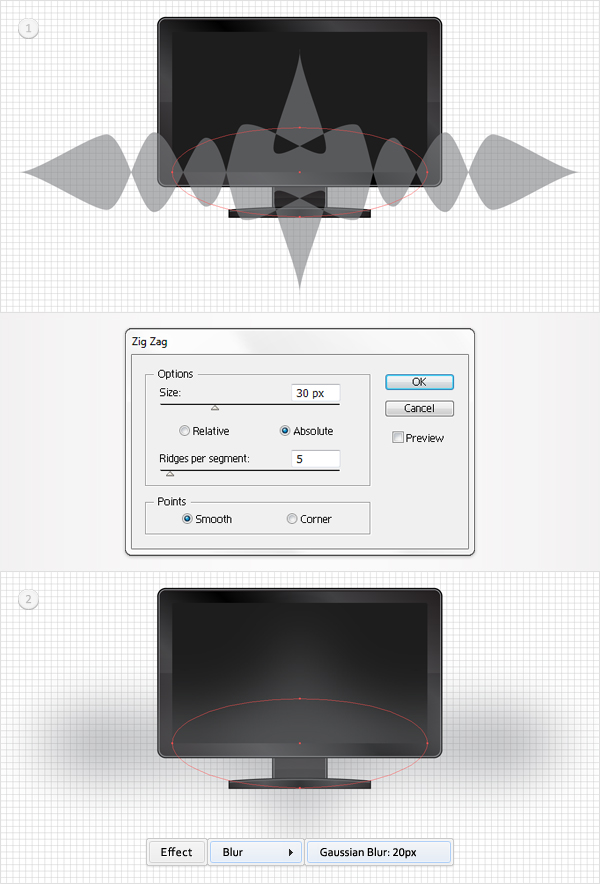
Reselect the shape created in the previous step and go to Effect > Distort&Transform > Zig Zag. Enter the data shown below, click OK, then go to Effect > Blur > Gaussian Blur. Enter a 20px radius and click OK.
Step 13
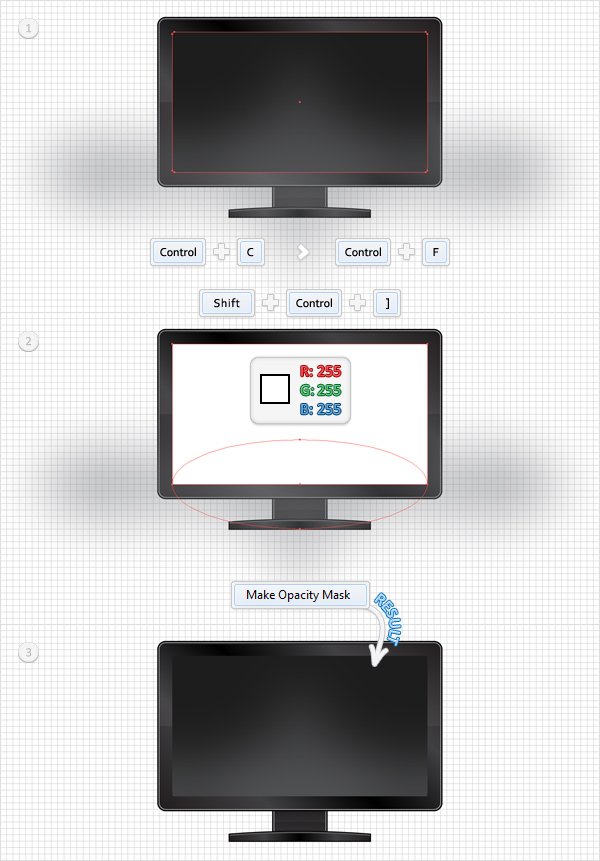
Next, you need to mask the shape created in the previous step. Select the shape made in the tenth step and make a copy in front (Control + C > Control + F). Fill it with white and bring it to front (Shift + Control + Right Square Bracket ). Select this white shape along with the blurred shape created in the previous step and go to the Transparency panel (Window > Transparency). Open the fly-out menu and click on Make Opacity Mask. Lower the opacity of this masked shape to 60%. In the end it should look like in the third image. Go to the Layers panel and lock this shape.
Step 14
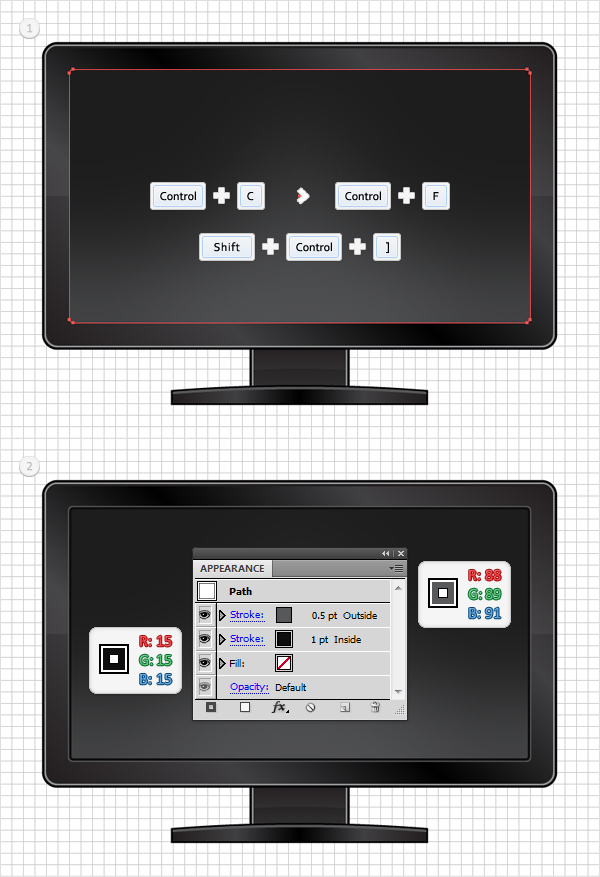
Reselect the shape made in the tenth step, make a copy in front (Control + C > Control + F) and bring it to front (Shift + Control + Right Square Bracket ). Fill this copy with none, but add a stroke. Make it 1pt wide, align it to inside and set the color at R=15 G=15 B=15. Add a second stroke for this shape, make it 0.5pt wide, align it to outside and set the color at R=88 G=89 B=91.
Step 15
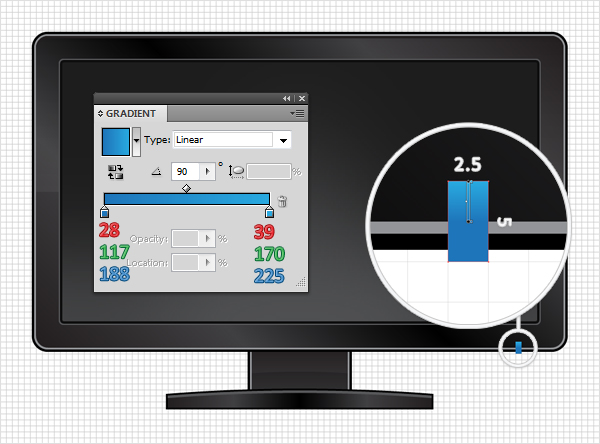
For the following step you will need s grid every 2.5px. Go to Edit > Preferences > Guides > Grid and enter 2.5 in the Gridline every box. Pick the Rectangle Tool (M), create a 2.5 by 5px shape and place it as shown in the following image. Fill this simple rectangle with the linear gradient shown below.
Step 16
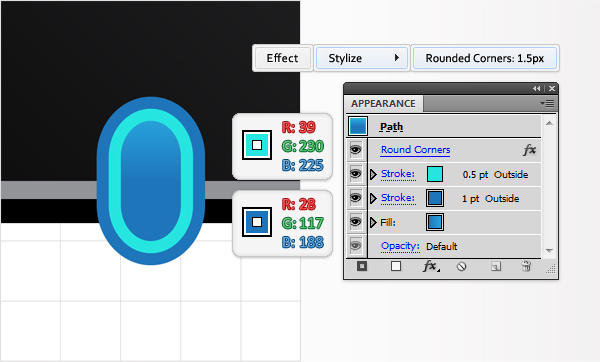
Let’s make some changes for the shape made in the previous step. Select it and add a first stroke. Make it 1pt wide, align it to outside and set the color at R=28 G=117 B=188. Add a second stroke for this shape, make it 0.5pt wide, align it to outside and set the color at R=39 G=230 B=225. Reselect the entire path and go to Effect > Stylize > Rounded Corners. Enter a 1.5px radius and click OK.
Step 17
Pick the Rectangle Tool (M), create a 7.5 by 5px shape, fill it with white and place it as shown in the first image. Select this white rectangle along with the shape edited in the previous step and go to the Transparency panel. Open the fly-out menu and click on Make Opacity Mask. In the end your shape should look like in the third image.
<div cla
ss=”tutorial_image”>
Step 18
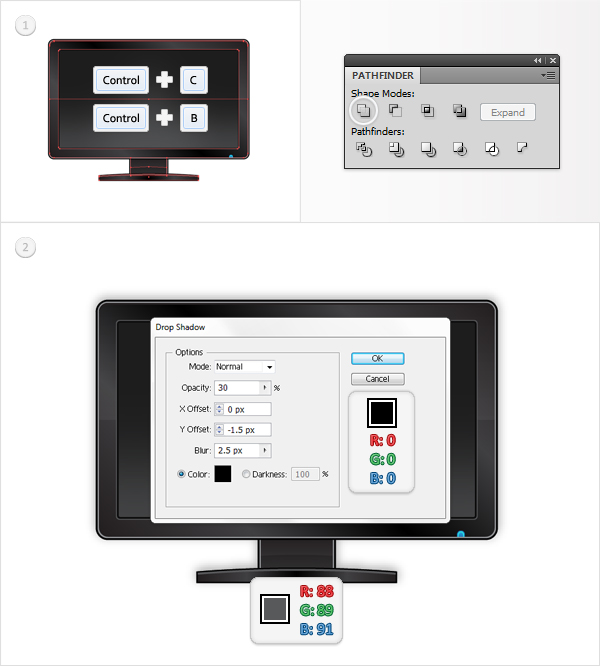
Select all the shapes created so far (except the masked ones) and make a copy in back (Control + C > Control + B). Select those copies and click on the Unite button from the Pathfinder panel. Fill the resulting shape with R=88 G=89 B=91 and go to Effect > Stylize > Drop Shadow. Enter the data shown below, click OK and you’re done.
Conclusion
Now your work is done. Here is how it should look.
