Quick Tip: Convolution Reverb – McDSP’s Revolver Part 2
In this short series of quick tips, we are looking at how to record an Impulse Response of a space using Pro Tools, and then using McDsp’s Revolver Plugin to ‘de’convolve it. Sounds complex? Not at all, refer back to Part 1 to catch up with the story!
Step 1: How Does the Equipment Go Together?
Check out the diagram below as an example on how you should set-up your system.
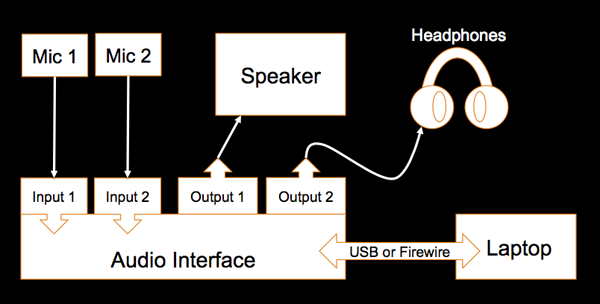
A couple of points about the above signal flow diagram:
- I have tried to keep the equipment generic, e.g. an Audio Interface as opposed to a Digidesign Mbox.
- The headphones are plugged into their own output instead of the standard headphone output associated with an audio interface. The reason for this will become evident soon enough!
- My diagrammatic representation of headphones is truly magnificent!
Step 2: Where Do We Put the Microphones to Pick Up the Best Sound?
Good question, and to be truthful this question would be an article in itself! However being outside the scope of this quick tip I will suggest the simplest way to choose where to put the microphones is to walk around the space clapping your hands and listening. Ask yourself, where does it sound most pleasing? When you have found this spot, place your microphones in a stereo configuration there.
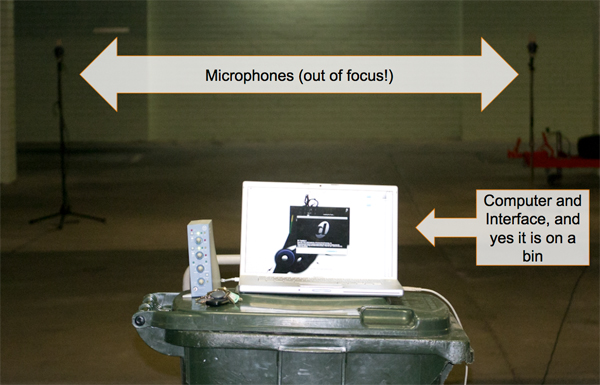
Once your microphones have been placed where you want them, place your speaker a good distance away, in this example the speaker was approx 6-7 metres from the microphones directly in between them.
Step 3: Lets look at the Pro Tools configuration
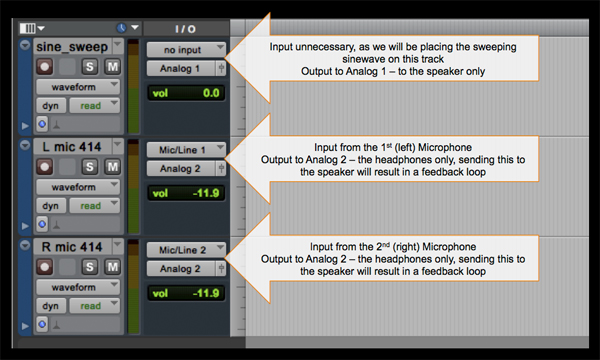
This tutorial uses Pro Tools, but again, most DAW’s would be suitable, it’s all about how you route it. Upon opening a new session in Pro Tools you need to create three mono audio tracks. Set the routing of them as per the diagram below.
Now we need to use McDSP’s sweeping sine wave generator to create the sound we are going to output through the speaker to excite the space. Providing you have the software installed, go to the audio suite menu and choose ‘Sweep Generator’. We are going to choose a long sweep. I have trialed long and short sweeps of differing lengths and the best results seem to always come from using the long sweeping sine wave. The short sweeps are much better for noisy environments when you need to get your recording done quick.
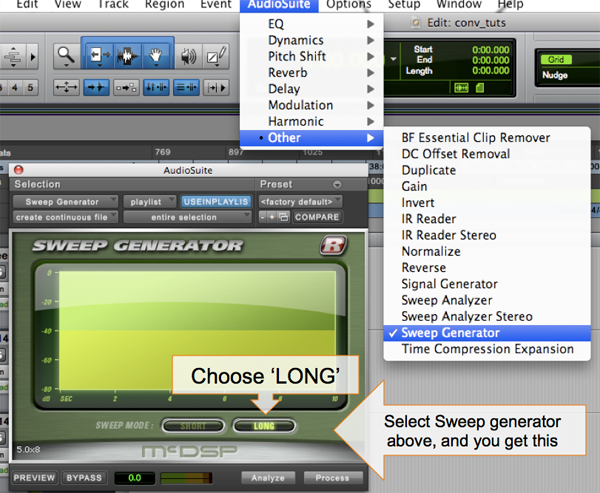
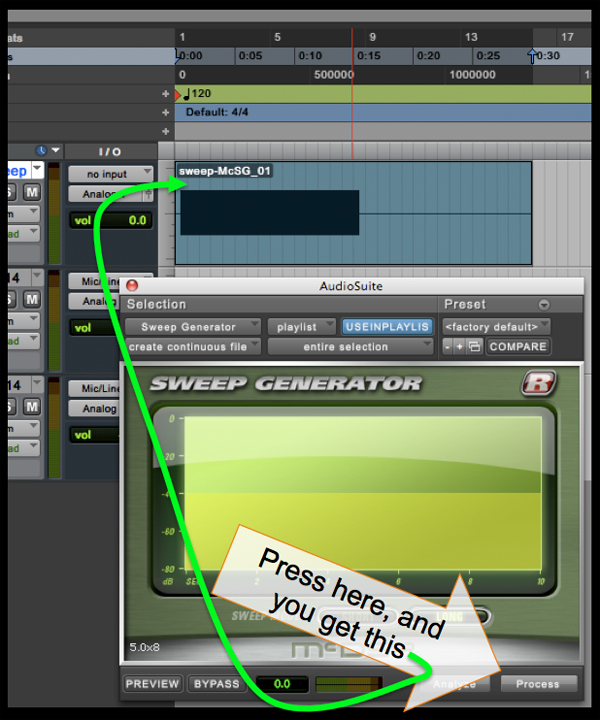
Now select 30 seconds and press process on the sweep generator, it will give you a 30 second region with your long sweep in it.
Step 4: Press Record
Now it is simply a case of record arming your microphone tracks and pressing record. Loop record is a good option here, keep loop recording until you are confident that you have an entire 30 second recording with minimal ambient background noise, e.g. no surrounding traffic, aeroplanes, penguins etc! There a couple of considerations you need to keep in mind while doing this step:
- Have the speaker turned up loud, without distortion.
- Trial the volume of the speaker, is it reproducing the sweeping sine wave effectively?
- You will need to play with the gain of the microphones, try to set the gain so that your signal from the microphones is peaking at around -3 to -6 dB.
- Monitor your signal from the microphones as shown by the routing in Step 3, you are sending both microphones to the same output, (output 2) to the headphones, ensure there is no audible clipping and minimal ambient sound.
A bit of trial and error is needed here to get the best possible results, here is an example of the sweep recorded in the space
Download audio file (sweep.mp3)
Sweep in the space sample
That’s all for now, ensure you stay tuned for Part 3, where we ‘de’convolve the recorded audio into an Impulse Response of the space.
{excerpt}
Read More