So you’ve just got a shiny new iPad and you want to make some music. To be honest you now have quite a few choices when it comes to music creation apps and the list continues to grow. To keep things simple let’s take a look at the most obvious choice… Apple’s very own GarageBand.
In this tutorial I’ll give you a step by step account of how I built my first loop in GarageBand and hopefully this will give you a nice overview of what the app is capable of. The audio and the actual Garageband project file is available to download, so you can take a closer look in your own time.
Step 1: A ‘Smart’ Beat
GarageBand on the iPad is capable of producing eight simultaneous tracks of audio (or instruments). These eight tracks can be made up of various sound sources, you can record your own audio via the microphone or audio input, you can use built in Apple loops or your own samples and you can also use any of GarageBand’s excellent built in instruments.
I’ve tried to mix things up a little throughout this mini project but I thought I’d start with some of the instruments that are included with the purchased app. On pressing the ‘Instruments’ button you are presented with a slideshow of instrument icons. Amongst these you’ll find everything you’ll need to create your track.
if you are slight musically challenged, or just want a quick melodic fix then you should opt for the ‘Smart’ instruments. These are basically keyboards, drum kits and guitars that go some way to programming themselves.

The Smart Beat programming section is a lot of fun to use.
To give you an example of this my first track is created with the ‘Smart Drums’ instrument. Using this feature you have the ability to choose a drum machine type and program a beat using a grid that displays values such as ‘Complexity, Volume and Drum Type’. Let’s be honest it doesn’t get any more simple than this!
Using the ‘Hip Hop Drum Machine’ I was able to construct a simple beat in about five minutes. The results are below…

The first part I recorded is isolated.
The new beat plays back
Step 2: Even Smarter Guitar
Continuing on the Smart instrument tip I proceeded to lay down a guitar line using the ‘Smart Guitar’. The instrument is really impressive, giving you choice of basic guitar models and the ability to playback single notes or chords with a single touch of the screen.
I went for the classic clean with some delay and quickly hammered out a pleasing chord sequence to go with my drum part. Once recorded you can navigate back to the main arrange page to see your part recorded. I applied a little quantisation via the settings menu in the top right and cut and pasted the part, to create two copies.

The Smart Guitar allowed me to program a part quickly.
Now this is where I have to say GarageBand really let me down. You can’t actually edit notes once they have been recorded. You can see them within the parts but there is no way of getting inside and altering note positions or lengths etc.
I guess this must be a user interface limitation but it’s a real shame. In it’s current state GarageBand requires you to actually delete and re-record a part if you play in a bum note or incorrect sequence. Here’s hoping they’ll fix this in the future.
The new guitar part is mixed
Step 3: D.I.Y. Synth Bass
Next I thought I’d take a more D.I.Y approach and use a straight forward instrument to record my Bass part. I loaded up one of the Synth Bass models and got playing. The keyboard was pretty easy to use and the keys can be changed in size pretty quickly.

The Retro Bass was simple to locate and load.
With a few tweaks of the synth patch itself, a re-record or two and some quantisation, I had a useable bass line. You can hear the first three parts playing together below…

A few adjustments and the bass is done.
The bass, guitar and drum parts together.
Step 4: The Creation Continues
I continued to create parts in the same way using various sound sources, an Apple loop or two (accessed via the loop logo in the top right), a drum machine and two more virtual analog synths.

Extra parts being created
After some work I had created a bongo loop, vocal effect, synths strings and some new high hats. You can hear these parts below in isolation.

Another synth part being added
It’s worth adding that you can add effects (delay and reverb) to any of your parts using the sends in the mix area, also located in the top right of the interface.
The new parts in isolation
Step 5: Exporting The Finished Article
When I was done (and after adding an extra synth lead part) I exported the project to iTunes. On connecting the iPad to my MacBook Pro all the parts were visible in the area at the bottom of the ‘Apps’ page. These can then be dragged on to your desktop.

The new loop being exported to iTunes

You can export audio or the entire project file
You can save individual parts or the whole project in Garageband format. This means you can load it up in the full versions of GarageBand for extra editing and arrangement. GarageBand will actually download an update to ensure 100% compatibility.
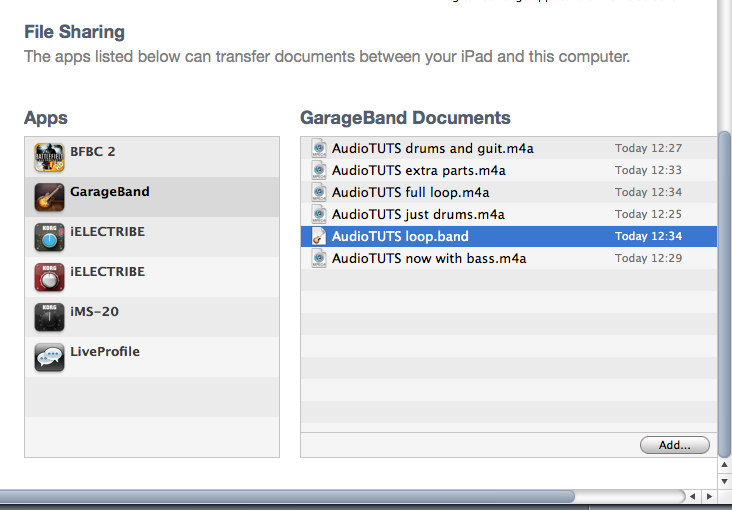
The parts exported show up in iTunes on any computer
The final loop that was exported plays back
All in all I have to say this was an extremely straight forward, fun way to create a small electronic project. For £2.99 you really can’t go wrong and it’s really a no brainer for any iPad owner. Better still if you invest in a few accessories you’ll be able to record vocals and guitar directly into the app transforming it into a true mobile multi-tracker.
If you have any projects created in this app (or any other) on your iPad let us hear them. Be great to know how everybody is using their portable hardware to create music.
{excerpt}
Read More