Hello once again! Today I am going to introduce you to my favorite recording and editing DAW, Samplitude. While more popular in Europe than in the States, Samplitude like its big brother Sequoia offers a wide array of tools that are not exactly standard to most other DAWs.
The tool I am going to show you today is Object Oriented Editing. Usually, we edit audio in a semi nonlinear approach. The reason I call it semi nonlinear and not just nonlinear is because we only are able to cut and move around audio clips nonlinearly; effects and processing always come after on the tracks in our mixer. There is of course destructive editing like Pro Tools Audio Suite but I tend to avoid destructive editing like the plague.
In OOE however, we are able to treat every audio clip whether it is a whole song long or just a few seconds as an object that can be edited, have effects applied, etc. all before it every reaches the mixer. In addition, it does not generate fade files or additional audio files every time you split and object into more objects. This opens up a world of possibilities for editing and mixing and can make our lives as audio engineers much easier.
Let’s delve into Samplitude to see how this process works.
Step 1: Basic Training
As Samplitude is probably new to many of you we are going to briefly cover where the controls are in this DAW. For this tutorial I am going to be using a vocal sample from a track I have that needs some tweaking. Either open up a project or start a new one to load an audio file into.
- To load a file into a new project go to File>Load/Import>Load Audio File and select the audio file you wish to load.
- It will prompt you if you want to copy the audio file to the directory where your project file (.VIP) is located. For file maintenance purposes I would recommend this option.
- Upon loading the file you will see a new object appear in a track with a waveform representing your audio. To select an object click Below the zero line (your mouse will now have a crosshair next to it) and when your object is selected it should change color (default is green to orange). If your mouse is not working as it should you may need to change your mouse mode to universal by clicking on the highlighted icon in the picture below.

Now that we have our object selected you may have noticed some new options appeared in the object in the form of a few lines and some squares. These squares represent different tools for quick editing. The bottom two on the left and right sides of the object represent the range of the object; what part of the audio file the object will play (just like regions in Pro Tools and Logic). The squares in the top left and right of the object are your fade controls. If there is no adjacent object it will fade in or out from 0 but if there is an adjacent object it will instead cross fade the two objects together. Simple right?
The control we are particularly concerned with is the square in the middle of the object on the new line that appeared. The center square controls the volume of that particular object. What that means is we can adjust the volume of a particular word, note, etc. without touching the track fader, master fader, or using any messy automation. The easiest way to adjust the objects volume is to click and drag the square up or down. You will see a new box appear indicating how many dBs you are adjusting the object by and the line will also move up with it.
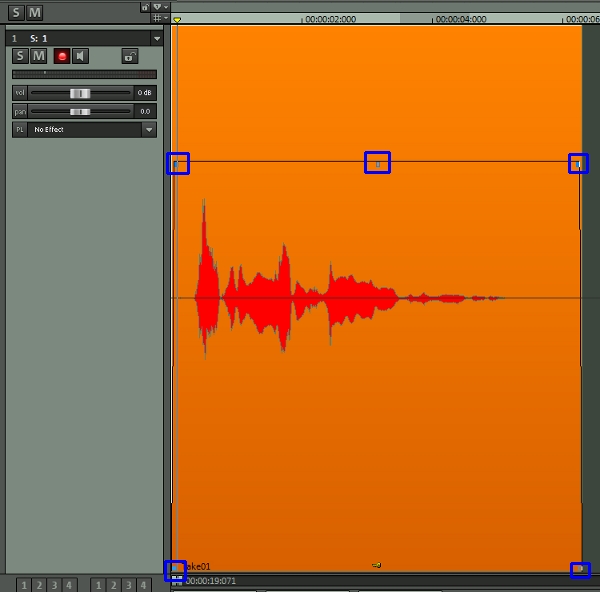
One quick note about that line, it essentially is a volume indicator as it goes all the way down to 0 on either side of the object and helps you to get a rough idea of how long your fades are and what you max volume is for the object.
Here is the original vocal sample we will be working with:
Download audio file (step_1.mp3)
Step 2: Adjusting Object Volume
Now that we understand how to the basic volume controls work in Samplitude’s OOE let’s try and adjust the volume of the entire vocal clip to a more adequate level. I am going to increase my vocal sample by 7.15 dBs to get a more solid volume since the singer backed away part way through the song here. Remember just grab the center square and lift. You will see a new box appear that will indicate how many dBs you are changing the object by.
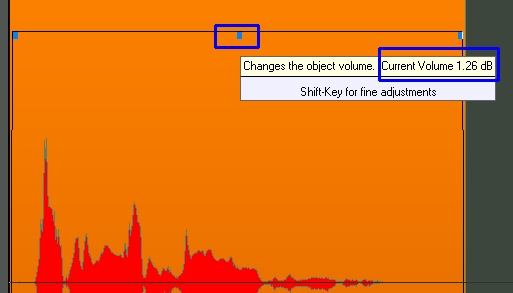
It is just that easy. Here is the effects of raising the objects volume:
Download audio file (step_2.mp3)
Step 3: Splitting Objects
While it is nice that that we can edit this whole audio sample, this clip is going to need some more fine tuned editing to get it where we want it. Where the singer says “Ever” I find that the “er” at the end needs to be brought down a touch as well as the “St” in the word “Stop”. However I believe that the “Oh yah baby” at the end needs to be brought out even more.
- Put your mouse above the 0 line and left click and drag to select the “er” in “Ever”.
- Next press T (default) to split the object into 3 new objects.
When you did this your probably will have noticed that it automatically crossfaded your objects so no clicks or pops will occur. What you may not have noticed was that the 7.15 dBs we increased earlier stayed on our object so we wouldn’t have to readjust later. Cool right?
Once you have the other parts of the vocals split we will need to adjust the volume of those objects. However I am going to show you an alternate way to adjust the volume and how to gain even more control over your objects.
- Click below the 0 line to select the “er” and then double click it and you will see a window pop up.
- This window will be the Object Editor for that particular object and in the far right side you should see a fader.
- Drag the fader down to 3.73 dBs or click in the numerical box to type it in.
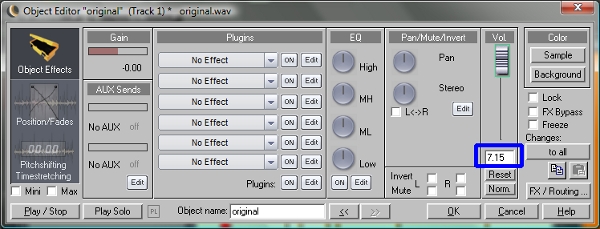
Editing the volume fader inside the Object Editor is the same as adjusting the volume control on the object. However you may have noticed that the object editor had a lot more controls. Looks fun right? Well before we get to play with it. Bring the “St” down to 3.53 dBs and bring up the “Oh yah baby” to a whopping 12 dBs (you will need to type in anything over 10 dBs)
Here is what our sample sounds like now:
Download audio file (step_3.mp3)
Step 4: Object Effects
Now that we have balanced out our volumes for the vocal sample you may or may have not noticed a problem. The “Oh yah baby”, while at a better volume, has a more audible whomph in the bottom range that doesn’t match the rest of the vocal sample. It is subtle but definitely there. We could fix that phrase in the mixer with an EQ but it would affect the entire vocal track. Since we only want to edit that particular phrase, lets place an EQ inside the object.
- Double click the object below the 0 line to bring up the Object Editor.
- There is a section labeled “Plugins”, from the drop down menu pick your favorite EQ to go into the first plugin slot. I choose Samplitude’s EQ116 under Frequency/Filters.
- You now will see your plugin appear on your screen. In your EQ go to around 170Hz and bring it down about 2dBs with a fairly wide Q.
If you play back the vocal sample you will notice that the whomph is gone. Try A/Bing the phrase with the plugin turned on and off if you are having issues hearing it
Download audio file (final.mp3)
Now some of you may be wondering how you can possibly keep track of object level plugins since you will not normally have the Object Editor open. Well Samplitude has the answer for you my friend! In the bottom left corner of each object is a name. This is the name of the audio clip the object is referencing for playback and next to it will appear the plugin order for all the plugins on that object.

Conclusion
Truth be told we have only scratched the surface of what OOE can do for mixing and editing. You may have noticed that there were additional controls such pans, aux sends, pitch shifting, time shifting, etc. in the Object Editor. The amount of control this leaves you is absolutely astounding. The only limitation it leaves you is what you can think to do with it. One note to keep in mind is that if you split an object with an effect on it, the effects will also carry through as well.
I hope you all enjoyed and maybe will take a closer look at Samplitude or Sequoia in the future. If you want to see more just leave a shout out in the comments section below. Thanks!