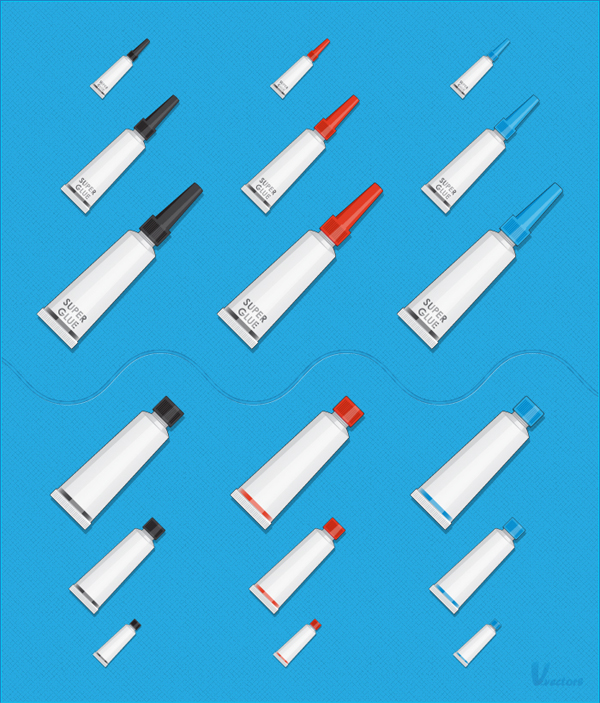
In the following tutorial you will learn how to create a super glue and a paint tube icon. These shiny icons are simple to create, we’ll cover a complete workflow, and show you techniques that will speed up your work process. Let’s get started!
Step 1
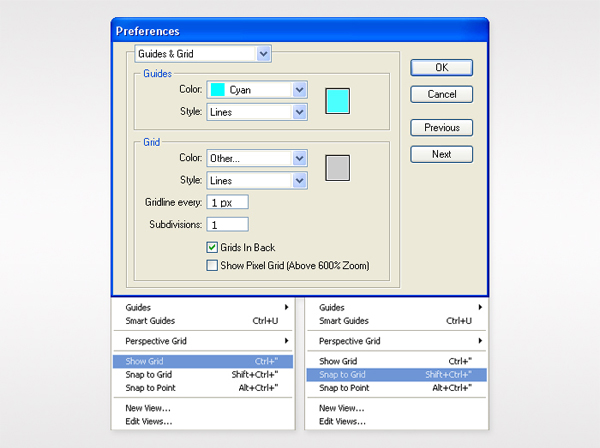
Create a 700 by 820px, RGB document. Turn on the Grid (View > Grid) and the Snap to Grid (View > Snap to Grid). Next, you’ll need a grid every 1px. Go to Edit > Preferences > Guides & Grid, enter 1 in the Gridline every box and 1 in the Subdivisions box.
You can also open the Info panel (Window > Info) for a live preview with the size and position of your shapes. Do not forget to replace the unit of measurement to pixels from Edit > Preferences > Unit > General. Al these options will significantly increase your work speed.
Step 2
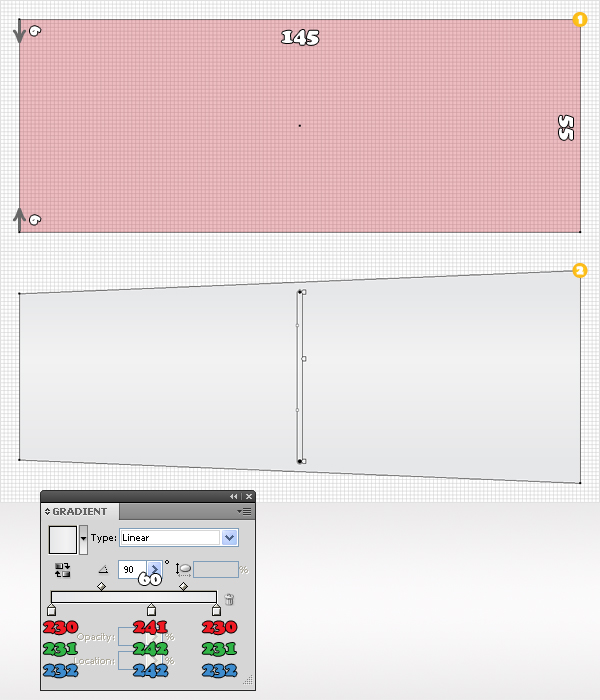
Pick the Rectangle Tool (M) and create a 145 by 55px shape. For the moment fill it with any color. Grab the Direct Selection Tool (A). Select the top left anchor point and move it 6px down then select the bottom, left anchor point and move it 6px up. The Snap to Grid should ease your work.
Now, your shape should look like in the second image. Fill it with the linear gradient shown below. Take a closer look at the gradient image and you’ll notice some white numbers. It stands for Location.
Step 3
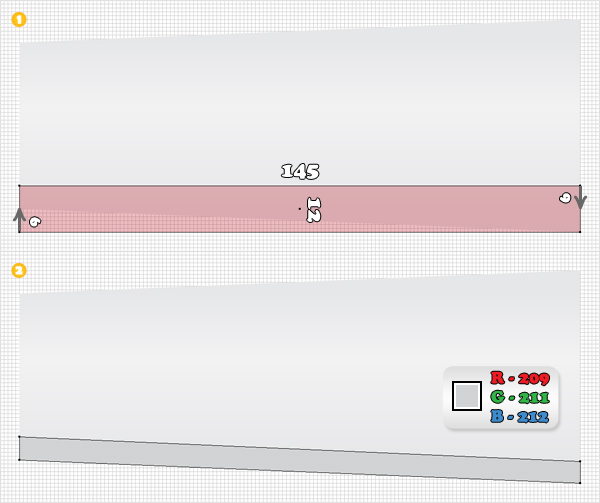
Reselect the Rectangle Tool (M). Create a 145 by 12px shape and place it as shown in the following image. Pick the Direct Selection Tool (A). Select the bottom, left anchor point of this new shape and move it 6px up. Select the top, right anchor point and move it 6px down. Now, this second shape should look like in the second image. Fill it with R=209, G=211, B=212.
Step 4
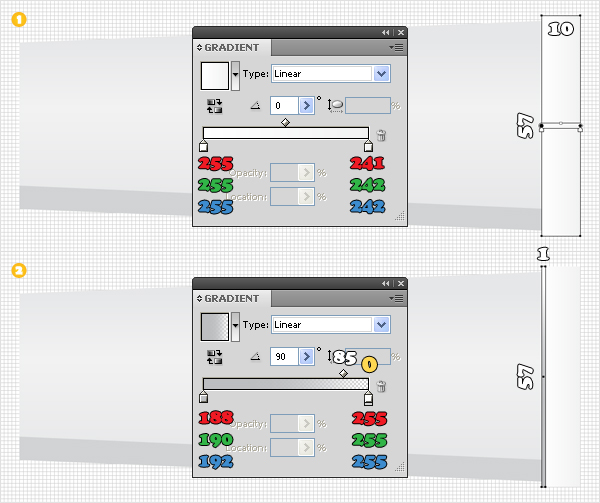
Grab the Rectangle Tool (M) and create a 10 by 57px shape. Place it as shown in the first image and fill it with the first linear gradient. Continue with the Rectangle Tool (M) and create a thin shape. Make it 1 px wide and 57px tall, then place it as shown in the second image. Fill it with the other linear gradient. Again, if you take a closer look at this gradient image you will notice some yellow numbers. They stand for Opacity.
Step 5
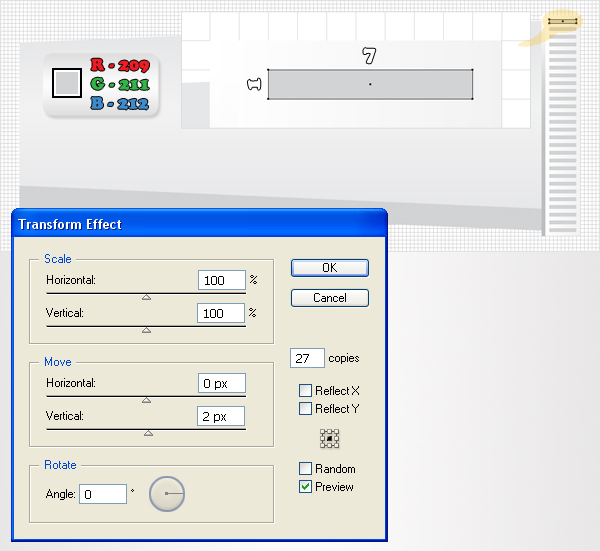
Continue with the Rectangle Tool (M) and create a 7px by 1px shape. Place it as shown in the following image, fill it with R=209, G=211, B=212. Now go to Effect > Distort & Transform > Transform. Enter 27 in the copies box, drag the Move Vertical slider to 2px, then click OK.
Step 6
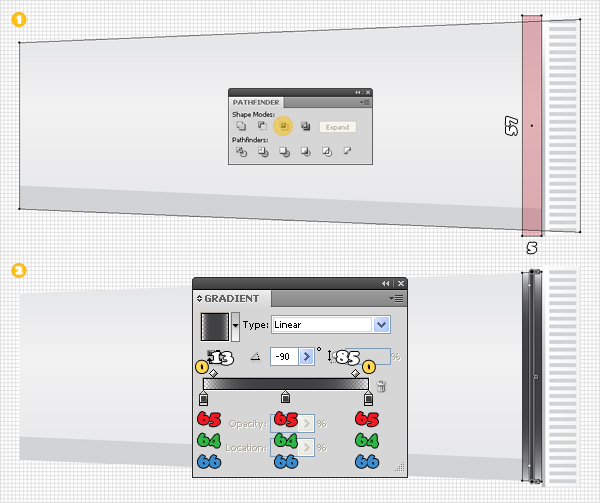
Duplicate the shape made in the second step (Command + C > Command + F). Pick the Rectangle Tool (M), create a 5px by 57px, shape and place it as shown in the first image. Select this fresh shape, along with the copy, and click on the Intersect button from the Pathfinder panel. Fill the resulting shape with the linear gradient shown in the second image. Pay attention to the Location and Opacity percentage.
Step 7
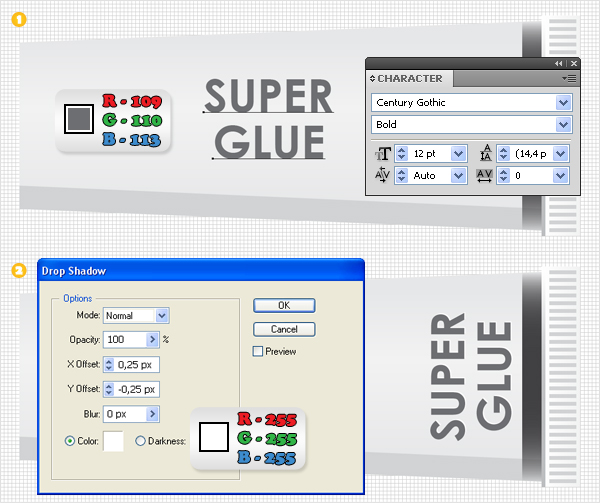
Pick the Type Tool (T), click on your artboard and add the “Super Glue” text. Use the Century Gothic font with a size of 12pt, make it bold and set the color to R=109, G=110, B=113. Select this text and rotate it 90 degrees. Place it as shown in the second image, then go to Effect > Stylize > Drop Shadow. Enter the data shown in the following image, then click OK.
Step 8
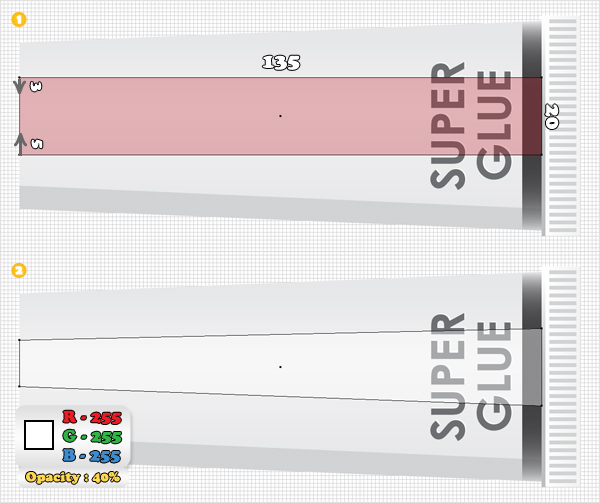
Pick the Rectangle Tool (M), create a 135px by 20px shape and place it as shown in the first image. Grab the Direct Selection Tool (A), select the top, left anchor point and move it 3px down. Now select the bottom, left anchor point and move it 5px up. Now, your shape should look like the second image. Fill it with white and lower its Opacity to 40%.
Step 9
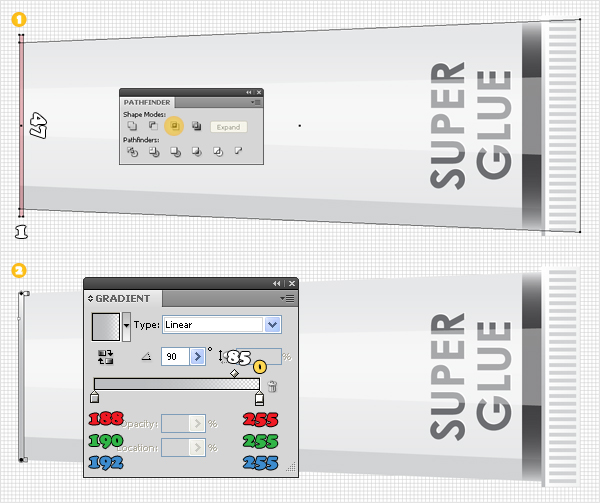
Again, duplicate the shape made in the second step (Command + C > Command + F). Reselect the Rectangle Tool (M), create a 1px by 47px shape and place it as shown in the first image. Select this fresh shape along with the copy and click on the Intersect button from the Pathfinder panel. Fill the resulting shape with the linear gradient shown in the second image.
Step 10
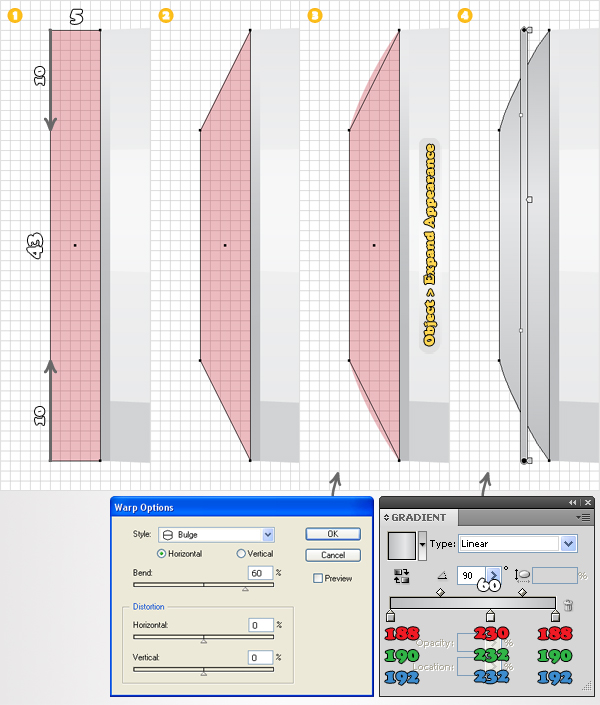
Focus on the left area. Pick the Rectangle Tool (M), create a 5px by 43px shape and place it as shown in the first image. Grab the Direct Selection Tool (A), select the top, left anchor point and move it 10px down, then select the bottom, left anchor point and move it 10px up.
Now your new shape should look like the second image. Select it and go to Effect > Warp > Bulge. Enter the data shown below, click OK, then go to Object > Expand Appearance. Fill the resulting shape with the linear gradient shown below.
Step 11
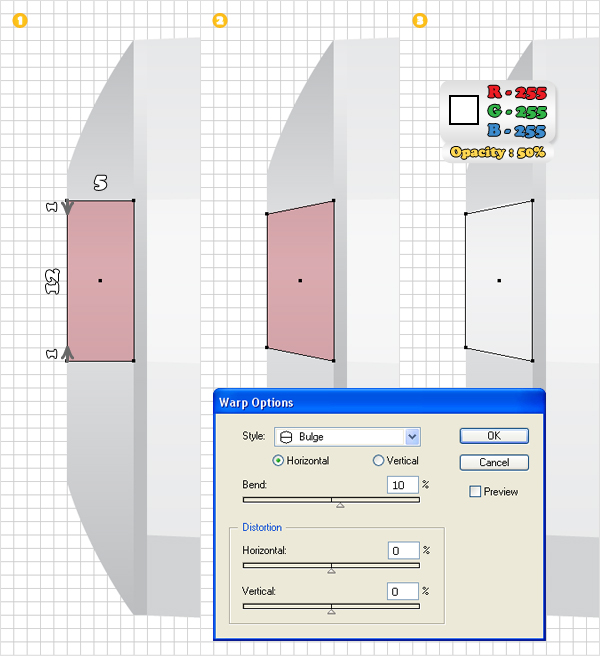
Reselect the Rectangle Tool (M). Create a 5px by 12px shape and place it as shown in the first image. Pick the Direct Selection Tool (A), select the top, left anchor point and move it 1px down. Select the bottom, left anchor point and move it 1px up. Now, this new shape should look like the second image. Fill it with white, lower its Opacity to 50%, then go to Effect > Warp > Bulge. Enter the data shown below and then click OK.
Step 12
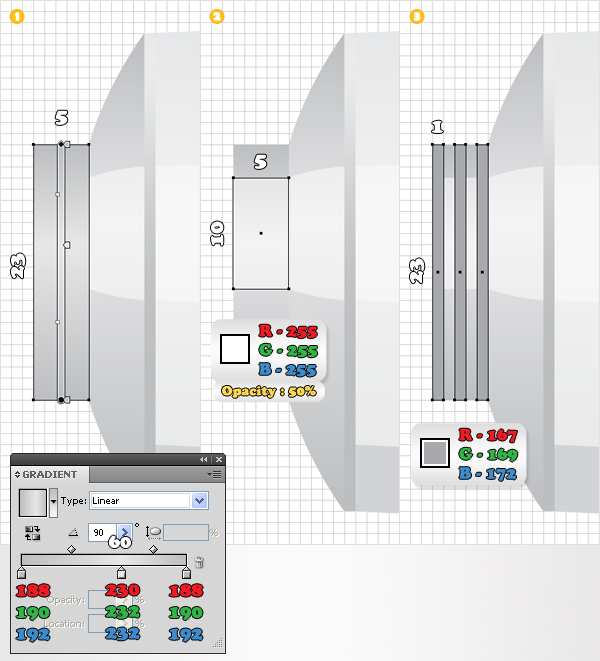
Grab the Rectangle Tool (M), create a 5px by 23px shape, place it as shown in the first image. Now fill it with the linear gradient. Continue with the Rectangle Tool (M). Create a 5px by 10px shape and place it as shown in the second image. Fill it with white and lower its Opacity to 50%. Again, use the Rectangle Tool (M) to create three similar shapes. Make them 1px wide and 23px tall, then fill them all with R=167, G=169, B=172.
Step 13
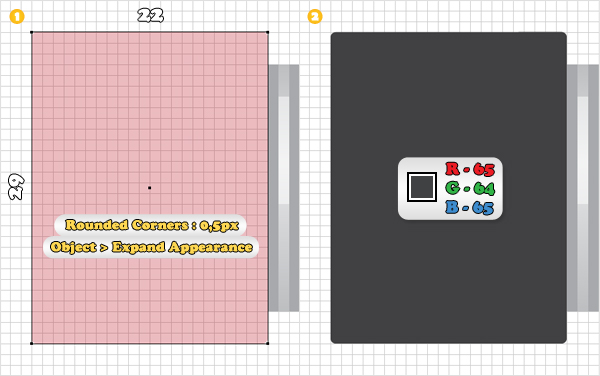
Use the Rectangle Tool (M) to create a 22px by 29px shape. Place it as shown in the first image, then go to Effect > Stylize > Rounded Corners. Enter a 0,5px radius, click OK, then go to Object > Expand Appearance. Fill the resulting shape with R=65, G=64, B=66.
Step 14
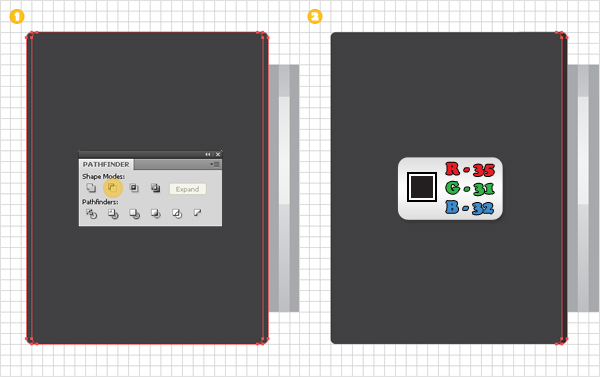
Disable the Snap to Grid (View > Snap to Grid), then go to Edit > Preferences > General, and enter 0,5 in the Keyboard Increment box. Select the shape made in the previous step and make two copies (Command + C > Command + F). Select the top copy and hit the left arrow once (to move it 0,5px to the left). Reselect both copies and click on the Minus Front button from the Pathfinder panel. Fill the resulting shape with R=35, G=31, B=32.
Step 15
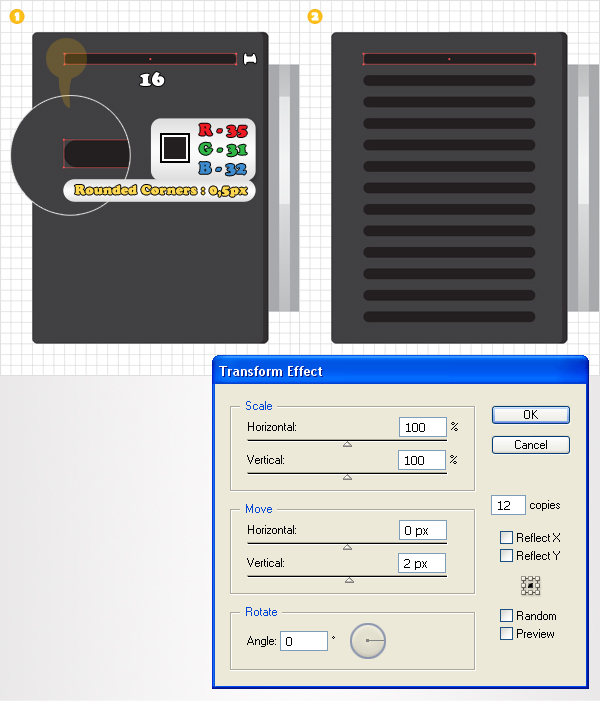
Enable the Snap to Grid (View > Snap to Grid) again, then pick the Rectangle Tool (M). Create a 16px by 1px shape and place it as shown in the first image. Fill it with R=35, G=31, B=31, then go to Effect > Stylize > Rounded Corners. Enter a 0,5px radius, click OK, then go to Effect > Distort & Transform > Transform. Enter 12 in the copies box, drag the Move-Vertical box to 2px, then click OK.
Step 16
Grab the Rectangle Tool (M), create a 22px by 9px shape, and place it as shown in the first image. Pick the Direct Selection Tool (A), select the top, left anchor point and move it 1px down. Now select the bottom, left anchor point and move it 1px up. Now, your shape should look like the second image. Fill it with R=147, G=149, B=152, and lower its Opacity to 30%.
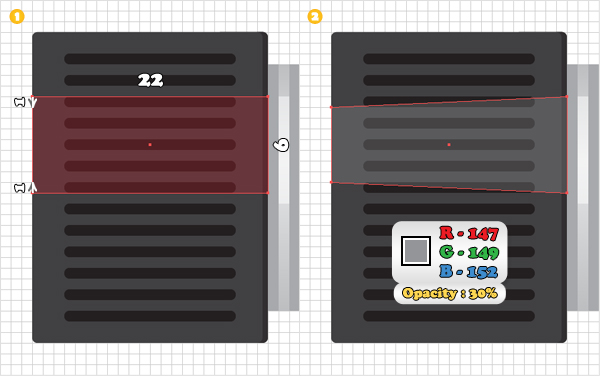
Step 17
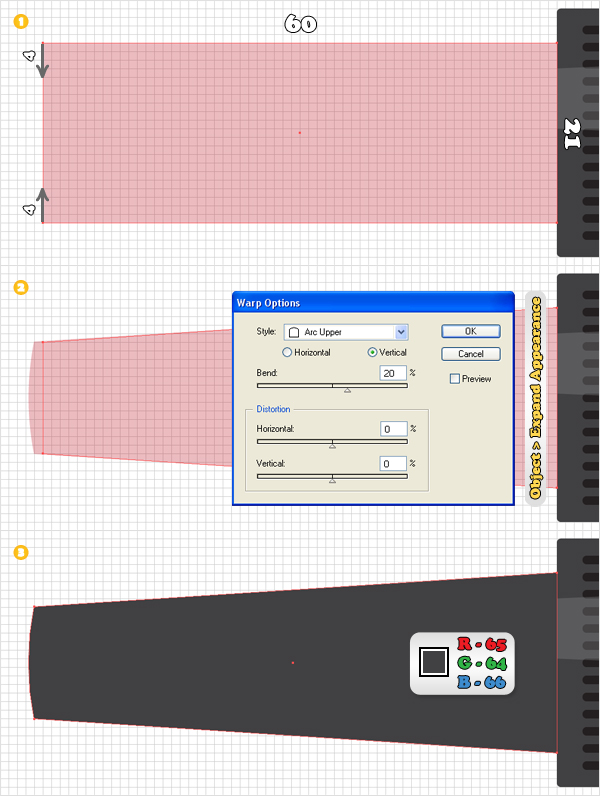
Pick the Rectangle Tool (M), create a 60px by 21px shape and place it as shown in the first image. Grab the Direct Selection Too l(A), select the top, left anchor point and move it 4px down. Now select the bottom, left anchor point and move it 4px up. Your shape should look like the second image. Select it and go to Effect > Warp > Arc Upper. Enter the data shown in the second image, click OK then go to Object > Expand Appearance. Fill the resulting shape with R=65, G=64, B=66.
Step 18
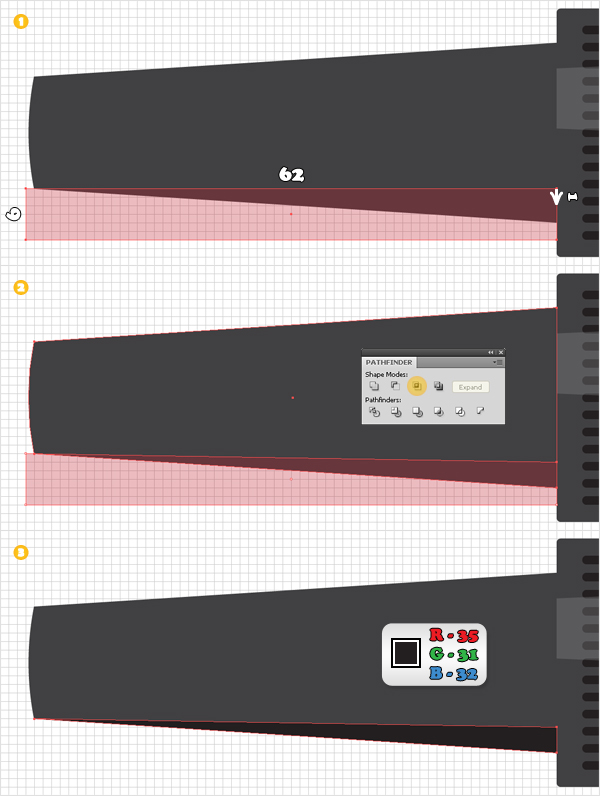
Duplicate the shape made in the previous step (Command + C > Command + F). Grab the Rectangle Tool (M), create a 62px by 6px shape and place it as shown in the first image. Pick the Direct Selection Tool (A), select the top, right anchor point and move it 1px down. Select this fresh shape along with the copy and click on the Intersect button from the Pathfinder panel. Fill the resulting shape with R=35, G=31, B=32.
Step 19
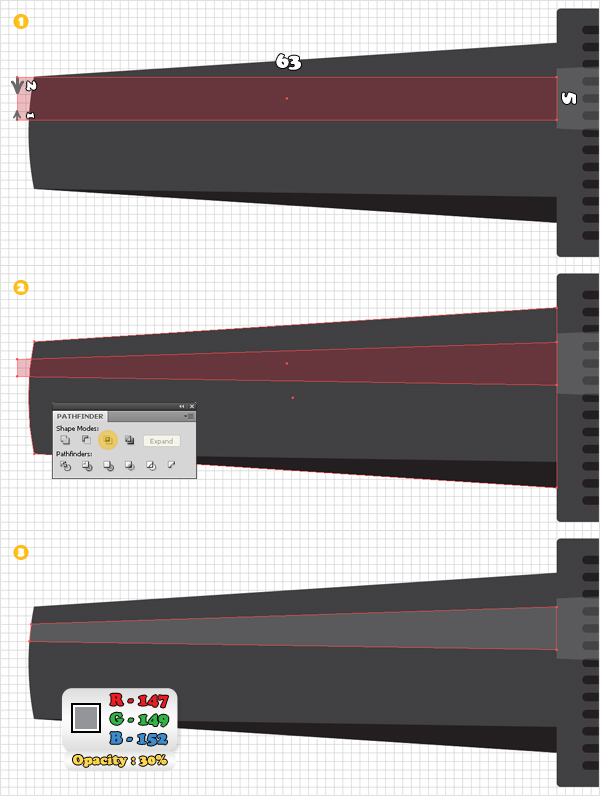
Again, duplicate the shape made in the seventeenth step. Pick the Rectangle Tool (M), create a 63px by 5px shape, and place it as shown in the first image. Grab the Direct Selection Tool (A), select the top, left anchor point and move it 2px down. Now select the bottom, left anchor point and move it 1px up.
Your shape should look like the second image. Select it along with the copy and click on the Intersect button from the Pathfinder panel. Fill the resulting shape with R=147, G=149, B=152, and lower its Opacity to 30%.
Step 20
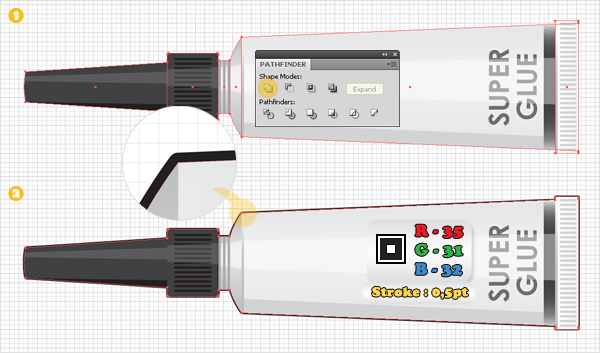
Duplicate the large shapes that make up the overall super glue tube. Select these copies and click on the Unite button from the Pathfinder panel. Fill the resulting shape with none and add a 0.5, aligned to the outside stroke (R=35, G=31, B=32). Select all the shapes created so far and group them (Command + G).
Step 21
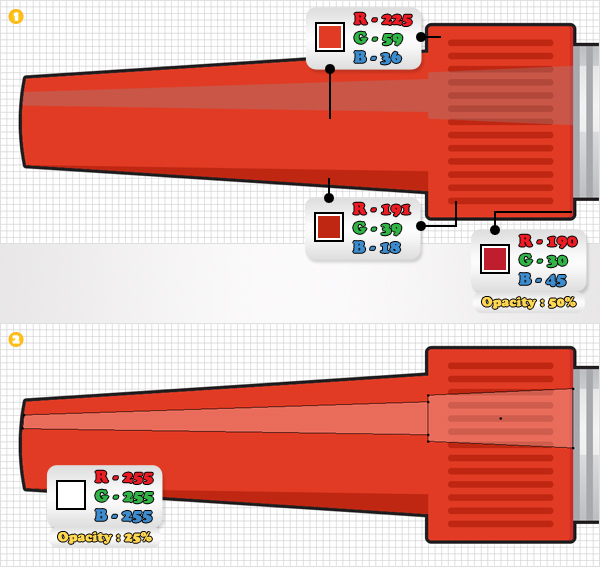
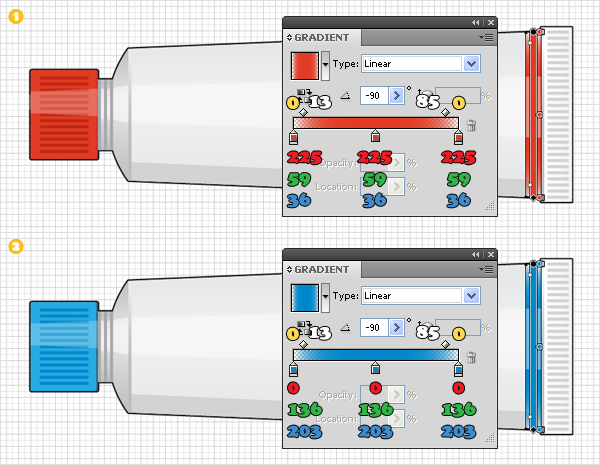
Duplicate the group made in the previous step. Move this new group a few pixels to the left. Now, let’s make some color changes for this second group. Replace the dark colors with the red tints shown below. Also, replace the fill color and the opacity percentage for the highlight elements, as shown in the second image.
Step 22
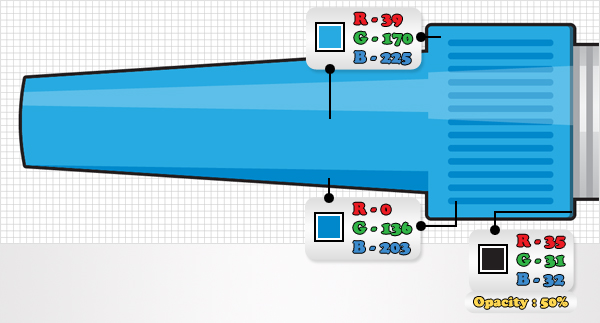
Make a new copy of the existing group and use the set of colors shown below.
Step 23
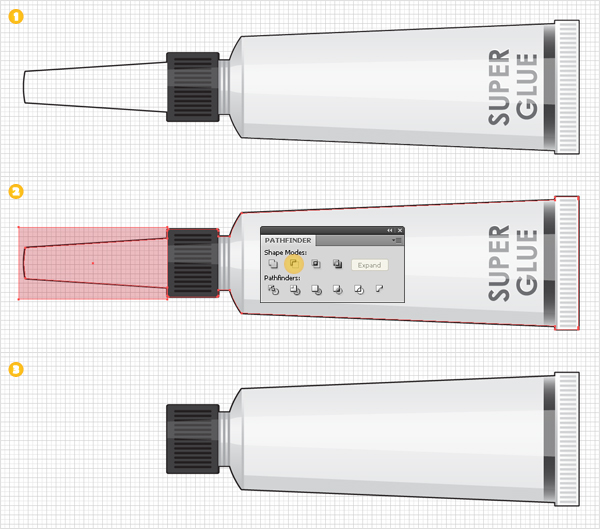
Now, let’s turn the super glue tube into a paint tube. Duplicate the group with the original super glue tube. Focus on this new group. First, remove the shape from the left end, as shown in the first image. Next, you need to edit the stroked shape.
Pick the Rectangle Tool (M), create a simple rectangle and place it as show in the second image. Select this new shape along with the stroked shape and click on the Minus Front button from the Pathfinder panel. In the end your shape should look like the third image. Remove the text and you got your paint tube.
Step 24
Make two copies of the paint tube group. Focus on these new copies and replace the dark gradient with the linear gradients shown in the following images.
Step 25
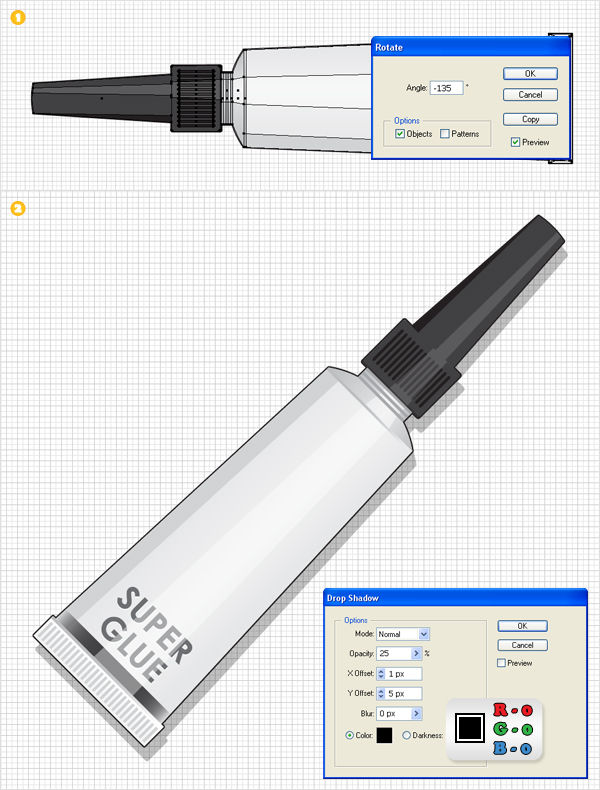
Let’s add some final effects for these tubes. Select the original super glue tube group and go to Object > Transform > Rotate. Enter a -135 degrees angle, click OK, then go to Effect > Stylize > Drop Shadow. Enter the data shown in the second image, then click OK. Repeat the same techniques for the rest of the groups.
Step 26
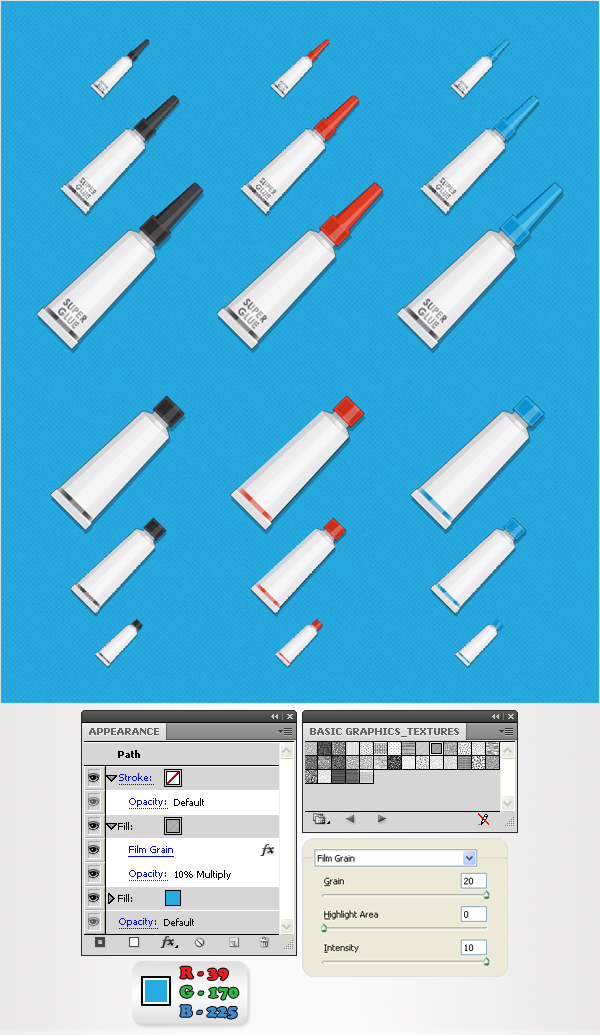
Here I made several copies of the tubes. Now, let’s add the background. Pick the Rectangle Tool (M), create a shape the size of your artboard, fill it with R=39, G=170, B=225 and Send it to Back (Shift + Command + [). Open the fly-out menu of the Swatches panel and go to Open Swatch Library > Pattern > Basic Graphics > Basic Graphics_Textures.
This will open a new window with some nice patterns. Reselect the blue rectangle, open the fly-out menu of the Appearance panel, and click on Add New Fill. This will add a second fill for your shape. Select this new fill and use the Diamond pattern. Lower its Opacity to 10%, change the blending mode to Multiply, then go to Effect > Artistic > Film Grain. Enter the data shown below, then click OK.
Step 27
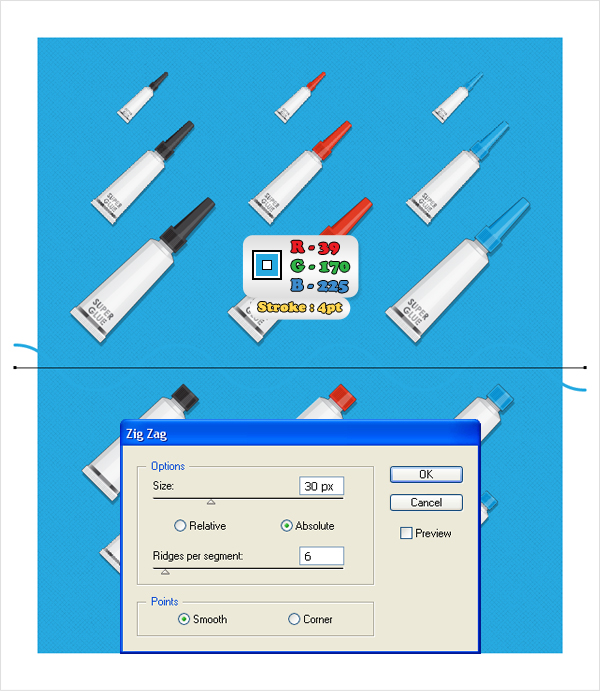
Now, let’s add the divider. Pick the Pen Tool (P), draw a 760px, horizontal path and place it as shown in the following image. Fill it with none, add a 4pt stroke (R=39 G=170 B=225) then go to Effect > Distort & Transform > Zig Zag. Enter the data shown below and click OK.
Step 28
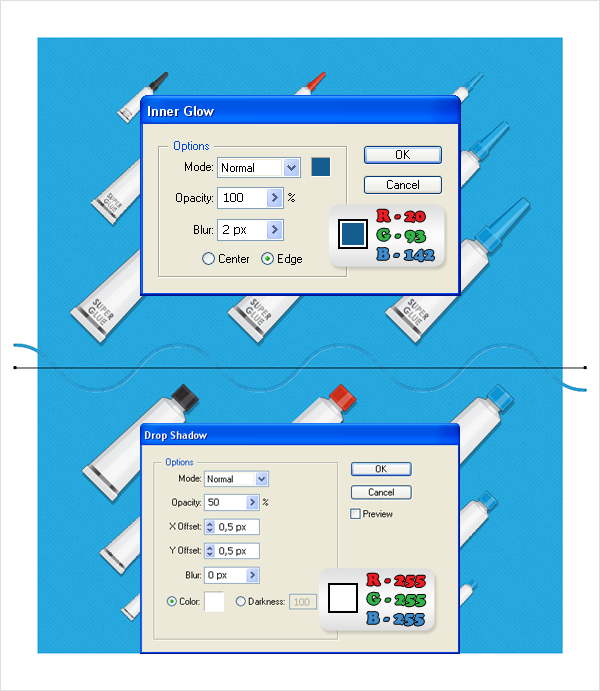
Reselect the path made in the previous step and go to Effect > Stylize > Inner Glow. Enter the data shown below, click OK, then go to Effect > Stylize > Drop Shadow. Enter the data shown below, click OK, and you’re almost done.
Step 29
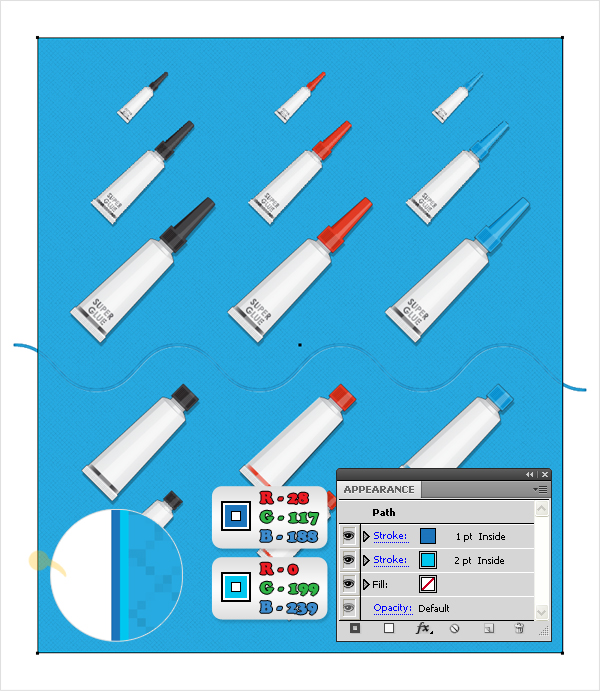
Finally, duplicate the blue rectangle made three steps ago. Move this copy above the divider (in the Layers panel). Select it, remove the fills and add a 2pt, aligned to inside stroke (R=0 G=199 B=239). With this shape still selected open the fly-out menu of the Appearance panel and click on Add New Stroke. This will add a second stroke for this new shape. Select it from the Appearance panel. Make it 1pt wide, set the color to R=28, G=117, B=188, and you’re done.
Conclusion
The final image is below.
