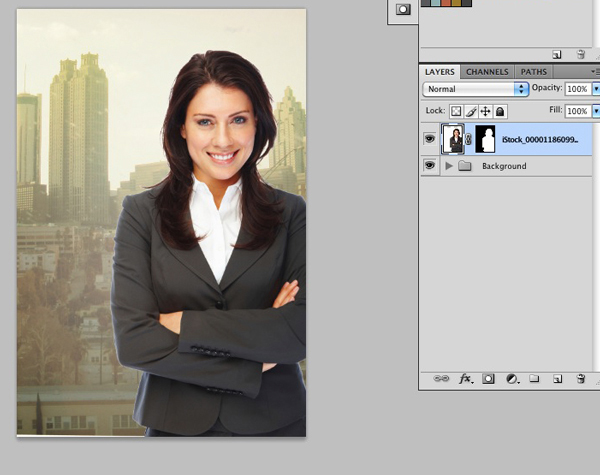
Movie posters are often amazing pieces of art. What we see as a seamless design however is often a combination of several different images carefully blended and manipulated to produce a desired result. In today’s tutorial, we will demonstrate how to create the key art for a romantic comedy movie poster using a handful of photographs. Let’s get started!
Tutorial Assets
The following assets were used during the production of this tutorial.
Step 1
Start with a new canvas with the following dimensions: 10.13" x 15" at 200dpi. Stick to RGB color mode. Fill your background layer with white. Double click on the background layer. A menu should pop up, click OK. Your background is no longer locked.
Step 2
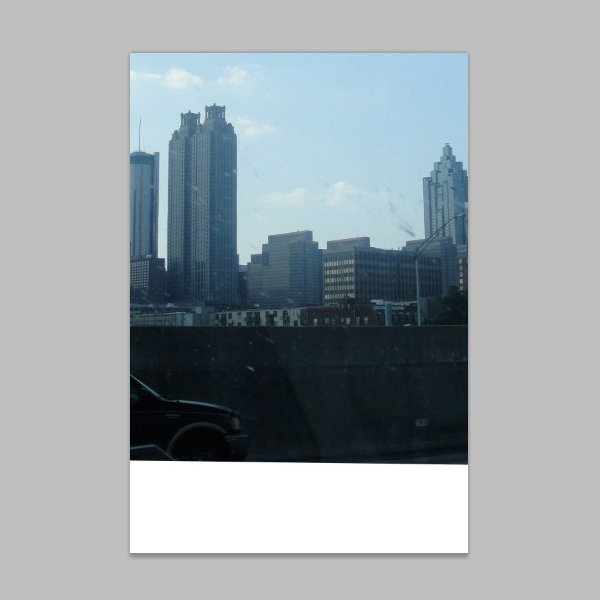
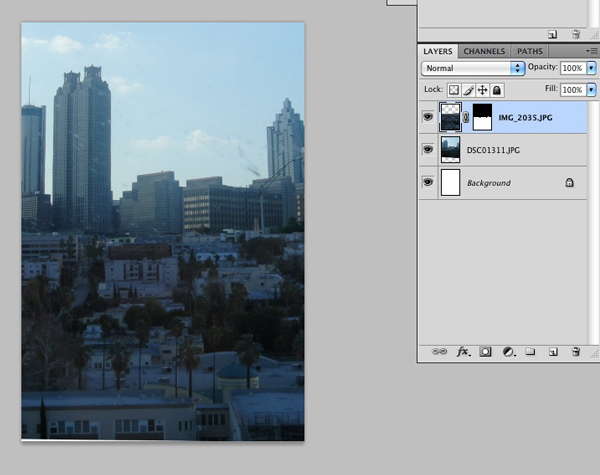
You need an image of a city for the background. You can use an image from your own collection, or use the one provided in the assets I took of Atlanta out of a car window (don’t worry about the window smudges!). File name: Atlanta. Copy the image and paste it into your canvas by pressing Command/Ctrl + C, then clicking on your new canvas. Then press Command/Ctrl + V. Scale the image up to about 130% by pressing Command/Ctrl + T. In the top menu bar, some new options will appear. Click in the text box that reads "W: 100%" and change it to 130%. Click on the chain link icon to the right of the text box and hit Enter twice. Position the image similar to how it appears in the example below.
Step 3
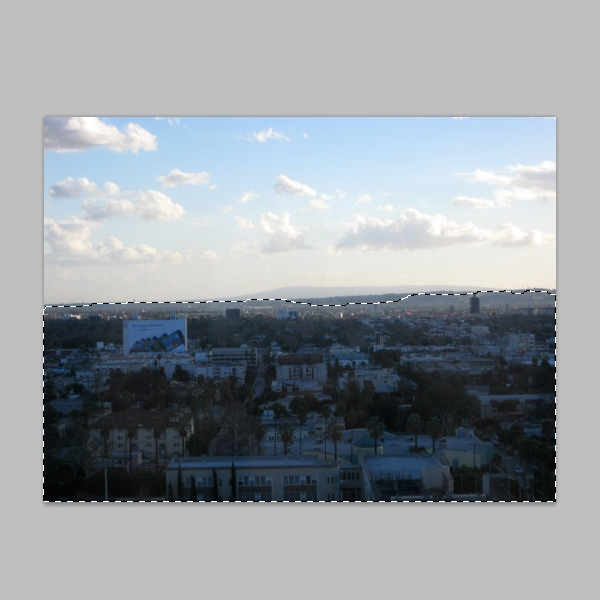
Need some more city to be added to this image. Open the image of Los Angeles I took labeled: Los Angeles. Make a rough selection with the Lasso Tool of the bottom half of the image.
Step 4
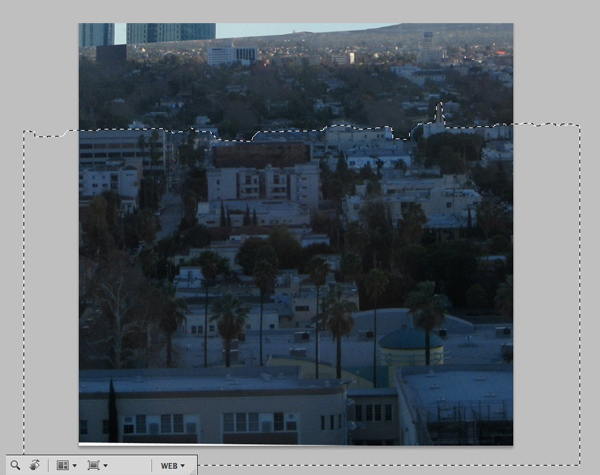
Copy that selection and paste it into your movie poster canvas (Command/Ctrl + C, Command/Ctrl + V). Scale it up to about 175% (Command/Ctrl + T, then press Option + Shift + pull on one of the corners to increase the size of the image). We’re going to clean up the loose selection that we made of this part of the city. If you have a steady hand, go ahead with the Lasso tool. If not, use the pen tool to create a path outlining the top of the buildings as seen in the image below. If you are using the pen tool: Once you have completed making your path, go to the Paths Panel that is underneath the Layers Panel. Make sure your work path is selected. At the bottom of the Paths Panel there is an icon of a circle made out of dots. Click on that to turn your path into a selection. Return to the Layers Panel. With your selection created, and your layer of Los Angeles selected, click on the "Add Layer Mask" icon at the bottom of your Layers Panel.
Step 5
With your selection created, and your layer of Los Angeles selected, click on the "Add Layer Mask" icon at the bottom of your Layers Panel. The result should look like the image below. Adjust the placement of the layers if you need to.
Step 6
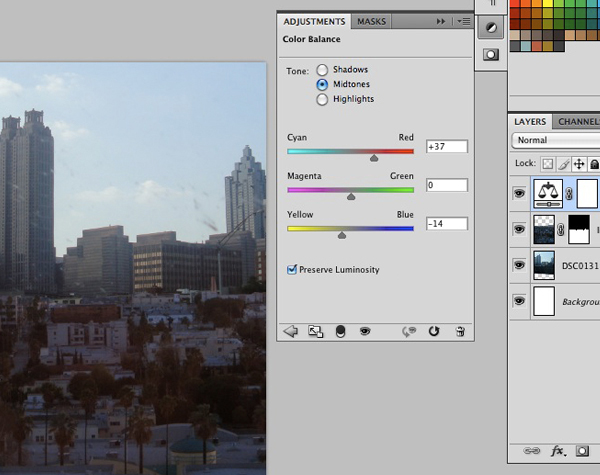
The cityscape image is too blue for a Romantic Comedy. Add a Color Balance Adjustment Layer by clicking on the "Adjustment Layer" icon on the bottom of the Layers Panel. Choose "Color Balance" from the list. Make sure that the Midtones is what you are adjusting. Change the colors adjusting the levels to be warmer. You do not have to use the exact adjustments I made, use what looks good to you.
Step 7
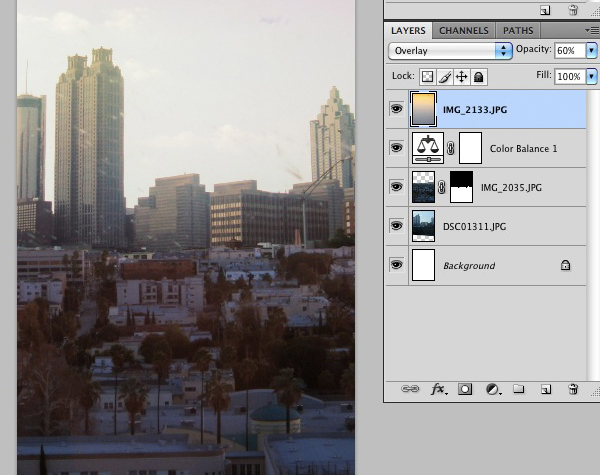
We’re going to add a color gradation to the canvas. You can do this part two ways: 1) use an image of a sunset. 2) make a gradient. I used an image of a sunset I photographed because I think that the colors are more natural and it is faster. Open up the file: Sunset. Copy and Paste it into your poster canvas. Rotate the new layer 180 degrees. All we want from this image is the orange to purple gradation. Transform, stretch, and pull it until all you have is a orange to purple gradation on your canvas. Change the Blend Mode to "Overlay" and the Opacity to 60%.
Step 8
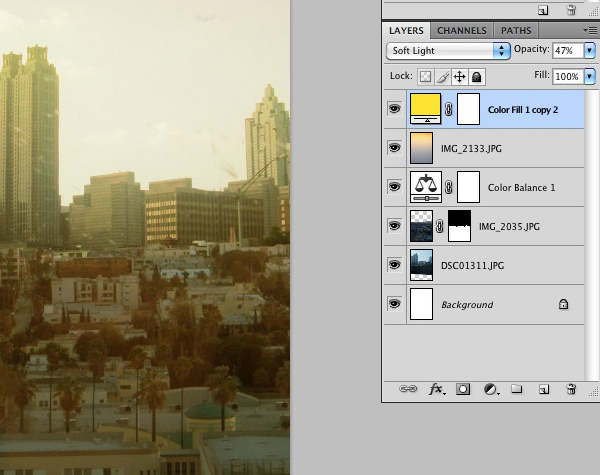
We’re now going to add a yellow tone to the canvas to get a sense of the overall color palette. In the top menu bar, go to Layer > New Fill Layer > Solid Color. When the menu pops up and it asks you what color, just choose None, Mode: Normal, Opacity 100% and click OK. In the next menu that pops up, pick a yellow color. I used a yellow with the following RGB values: R:255 G: 228 B: 0. Click OK. Change the Blend Mode of the layer to Soft Light, and the Opacity to 47%.
Step 9
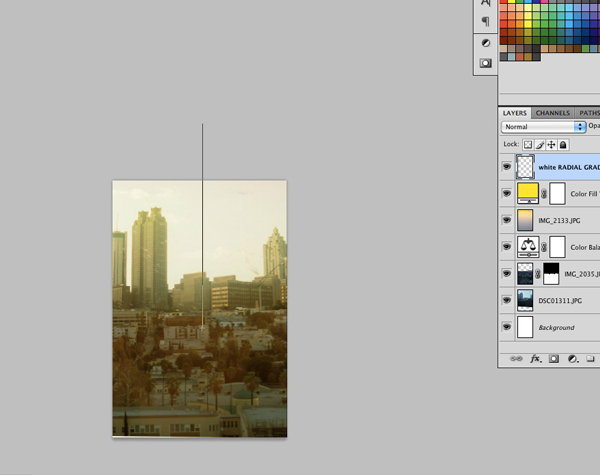
The last part of the background is a white radial gradient. Create a New Layer on top of all the layers you have already built onto your canvas. Select the Gradient Tool, make sure you are using a Radial gradient. You want to create a gradient with a white center that fades to nothing. Zoom out, give yourself some room, and create a large gradient starting from the middle of the canvas and pulling upwards as seen in the image below. Set the layer’s Opacity to 50%.
Step 10
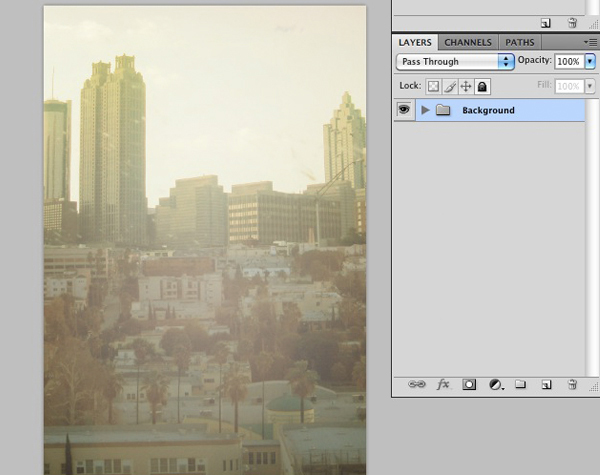
To keep organized, select all the layers you’ve created so far. Press Command/Ctrl + G to put them in a Folder. Label the folder "Background". We’re about to start making a lot of layers.
Step 11
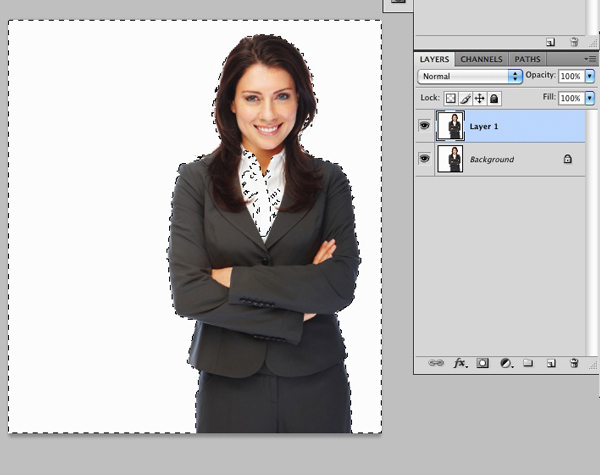
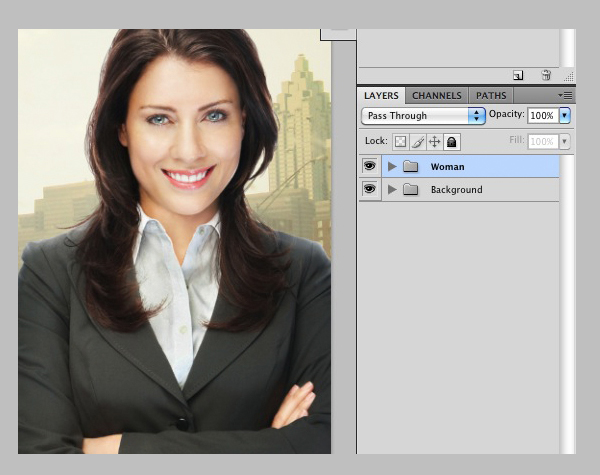
Open the Business Woman stock. Select all, copy, and paste a new layer right on top of the other one (Command/Ctrl + A, Command/Ctrl + C, Command/Ctrl + V). Highlight this new layer. Since she is on a white background, she can be separated from it easily with Channels. Click on the Channels Panel underneath the Layers Panel. Click on the Blue Channel because it provides the greatest contrast between the figure and the background. With the Blue Channel highlighted, click back into the Layers Panel. Go to the top menu to SELECT > COLOR RANGE. With the Eyedropper tool, click on the white background in the little menu that popped up. Play around with the Fuzziness option until you have the background and just some of her shirt selected. I had the Fuzziness meter set to 18. Click OK. You should now have a selection similar to the image below.
Step 12
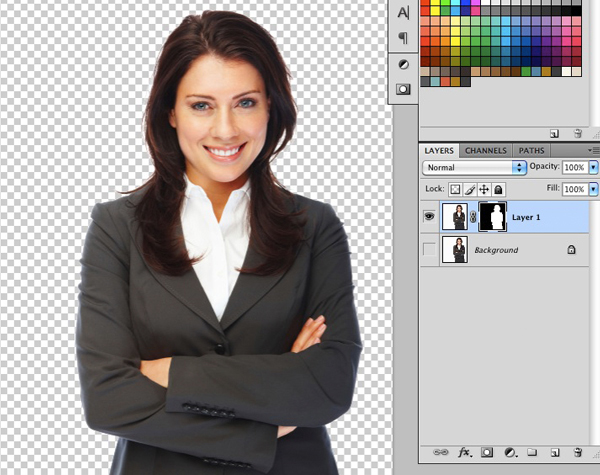
With the Lasso tool, fix the selection you’ve made. Since you have the white background and some of the woman’s shirt selected, you need to subtract from the selection. The goal is to only have the background selected. Hold down the Option key, and select the woman’s shirt. Do the same for her teeth and eyes just in case you have some white in them that was selected through the Color Range. Press Command/Ctrl + Shift + I to select the inverse. Now the woman is selected, not the background. On the bottom of the Layers Panel, click the "Add Layer Mask" icon. You should now have a decent masking of the woman away from the background.
Step 13
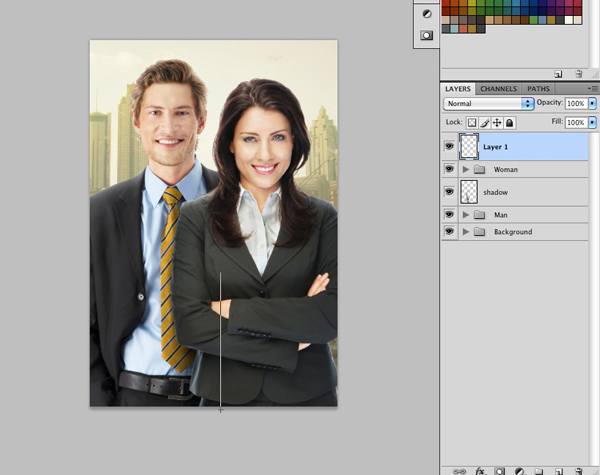
Drag the masked layer of the woman into your poster canvas. This new layer should sit above the Background Folder. Increase the size of the woman by about 222%. Place her to about where you see she is placed in the image below.
Step 14
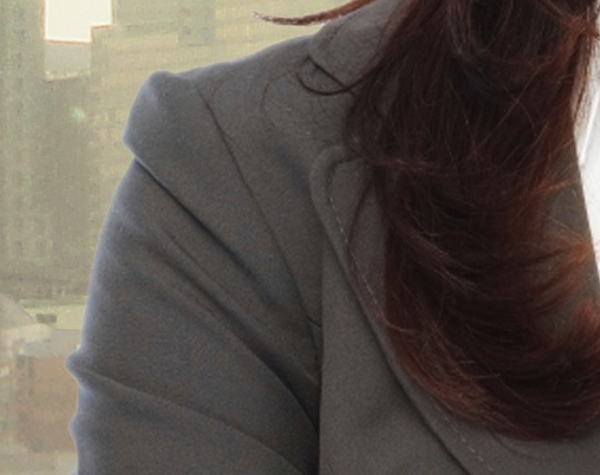
When you increase the size of a masked layer, the mask will get a little funky. To fix this issue, Command/Ctrl + Click on the mask of the woman’s layer so she is selected. Go to the top menu to SELECT > MODIFY > FEATHER. In the menu that appears, feather the selection 3 pixels and click OK. Make sure that the MASK is selected, NOT THE IMAGE of the woman in the Layers Panel. Check your foreground and background color swatches. Make sure your BACKGROUND color swatch is BLACK. Now press Command/Ctrl + Shift + I to invert your selection. Now press the DELETE key. Your mask should have less white around the woman. If there is still some white, you can repeat this step, just feather it by 1 or 2 more pixels.
Step 15
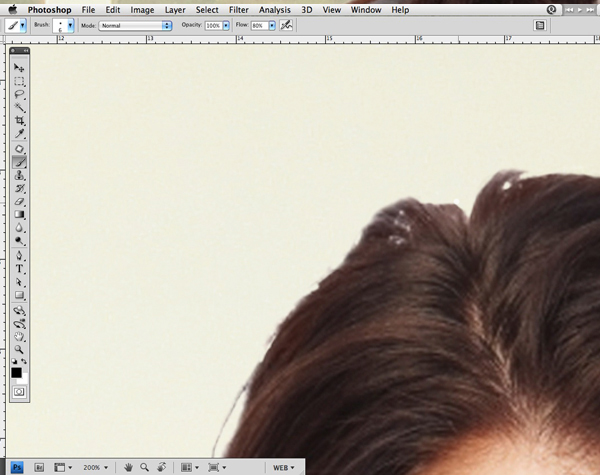
If you take a close look at her hair, you can see that the mask made a mess, and there are still parts of the white background that you can see. Using a pen tablet will make this step a lot easier. Select the Brush tool. Make the brush about 6px wide with a hardness of 80%. Make the Brush’s opacity 100%, and change the flow to 80%. These settings are just what I am comfortable using, adjust them to suit your preferences. Start by removing any white that may be left in her hair. A good place to start is the top of the part in her hair. Make sure you are working on the mask by clicking on it so a set of brackets encloses the mask icon. Check that your foreground color is BLACK. Paint over the white areas left in the mask. If you mess up, change your foreground color to WHITE and paint the area of the mask back in. An easy way to do this is to have Black and White be the two colors you have for foreground and background. When you want to remove from the mask, make the foreground color Black. If you want to add back to the mask, press X and your foreground/background colors will flop, and you can now continue editing your mask.
Step 16
Save if you haven’t at this point! Create a New Layer UNDERNEATH the masked layer of the woman. Re-name the layer "hair strands." With the Eyedropper Tool, make a color selection out of the woman’s hair. Switch to the Brush Tool. Use a small brush, 2px at 80% hardness, 100% Opacity, and 80% Flow. Paint long, flowy strands of hair back in to make the mask look more refined.
Step 17
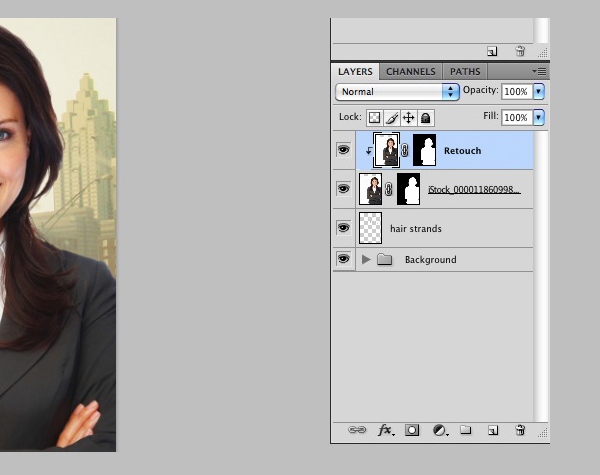
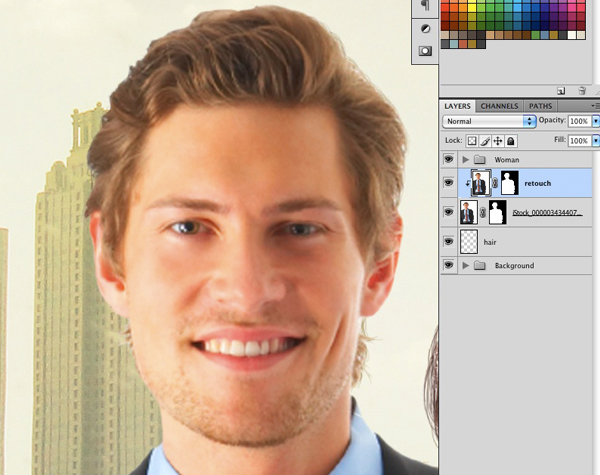
Select the layer the woman is on. Hold the Option key, Click and drag down on the layer to create a copy of it. Re-name the duplicate of the layer that sits on top "Retouch." Place the Cursor on the line in between these two identical layers. Press the Option key so a new icon appears (Should look like two overlapping circles) and Click. Your top layer named Retouch should now have a little arrow showing that it will affect the layer below it.
Step 18
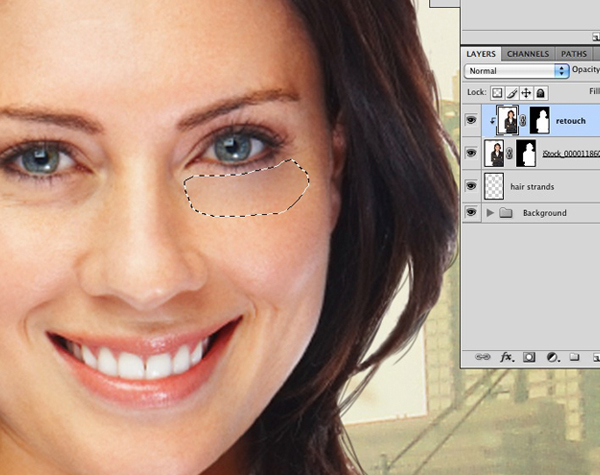
Get rid of the wrinkles around her eyes and neck. Retouch a little around her mouth. Use the Stamp tool to clone areas. You can also use the Patch Tool. Lasso an area with the Patch Tool, for example, under her eye. Place the cursor in the middle of your selection, then Click and Drag to her forehead. Release to see the wrinkles disappear. Repeat for the other eye. Clone out the wrinkles in her neck and around her mouth.
Step 19
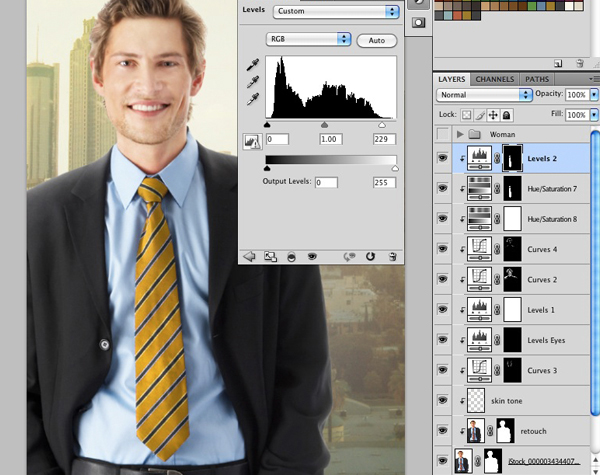
Her shirt is really blown out. To fix this problem, create a new LEVELS Adjustment Layer on top of all your layers you have thus far. Pull on the Midtones and Shadows markers until you have a significant range of values in the shirt. Attach the Levels layer to the layer of the woman the way you did to the Retouch Layer (see Step 17).
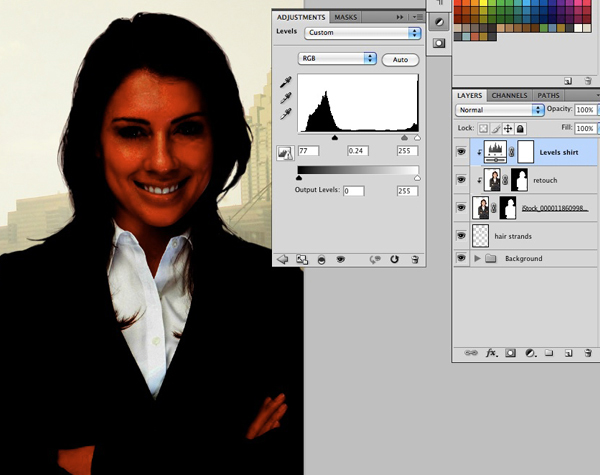
Step 20
Using the Pen tool, make a path around the white part of the woman’s shirt on the Levels layer. When the path is closed, click on the Paths Panel under the Layers Panel. Turn the path into a selection with the Dotted Circle Icon on the bottom of the Paths Panel. Return to the Layers Panel. Press Command/Ctrl + Shift + I to invert the selection. Make sure your Background Swatch Color is set to Black. Press DELETE. You should now only have the area of the woman’s shirt affected by the Levels. Press Command/Ctrl + D to deselect your selection. Clean up the mask the same way you did with the woman’s hair until it looks similar to the image below.

Step 21
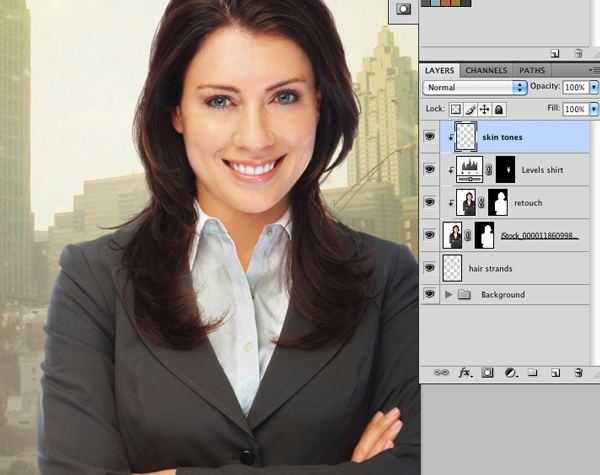
Create a New Layer, attach it to the chain you have of layers affecting the image of the woman. Re-name this layer "skin tones." Set up a Soft Brush with a size at about 150px – 200px, 0% Hardness, 10% Opacity, and 20% Flow. Carefully even out her skin tone by painting over it. Don’t forget to even the skin tones on her hands and to lighten up her neck.
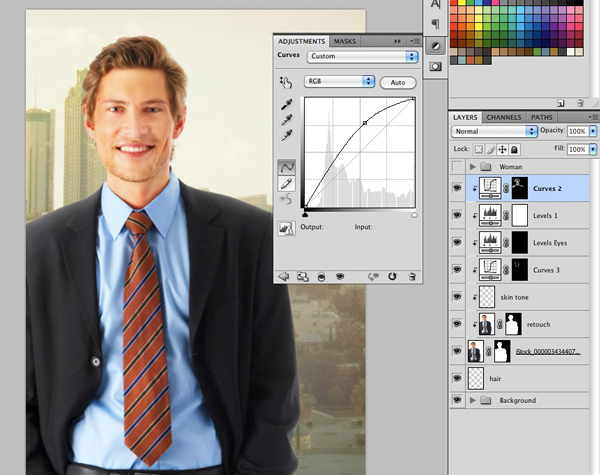
Step 22
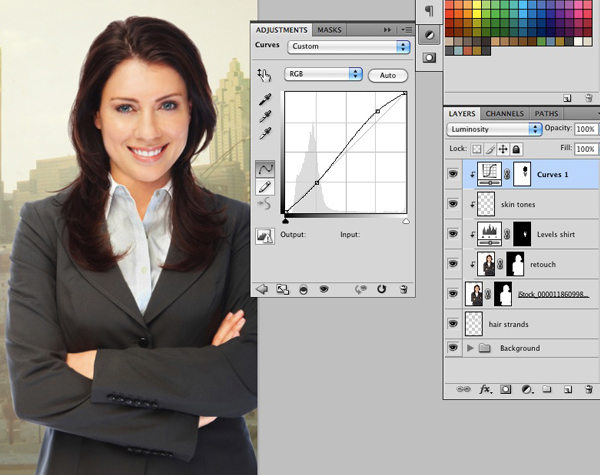
Now to Brighten up her suit a little. Create a Curve Adjustment Layer on top of all your layers. Create a curve with two control points as seen in the image below. Lasso out the face and neck from your Curve layer’s mask. Command/Ctrl + D to Deselect. With a soft brush on about 30% opacity, paint away the mask a little on her shirt to darken it back up. Fix any strange edges that may have been created by the lasso tool.
Step 23
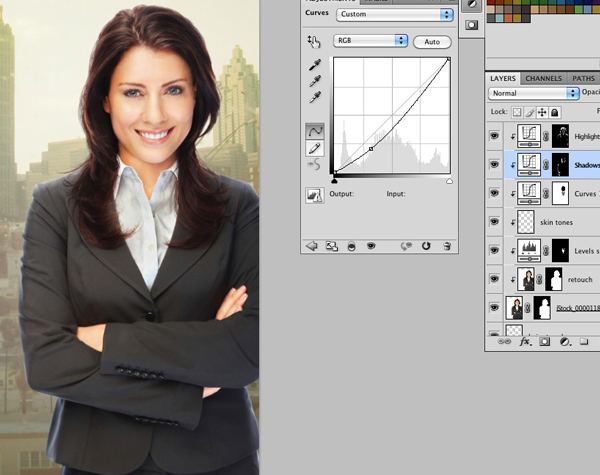
We’re now going to add Highlights to help define the light source. Pretend there is a like coming from the upper left, above the canvas. Create a new Curve Adjustment Layer on top of all your layers you have so far. Make a BIG bright curve. Command/Ctrl + Click on the mask. Make sure you have your Background Swatch color set to Black. Press DELETE to remove all information from the mask of this new Curve layer. Command/Ctrl + D to deselect. Attach this layer to the chain like you did to the previous 4 layers. Paint in highlights on the woman and create the direction of the light. Use a smaller, soft brush, something like 20px with 0% Hardness, 20% Opacity, and 30% Flow. Build up your light. If you mess up, remember to toggle with X between White and Black foreground/background colors to add or subtract from your mask.

Step 24
Now that the highlights are in, create some shadows. Create a new Curve Adjustment Layer BELOW the Highlights layer. Make a control point and pull Down on it to create shadows. Just like with the Highlights layer, Delete the information in the mask. You’ll need to paint the shadows in the same way you painted in the Highlights. Add shadows around her face, down the side of her arm, and cover up the highlight on the left side of her just below her forearm. There is going to eventually be someone blocking light from reaching that area.
Step 25
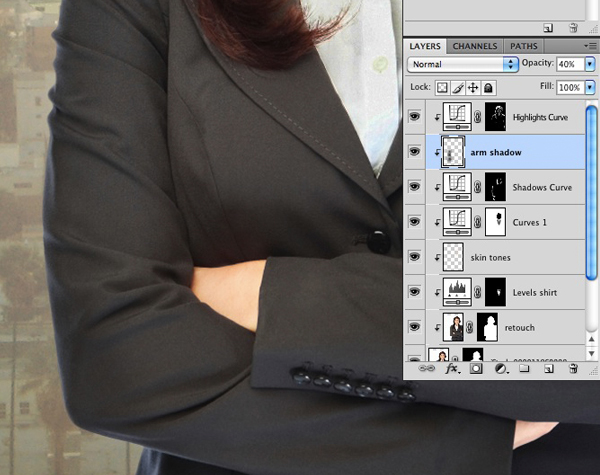
There is still a highlight on the left side of her that needs to be taken down. Create a New Layer just above the Curve adjustment layer you painted your shadows on. Re-name the layer "arm shadow." With the eyedropper tool, make a color selection of an area of her jacket that is in shadow. Now switch to the brush tool. With the same soft, low opacity brush you used to create highlights and shadows, paint over the highlight on her arm where light will not touch it. If the shadow is getting too dark, change the opacity of the layer. I adjusted mine down to 40% Opacity.
Step 26
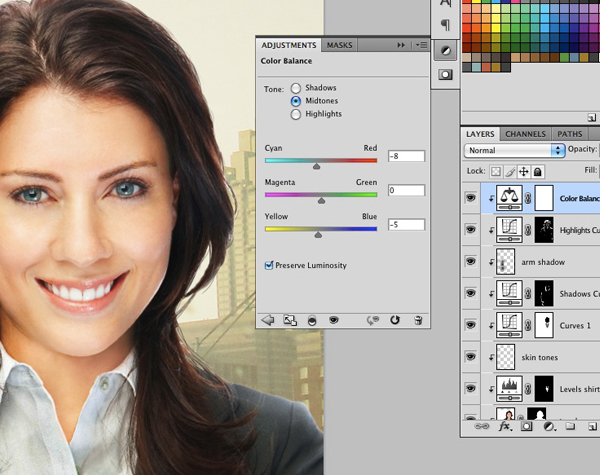
She looks a little red, especially her hair. On top of all your layers, create a new Color Balance Adjustment Layer. Pull the bars until you feel that her hair looks a little more natural. Attach the layer to the chain of layers you’ve got going. See my example below.
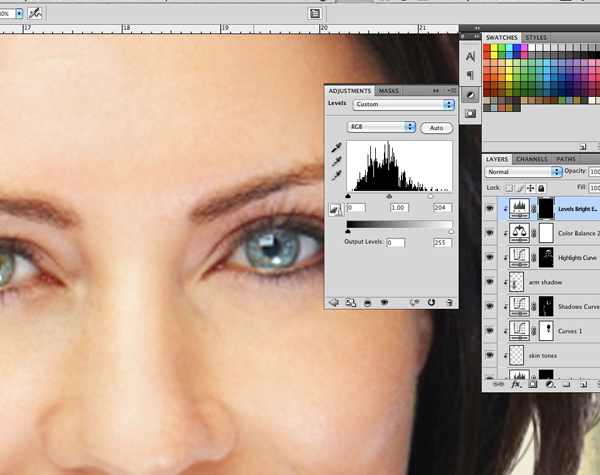
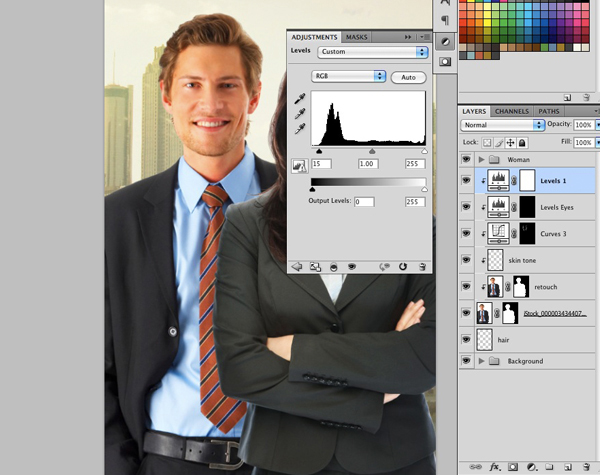
Step 27
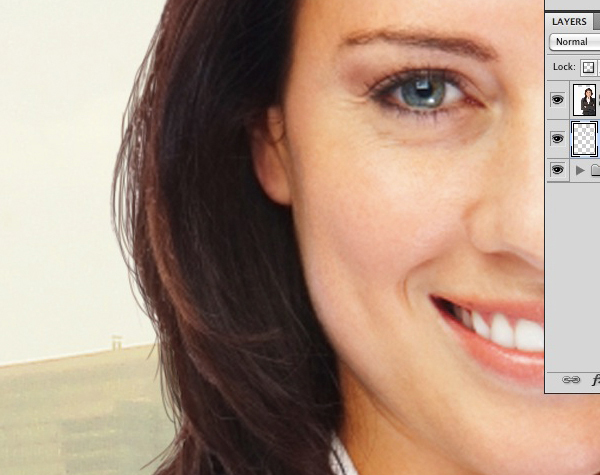
Her eyes could be brightened up. Create a new Levels Adjustment Layer on top of all your layers. Attach the layer to the chain of layers you have going. Pull the White Highlights Marker to the left until your image brightens up and you like what you see for how bright the irises of her eyes are. Command/Ctrl + Click on the mask of the Levels Adjustment Layer to select the entire area the mask covers. Make sure your Background Color Swatch is set to Black, then press DELETE. Command/Ctrl + D to deselect. With a Soft, Low Opacity 15px brush, paint back in the mask on her eyes. You can brighten up the whites of her eyes too, but don’t go overboard.
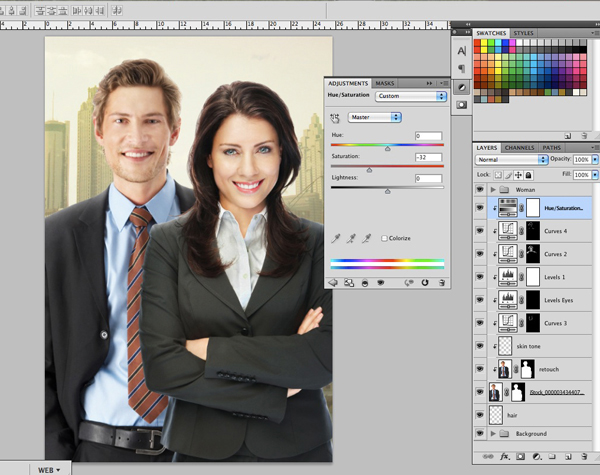
Step 28
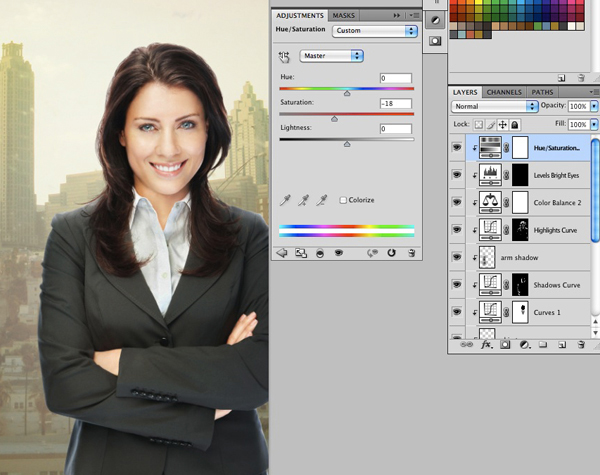
She is a little over-saturated for what the final color palette is going to be. On top of all the layers you have, create a Hue/Saturation Adjustment Layer. Attach it to the chain of layers like you have been doing so the effects of this layer only affect the woman. Take down her Saturation to an area that you like.
Step 29
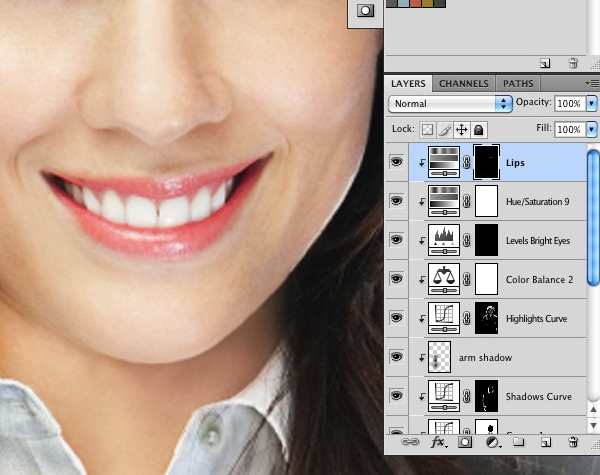
Her color is better… except her lips are too pale. Create a new Hue/Sat Adjustment Layer above all your layers. Adjust the color so her lips are a color you like. Connect the layer to the chain. Rename the layer "Lips." Command/Ctrl + Click on the layer’s mask to select it. Make sure your Background Color Swatch is set to Black, press DELETE to remove all information from the mask, then Command/Ctrl + D to deselect. Make a rough Lasso around her lips, change your Background Color Swatch to White and press DELETE. Fix the edges of the mask by painting it in and out with a soft brush on the mask until you have just her lips affected by your Hue/Sat Layer like the image below.
Step 30
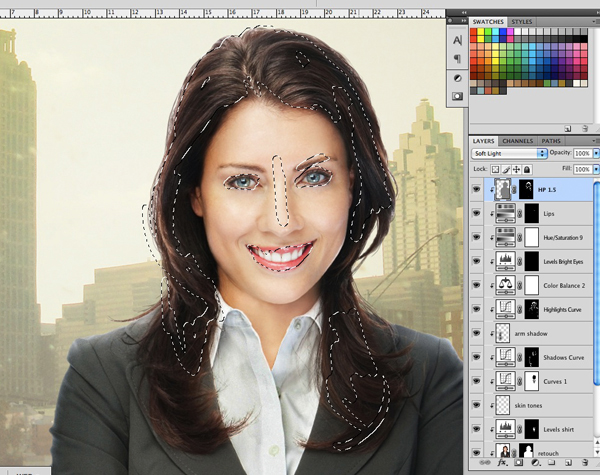
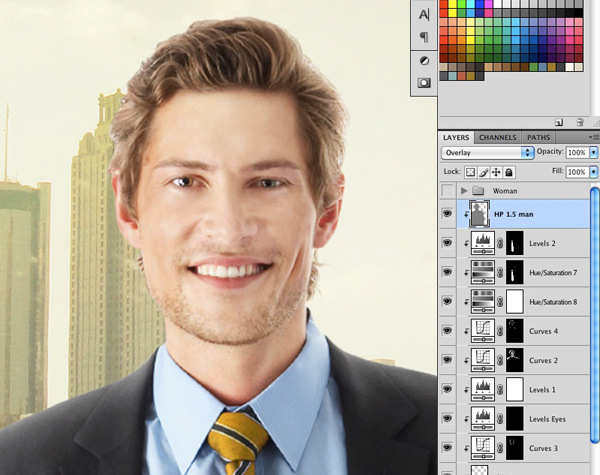
This step will enrich the look of the hair, eyes, and mouth. Select all your layers starting from the istock layer with the woman on it all the way up to the Lips layer (Select that bottom layer, scroll up, Shift + Click on Lips layer to highlight all the layers in between). With all these layers selected, Press Option + Click and drag up to copy all these layers. With all these new layers created, and STILL SELECTED, press Command/Ctrl + E to flatten them into one layer. You should now have a flattened version sitting on top of all the layers you created in steps 13 – 29. With this new layer selected, go to the top menu to FILTER > OTHER > HIGH PASS. On the menu that appears, adjust the Radius to 1.5 pixels and click OK. Change the Blend Mode of the layer to SOFT LIGHT. You’ll notice if you zoom in and turn the layer on and off that you have increased the sharpness a little. We only want this effect to be on her eyes, hair, and mouth. Rename the layer something that you will remember. I labeled mine HP 1.5 (for High Pass at 1.5px Radius). Add a mask to the High Pass Layer. Delete the information from the mask and then paint it in over areas that you see fit for it to be on. The image below shows a rough selection of the areas I painted the High Pass mask in.
Step 31
To keep organized, place all the layers you have that involve the woman in a Folder, just as you did with the Background. Select the top layer (High Pass Layer) and then scroll down your Layers Panel to the last layer on top of your Background Folder (Hair Strands). Shift + Click on the Hair Strands Layer. With all those layers highlighted, press Command/Ctrl + G to put them in a folder. Rename the folder "Woman."
Step 32
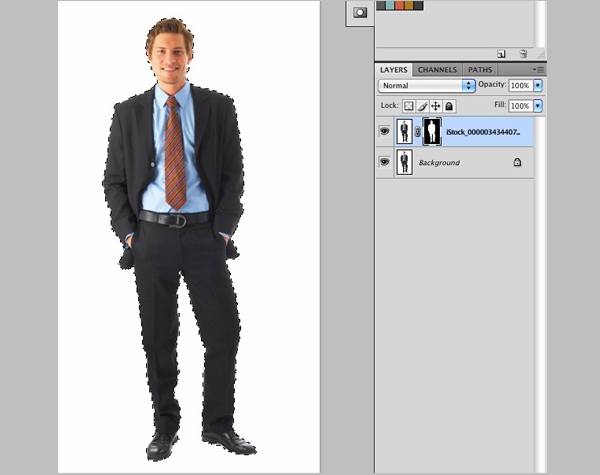
Open the file of the man labeled iStock_000003434407Medium.jpg. Press Command/Ctrl + A, Command/Ctrl + C, Command/Ctrl + V to copy and paste the background layer. Mask out the man from the background the same way you did with the image of the woman in Steps 11 and 12. You can use Channels again to separate him from the background. Select the Blue Channel, return to the Layers Panel, then go to the top menu to SELECT > COLOR RANGE > select white from the background and move the Fuzziness meter until you have a good selection of the background, and click OK. Since you selected white, you have a selection of the background, not the man. With the Lasso tool, hold down Option and make a lasso around his teeth, eyes, and parts of his shirt that are almost completely white. Press Command/Ctrl + Shift + I to invert your selection. Press the Add Layer Mask button to mask the man out of the background.
Step 33
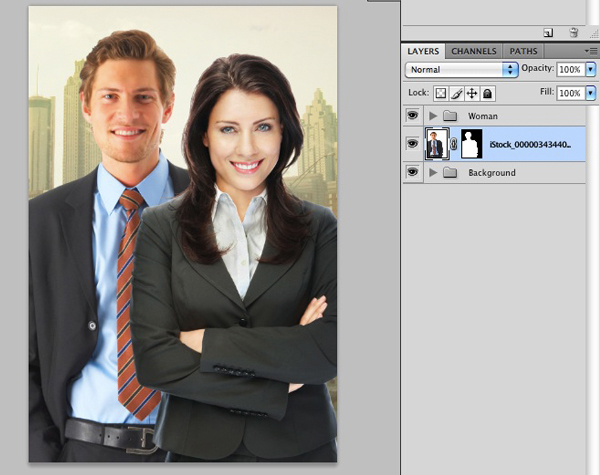
Drag your Masked layer of the man to your poster canvas. Place his layer in between the Background Folder and the Woman Folder. Press Command/Ctrl + T and increase his size to about 356% and press Enter. I know that’s a huge percentage increase, but it’ll look fine, trust me for now! Place him in the poster as you see him in the image below. Refer to Step 14 to fix the mask outline of the man. You’ll need to feather it just as you did for the woman.
Step 34
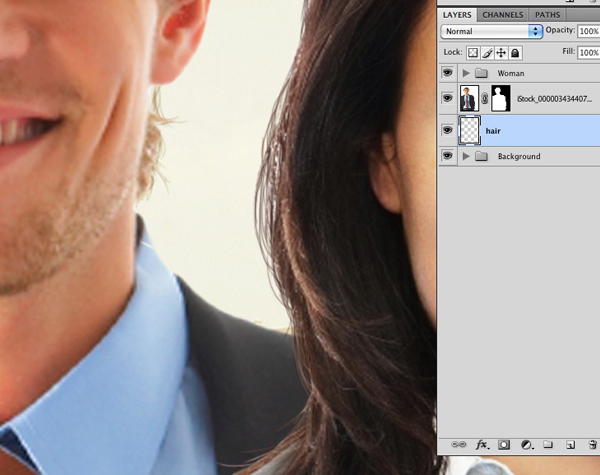
Create a New Layer underneath the layer of the man. Rename the layer "Hair." Use the Eyedropper tool to select a color sample from the man’s hair. With a 2px Brush on 80% Hardness, Opacity 100%, and Flow 80%, paint in strands of hair to make it look more natural.
Step 35
Highlight the layer of the man. Press Option + Click drag the layer up to create a copy of it. Link this layer to the one below it by hovering the cursor on the line between the two layers. Hold Option until the cursor changes to two overlapping circles, then Click to link the layer to the one below it. Re-name the linked layer "Retouch." Get rid of the wrinkles/bags under the man’s eyes with the Stamp Tool and/or the Patch Tool. See Step 18 for reference.
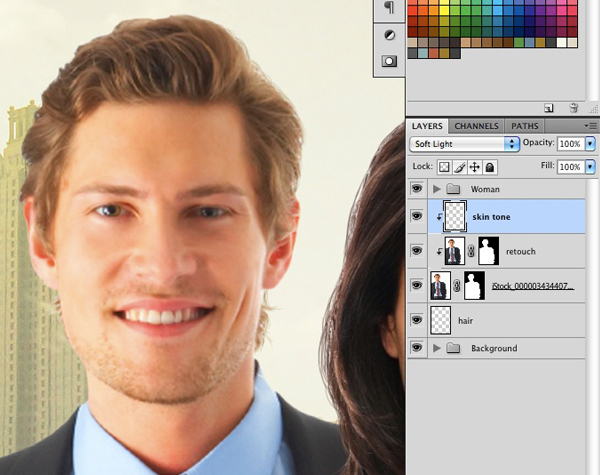
Step 36
To even out the man’s skin tone, create a New Layer on top of the Retouch layer. Link it into the chain of layers so it only affects the man and none of the layers beneath him. Sample a skin color in the lighter range of is face with the eyedropper tool. With a 150px Soft Brush, 0% Hardness, 10% Opacity, and 20% Flow, paint over his face in some of the darker areas. Change the Blend Mode to Soft Light.
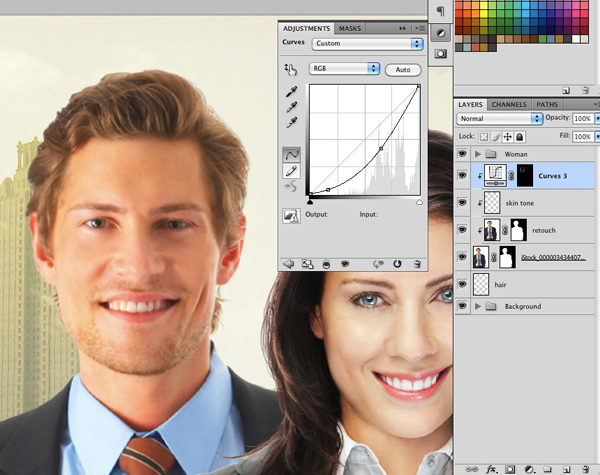
Step 37
To even out his skin even more, and to fit the lighting better, create a new Curve Adjustment Layer above the Retouch layer. Pull the curve down to darken it similar to what you see in the image below. Attach the layer to the chain of layers. Command/Ctrl + Click on the mask, make sure you have your Background Color swatch set to Black and press DELETE to remove the information from the mask. Press Command/Ctrl + D to deselect. Paint back in the mask with a soft brush on the sides of his face. Use a brush similar to the one you used for painting in the skin tone color.
Step 38
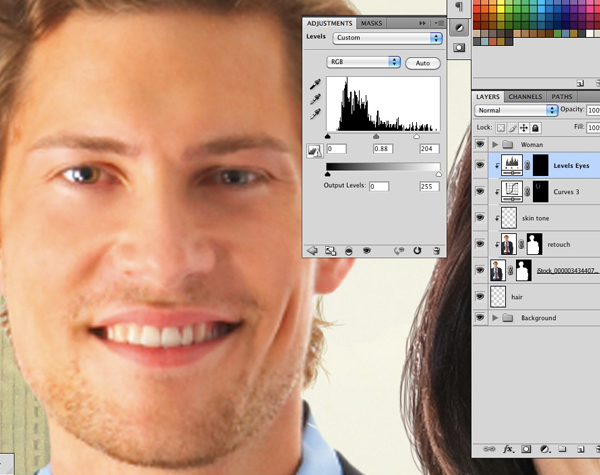
To brighten up his eyes, follow Step 27. Create a Levels Adjustment Layer above the face shadow layer you just made in the last step. Adjust the Levels until the eyes are a little brighter. Link the Levels layer to the one below it. Command/Ctrl + Click the mask to select it, make sure you have Black as your background color swatch, and press DELETE. Command/Ctrl + D to deselect. With a soft brush, low opacity, and low flow, paint back in the Irises and a little of the whites in his eyes to brighten them up.
Step 39
He doesn’t have a great range of values in his suit. To fix this issue, create a new Levels Adjustment Layer on top of all the other layers affecting the man. Pull on the Shadows marker until you have stronger dark areas.
Step 40
Turn off the eye on the Woman Folder to get a better look at the guy. Create a new Curves Adjustment Layer above your latest Levels layer. Adjust the curve so there is a strong highlight. Remove all the information from the mask like in previous steps, and paint back in highlights following the light source you had on the woman.
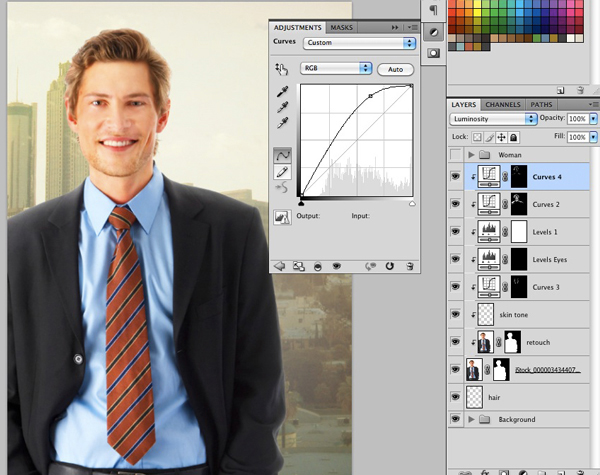
Step 41
He still has a bad shadow on his face, and could use stronger highlights in some areas, but not everywhere that you created highlights before. Create a new Curve Adjustment Layer on top of the previous one and give it a strong highlight curve. Connect it to the chain of layers, and remove the information from the mask. Change the Blend Mode to Luminosity. Paint in the stronger highlights that you want on the shoulders of his suit jacket, on his face, and on the edges of his hair.
Step 42
Turn the Woman Folder back on. Create a Hue/Saturation Adjustment Layer below the woman folder. Adjust the Saturation down so that the man matches the saturation of the woman. Attach the Hue/Sat layer to the chain of layers.
Step 43
Turn off the Woman Folder again. Since we have a Yellow background, the man’s tie should fit in better with the color scheme. With the Pen Tool, create a path outline of the tie. Switch over to the Paths Panel, and click on the Dotted Circle button on the bottom of the Paths Panel so your path has now become a selection. Return to the Layers Panel. Create a new Hue/Saturation Adjustment layer. In the Hue/Sat panel, there should be a pull-down Menu that currently has "Master" selected. Pull Down and set it to "Reds." Mess around with the Hue and the Saturation bars until you start to get close to a yellow color. You can change the pull down menu from Reds, to Yellows, Greens, etc. Play around with the levels until you reach a color you like. Shoot for yellow if you want to stay within the yellow palette. Link the layer to the chain of layers. To brighten up the color of the tie, you can press Command/Ctrl + Click on the mask of the Hue/Sat tie color layer to select the outline of the tie, then create a new Levels Adjustment Layer. Pull on the white Highlights marker to brighten up the tie.
Step 44
Now to add a High Pass layer to the man. Select all the layers that involve the man, from the one he is on all the way up to the Levels layer affecting his tie. When all these layers are selected, press Option + Click and drag the layers up to copy them. With all the newly copied layers selected, press Command/Ctrl + E to merge them into one layer. With your new layer selected, go to the top menu to FILTER > OTHER > HIGH PASS. Use a Pixel Radius of 1.5px and click OK. Change the Blend Mode of the layer to OVERLAY. Rename the layer something like HighPass 1.5. Since the image of the man is a lower quality image than the one of the woman, it is ok to let the high pass layer affect him entirely to sharpen up the image.
Step 45
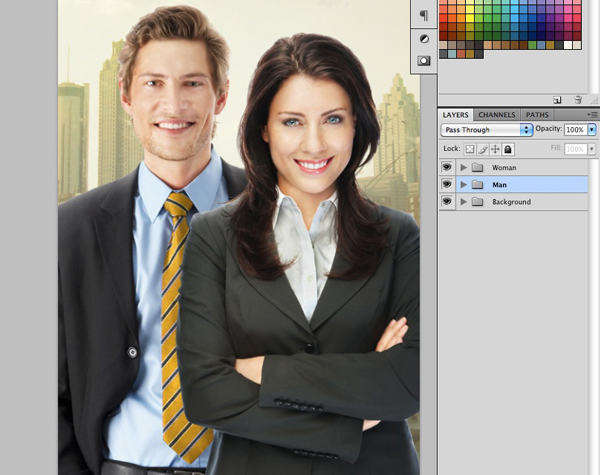
Select all the layers that have to do with the man from the layer you painted his hair strands onto, all the way to the high pass layer affecting him. Press Command/Ctrl + G to group these layers into a new folder. Rename the Folder "Man." Turn on the Woman Folder.
Step 46
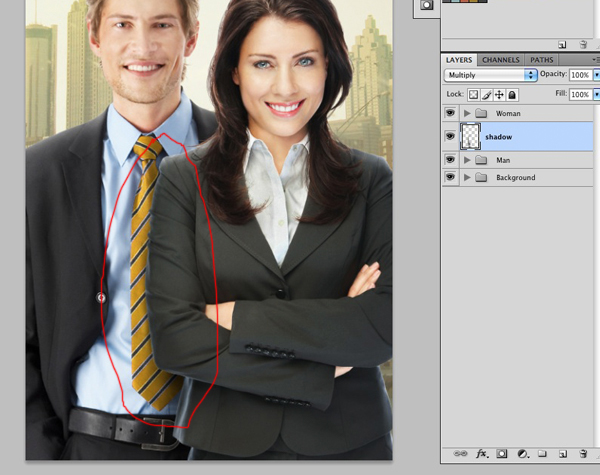
Create a New Layer in between the Man folder and Woman folder. Rename the layer "Shadow." Change the layer’s Blend Mode to MULTIPLY. Use the Eyedropper tool to make a color selection from a dark area in the man’s suit. Switch over to the Brush tool, and with a brush about 150px – 200px, 0% Hardness, 10% Opacity, and 20% Flow, paint in a shadow on the layer to show that the woman is creating a shadow over the man by standing in front of him.
Step 47
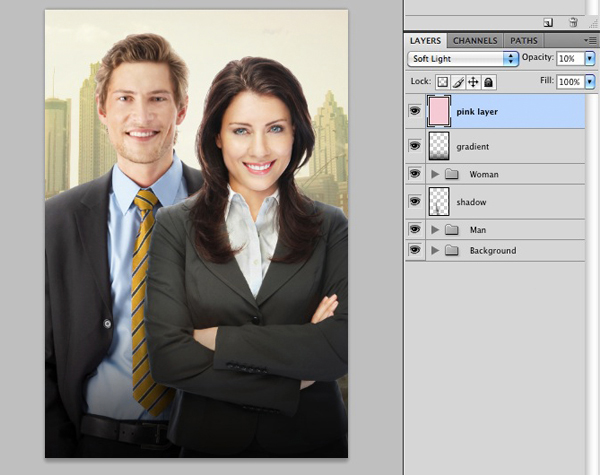
Create a New Layer on top of the Woman folder. Change the foreground color swatch to Black. Rename the layer "Gradient." With the Gradient Tool, create a Linear Gradient from the bottom of the canvas to about mid-way up the woman’s arm. Change the Blend Mode of the layer to MULTIPLY.
Step 48
Create a New Layer above the Gradient layer. Rename it "Pink Layer." Double-click on the Foreground Swatch. Pick out a light pink color. The RGB values I used were R: 253 G: 203 B: 212. Click OK. With your Pink Layer highlighted, press Option + DELETE to fill the layer with your foreground color. Change the Pink Layer’s blend mode to SOFT LIGHT, and the Opacity to 10%. This layer will warm up your palette a little.
Step 49
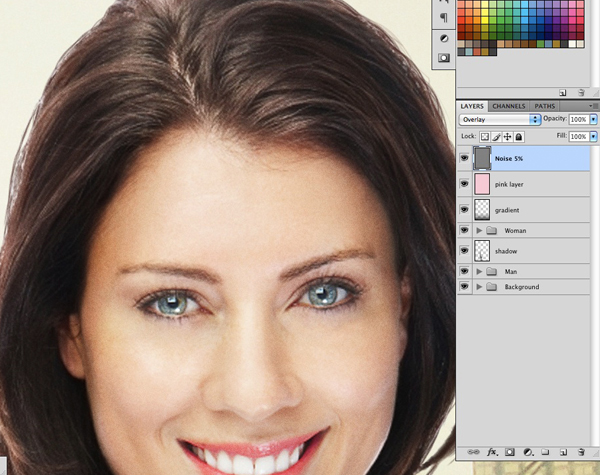
To add film grain to the poster, create a New Layer on top of the Pink Layer. Press Shift + F5. Under Contents, select 50% Gray. Keep the Mode at Normal, Opacity at 100%. Leave "preserve transparency" unchecked. Click OK. Go to the top menu to FILTER > NOISE > ADD NOISE. Set the Amount to 5%. Select Uniform, and check the box next to Monochromatic. Click OK. Rename the layer "Noise 5%." Change the Blend Mode to OVERLAY.
Step 50
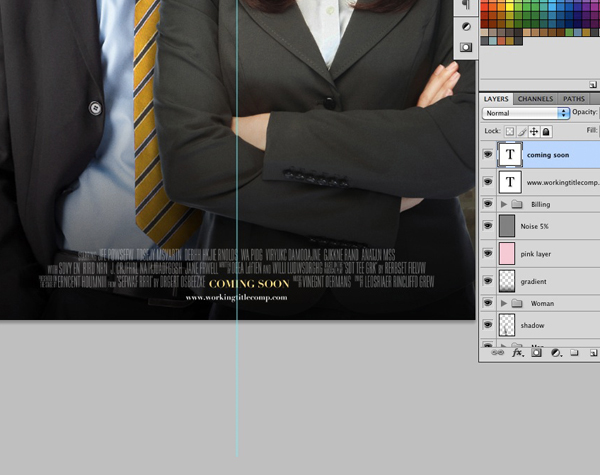
Now to add type. Open up the fake billing file. Drag it into your poster canvas above the Noise 5% layer. Go to the top menu to LAYER > NEW FILL LAYER > click OK. Choose White click OK. Place the cursor on the line in between the white Fill layer, and the fake billing layer. Press Option + Click to attach the Fill layer to the Fake billing layer. The white should now only affect the billing. Highlight the two layers and press Command/Ctrl + G to put them in a new Folder. Rename the Folder "Billing." Change the Opacity to 40%. Place the billing on the poster as you see it in the image below.

Step 51
Pull a vertical guide into the middle of the poster, dividing it in half. In small type, create a fake url for your movie’s website. Center it on the line below the billing as seen in the image below. In slightly larger type, place a new type layer in the little space on the last line of the billing. Type "coming soon" and align it with the bottom line of the billing.
Step 52
Add your title. I used Linotype Didot in all caps with a larger scale "W." I then highlighted "o – e" in the title, and set the baseline height to 7pt to align the top of the W with the rest of the letters. In a pale yellow color, I typed out the two names of my actors on separate type layers and aligned them on the same baseline, and along the "o" and the "e" in my title. In the same pale yellow color and type size, I added my tagline and aligned it in the same way I aligned the two actor names. Kern the letters in your type until they have the type of spacing you want.
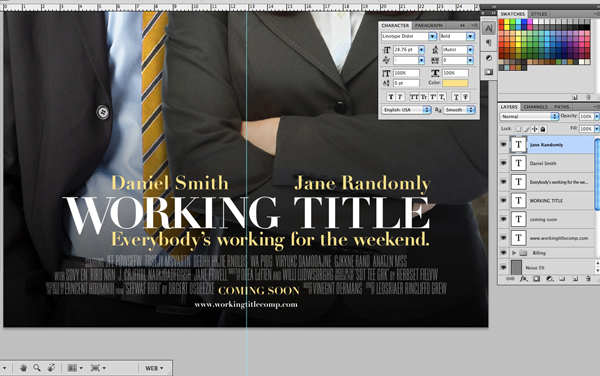
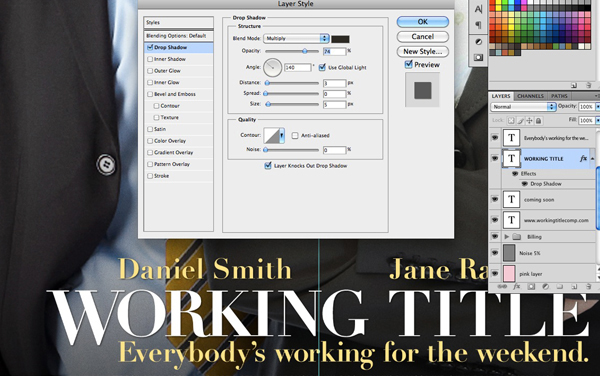
Step 53
To help the title and the actor names stand out a little bit, I added a drop shadow to them. Double click on the Title layer to bring up the Layer Style menu. Click on Drop Shadow. Adjust the angle and the opacity of the shadow, the Distance, Spread, and Size to a drop shadow that you like. I went for a subtle drop shadow at 74% Opacity, Distance 3px, Spread 0%, and size 5px. Click OK. Add the same drop shadow to the two actor names. Place the cursor over the "FX" you see on the Title layer. Press Option + Click and drag the "FX" onto the first actor’s name. Do it again for the second to apply the same effect. Select all your type layers, including the Billing folder, and press Command/Ctrl + G to put them in a new folder. Rename the folder "Type."
Final Image
Good job! You’re Done!