In this tutorial you will be introduced to one of the most commonly used Cocoa-Touch classes: UIAlertView. With this class, you can quickly notify users of important or urgent application information. You may also force user feedback by combining UIAlertView with the UIAlertViewDelegate, which will also be demonstrated. Read on to learn more!
Step 1: Project Setup
Create a new Xcode project using the View-based Application template. Name the application “AlertDemo” and click Save.
After creating your project, expand the Resources folder in the “Groups & Files” pane in the left of Xcode. CTRL + Click (or right click) on the Resources folder and select Add > New Group. Name the new group “images” as this is where we will store the graphics for our application.
Download the project resource file attached to this tutorial and open the “images” folder. Drag and drop all of the images into the “images” folder in the “Groups & Files” Xcode pane. Be sure to check “Copy items into destination group’s folder (if needed)” as this will ensure the resources are actually copied into your project and not simply linked. Your setup in Xcode should now look similar to this:

Expand the “Classes” folder and open the AlertDemoViewController.h file. Add the following method declaration above the @end line:
-(IBAction)launchMessage:(id)sender;
The “IBAction” return type is equivalent to a return type of “void” and is used to allow you to graphically connect an action with a method in Interface Builder. The sender variable is used as a reference to the object that called this method. Because sender is declared as an “id” data type, it can represent any Cocoa-Touch object, including the button we will use in a moment. However, we won’t actively refer to the sender variable in this tutorial. Instead, it is referenced as a general-practice implementation detail.
Switch to the AlertDemoViewController.m file. Paste in the following code after @interface but before @end:
-(IBAction)launchMessage:(id)sender
{

}
This is our method implementation, and it is also where we will place our UIAlertView code.
Now it’s time to open Interface Builder and customize our app aesthetic. Double click the AlertDemoViewController.xib file to open IB.
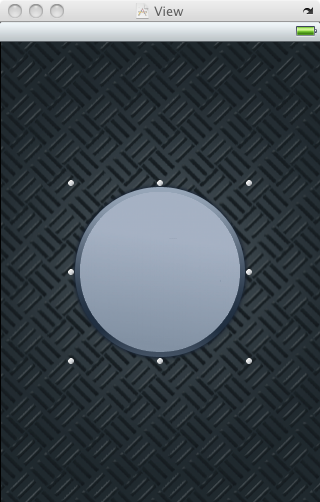
Search for a UIImageView in Library window (if you don’t see the Library window, select it from Tools > Library in the menu bar). Drag a new UIImageView onto the main view window and size it to fill the entire screen. Using the inspector window (Tools > Inspector), set the image property to background.png.
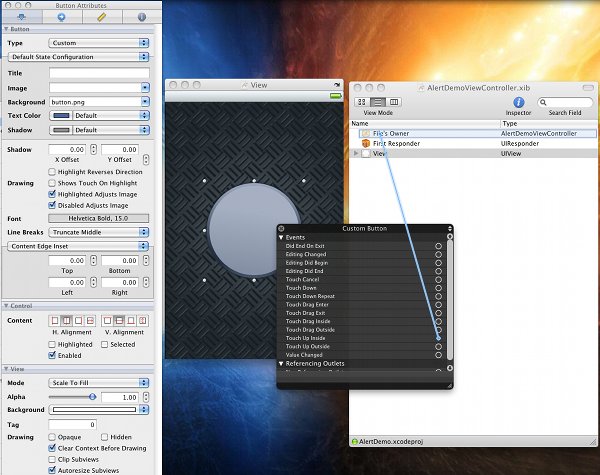
Repeat the process above to drag a new UIButton onto the view. Use the inspector window to set the button type to “custom.” Now set the button background property to button.png. Size the button to fit the image by selecting Layout > Size to Fit in the menu bar. Go back to the Inspector window and select the drop-down that reads “Default state configuration.” Replace this value with “Highlighted state configuration.” Now update the Background property to be button-pressed.png and do the same for the “Selected state configuration” option. Center the button on the view, and your interface should now look like this:
Finally, you connect the “Touch up inside” action of the button with the method we declared earlier in our view controller interface file. You can do this by CTRL + clicking the button and dragging the circle from the “Touch up inside” option to the “File’s Owner” icon.
NOTE: You must actually select the the method name that appears, in our case “launchMessage,” to complete the connection.
Save your work in Interface Builder and go back to Xcode.
Select Build > Build and Debug from the menu bar to test your progress so far. You should now see the view you just created!
Step 2: Create a Basic UIAlertView Message
Now that you have your project template setup, you are ready to use UIAlertView to trigger your message when the custom button is pressed. Open the AlertDemoViewController.m file, and type the following into the launchMessage method you created earlier:
-(IBAction)launchMessage:(id)sender
{
       UIAlertView *message = [[UIAlertView alloc] initWithTitle:@"Hello World!"
                                                        message:@"This is your first UIAlertview message."
                                                        delegate:nil
                                          cancelButtonTitle:@"OK"
                                          otherButtonTitles:nil];

       [message show];

       [message release];
}
On line 3, you are creating and initializing your instance of the UIAlertView class. The initWithTitle: and message: parameters are self-explanatory and easily understood after seeing an alert displayed. The delegate: parameter refers to which class should receive delegate notification messages for UIAlertViewDelegate. The cancelButton: parameter is the default button to be displayed along side the alert, and the otherButtonTitles: parameter is used to display one or multiple additional options that user may select.
On line 9, we actually show our message by popping our new UIAlertView onto the screen. Line 11 releases the memory we allocated for this object on line 3.
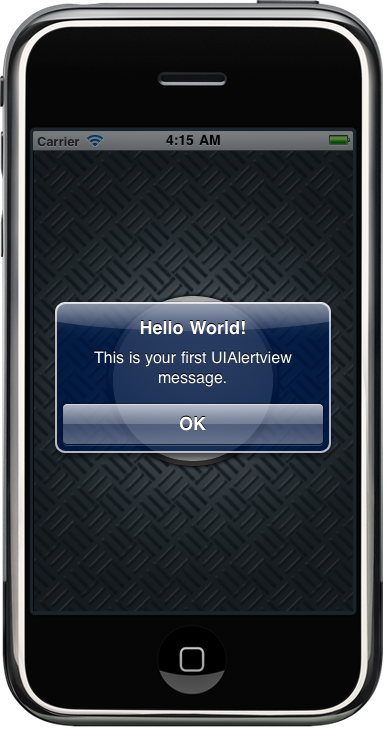
If you build and debug the application now, you’ll see that tapping the button results in our message being displayed!
NOTE: If nothing happens when you tap the button in the simulator, be sure that you actually saved the changes you made in Interface Builder and that the “Touch up inside” action is connected to the launchMessage: method.
Step 3: Add Buttons to UIAlertView
Adding additional buttons to a UIAlertView can be done either when you initialize your object or after. To add buttons at initialization time above, you would use the following code:
    UIAlertView *message = [[UIAlertView alloc] initWithTitle:@"Hello World!"
                                                                               message:@"This is your first UIAlertview message."
                                                                               delegate:nil
                                                                 cancelButtonTitle:@"Button 1"
                                                                 otherButtonTitles:@"Button 2", @"Button 3", nil];
To achieve the same effect after having initialized your alert, you would use the following lines of code:
       UIAlertView *message = [[UIAlertView alloc] initWithTitle:@"Hello World!"
                                                                                  message:@"This is your first UIAlertview message."
                                                                                  delegate:nil
                                                                    cancelButtonTitle:@"Button 1"
                                                                    otherButtonTitles:nil];

        [message addButtonWithTitle:@"Button 2"];
        [message addButtonWithTitle:@"Button 3"];
Both of these code fragments are equivalent, but using the addButtonWithTitle: method makes it easy to optionally add buttons to your alerts using conditionals such as if statements.
Step 4: Implement UIAlertViewDelegate to Respond to Buttons
Switch back to AlertDemoViewController.h and modify your class declaration line to read as follows:
@interface AlertDemoViewController : UIViewController <UIAlertViewDelegate> {
This allows your class to respond to the UIAlertViewDelegate protocol methods. In order to respond to button taps in our UIAlertView, we will use the – alertView:clickedButtonAtIndex: protocol method. Back in AlertDemoViewController.m, add this into your class:
- (void)alertView:(UIAlertView *)alertView clickedButtonAtIndex:(NSInteger)buttonIndex
{

}
As you can see from the method name, this method will accept a pointer to the UIAlertView object we created earlier and the button index that was selected by the user. You may be tempted to simply switch conditionally on the buttonIndex variable to determine which button was selected by the user, but what would happen if you were conditionally adding buttons to the alert? A much better way is to test against the title of the button and then act accordingly, like so:
- (void)alertView:(UIAlertView *)alertView clickedButtonAtIndex:(NSInteger)buttonIndex
{
	NSString *title = [alertView buttonTitleAtIndex:buttonIndex];

	if([title isEqualToString:@"Button 1"])
	{
		NSLog(@"Button 1 was selected.");
	}
	else if([title isEqualToString:@"Button 2"])
	{
		NSLog(@"Button 2 was selected.");
	}
	else if([title isEqualToString:@"Button 3"])
	{
		NSLog(@"Button 3 was selected.");
	}
}
Think this code will run correctly? Actually, there is one more tweak that we need to make. Go back to the UIAlertView initialization statement, and update the delegate: parameter to accept the self keyword instead of nil.
If you build and debug the application now, you should be able to select multiple buttons and see a statement print to the console when a button is selected. To pull up the console, select Run > Console from the Xcode menu.
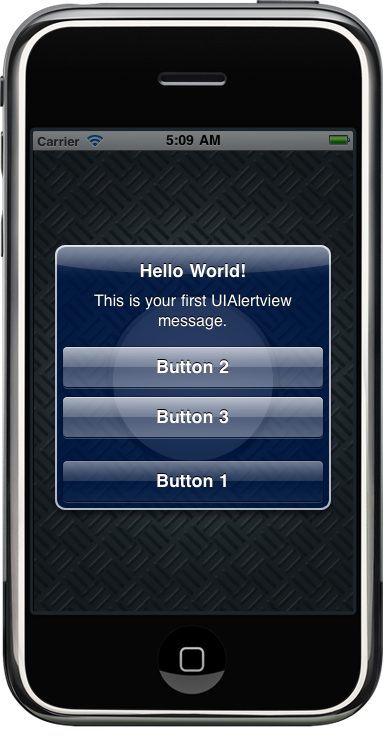
This is what the final alert view should look like in the simulator:
Conclusion
This concludes our introductory tutorial on UIAlertView. In addition to what we covered today, there are many other options provided by the UIAlertViewDelegate protocol and some additional, inventive ways to use UIAlertView, such as placing a UITextField as a subview of the alert to quickly force users to enter text based feedback. If you would like to see an additional tutorial on these advanced alert view topics, let me know in the comments section below! Also feel free to send in questions or comments via either my personal twitter @markhammonds or the official Mobiletuts+ twitter account @mobtuts.