Using the default UITableViewCell we can display a text or an image but sometimes it is not good enough. In this tutorial you will learn how to customize the UITableViewCell.
- UITableView – Creating a simple table view
- UITableView – Loading a detail view
- UITableView – Sectioned table view
- UITableView – Searching table view
- UITableView – Indexed table view
- UITableView – Adding subviews to a cell’s content view
Introduction
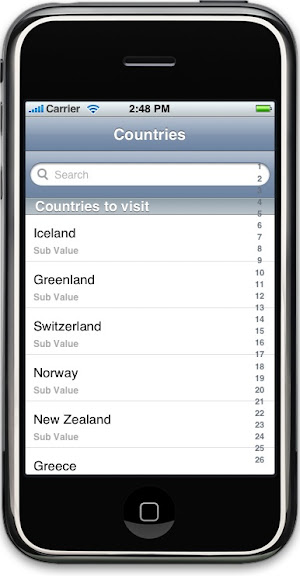
Using the default UITableViewCell, we can display a text (using the text property) or an image (using the image property). However, we cannot display data in multiple columns or rows. This is the sixth tutorial in the UITableView tutorial series and borrows its source code from the previous one. This is how the final app will look like
 We cannot achieve the display we want by setting the text property of the UITableViewCell. To solve this problem, we are going to add two labels to the content view of the cell. The labels are added in such a way that they show up one above the other by using coordinates. Apple documentation says we should add subviews to the cell’s content view, if you do not want to change the default behavior of the cell. This is the reason why we are not going to inherit from UITableViewCell.
Adding Sub Views
Instead of creating a cell by using initWithFrame:reuseIdentifier, we will create it from our own custom method. This method will be responsible for not only creating the cell but also the labels. The labels are created with specific locations in the cell using x and y coordinates. They are added to the content view of the cell as seen below
//RootViewController.h
#import <UIKit/UIKit.h>
@class OverlayViewController;
@interface RootViewController : UITableViewController {
NSMutableArray *listOfItems;
NSMutableArray *copyListOfItems;
IBOutlet UISearchBar *searchBar;
BOOL searching;
BOOL letUserSelectRow;
OverlayViewController *ovController;
}
- (UITableViewCell *) getCellContentView:(NSString *)cellIdentifier;
- (void) searchTableView;
- (void) doneSearching_Clicked:(id)sender;
@end
//RootViewController.m
- (UITableViewCell *) getCellContentView:(NSString *)cellIdentifier {
CGRect CellFrame = CGRectMake(0, 0, 300, 60);
CGRect Label1Frame = CGRectMake(10, 10, 290, 25);
CGRect Label2Frame = CGRectMake(10, 33, 290, 25);
UILabel *lblTemp;
UITableViewCell *cell = [[[UITableViewCell alloc] initWithFrame:CellFrame reuseIdentifier:cellIdentifier] autorelease];
//Initialize Label with tag 1.
lblTemp = [[UILabel alloc] initWithFrame:Label1Frame];
lblTemp.tag = 1;
[cell.contentView addSubview:lblTemp];
[lblTemp release];
//Initialize Label with tag 2.
lblTemp = [[UILabel alloc] initWithFrame:Label2Frame];
lblTemp.tag = 2;
lblTemp.font = [UIFont boldSystemFontOfSize:12];
lblTemp.textColor = [UIColor lightGrayColor];
[cell.contentView addSubview:lblTemp];
[lblTemp release];
return cell;
}
The above method creates three rectangles: one for the cell and for the two labels in the cell. We create the cell using initWithFrame:reuseIdentifier, but this time we add two labels to the content view property. Initialize the first label with “Label1Frame” coordinates, which will make this label show up at the top of the cell. Set the tag of this label to 1, so we can find it in tableView:cellForRowAtIndexPath method. Initialize the second label using “Label2″Frame” coordinates, which will make this label to show up at the bottom. The tag of this label is set to 2. The labels are added to the content view using addSubView method. Finally the cell is returned to be reused.
Displaying data
//RootViewController.m
- (UITableViewCell *)tableView:(UITableView *)tableView cellForRowAtIndexPath:(NSIndexPath *)indexPath {
static NSString *CellIdentifier = @"Cell";
UITableViewCell *cell = [tableView dequeueReusableCellWithIdentifier:CellIdentifier];
if(cell == nil)
 cell = [self getCellContentView:CellIdentifier];
UILabel *lblTemp1 = (UILabel *)[cell viewWithTag:1];
UILabel *lblTemp2 = (UILabel *)[cell viewWithTag:2];
if(searching) {
 lblTemp1.text = [copyListOfItems objectAtIndex:indexPath.row];
 lblTemp2.text = @"";
}
else {
 //First get the dictionary object
 NSDictionary *dictionary = [listOfItems objectAtIndex:indexPath.section];
 NSArray *array = [dictionary objectForKey:@"Countries"];
 NSString *cellValue = [array objectAtIndex:indexPath.row];
 lblTemp1.text = cellValue;
 lblTemp2.text = @"Sub Value";
 [cellValue release];
}
return cell;
}
If you run this application now you will notice some obvious display issues, which we can resolve by specifying the height of the row. This is done in tableView:heightForRowAtIndexPath method. The code looks like this
//RootViewController.m
-(CGFloat)tableView:(UITableView *)tableView heightForRowAtIndexPath:(NSIndexPath *)indexPath {
return 60;
}
All the rows in the table view will have a height of 60. Run your app to see the changes.
Conclusion
In this tutorial we saw how easy it is to customize the table view cell. The same principle can be applied to customize the display by adding different controls to the content view. Instead of adding labels a progress bar can also be added. I hope this tutorial has helped you in some way.
Happy Programming,
iPhone SDK Articles
Attachments
Suggested Readings
- UITableView – Creating a simple table view
- UITableView – Sectioned table view
- UITableView – Searching table view
- UITableView – Creating a simple table view
- UITableView – Loading a detail view
- UITableView – Sectioned table view
- UITableView – Searching table view
- UITableView – Indexed table view
- UITableView – Adding subviews to a cell’s content view