
If you or a friend are planning a destination wedding, these invites would be great for giving guests a tropical taster in advance of the big day. This easy-to-create palm-leaf design blends modern styling with traditional typography for a fresh feel. In this tutorial suitable for beginners, we’ll be using Adobe InDesign to put the layout together and dipping into Adobe Illustrator to edit graphics.
Still searching for your perfect invitation design? You can find a selection of stylish, easy-to-edit wedding invite templates over on GraphicRiver.
Get ready to whisk yourself away to a beachside wedding…
1. What You’ll Need to Create Your Invites
First up, a note on sizing. We’ll be setting up the invite to a standard US invite size, 5.5 in x 7.5 in. This will fit into a standard-size envelope, so you can have fun with picking envelope styles and colors to complement your tropical invite.
You’ll also need access to Adobe InDesign and Adobe Illustrator. Any version of the software will work just fine for this tutorial.
To create the design, you’ll need to download the following images and font files:
- Paper texture background (image no longer available, try this Texture Pack instead)
- Watercolor set of tropical plants
- Jacques Francois font
- Engravers MT Regular font
- Engravers Bold Face font (usually included on your Adobe system)
- Adobe Caslon Italic font (usually included on your Adobe system)
If you want to add in other tropical graphics to customize your invite further, try this vector for quirky pineapples and coconut trees.
Once you have everything downloaded, installed and ready to go, we can get started…
2. How to Set Up the Invite Template in InDesign
Step 1
Open up Adobe InDesign, and go to File > New > Document. In the New Document window that opens, set the Intent to Print and Number of Pages to 1, and deselect Facing Pages.
From the Page Size drop-down menu, click on Custom at the bottom. For the Name, type in Wedding Invite_5.5. in x 7.5 in. Set the Width to 5.5 in (139.7 mm) and Height to 190.5 mm (190.5 mm). Click Add and then OK to exit the window.

Set the Top and Bottom Margins to 26.5 mm, and the Left and Right Margins to 21.5 mm. Add a Bleed of 5 mm to all edges of the page. Then head up and click OK.

Step 2
Expand the Layers panel (Window > Layers) and Double-click on the Layer 1 name. Rename it Leaves and click OK.

3. How to Add a Tropical Border to Your Invite
Step 1
Open up the tropical leaves vector in Adobe Illustrator.
Isolate the palm leaf to the right side of the image and Edit > Copy it.

Return to your InDesign document and Edit > Paste the graphic onto the page. Scale while holding Shift, Rotate slightly and position over the bottom-left corner of the page as shown below.
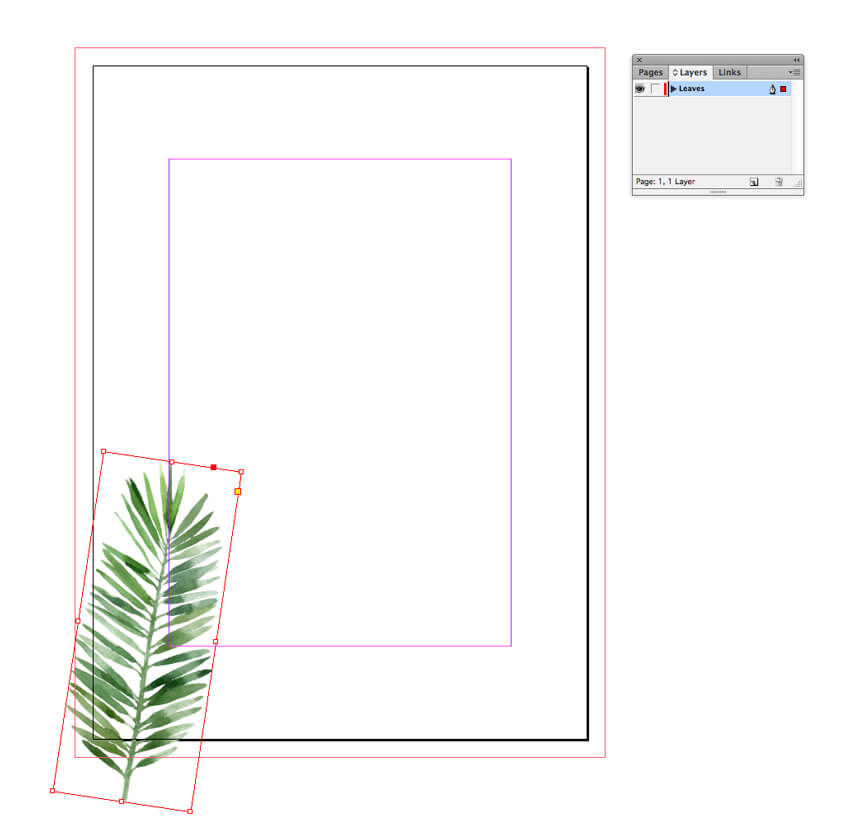
Step 2
Select the palm leaf image in InDesign and Edit > Copy, Edit > Paste repeatedly, creating more leaves. Move these around the perimeter of the page, varying the rotation and size to make a sort of dense, leafy border around the area marked out by the margin line.


You can eventually build up a dense canopy around the whole border of the page.

Step 3
Return to the Layers panel and click on the Create New Layer button at the bottom.
Name the new layer Frame, and click Add and then OK.

Take the Rectangle Frame Tool (F) and drag onto the page to create an image frame which matches the area defined by the margins of the page. Go to File > Place, choose your paper texture image (alternatively, you can use this Paper Texture Pack instead), and Open it. Allow the paper to fill the whole of the frame.

Step 4
Expand the Swatches panel (Window > Color > Swatches) and select New Color Swatch from the panel’s drop-down menu. Set the Type to Process and Mode to CMYK, and set the percentage levels to C=1 M=1 Y=2 K=0. Click Add and then OK.

Then take the Rectangle Tool (M) and drag onto the page, matching the proportions of the image frame below. From the Swatches panel, set the Fill to your new off-white swatch and Stroke to [None].

With the colored rectangle selected, go to Object on the top menu and choose Effects > Transparency. Set the Mode to Hard Light and reduce the Opacity to about 40%. If you want the effect to be lighter, bring the Opacity up a little.

Step 5
You can add an optional gold foil effect to your invite, which will bring a touch of luxury to the design. Skip ahead to Section 4 of the tutorial if you don’t want to add hot foil stamping to your design.
Create another New Layer, naming it Gold Foil. Take the Rectangle Tool (M) and drag onto the page, creating a shape to match the dimensions of the rectangles sitting below. Set the Fill to [None] and Stroke to 100% Cyan. You can adjust the Weight of the Stroke from the Stroke panel (Window > Stroke), making it thicker or thinner.

Then, with the rectangle selected, go to Window > Output > Attributes. Check the box that reads Overprint Stroke and then you can close the window.

When you come to export the invite artwork, this will ensure the cyan stroke is prepared for hot foil stamping. You should still make sure to talk to your printer about where you want the stamping to take place, as different print shops will have different setup requirements for foiling.
To demonstrate how the design will look with a foil, I’ll set the color of the stroke to a gold color, but you can keep yours set to the original cyan.

4. How to Create Beautiful Typography on Your Layout
Step 1
Create a New Layer and name it Typography. Ensure all the other layers sitting below are Locked.

Create a new CMYK Swatch, C=53 M=43 Y=42 K=66, which is a gentle off-black you can use for your typography.

Step 2
Create a text frame using the Type Tool (T) towards the top of the central rectangle. Type in: ‘You are cordially invited / to the wedding of’.
From either the Character Formatting Controls panel at the top of the workspace or the Character panel (Window > Type & Tables > Character), set the Font to Jacques Francois, Size 10 pt and Align Center. Increase the Tracking (space between all characters) to 70. Apply your new off-black swatch to the text too.

Step 3
Create a second, larger text frame and position it just above the center point of the page. Type in ‘&’ and set the Font to Jacques Francois, Size 118 pt, Align Center and your off-black color swatch.

Step 4
Set another text frame below the ampersand, and type in the date and time. Set the Font to Jacques Francois, Size 10 pt, as before.

Add a text frame below with the place and address set in Engravers Bold Face, Size 11 pt.

Finally, place a text frame below this stating ‘Reception to follow’, set in Adobe Caslon Italic, 9.5 pt.

Step 5
Curved type will look lovely circling your bold ampersand, and you can achieve this using InDesign’s handy Type on a Path Tool.
Firstly, select the Ellipse Tool (L) and create a circle around the ampersand. Set the Fill and Stroke Color of the circle to [None].
Expand the Type Tool menu in the Tools panel and select the Type on a Path Tool (Shift-T). Click once onto the perimeter of the circle to be able to add text to the path. Type in ‘Name One’ and set the Font to Engravers MT Regular, Size 13 pt. You can also flank the name with bullets selected from the Glyphs panel (Window > Type & Tables > Glyphs).

Step 6
Create another New Layer and name it Typography in Front, Locking the Typography layer below.

Use the Ellipse Tool (L) and Type on a Path Tool (Shift-T) to replicate the same curved text you created on the layer below. This time, once you’ve typed the text, look for a small single line crossing the path line. By grabbing this and dragging it upwards, you can flip the text onto the inside of the path. Type in ‘Name Two’ and replicate the same text formatting as for the first name.

5. How to Add a Final Tropical Touch to Your Invite
Step 1
Return to the Typography layer, Locking the Typography in Front layer. Select the ampersand in the center of the page and adjust the Font Color to [Paper].

Step 2
Create a New Layer, naming it Leaves in Front. Drag the layer down to reorder it, sitting it above the Gold Foil (or Frame) layer and below the Typography layer.
Return to your Illustrator palm leaf briefly, and Copy it. Head back to InDesign and Paste it in. Adjust the image frame so that only the top half of the palm leaf is visible, and position it behind the ampersand, as shown.

Copy and Paste the half-leaf image, Rotating each behind the ampersand to create a fan effect.

Keep pasting and rotating, until you have built up a dense fan of leaves behind the text.


Congratulations! Your invite artwork is complete, and it’s looking gorgeous.

Now all that’s left to do is to check you’ve definitely listed the right date (very important!) and Export your design as a print-ready PDF…
6. How to Export Your Wedding Invite for Print
Step 1
First, File > Save your InDesign artwork.
If you have included a Gold Foil layer in your artwork, it’s best if you export this foil layer as a separate PDF file. To do this, switch off the visibility of all the layers except Gold Foil, and go to File > Export. Choose [PDFX1a 2001] from the Preset menu at the top of the window, and click Export.
To export the remainder of your invitation, or if you have chosen not to include a gold foil layer, switch on the visibility of all layers (except the foil layer) and go into the File menu and choose Export.
In the Export Adobe PDF window that opens, choose Press Quality from the Preset menu at the top.

Step 2
Click on Marks and Bleeds in the window’s left-hand menu. From here, check All Printer’s Marks and Use Document Bleed Settings.
Then click Export to create your print-ready file.

You can send this PDF off straight to the printers. Your printer will be able to advise you on suitable choices for paper stock and coatings (e.g. matte or gloss), to help make your invites the very best they can be.
Conclusion
Your tropical wedding invite is finished, and ready to send straight off to print. Great work!

In this tutorial we’ve looked at a range of skills and techniques for creating high-quality invites for print in Adobe InDesign. You now know how to:
- Set up a simple invite template in InDesign.
- Create a quirky border for your design using pasted graphics.
- Craft elegant typography for your layout.
- Add extra effects like hot foil stamping to give your invites a luxurious touch.
- Export your InDesign artwork as a print-ready PDF.
If you’re still hunting for that dream invite design, you can find a selection of stylish, ready-to-print wedding invite templates over on GraphicRiver. Or check out our pick of the best wedding program templates:
-

20 Elegant Wedding Program Templates
With premium wedding program templates, you can achieve professional results right at home! Check out this collection of 20 elegant wedding programs to make…
If you’re interested in creating more of your own wedding stationery from scratch, take a look at these invite and save-the-date card tutorials:
-

How to Create a Rustic Wedding Invitation in Adobe InDesign
We’re celebrating all things love-themed this week, and with wedding season just around the corner, there’s no better time to create a gorgeous rustic-style… -

How to Create a Floral Wedding Invitation and Matching Envelope
If you’ve ever wanted to DIY your wedding invitations, this tutorial is for you! Here, we’ll be creating a two-sided wedding invitation with a rustic, floral…
{excerpt}
Read More