Custom fields in WordPress make it easy to customize your theme in a variety of ways; plus, they are simple to implement for posts and pages. Attachments, on the other hand, take a bit more work to implement, requiring you to read through and decipher core source code in order to make them work. We’ll be walking through the use of a couple undocumented WordPress hooks in this tutorial to make this process much easier.
Preface: About The Hooks
Both these hooks have been around since WordPress 2.5, and are applied in wp-admin/includes/media.php, but remain underused in the community most likely because they’re undocumented in the Codex. Below is where the hooks are applied in the core code, letting us know what will be passed to the functions we add to each hook.
attachment_fields_to_edit
function get_attachment_fields_to_edit($post, $errors = null) {
	// ...
	$form_fields = apply_filters("attachment_fields_to_edit", $form_fields, $post);
	// ...
}
- $form_fields is a special array which will be described in detail in a moment.
- $post is the attachment as an object (attachments are treated as post objects in WordPress).
attachment_fields_to_save
function media_upload_form_handler() {
	// ...
	$post = apply_filters("attachment_fields_to_save", $post, $attachment);
	// ...
}
- $post is the attachment as an array (attachments are treated as post objects in WordPress).
- $attachment is the attachment part of the form $_POST which will include the fields setup through the attachment_fields_to_edit hook.
Note: Be careful in your code, as $post is sent to one function as an object and to the other as an array.
Custom Field Naming Tips
The new fields being added will be saved as post meta, just like the custom fields section of the post/page edit screen. Fields prefixed with an underscore (_my_custom_field) will not be listed in the drop down of available custom fields on the post/page screen; all other existing post meta fields will be listed. We can use this knowledge to hide the fields we’re adding to the media form, since they aren’t relevant for posts/pages.
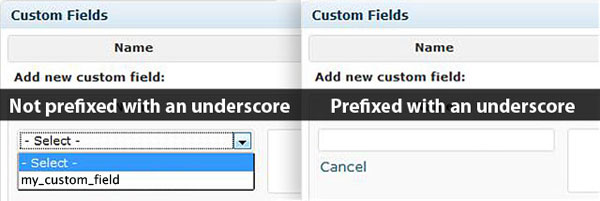
There is a similar rule to keep in mind when choosing the $form_fields array key to use for your new field. Here, if you use an underscore ($form_fields[‘_my_custom_field’]) your field will be skipped and will not be added to the form.
So in order to show our fields in the media form, but also not list them in the page/post custom fields drop down, we must combine both methods. This will invlove both the edit and save functions we’ll be creating. For the ‘attachment_fields_to_edit‘ hook we’ll set the $form_fields keys up to not have underscore prefixes, and for the ‘attachment_fields_to_save‘ hook we’ll prefix our fields with an underscore before saving them as post meta. This is a workaround worth doing in order to not muddy our users’ interface with unneeded info.
Hook 1: attachment_fields_to_edit
Below is an example of how to add your own custom fields to the attachment form.
/**
 * Adding our custom fields to the $form_fields array
 *
 * @param array $form_fields
 * @param object $post
 * @return array
 */
function my_image_attachment_fields_to_edit($form_fields, $post) {
	// $form_fields is a special array of fields to include in the attachment form
	// $post is the attachment record in the database
	//     $post->post_type == 'attachment'
	// (attachments are treated as posts in WordPress)

	// add our custom field to the $form_fields array
	// input type="text" name/id="attachments[$attachment->ID][custom1]"
	$form_fields["custom1"] = array(
		"label" => __("Custom Text Field"),
		"input" => "text", // this is default if "input" is omitted
		"value" => get_post_meta($post->ID, "_custom1", true)
	);
	// if you will be adding error messages for your field,
	// then in order to not overwrite them, as they are pre-attached
	// to this array, you would need to set the field up like this:
	$form_fields["custom1"]["label"] = __("Custom Text Field");
	$form_fields["custom1"]["input"] = "text";
	$form_fields["custom1"]["value"] = get_post_meta($post->ID, "_custom1", true);

	return $form_fields;
}
// attach our function to the correct hook
add_filter("attachment_fields_to_edit", "my_image_attachment_fields_to_edit", null, 2);
The $form_fields array has several options for including different types of inputs and custom content. I’ve compiled the various methods below with notes and screenshots of how they render in the form.
Text Input
// input type="text"
$form_fields["custom1"]["label"] = __("Custom Text Field");
$form_fields["custom1"]["input"] = "text"; // this is default if "input" is omitted
$form_fields["custom1"]["value"] = get_post_meta($post->ID, "_custom1", true);
Renders in the form as:

Textarea
// textarea
$form_fields["custom2"]["label"] = __("Custom Textarea");
$form_fields["custom2"]["input"] = "textarea";
$form_fields["custom2"]["value"] = get_post_meta($post->ID, "_custom2", true);
Renders in the form as:

Hidden Field
Hidden fields are compiled together and output at the end of the form.
// input type="hidden"
// no need for a label
$form_fields["custom3"]["input"] = "hidden";
$form_fields["custom3"]["value"] = get_post_meta($post->ID, "_custom3", true);
Other Field Types
If you need an input type other than ‘text’, ‘textarea’, or ‘hidden,’ then use ‘html’ which allows you to pass your own custom content to use for the input element of your choice. When you create your own input html, it’s important to set the ‘name’ attribute on the element correctly, in order for the field to be passed to our save function later. You want something like this: name = "attachments[$post->ID][my_custom_key]" .
$form_fields["custom4"]["label"] = __("Custom Select");
$form_fields["custom4"]["input"] = "html";
$form_fields["custom4"]["html"] = "
<select name='attachments[{$post->ID}][custom4]' id='attachments[{$post->ID}][custom4]'>
	<option value='1'>Option 1</option>
	<option value='2'>Option 2</option>
	<option value='3'>Option 3</option>
</select>";

// another example
$form_fields["custom5"]["label"] = __("Custom Checkbox");
$form_fields["custom5"]["input"] = "html";
$form_fields["custom5"]["html"] = "the html output goes here, like a checkbox:
<input type='checkbox' value='1'
	name='attachments[{$post->ID}][custom5]'
	id='attachments[{$post->ID}][custom5]' />";
Renders in the form as:

Special Attributes
There are several special attributes you can add to your custom fields to enhance them.
helps – This attribute adds a help string to your custom field.
$form_fields["custom6"]["label"] = __("Custom Field with Helpful Text");
$form_fields["custom6"]["value"] = get_post_meta($post->ID, "_custom6", true);
$form_fields["custom6"]["helps"] = "Put helpful text here.";
This renders in the form as:

required – This attribute will mark the field as required; but it is only a visual reference. We’ll have to write code later in the save function to enforce it.
$form_fields["custom7"]["label"] = __("Required Field");
$form_fields["custom7"]["value"] = get_post_meta($post->ID, "_custom7", true);
$form_fields["custom7"]["required"] = TRUE; // default is FALSE
Renders in the form as:

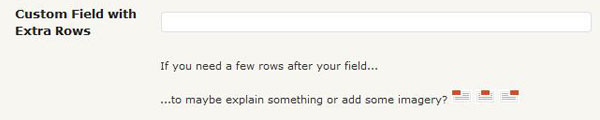
extra_rows – This attribute lets you add an array of rows right after your custom field. The markup for each array item is shown below: the array key will become the class of the td, and the value is the content:
// extra_rows markup:
// <tr>
//		<td></td>
//		<td class="{arrayItemKey}">{arrayItemValue}</td>
// </tr>
$form_fields["custom8"]["label"] = __("Custom Field with Extra Rows");
$form_fields["custom8"]["value"] = get_post_meta($post->ID, "_custom8", true);
// extra_rows must be an associative array $cssClass => $content
$form_fields["custom8"]["extra_rows"] = array(
	"cssClass1" => "If you need a few rows after your field...",
	"cssClass2" => "...to maybe explain something or add some imagery?
			<img src='".get_bloginfo("wpurl")."/wp-admin/images/align-left.png' />
			<img src='".get_bloginfo("wpurl")."/wp-admin/images/align-center.png' />
			<img src='".get_bloginfo("wpurl")."/wp-admin/images/align-right.png' />",
);
Renders in the form as:
tr – While extra_rows only lets you add table cells directly under your custom field’s input element, this attribute lets you create entire rows.
The table we’re adding a row to has two columns, so keep that in mind when using this method. And this doesn’t have to be a form field, you could just add a row that explains the next few fields, add all of your fields manually, or something else entirely.
$form_fields["custom8"]["tr"] = "
<tr id='MySpecialRow'>
	<td colspan='2' style='background:#000;color:#fff;'>
		Can do whatever you want, style it, add some fields, display a table of data...sky's the limit
	</td>
</tr>";
Renders in the form as:

Hook 2: attachment_fields_to_save
Saving your custom fields is a much simpler process than adding them to the form; just check if your field is set and update its value as post meta. Remeber to prefix your field with an underscore when saving to hide it on the post/page edit screen.
/**
 * @param array $post
 * @param array $attachment
 * @return array
 */
function my_image_attachment_fields_to_save($post, $attachment) {
	// $attachment part of the form $_POST ($_POST[attachments][postID])
	// $post attachments wp post array - will be saved after returned
	//     $post['post_type'] == 'attachment'
	if( isset($attachment['my_field']) ){
		// update_post_meta(postID, meta_key, meta_value);
		update_post_meta($post['ID'], '_my_field', $attachment['my_field']);
	}
	return $post;
}
You can also add errors here that will automatically be displayed below your field in the form. The $post['errors'] array gets merged with the $form_fields array before being sent through the attachment_fields_to_edit hook.
/**
 * @param array $post
 * @param array $attachment
 * @return array
 */
function my_image_attachment_fields_to_save($post, $attachment) {
	if( isset($attachment['my_field']) ){
		if( trim($attachment['my_field']) == '' ){
			// adding our custom error
			$post['errors']['my_field']['errors'][] = __('Error text here.');
		}else{
			update_post_meta($post['ID'], 'my_field', $attachment['my_field']);
		}
	}
	return $post;
}
Note Regarding Custom Errors: There are a couple long standing bugs in WordPress (as of version 3.0-RC3) that have to do with the display of custom errors.
- One will prevent your custom error messages from showing up on the single media edit page.
-
The other bug is in the modal popup for media items used on the post/page edit screen. The errors do display
here, it’s just the problem of initially seeing them. After saving you’re automatically switched to the
‘Gallery’ tab where there’s a minimized list of media items. If you click on ‘show’ to open your new item,
you’ll see your error messages in the form. The problem is that if there are errors, that items form is supposed to
be open by default. There’s a bug in the css where the class ‘startopen’ (which is present on the item if
there are errors to show) has the value of ‘display:none’ in a few places in the core stylesheets.
I have submitted patches for both of these issues (#13810 & #13838), and have been told they should be reviewed and included by version 3.1. So for now, don’t rely on your error messages too much, just be glad you know how to work with them for when they become more useful in the near future.
Other Ideas
You may want to include some of your fields on only audio attachments, or just images attached to the front page. To further customize your attachment forms, just wrap your special fields in distinguishing statements for both the edit and save functions.
// for audio files
if( substr($post->post_mime_type, 0, 5) == 'audio' ){
	// add your custom fields for audio files
}

// OR for images on a specific page

$page_id = 5; // set the id to whatever page you want these applied to
if( $post->post_parent == $page_id && substr($post->post_mime_type, 0, 5) == 'image' ){
	// add your image specific custom fields for this particular page
}
If you think of any clever ways to use custom fields with attachments, share it with us in the comments!