In this tutorial you will learn how to illustrate your own eBook Reader, using Rectangle, Pen and Offset Path. If you have Adobe Illustrator CS5, you can also learn the new features, the Perspective Grid Tool and Perspective Selection Tool.
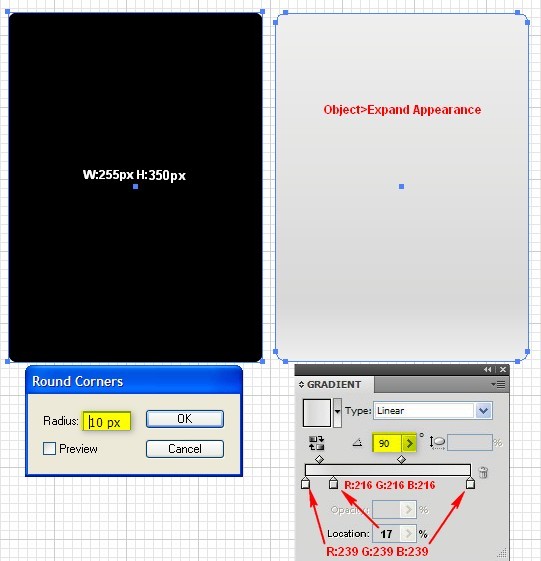
Step 1
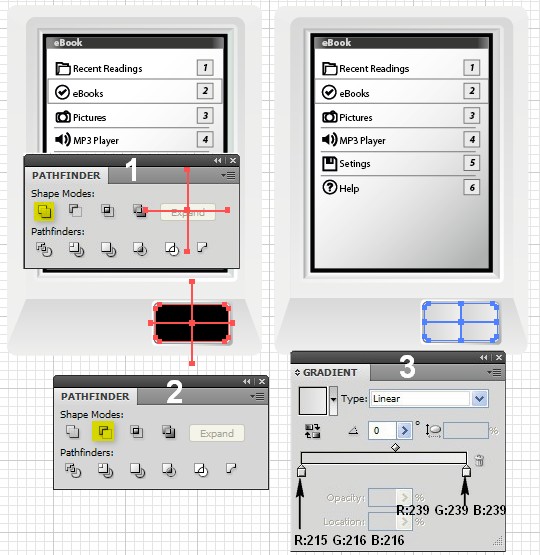
Create a 255px by 250px rectangle and round the corners by going to Effect > Stylize > Round Corners, Radius: 10px, click OK, then go to Object > Expand Appearance and fill the shape with a Linear Gradient. You need 3 Gradient Sliders, set the color from left to right R: 239 G: 239 B: 239, for the second one R: 216 G: 216 B: 216 with the Location set to: 17%, for the third gradient apply the same color you applied to the first gradient slider and set the Angle to: 90 degrees.
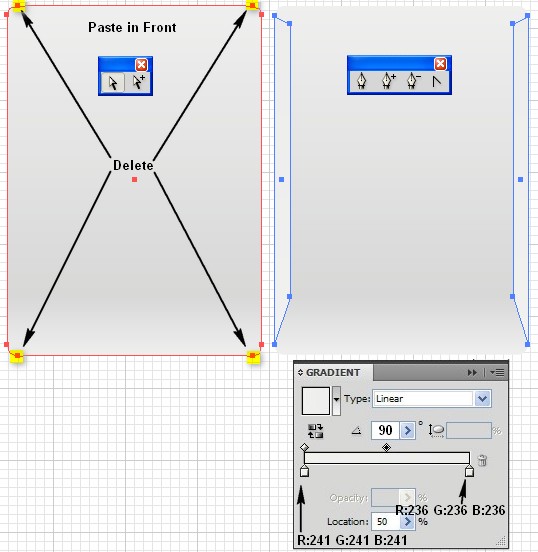
Step 2
Copy the shape from the previous step using Control + C followed by Control + F, and with the Direct Selection tool (A), delete the two bottom and two points. Then with the Pen tool (P) edit the shape from one side as shown in the picture below. Create the same shape on the other side, then fill the shapes with a Linear Gradient consisting of the colors R: 241 G: 241 B: 241 to R: 236 G: 236 B: 236, set the Angle to: 90 degrees.
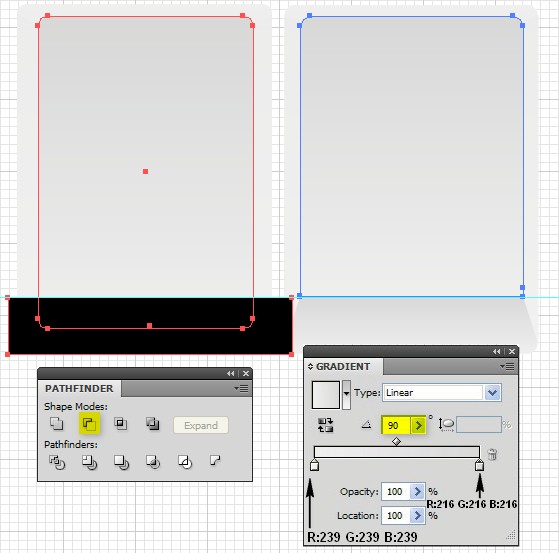
Step 3
Create another rectangle with 10px rounded corners, and move it into position as shown in the picture below. Create a rectangle to cover the bottom of the previous rectangle. Select both shapes, open the Pathfinder panel, click on the Minus Front button and fill the shape with a Linear Gradient made from the following colors R: 239 G: 239 B: 239 to R: 216 G: 216 B: 216, Angle: 90 degrees.
Step 4
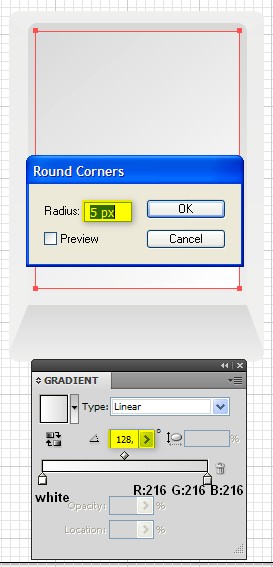
Create a a rectangle with 5px rounded corners and move it into position as shown in the picture below. Fill the rectangle with a Linear Gradient made from white to R: 216 G: 216 B: 216, Angle: 128
Step 5
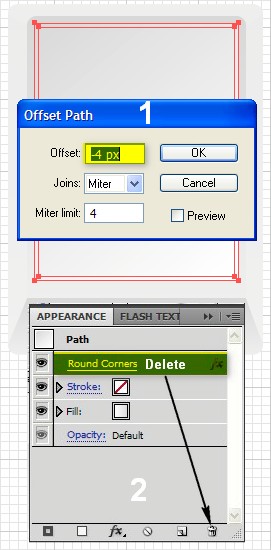
With the previous shape still selected, go to Object > Path > Offset Path, set the offset to: -4px, click OK, open the Appearance panel and delete the layer with the Round Corners effect.
Step 6
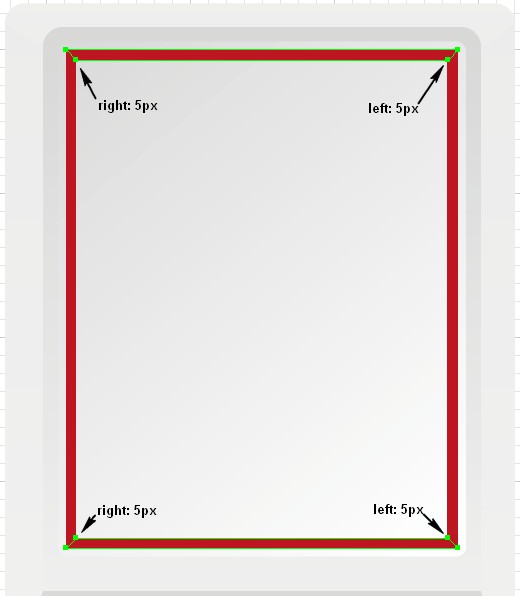
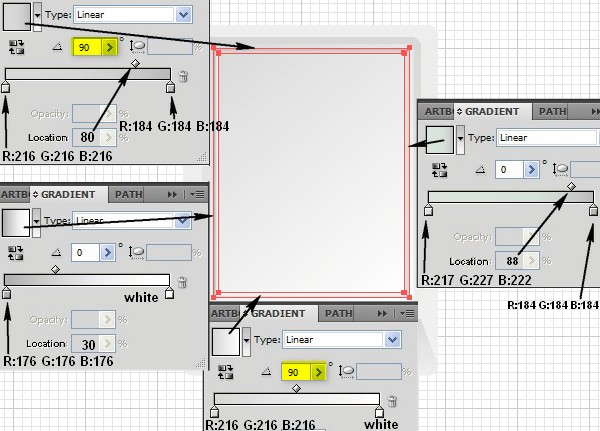
With the Direct Selection tool (A), create shapes from with the copy from the previous step (as shown in the picture below) and fill the shapes separately with a Linear Gradient as shown in the second example below.
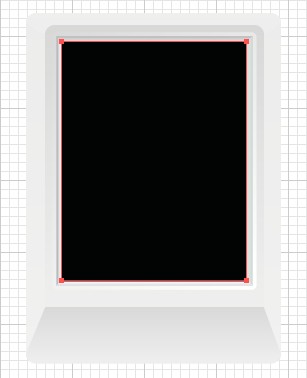
Step 7
Create a black rectangle like the one shown in the example below.
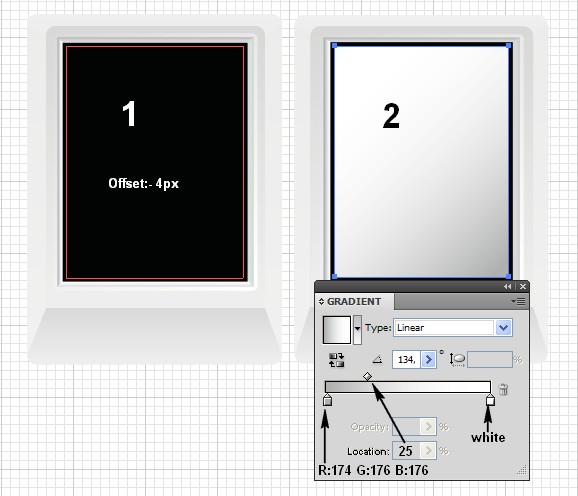
Step 8
With the rectangle from the previous step still selected, go to Object > Path > Offset Path, set Offset: -4px, click OK and fill the new shape with a Linear Gradient made from the following colors R: 174 G: 176 B: 176 to white, Angle: 134 degrees.
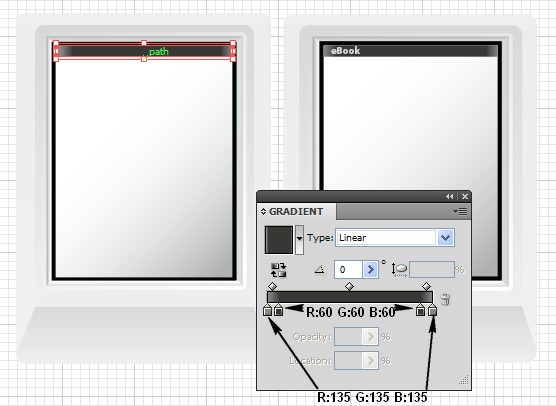
Step 9
Copy the rectangle from the previous step using Control + C followed by Control + F, reduce the copy’s size with the Selection tool (V) by clicking the bottom middle point and sliding it upwards, fill with Linear Gradients as shown in the example and add the necessary text.
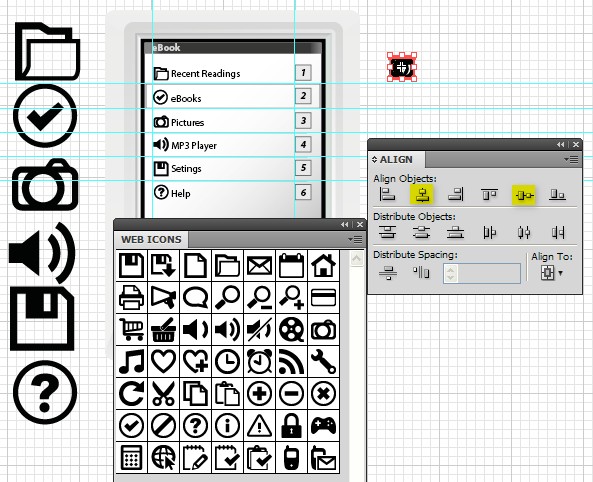
Step 10
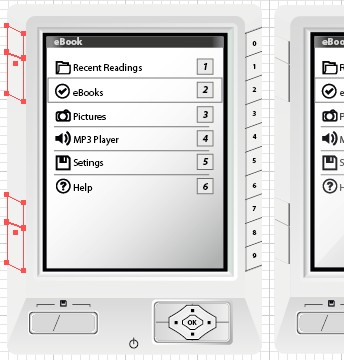
Add the necessary icons by going to Windows > Symbol > Web Icons. Drag the icons from the panel to the work area, then select all the icons, open the Align panel, click on Horizontal Align Center and Vertical Align Center, then using the Selection tool (V) reduce the size. This way you’ll re-size all icons uniformly, after that put them into position as shown in the picture below. You can also add some text or other signs and symbols.
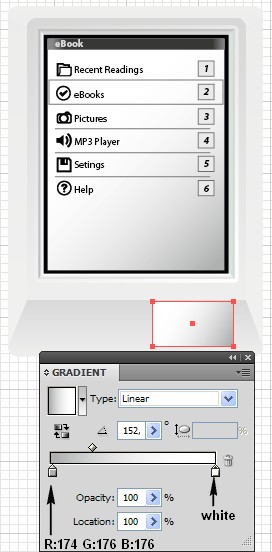
Step 11
Create a 80px by 45px rectangle with 4px rounded corners, as shown in the example below, and fill it with a Linear Gradient made from the following colors R: 174 G: 176 B: 176 to white, Angle: 150 degrees.
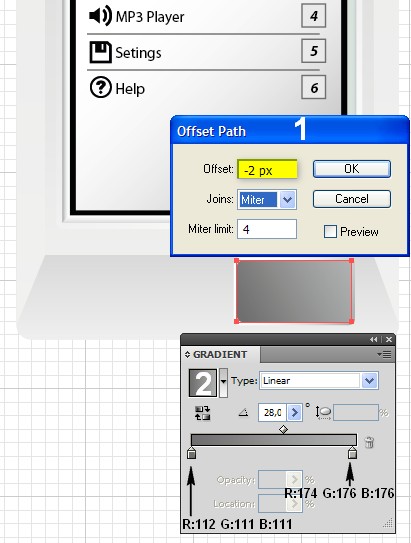
Step 12
With the shape from the previous step still selected, go to Object > Path > Offset Path, set Offset: -2px, click OK and change the gradient to have the colors R: 112 G: 111 B: 111 to R: 174 G: 176 B: 176, Angle: 28.
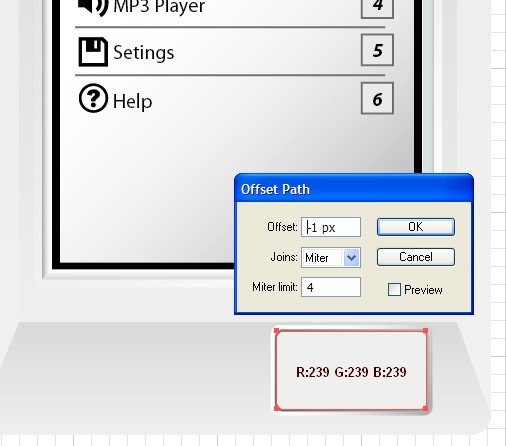
Step 13
With the previous Offset shape selected, go to Object > Path > Offset Path, set Offset: -1px, fill the new shape with R: 239 G: 239 B: 239.
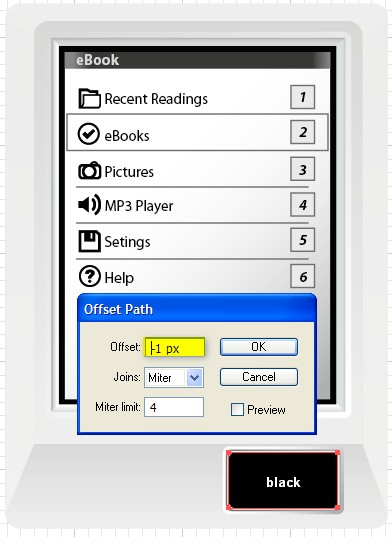
Step 14
With the offset shape still selected, go to Object > Path > Offset Path, set the Offset to: -1px, click OK and fill it with black.
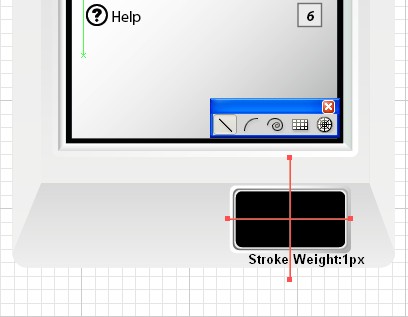
Step 15
Copy the black rectangle using Control + C followed by Control + F, go to Object > Expand Appearance, then pick the Line Segment tool (Backslash) and draw two1px lines in the center of the shape, as shown in the example below.
Step 16
With the lines still selected, go to Object > Expand, then open the Pathfinder panel and click on the Unite button. Select the black rectangle from the previous step and the shape you just created, click on the Minus Front button from the Pathfinder pallet. Fill the new shapes with a Linear Gradient made from the following colors R: 215 G: 216 B: 216 to R: 239 G: 239 B: 239.
Step 17
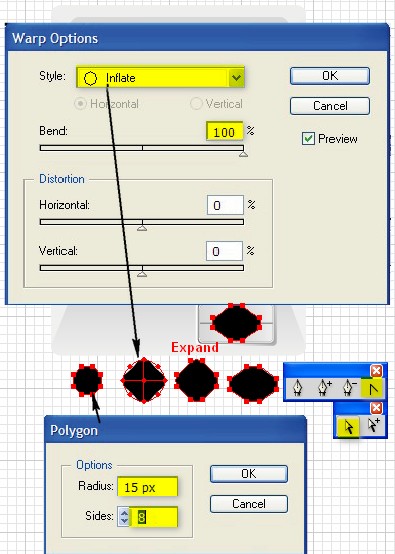
Create a black polygon with the Polygon tool by clicking somewhere in the work area. A new window will open, enter the following settings: Radius: 15px, Sides: 8, click OK, then go to Object > Envelope Distort > Make With Warp, enter the following settings: Style: Inflate, bend: 100%, click OK. Go to Object > Expand, then correct the points with the Direct Selection tool and the Convert Anchor Point tool and position the shape in the center of the shapes from the previous step. Have a look at the picture below for reference.
Step 18
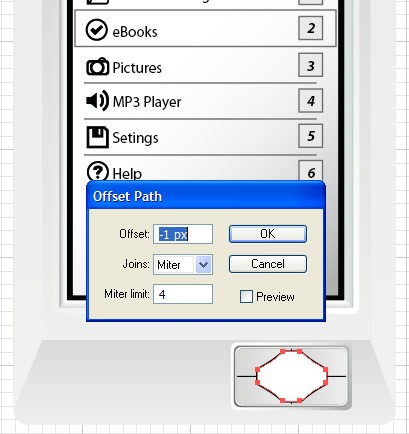
With the shape from the previous step selected, go to Object > Path > Offset Path, set Offset: -1px, click OK and change the color to white.
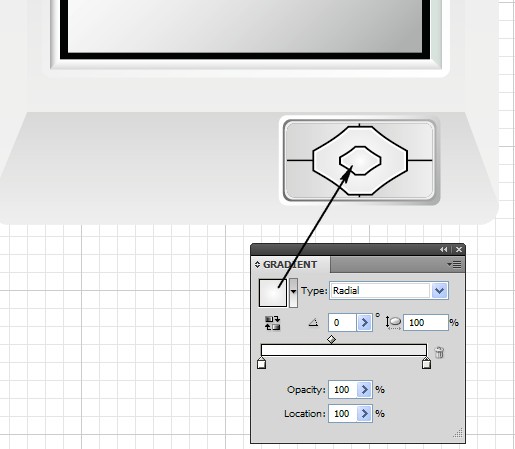
Step 19
Go to Object > Path > Offset Path, set Offset: -1px, click OK and fill the new shape with the Radial Gradient shown in the example below.
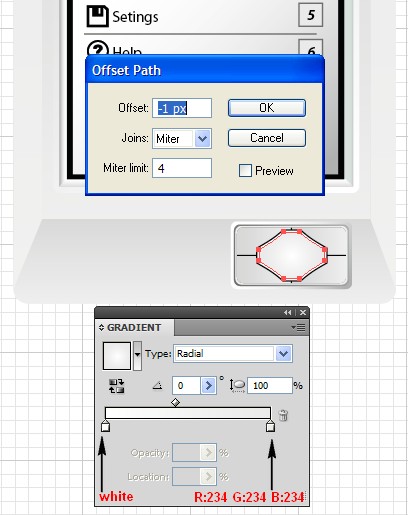
Step 20
Using Control + C followed by Control + F, copy the shape from the previous step. Reduce the copy’s size with the Selection Tool, by clicking on one of the corner points and holding the Shift + Alt keys while you drag the corner inwards, after that change the color to black.
Step 21
With the shape still selected, go to Object > Path > Offset Path, set Offset: -1px, click OK, change the color to white. After that go to Object > Path > Offset Path, set Offset: -1px and fill with the shape with a Radial Gradient with colors from white to R: 234 G: 234 B: 234
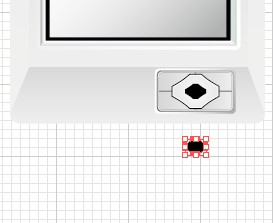
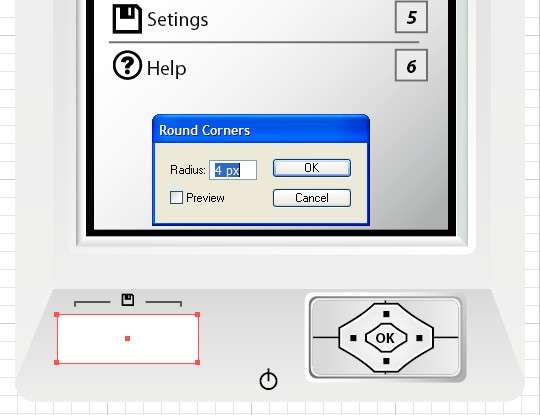
Step 22
Create a white rectangle with 4px rounded corners, and position it as shown in the picture below.
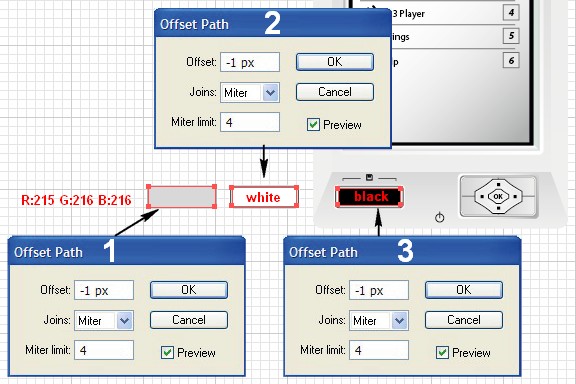
Step 23
With the shape still selected, go to Object > Path > Offset Path, set Offset: -1px, click OK and change the color to R: 87 G: 87 B: 86.
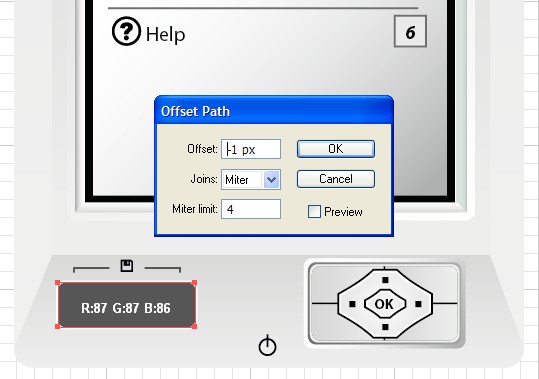
Step 24
With the offset shape still selected, go to Object > Path > Offset Path, set Offset: -1px, click OK. Change the color to R: 215 G: 216 B: 216. Repeat the same action two more times, for the first one apply white and for the second one black.
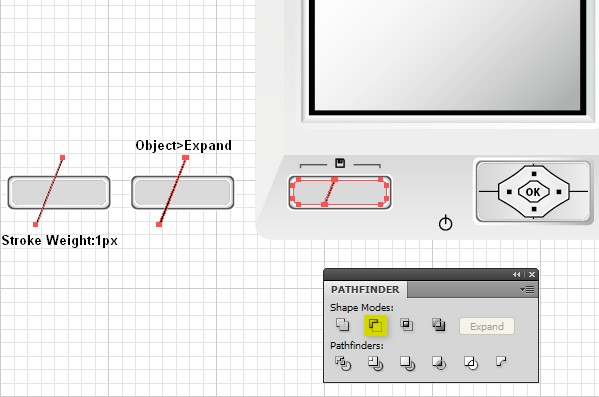
Step 25
Copy the last shape you filled with black using Control + C followed by Control + F, and with the Pen tool (P) draw a 1px line over the copy, after that go to Object > Expand. Select the copy and the shape you created earlier, open the Pathfinder panel, click on the Minus Front button and fill both shapes that appeared with the color R: 217 G: 217 B: 217.
Step 26
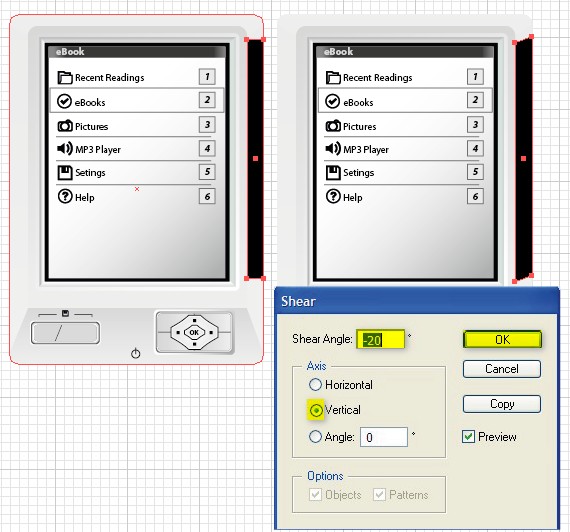
Create a black rectangle on the right side of the eBook (as shown in the picture below) and go to Object > Transform > Shear, enter the following settings: Angle: -20px, Axis: Vertical and click OK.
Step 27
Using Control + C followed by Control + F, copy the shape you created in the previous step. Fill the shape with a Linear Gradient as shown in the picture below.
Step 28
Draw a 1px line in the top part of the shape from the previous step, copy the line using Control + C followed by Control + F and move it to the bottom part of the shape. Use the picture below as a reference.
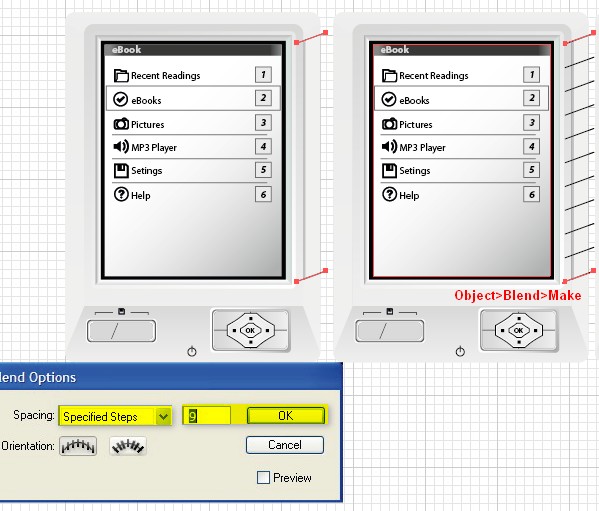
Step 29
Select both lines from the previous step and go to Object > Blend > Blend Options, enter the following settings: Spacing: Specified Steps: 9, click OK and straight after that go to Object > Blend > Make.
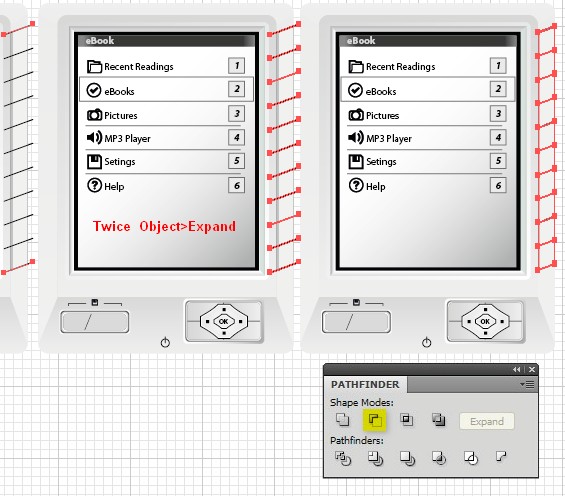
Step 30
With the new shapes still selected, go to Object > Expand. Select the shape from Step 27 (the one you filled with Linear Gradient) and the diagonal lines you created earlier, open the Pathfinder panel and click on the Minus Front button.
Step 31
Using the same technique, add the buttons on the other side of the eBook.
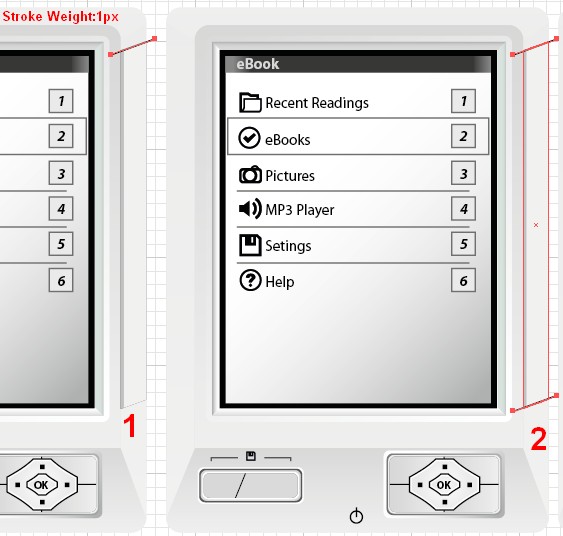
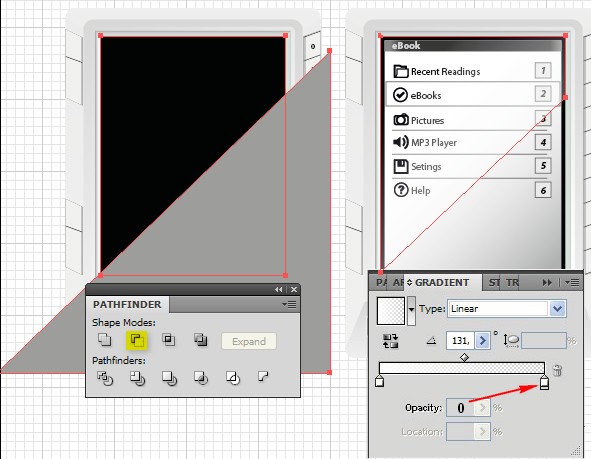
Step 32
Select the black shape from Step 7 and copy it using Control + C followed by Control + F, move the copy above all others by going to Object > Arrange > Bring To Front. Above the last shape, create a right angle triangle using the Pen tool (P), then select both shapes, open the Pathfinder panel, click on the Minus Front button. Fill the shape with a Linear Gradient from white 100% to white 0%.
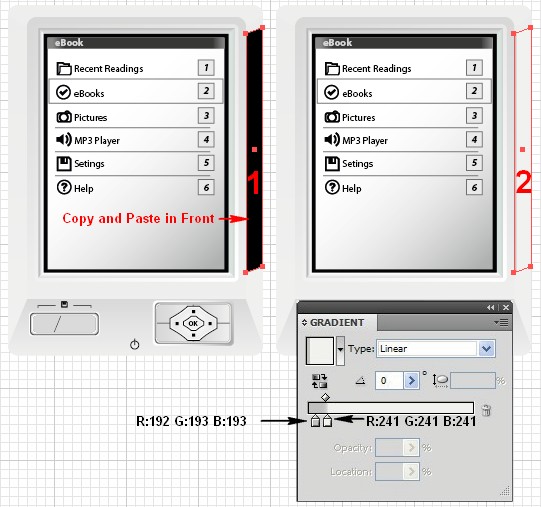
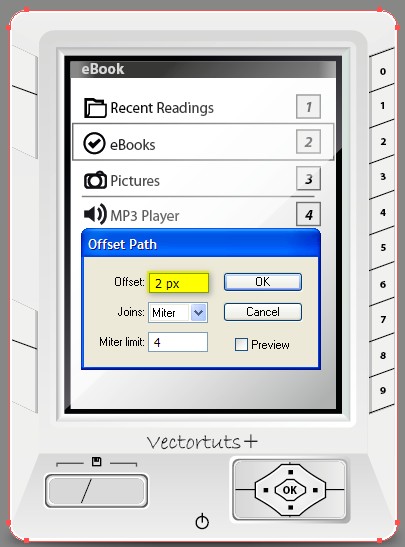
Step 33
Select the shape you created in Step 1 and go to Object > Path > Offset Path, set Offset: 2px, click OK, change the color to white.
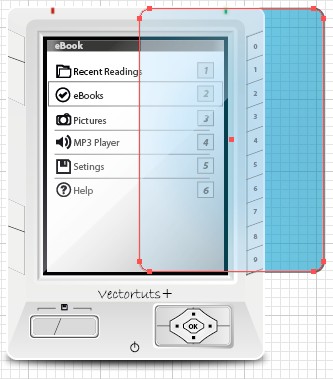
Step 34
Above all of the shapes, create a rectangle with 10px rounded corners, fill the rectangle with a Linear Gradient (you can use your favorite colors for this, I’ve used blue), finally apply a 2px black Stroke. Open the Transparency panel, change the Blending mode from Normal to Lighten and reduce the Opacity to 25, then duplicate the shape twice, change the colors and the Blending mode and move the shape into position as shown in the picture below.
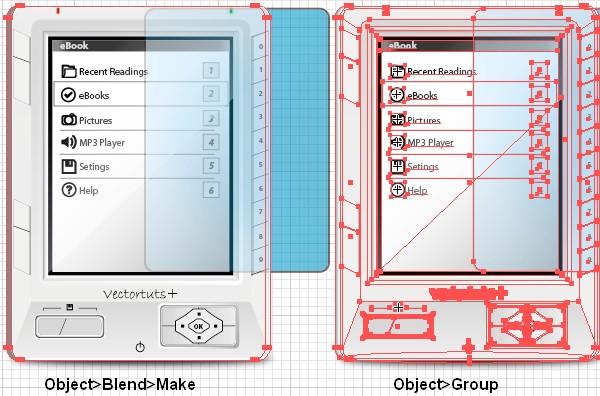
Step 35
Now we are going to create a more realistic illustration by using perspective. To do this, copy the objects from Step 33 (which is under all others) using Control + C followed by Control + B, move the copy a few pixels to the left, change the color to grey and go to Object > Blend > Make. This is for the perspective from left to right. If you are going to apply perspective from right to left you will have to do the same but on the other side of the eBook. Select everything on the artboard and group them by going to Object > Group (Control + G).
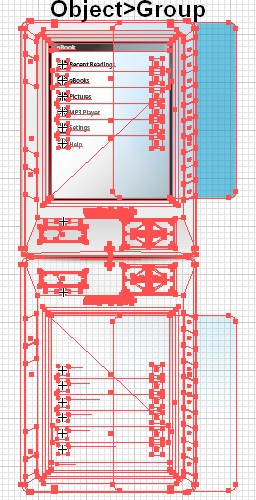
Step 36
Copy the group using Control + C followed by Control + F, flip it vertical, create a rectangle over the copy as shown in the picture below and fill it with a white to black Linear Gradient. Select the copy you flipped vertical and the rectangle you filled with Linear Gradient, open the Transparency panel, in the top right corner you’ll see a triangle. Click on it and from the drop down menu select Make Opacity Mask and reduce the Opacity to 35%.

Step 37
Select the eBook and the reflection and group them by going to Object > Group (Control + G).
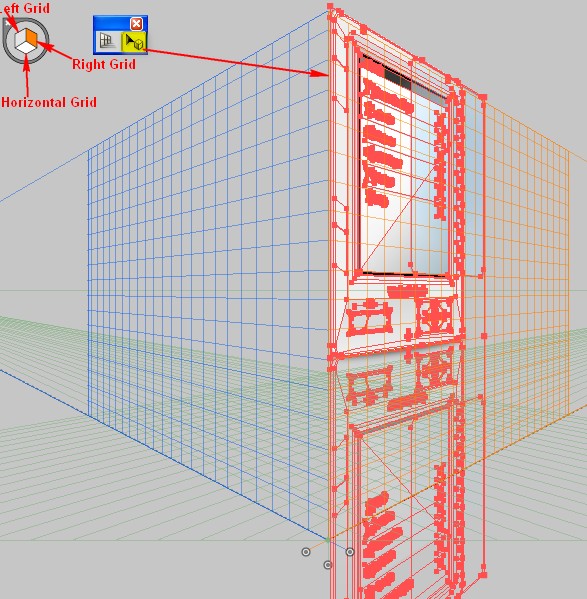
Step 38
Now it’s time to use Perspective Grid Tool and Perspective Selection Tool. Copy the group if you are going to apply perspective, send it to another layer and lock and hide it. Select the Perspective Grid tool (Shift + P), you will see what perspective will appear when you slide the object, now pick the Perspective Selection tool (Shift + V), if you are going to apply perspective from right to left you need to click on Left Grid. In this case we’ll apply perspective from left to right so click on Right Grid. Click once on the object to select it and slide it as shown in the picture below.
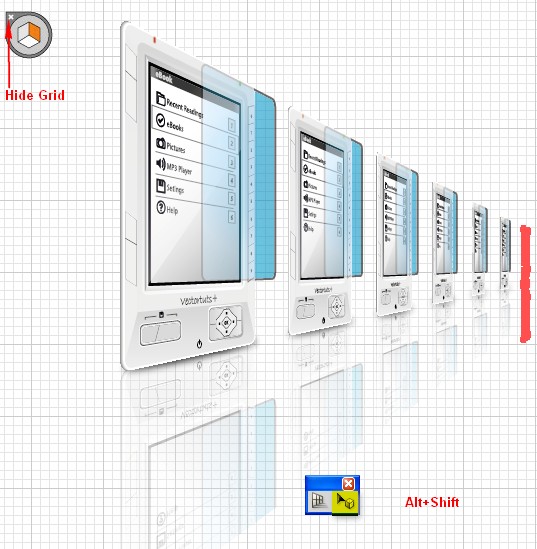
Step 39
Now you can turn off the net that is visible by clicking on Hide Grid. Using the Perspective Selection tool (Shift + V) you can copy into the perspective as many times as you want by clicking on the object, hold down the Alt + Shift keys and slide the object. You’ll notice that the perspective is being applied with the object’s sliding and with this we are finished.
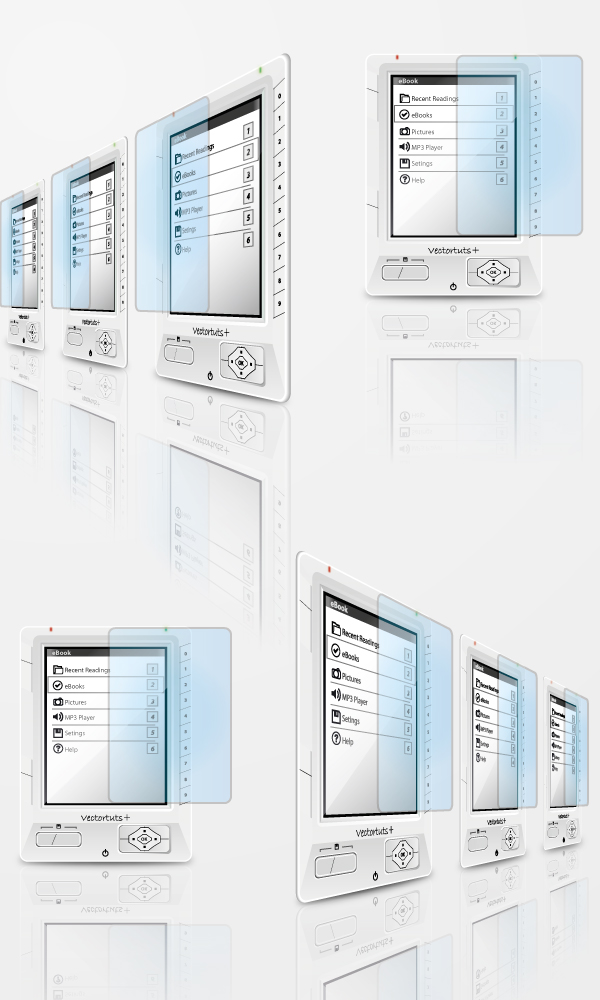
Conclusion
Here is the final image: