
This tutorial was originally published in March 2012 as a Tuts+ Premium
tutorial. It is now available free to view. Although this tutorial does
not use the latest version of Adobe Photoshop, its techniques and
process are still relevant.
In this tutorial we will explain how to create “awesome” 3D-style typography using illustrative techniques in Photoshop. This tutorial does not utilize any 3D apps or tools and relies heavily on a good sketch, as well as your ability to apply proper light and shadow.
Want a faster solution? Browse the amazing selection of Photoshop Layer Styles on GraphicRiver to create amazing text effects in half the time! Or enlist the help of a design professional from Envato Studio for all your custom typography needs.
Tutorial Assets
The following assets were used during the production of this tutorial:
1. How to Set Up Your Document
Step 1
Before we begin, let’s talk a bit about perspective. Take a look at the image below. As you can see, some of the objects are visible, and some are hidden depending on the viewer’s point of view.
In the first case (side view), only the parts in red are visible. The same applies to the second case (top view). In the third case, there’s a mix of the first and second case—the farther we are away, the more perspective there is. In this case, the sides are highlighted in blue.

Step 2
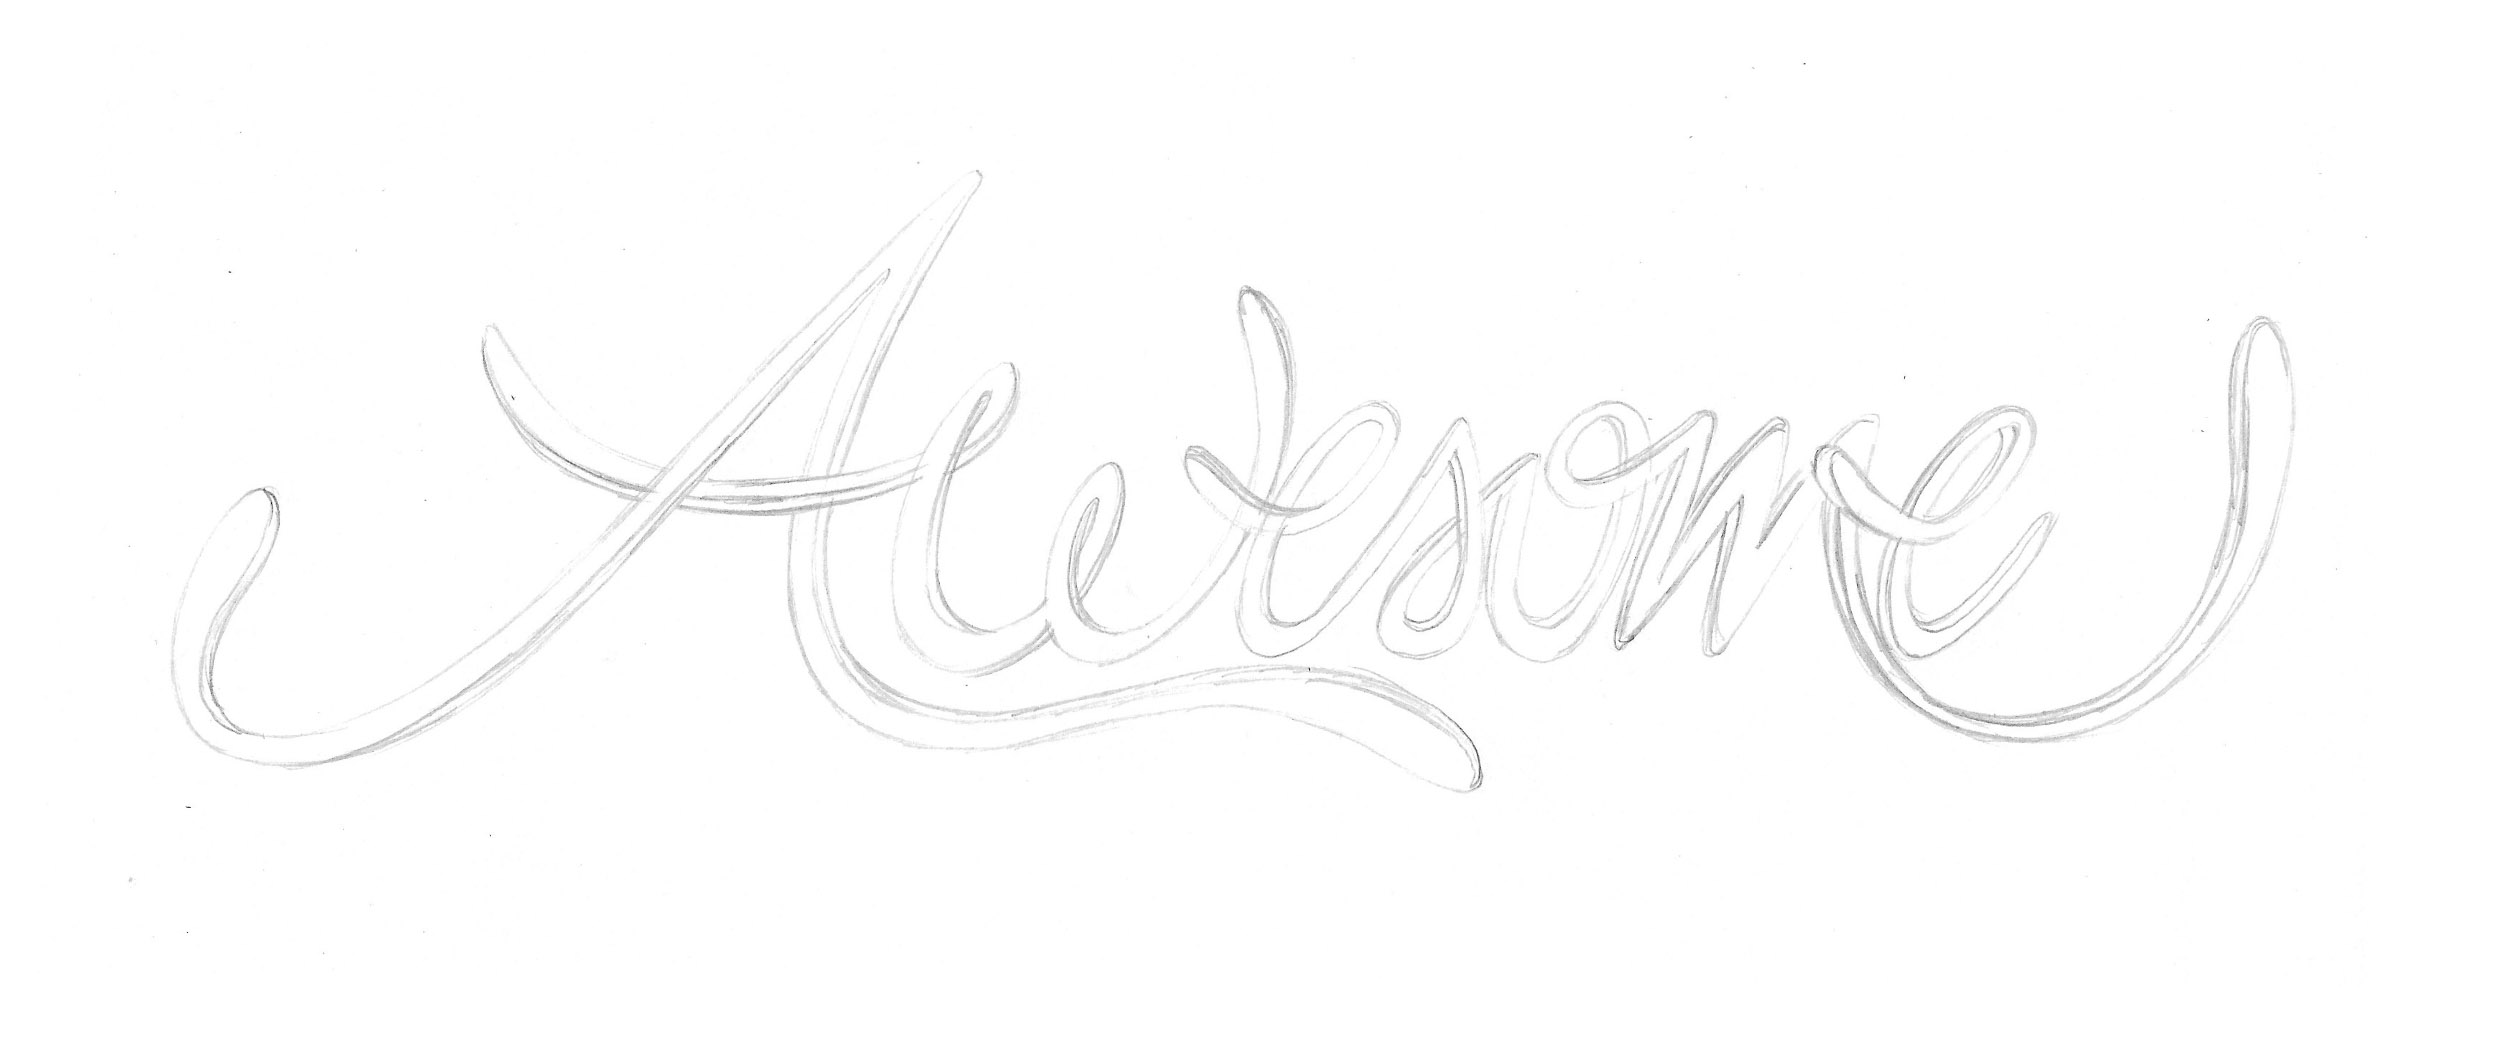
Download the original sketch to use as the base of this illustration.
Step 3
In Photoshop, create a New Document with 2500 x 1050 pixels (RGB, 72 dpi).

Step 4
Import the sketch within this file and create four folders:
- Background
- Shadows
- Letters
- Shine

2. How to Create the Letters
Step 1
Using the Pen Tool, start to draw the letters (inside the folder “3: letters”), following the same path of the sketch. Use #978958 to fill the letters with this color. Do the same on all letters. Each letter should be on a separate layer inside the folder “3: Letters”.

Step 2
After drawing all the letters, it will look like the image below:

Step 3
Now let’s make the paths to create depth. Refer to the first step where I explained the differences in perspective. To give a sense of depth, just follow along the paths from the sketch. Many times we can correct the paths of the sketch when we are drawing in Photoshop by making more rounded curves. Use the color #554c2f.

Step 4
Sometimes you’ll see that some parts are overlapping other parts. See the example below, the letter “A” where the two legs are going over.

Step 5
To make one of the lines pass underneath, we do not need to change the position of the layer; instead, we need to make a folder called Mask to hide the piece of the line that overlaps the other object. To do this, group both layers of the object that are overlapping the line (crossbar) of the “A” as seen in the image below.

Step 6
Upon completing those steps, we will now create a Layer Mask on this folder. Click on the ‘group’ layer and then, on the bottom Layers panel, click on the Icon that is shown in step 1 (see below). The result is a white rectangle on the right side of the folder which is called a layer mask (step 2).

Step 7
The next step is to draw an object exactly on the paths of the line on letter “A”, as seen in the image below.

Step 8
After that, in the Layers panel, click Command to make a Selection. Now click on the folder with the Layer Mask (click exactly on the white rectangle). Keep the Foreground Color as white #ffffff, and with the Layer Mask selected, now press Delete.

Step 9
You will see that one of the lines from the crossbar of the “A” now passes above, and the other line goes below. Don’t forget to Delete the temporary layer that was created to create the mask. Do the same on all letters that are overlapping.

After all overlapping paths have been masked, the image should look like this (image below). Take note on the perspective, it is the same principle from the example sketch that I explained in Step 1.

3. How to Create Shadows
Step 1
In the next step, we will make shadows on the darker parts to create more volume. To do this, click on the path layer holding Command in the grey box on the layer path, as shown in the image below. This will make a Selection on the path.

Step 2
While keeping the Selection Active, create a Group and create a Mask using the Mask icon at the bottom of the Layers panel (figure 1), and then create a New Layer inside that folder. Set the New Layer to multiply (figure 2).

Step 3
Now select the Brush Tool using the settings below with the Opacity set to 15%.

Step 4
Now pass the brush slowly over the ends, where light does not reach. These areas are usually below the letters or at the junctions.

Step 5
Now let’s change the background to Black. Create a New Layer inside the background layer as shown below. Select Solid Color and choose #000000.

Now the letters have more contrast with the background.

Step 6
Repeat the same procedure on all the dark parts (depth paths). See the red arrows below—each of them shows where you must shade. Remember to always create a New Group, apply the mask, and then create a New Layer and use it as Multiply.

Step 7
After repeating steps 15 and 16 on all the dark paths, the image should be as seen below. See the red circles.

4. How to Create a Border
Step 1
Now we will create a border effect on the letters. Select the Pen Tool and, holding Command, click on the path of the letter “A”. Now go to the layer panel and again, holding Command, click within the grey part on the layer of the path. You will make a Selection on this path, as seen in the image below.

Step 2
After making the Selection, on the top menu, go to Select > Modify > Contract.

Step 3
Contract by 3 pixels and click OK.

Step 4
While keeping the selection, go to the bottom of the Layers panel, click on the icon (see image below), and select Solid Color, using #ccbd88 as your color.

Step 5
After the previous step, Double-click on the layer to open Blending Options. Select Inner Shadow and use 120° for the angle, Opacity 30%, Distance 5, Size 15, and click OK.

5. How to Brighten the Edges
Step 1
Now we will create a Group Mask to brighten the edges of the letters. With Command, click on the lightest part of the letter. Then, on the Layers panel, click on Group to create one folder above the layer.

Step 2
With the group layer previously selected, click on the Mask icon on the bottom (see image below) to add a mask to this folder. All objects within this folder will be inside the mask.

Step 3
Create two layers inside this folder. One will be used for brightness, the other for the shadows. You must know that the light usually comes from up to down. Now you know this, select the brush tool and with the white color and 30% Opacity, carefully paint the ends, as shown in the image below. The same must be made to shadows on the “shadow layer”, but using the #000000 (black), with 30% Opacity.

You should to do the same procedure to all the ends of all letters. The image should look like this:

6. How to Add More Shadows
Step 1
The next step is to separate the letters using the shadow between them. But instead of deleting, you will create a Group and add a Mask using the Selection.

Step 2
Now, inside this folder with the mask, create a New Layer as Multiply. Using the Brush Tool with the color #000000 (black) and 20% Opacity, carefully paint underneath the line (crossbar) of the “A” that is on the first plane.

Repeat the same procedure to all letters. See the image below, where you should make the shadows.

7. How to Create the Background
Step 1
Change the Background Color that was #000000 (black) before to #192607.

Step 2
Open Adobe Illustrator and create a New Document at 2500 x 1050 px. Using the Rectangle Tool (see image below), make a rectangle with the color #192607.

Step 3
Create a Diagonal Line (stroke weight:1) with the color #C4B488 and Duplicate this line until it covers the entire green rectangle. Next, Select All lines and Duplicate, then Reflect (Horizontally). It will look like a grid.

Step 4
Now, create smaller circles on the intersections and bigger circles on the middle of the line’s junctions. Use the color #C4B488.

Step 5
Select the grid and the circles and Group them without the green rectangle on the background.

8. How to Add the Final Details
Step 1
Copy the vectors from Illustrator, and Paste them in Photoshop inside the folder “1: Background” as shown below.

Step 2
Rename the layer to “Grid”, Duplicate it, and on the layer below, apply “gaussian blur” using 7, 8 as the Radius.

Step 3
Apply a Mask on this layer that has the “Gaussian blur”, and using Radial Gradient, click on the top center of the image and drag to the right corner, as shown in the image below. It is important that the color #000000 (black) is the main color. You will notice that only the sides are now blurred, leaving the center sharper.

Step 4
Create a New Layer and use it as a Multiply layer. With the tool Radial Gradient and (Reverse) selected, drag from the center to the right, as shown in the image below. This will hide the blurry part in the center of the image.

Step 5
Using the Ellipse Tool with #ffffff (white), make an ellipse on the top/center of the image. See the position below:

Step 6
Select the ellipse and go to the top menu Filter > Blur > Gaussian Blur, and use 200 for the Radius.

Step 7
Set this layer to Overlay.

Step 8
Duplicate the folder “3: Letters”.

Step 9
After, Flatten the image as shown in the image below:

Step 10
Double-click on the layer (which has been flattened) to open Blending Options.

Step 11
Select Color Overlay on the left side, and use #000000 (black).

Step 12
Rename it to “shadow1” and drag it to the folder “2: shadows”. The layer should be somewhat further down from the text, as shown in the image below:

Step 13
On the layer “shadow1”, go to the top menu Filter > Blur > Gaussian blur and use 4.0 as the Radius.

After that, Duplicate this layer.

Step 14
On the layer “shadow2”, go to the top menu Filter > Blur > Gaussian blur and use 40 as the Radius.

Step 15
Repeat these steps, and drag to the folder “4: shine”.

Step 16
Create a New Group and apply a Layer Mask. Hide the layer below. Create a New Layer inside the folder you created.

Step 17
Create a New Layer inside this folder, and use it as Overlay. Select the Brush Tool with color #ffffff (white), 15% Opacity, and carefully paint the top letters until these letters become clearer.

Final Image
Here is the final image below!

Creative Text Effect Actions From GraphicRiver
Short on time? You can still achieve stunning text effects in half the time just by using one of our incredible Text Effect Actions available through GraphicRiver. Use these actions to create mind-blowing effects, and check out one of our favorites below!
3D Cinematic Text Actions
Generate exciting cinematic text effects with this wicked Photoshop action. This pack comes complete with five different actions and six directions you can choose from for the 3D effect. Customize these effects easily with simple-to-use files and organized layers.

{excerpt}
Read More