Augmented Reality has been cropping up a lot lately, especially Flash-based AR. I will guide you through how to create some simple yet neat effects that you can put on your own website.
Introduction: Augmented Reality
Augmented Reality has been judged as one of 2010’s hottest trends. The concept behind it is pretty simple, over lay the physical world with cool graphics that appear to occupy the same space as you.
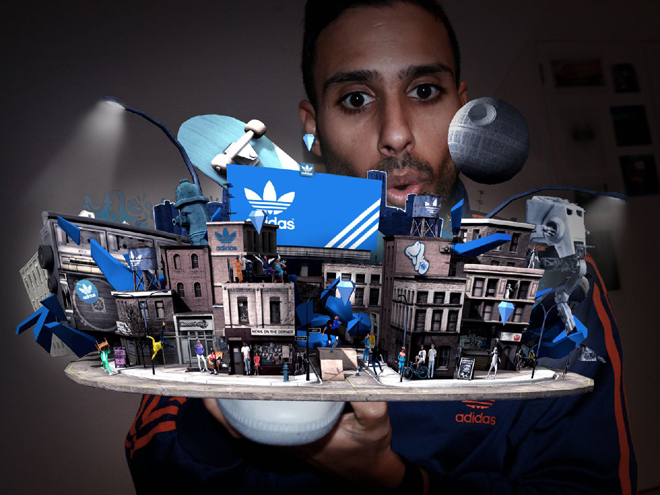
Lots of companies have used it as a great promotional tool. Adidas have recently put them on their shoes and made a very cool looking game.
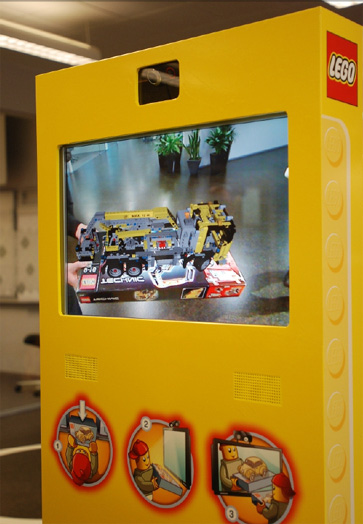
Lego use it as a way to visualize what their products will look like when you’ve finished building them.
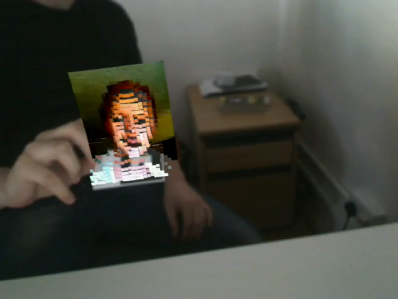
Some freelancers use it as a very cool business card and promotional tool. AR allows you to create a more impressive business card at no cost at all and you can fit way more info on it.
In January of this year, I completed a project for university where I created a wearable augmented reality system. It featured a virtual gallery which, as you walked around, told a very tragic story.
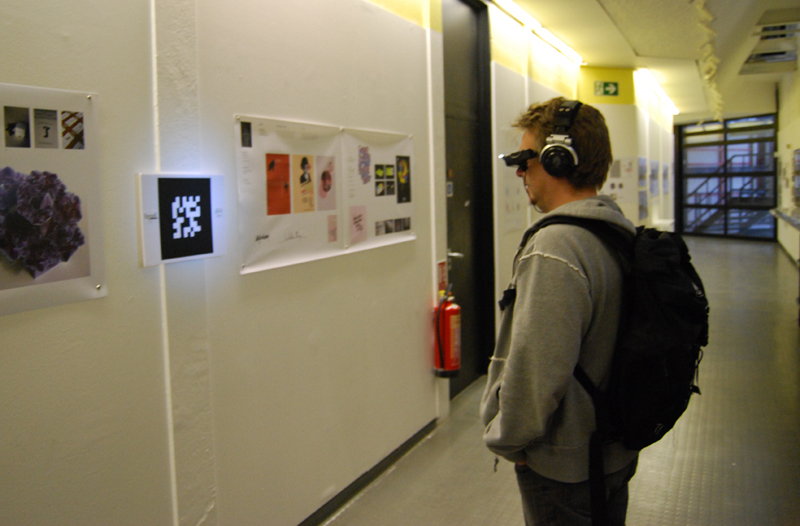
Check out the video on Youtube.
I approached creating AR from a design point of view, knowing very little about coding in AS3. I am here to share what I learned with you as I found it very difficult for beginners to learn anything about the subject. It was just a question of starting everything from scratch.
Now I’m sure you’re full of ideas of things to create, let’s create your first augmented reality project: adding depth to a flat piece of paper.
Introduction: flARToolkit
flARToolkit is the flash version of the C-coded augmented reality library known simply as ARToolkit. It was converted over by a very very skilled Japanese coder known as saqoosha. He does all kinds of crazy stuff with augmented reality and if you can read Japanese or are prepared to wade through lots of posts that barely make sense when translated, then you can learn a lot from him. He created the infamous ‘hole in the wall’ effect which is demonstrated in the New Years celebration project he created to welcome in 2009.
More recently, he has demonstrated that you can link various markers together and other wonderful effects that I could only ever dream of creating.
Step 1: Getting to the Source
Squidder.com modified an existing flARToolkit library, the flARManager class, to be able to handle events and multiple objects. Interestingly enough they post their source code and a so called ‘how to’ but never actually explain their own code. It took me some time to work out how to get multiple objects that could all be different. I should point out now that I am a designer first and coding resulted from wanting to make crazy things. I approached this wanting the end result to work rather than being concerned with best ways to code things.
Let’s download the code from their original post on the subject and give it a look over.
Download the file called “flarsquidderki.zip”, extract the .zip file and open up the main folder. Note, if you don’t extract the .zip folder, you won’t be able to open the .swf correctly or edit the files you need. So once you have done that, you’ll see 3 key folders: deploy, fla and src. You will also see a file called “flardrums.pdf”.
Step 2: Play Time
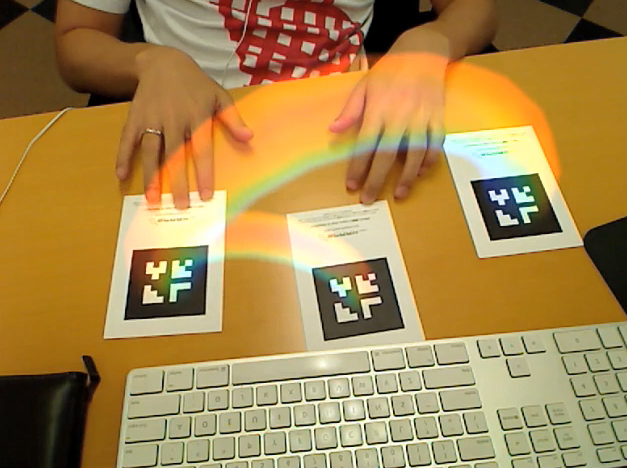
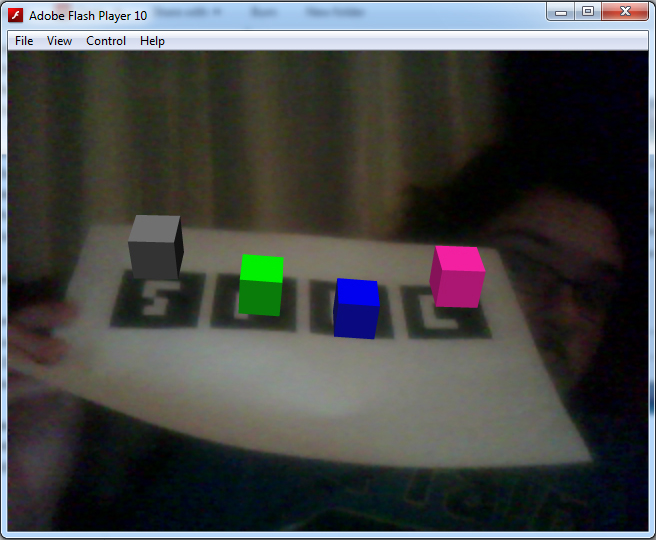
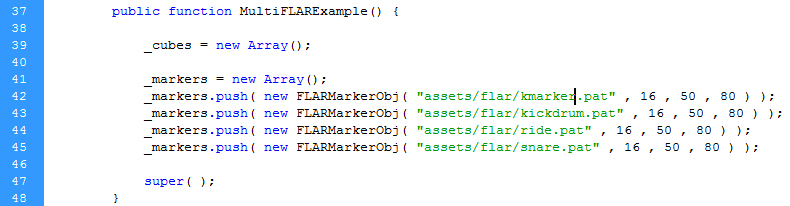
We have our markers for now, print them off so we can test it and see how the source currently works.
Open up the deploy folder and open the MultiFLARExample.swf. Accept the webcam and start playing with the markers.
In a video demo that they created, you pass your hand over each marker individually and see how they make sounds when they disappear. This was written in by squidder. They added two events, MARKER_ADDED and MARKER_REMOVED. We will explore how to use these events later.
Now you know how it currently looks, let’s get down to modifying their source code to do some cool things of our own.
Step 3: There’s Coding to Do
For this tutorial, I assume you have basic knowledge of AS3 and class sheets.
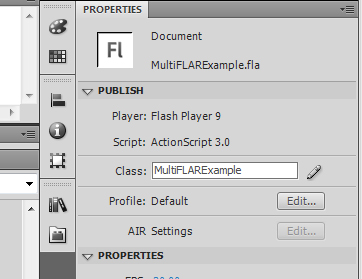
Open up the \fla\ folder and then double click on “multiFLARExample.fla”. In the properties panel you should see the class box filled in with MultiFLARExample. You’ll want to click the pencil icon next to the class box so that we can start looking at the code.
Step 4: MultiFLARExample
Straight away you’ll see the usual import code at the top and underneath that some basic variables for light sources.
Next is an interesting part, the code that loads in the markers. As you can see, the markers are loaded into an array so that they can easily be called later on. Pay attention to the order they loaded in here. The first marker in the array gets the id of 0, the next is 1 and so on. We will be using these id’s later on.

Also look at private functions _addCube and _getFlatMaterial as these are the other two sections that we will be focusing on editing today. They’re pretty self explanatory in what they do, but they are oddly set up. They have been coded for simplicity in getting the same object in multiple colors, rather than lots of different objects, so we have to make a few changes.
Step 5: Ch-Ch-Changes
Okay, let’s change some code. Let’s alter it to a more usable state but for now we’ll keep the visual look the same. When I was figuring all this out, it was an odd relief to find out that it all came down to if statements in the end. If statements are just so magical and useful when it comes to coding things.
In the _addCube function replace this code :
var cube : Cube = new Cube( new MaterialsList( {all: fmat} ) , 40 , 40 , 40 );
					cube.z = 20;
					dispObj.addChild( cube );
with the following code:
if (id==0){

	var cube : Cube = new Cube( new MaterialsList( {all: fmat} ) , 40 , 40 , 40 );
	cube.z = 60;
	dispObj.addChild( cube );

} else if(id==1){

	var cube2 : Cube = new Cube( new MaterialsList( {all: fmat} ) , 40 , 40 , 40 );
	cube2.z = 0;
	dispObj.addChild( cube2 );

} else if (id==2) {

	var cube3 : Cube = new Cube( new MaterialsList( {all: fmat} ) , 40 , 40 , 40 );
	cube3.z = 20;
	dispObj.addChild( cube3 );

} else if (id==3){

	var cube4 : Cube = new Cube( new MaterialsList( {all: fmat} ) , 40 , 40 , 40 );
	cube4.z = 40;
	dispObj.addChild( cube4 );

}
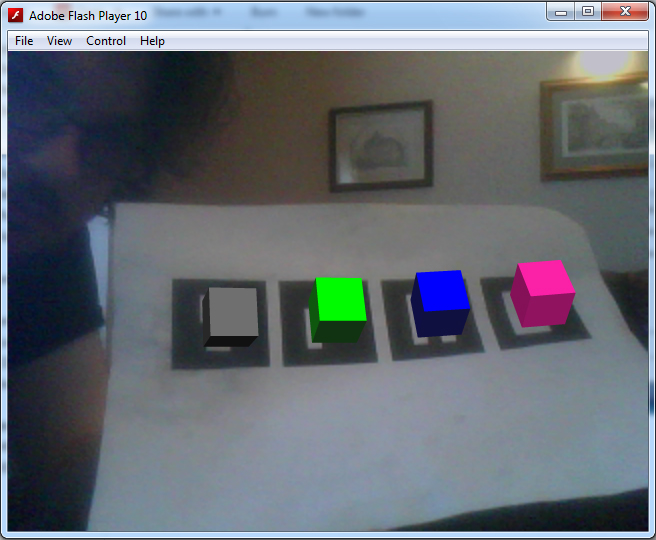
Step 6: Test the Movie
Now, this might seem like a convoluted way to deal with cubes, but it allows us to deal with each individual cube. For example, in the code above, I have altered the z axis of the cubes to demonstrate to you that the code is now handling each cube as its own object. Let’s try out the movie, you should have something to this effect:
Step 7: Explanations
Before we continue, let me explain the code you just put in. It’s pretty straight forward and if you have used papervision3D before you can skip this part.
var cube : Cube = new Cube( new MaterialsList( {all: fmat} ) , 40 , 40 , 40 );
Here we create a new variable, cube. This variable holds all the information needed to render a cube and determine how it looks. The MaterialsList part refers to the material used for the outside of the cube. As we want the same material on every side and that material is held in a variable created earlier in the code, we use {all: fmat}. I’ll talk more about the fmat variable later. Finally, the three 40’s, these are the dimensions of the cube, the width, height and depth. Of course they don’t have to all be the same even though this is a cube. You can use the cube method to create rectangular cuboid shapes if you so wish.
cube.z = 20;
This sets the z value of the cube. This is how high the cube sits above the marker. 0 is the center line of the cube and so setting it at half the shape’s height means that is sits exactly on top of the marker.
dispObj.addChild( cube );
dispObj refers to a display object that was created earlier in the code. A display object will render your object on the screen. You can load as many shapes as you want inside one display object, so we will load all our shapes into it for now.
Brilliant, now that you know how it works, let’s continue editing the code. You don’t really need the _getFlatShadeMaterial function so let’s edit it all together shall we. Doing it this way also allows us to give a different material to each object.
Step 8: Pulling it Together
You’ll want to find this line in your code:

We are now going to edit the fmat variable so that instead of calling a function, it will call a new flatShadeMaterial where we specify the colors. Later on I’ll deal with other materials including bitmap materials.
Replace _getFlatMaterial(id); with:
new FlatShadeMaterial( _lightPoint , 0xff22aa , 0x75104e );
The three parameters set the lightsource for the flatShadeMaterial, the flat color, and also the shade color. Doing this will give our object a more realistic effect as we turn and rotate it in physical space.
Now, underneath that line we’ll want to add:
var fmat2 : FlatShadeMaterial = new FlatShadeMaterial( _lightPoint , 0x00ff00 , 0x113311 );
var fmat3 : FlatShadeMaterial = new FlatShadeMaterial( _lightPoint , 0x0000ff , 0x111133 );
var fmat4 : FlatShadeMaterial = new FlatShadeMaterial( _lightPoint , 0x777777 , 0x111111 );
Now that we have created a variable for each of our objects, we’ll want to change up the cube code I gave you earlier. Instead of just having fmat as the material for all of our cubes, you’ll want to change it to fmat, fmat2, fmat3 and fmat4 so that our cubes will appear different.
After you have done that, you can now finally remove the _getFlatMaterial function.
Delete the following lines of code:
private function _getFlatMaterial( id:int ) : FlatShadeMaterial {

	if ( id == 0 ) {
		return new FlatShadeMaterial( _lightPoint , 0xff22aa , 0x75104e );
	} else if ( id == 1 ){
		return new FlatShadeMaterial( _lightPoint , 0x00ff00 , 0x113311 );
	} else if ( id == 2 ) {
		return new FlatShadeMaterial( _lightPoint , 0x0000ff , 0x111133 );
	} else {
		return new FlatShadeMaterial( _lightPoint , 0x777777 , 0x111111 );
	}
}
Step 9: Test the Movie Again
And now let’s test again. If everything is done correctly, it should look exactly the same. What an achievement, eh?
It may not look like much, but we have just set up the foundation for creating lots of different looking objects.
Step 10: Materials
Okay, let’s get on to something a bit more useful. The bitmap material. Most people would want to put their own images into AR as a cool way to present their work; this is achieved by using an image as a material.
It’s fantastically simple. I have created the following image for you to use, since I’ll show you how to use bitmap material through a web link.

Firstly, you need to import the BitmapFileMaterial class. At the top of your code sheet where all the other classes are imported, add the following line:
import org.papervision3d.materials.BitmapFileMaterial;
and change your fmat material to the following:
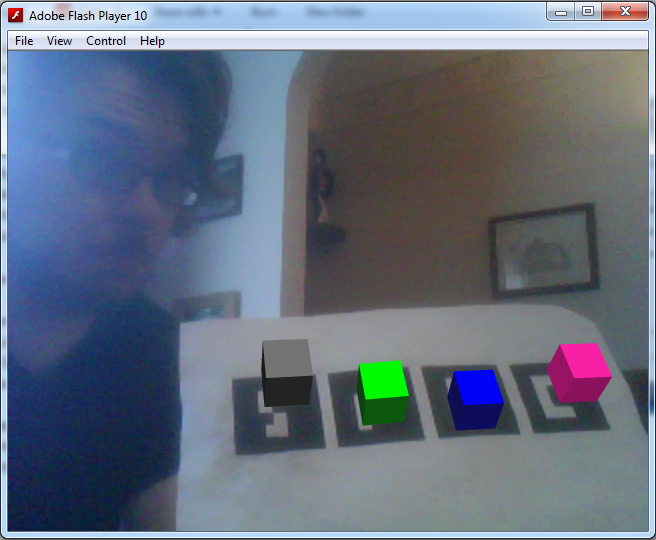
var fmat : BitmapFileMaterial = new BitmapFileMaterial("http://kablamo.co.uk/artutorial/kcube1.jpg");
Now let’s test it, it should look just like this:
How simple was that?
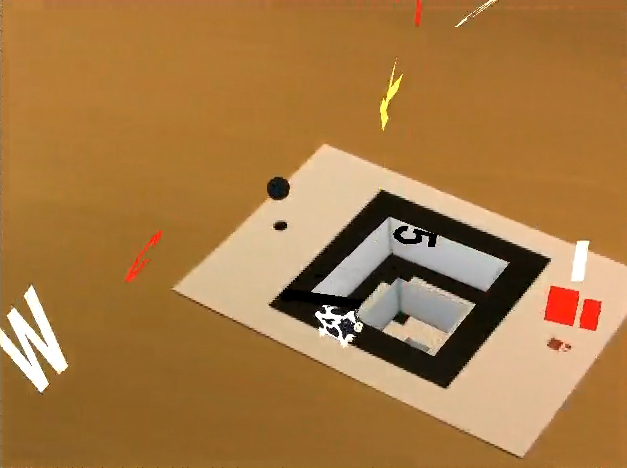
Step 11: Making it Hole
Now that I’ve shown you how to make a cube that sits above the marker, let’s create a cube that sits below the marker to create the hole in the wall effect.
This effect was originally imagined and explained by saqoosha. Unfortunately, he explained it in Japanese and for papervision3d rather that for use with flARToolkit so a few changes were made.
You need to import these two classes:
import flash.geom.ColorTransform;
import flash.filters.*;
Add this line under _lightpoint with the other private variables:
private var _green:Cube;
and then under var dispObj : DisplayObject3D = new DisplayObject3D(); add the following:
this.viewport.filters = [
	new ColorMatrixFilter([
                    1, 0, 0, 0, 0,
					0, 1, 0, 0, 0,
                    0, 0, 1, 0, 0,
                    1, -1, 1, 1, 0
	])
];
Basically, what’s going on here is that you will have two cubes, one being green and the other forming the inside view. They will sit one inside the other. The viewport filter will mask out anything that is that particular color green, which is what we set the outside cube to, giving the effect that there is a hole in the marker.
Now we will create the two cubes.
Remove your existing cube code and replace it with this:
var hole:Cube = dispObj.addChild(new Cube(new MaterialsList(
		{all:new  BitmapFileMaterial( "assets/hole.jpg" ), bottom: new  BitmapFileMaterial( "assets/k.jpg" )}
	), 80, 80,80,1,1,1, Cube.ALL,Cube.TOP)) as Cube;

this._green = dispObj.addChild(new Cube(new MaterialsList({all: new ColorMaterial(0x00ff00)}), 80, 80,80, 1, 1, 1, Cube.TOP)) as Cube;
hole.rotationX = this._green.rotationX =90;
hole.z = this._green.z = -40;
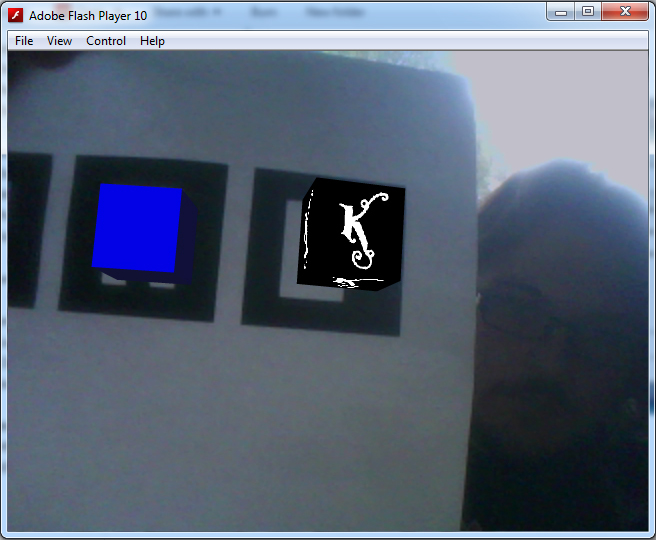
Notice, for the materials we import in two .jpg files from the assets folder. This folder is located inside the main deploy folder, where the file MultiFLARExample.swf is found. You can either download the following images that I have created, or make your own.


Step 12: Test the Hole
Give it a test and you should have something like this:

Step 13: Making Mark-ers.
By now, you are probably fed up of holding up a ratty piece of paper with four markers up to the camera. You want to have your very own marker, so let’s make it. With a few online tools and Photoshop, you can have your own marker up in minutes.
First, let’s make your marker. You don’t need to use a barcode-like design like on the markers you are currently using, but, if you are using a lot of markers then the barcode is the best way to go. If you are using one or two then go wild with the design. For my marker design, I used the K from my website’s logo.

If you are doing it for a business card or some promotional material, think about how the marker looks as you can make some very nice looking markers that blend into the design more.
You need to set up your Photoshop document ready for marker creation. For a basic marker, create an 800x800px file with a 150px border all the way around. Or download this image below:
Step 14: Online Marker Generator
The white square in the middle is where you can put your marker design. Print off the marker and then pay a visit to the Online Marker Generator.
They have an online marker creator that takes your marker and makes a .pat file that works with your code. It’s quite odd, they have an upload option but I have never gotten it to work (printing out works just fine). There is also an AIR app that does just the same job but this is fine for now.
Set the marker segments to 16×16 and the marker size to 50%, show your marker to your webcam and when a red square surrounds your marker click on get pattern, if you are happy with how it looks in the preview window click save.

If your marker looks really odd in the preview or a red square doesn’t come up, you may need to re-design your marker. You also have to make sure that there is some white space around your marker as otherwise Flash won’t recognize it.
When the dialog box comes up, don’t just download this anywhere, you need to put the .pat file in a specific folder. Navigate to your flARToolkit folder > deploy > assets > flar and you should find four other .pat files there. Save your pattern there and remember what you called it. I called mine “kmarker.pat”

Step 15: Alter the Code
Back in flash, find this line:
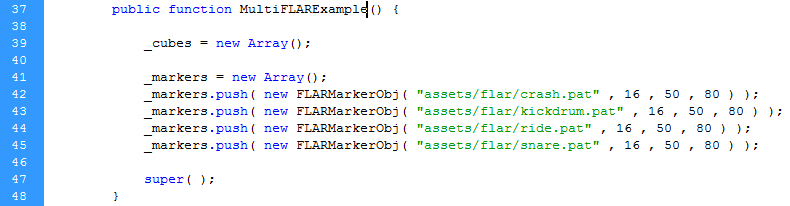
And change crash.pat to whatever you named your marker as.
If you test your Flash file, you should find that your new marker picks everything up perfectly.
Conclusion
Thanks for reading this introduction to Augmented Reality. I hope you enjoyed it and that it’s made you curious about creating your own AR projects. In the next part of this tutorial, I will cover how to animate objects with TweenMax, making the markers a bit more play sound, importing 3D models and making everything prettier.
Hello! thank you very much it is really helpful your tutorial! I wonder if you can help with more complex 3d models, like a 3d character which has many materials-textures on it. I am using Blender. Thank you very much.