Releasing a WordPress theme on a marketplace, such as ThemeForest, where the audience is so large and diverse, has some challenges. You cannot test a solution directly with the client. You need to plan in advance for all edge cases, and ensure that your theme is as customizable as possible. If you’re inexperienced, chances are that some things will unfortunately slip through the cracks. Luckily for you, we have drawn on our hard-earned wisdom to help you avoid repeating the same mistakes we made.
1: Don’t Display Comments on Protected Posts
WordPress has the option to make a post password-protected: visitors should be able to access this type of content only after typing in the password. You do not need to do anything special concerning the post itself, but if you forget to check before displaying comments, visitors will still see all comments on the protected post, which sort of defeats the purpose of protecting the post in the first place. You can remedy this with a simple check in comments.php:
<?php if ( post_password_required() ): ?>
     <p class="nopassword"><?php _e( 'This post is password protected. Enter the password to view and post comments.' , 'mytheme' ); ?></p>
</div>
<?php
        return;
      endif;
?>
2: Display Attachments Correctly
There is a special template file, attachment.php, which is used when a visitor clicks on an attachment. Attachments can be images, videos, music files . . . whatever is inserted with the attachment buttons on the editor:

Creating attachment.php is not obligatory: if the template is not there, the browser will just display the file, with an appropriate plugin if necessary. I would say that the main advantage of attachment.php is that when the visitor decides to see, for example, an image at full size, the site navigation remains accessible. You can also display some customized information about the attachment. The default TwentyTen theme in WordPress 3.0 has an interesting attachment.php which displays image sizes.
if ( wp_attachment_is_image() ) {
        echo ' |  ';
        $metadata = wp_get_attachment_metadata();
        printf( __( 'Full size is %s pixels', 'twentyten'),
                     sprintf( '<a href="%1$s" title="%2$s">%3$s × %4$s</a>',
                         wp_get_attachment_url(),
                         esc_attr( __('Link to full-size image', 'twentyten') ),
                         $metadata['width'],
                         $metadata['height']
                     )
       );
}
3: Introduce Right-To-Left Support
You might have heard about supporting right to left languages, but unless you are proficient in one of those languages yourself, you might imagine that it is all very complicated.
Introducing support in your theme for languages that are written right-to-left, such as Arabic and Hebrew, is actually quite easy. The styles in rtl.css will override those in the main style.css when the the WP_LANG variable in settings.php is set to a right-to-left language, for example, Arabic:
define('WP_LANG', 'ar')
Your rtl.css first needs this declaration:
body {
    direction: rtl;
    unicode-bidi: embed;
}
The first property is self-explanatory. The second one ‘opens an additional level of embedding with respect to the bidirectional algorithm’ (W3C).
The rtl.css file does not need to duplicate every style in style.css, just the things that need to change when reading from left to right. Think as if the site was viewed in a mirror: floats change direction (float: left becomes float: right, and vice versa) and margins and padding are inverted (margin-right: 18px becomes margin-left: 18px; margin-right: 0). Also think of large sections of the site: which direction will the header float? Don’t forget all the small details, like reversing the indents of your definition lists and blockquotes. To get a feel for it, you can try switching the language to Arabic or Hebrew on sites like Facebook or Wikipedia, or visit international sites like Al Jazeera.
Believe it or not, that’s about all there is to know.
Reference
4: Supply an Editor Style
To style the TinyMCE editor that comes with WordPress, just create a file named editor-style.css in your theme directory. It’s very easy to fill, as you only need to match the typography with that on the main stylesheet, and there is no need to worry about block layout. TinyMCE has some quirks though. You can avoid the lines being too long by setting a max-width property on the .mceContentBody class.
If you are including support for right-to-left languages via rtl.css, you should also add a file named editor-style-rtl.css, as some properties, such as list margins and paddings, need to also change in the editor.
5: Make Paginated Entries Work
Paginated entries (not to be confused with a paginated list of entries) are separated into pages by their author with the <!–nextpage–> Quicktag. Admittedly, this feature does not seem to get much use on most WordPress sites, but if you forget to do your part, visitors will be unable to read beyond the first page. To allow the whole content to be read, you must use the wp_link_pages tag within The Loop
wp_link_pages(array('before' => '<p><strong>Pages:</strong> ', 'after' => '</p>', 'next_or_number' => 'number'));
For a post with three pages, this outputs the following:
<strong>Pages:</strong> 1 2 3
Visitors can then click on the page numbers to read the whole post. The complete documentation for this function can be found on the WordPress codex.
6: Style Default Widgets
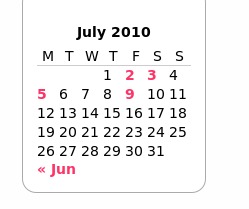
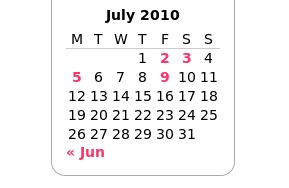
While you can’t style every possible widget under the sun, it is a good idea to check that every widget supplied with WordPress displays convincingly. All of them can receive an optional title and some have different appearances. For example, the Category widget can display as a dropdown and also display multiple levels of nested categories or tags, so make sure you are styling nested lists. Pay particular attention to the Calendar wiget. It’s a table, and you’ll generally want the days to be centered in their cells, so that they align with the week days in the header. On the first picture, numbers look slightly out of place, while they are correctly aligned on the second picture.
Finally, it will help if you start by devising good styles for the .widget class, as it will be applied to all widgets, even those coming from third parties. With flexible layouts in particular, make sure your widgets do not stretch excessively, as that makes them look really weird.
7: Make Threaded Comments Usable
Comments are a bit of a design conundrum. There is a lot of stuff to display (avatars, commenters names, comment dates, comment body, reply buttons), so you need to give it quite a bit of space, but, at the same time, it should not overwhelm the main content, and should be visually distinct in some way. Threaded comments compound all these difficulties, because you also need to distinguish replies. Generally, this is achieved with a margin, but as you cannot know how many levels of replies there will be, you always risk either not allowing for enough width or allowing for too much.
Also, keep in mind that the reply form will not only appear at the bottom of the page, but also in the middle of the comment thread when someone clicks the reply button. So margins and padding should be adequate for both cases. There is also the ‘cancel reply’ link which has to be styled and positioned.
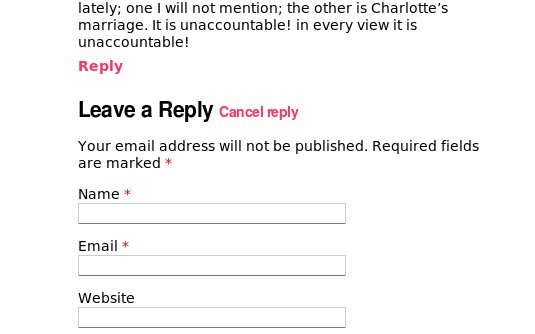
Finally, you should ensure that comment pagination works, that comments render correctly, both when there are very few, and when there are many, and that threaded comments do not overflow the boundaries of their container. Be careful not to mash comments together, and don’t forget to check the layout for when avatars are both enabled and disabled.
8: Do not Forget wp_footer() and wp_head()
Call wp_footer() just before closing the body tag, and wp_head() just before the closing head tag. Both functions are action hooks, which can be used by plugin and theme developers. If you leave them out, some features and plugins may not work, including custom headers.
Reference
- To learn more about action hooks, see the Plugin API reference.
9: Support Thumbnails
Although many themes still rely on plugins, such as TimThumb, WordPress, since 2.9, includes support for thumbnails (‘featured images’) out of the box. To take advantage of this functionality, you just add some lines in functions.php:
add_theme_support( 'post-thumbnails' );
set_post_thumbnail_size( 70, 70 );
The first line tells WordPress your theme supports thumbnails, while the second forces the thumbnail size to 70x70px, to avoid breaking your layout with differently sized thumbnails. Additionally, you can choose the resizing policy. The example above will just resize the image, while
set_post_thumbnail_size( 70, 70, TRUE );
will also crop the image to make it fit the given ratio. You can also make additional thumbnail sizes available, to use them in different areas of the site:
add_image_size( 'big-thumb', 500, 500 );
Now,
the_post_thumbnail();
displays a 70×70 thumbnail and
the_post_thumbnail( 'big-thumb' );
displays a 500×500 thumbnail.
Reference
- You can find a complete explanation by one of the WordPress developers at Mark Jaquith’s blog.
10: Support Custom Menus
WordPress 3.0 introduced the long awaited custom menus, so it’s about time to make your users profit from this feature. After registering theme support, like so:
register_nav_menu( 'main_nav', __( 'Main navigation menu', 'mytheme' ) );
. . . you can display a custom menu with wp_nav_menu():
wp_nav_menu( array( 'theme_location' => 'main_nav' ) );
Be careful, as the system allows you to insert nested elements, which can lead to strange results if you do not plan for them.
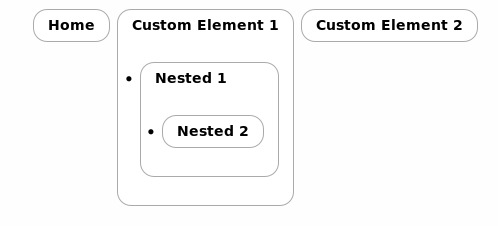
Even if you supply dropdowns or navbar style menus, it is difficult to elegantly display more than so many levels of navigation. To protect your layout, either decide a level below which all elements will display the same, or disable displaying lower levels. For example, to limit the display to two levels, use:
wp_nav_menu( array( 'depth' => 2) );
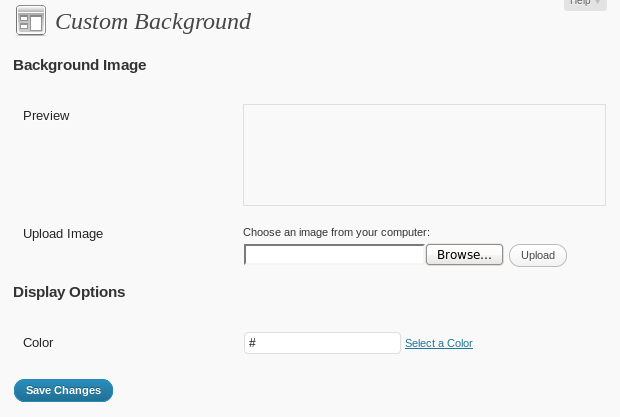
11: Enable Custom Backgrounds
This is a new feature in WordPress 3.0, and it’s also the easiest to implement. It’s literally one line:
add_custom_background();
That’s it! Users can now choose any custom background they want:
12: Enable Custom Headers
In the same spirit, but with a little more effort, you can allow to change the site header’s background, and also the site title color. This feature won’t work unless you start by defining a bunch of constants. Replace ‘yourwidth’ and ‘yourheight’ with whatever measurements fit your theme:
define( 'HEADER_TEXTCOLOR', '000' );
define( 'HEADER_IMAGE', get_bloginfo( 'stylesheet_directory' ) . 'path/to/your/image' );
define( 'HEADER_IMAGE_WIDTH', 'yourwidth' );
define( 'HEADER_IMAGE_HEIGHT', 'yourheight' );
Once this is in place, you need to write the function which will apply the background to your header. As there is no standard markup for a site header, WordPress cannot guess how to apply the required CSS for you. For example, to add a custom background to the div with the ‘header’ id, do this:
<?php
function mytheme_header_image() {
?>
     <style type="css">
         #header { background: url(<?php header_image(); ?>) no-repeat; }
    </style>
<?php
}
?>
You also need to create a function, say mytheme_admin_preview_header(), to style the preview pane in the admin to match the final result. The preview area has the #headimg id, while the site title and the site description have ids of #name and #desc. Experiment with the preview until you are satisfied. Finally, to enable the Appearance > Header panel, call:
add_custom_image_header( 'mytheme_header_image', 'mytheme_admin_preview_header' );
Reference
13: Make User-Visible Strings Translatable
Not everyone wishes their blog to display in English. Wrap every string users need to read with the __() if you wish to translate it, or _e() if you also wish to echo it, like:
__('Hello', 'mytheme')
_e('Hello', 'mytheme') // Also prints the translated string.
The second argument should be a unique identifier for your theme, so that different translations do not conflict.
After each string has wrapped in a translation function, you need to use the makepot.php script. The recommended way to obtain this script is to install Subversion, then run:
svn co http://svn.automattic.com/WordPress-i18n/tools/trunk
You will obtain a directory, named ‘trunk’ containing, among others, makepot.php.
The script is run like this
php makepot.php wp-theme mytheme
mytheme is the path to your theme directory. You will obtain a file named mytheme.pot, which is ready to be used in a program, such as Poedit to produce a .po file containing a translation.
To finish up, you need to tell WordPress where the translations live in your theme directory, for example:
load_theme_textdomain( 'mytheme', TEMPLATEPATH . '/languages');
Here, ‘mytheme’ is the unique identifier for your theme; the second argument tells where the translation files are. TEMPLATEPATH is a special constant defined by WordPress which always points to the current theme’s directory.
Reference
14: Handle Custom Fields
This one is a bit optional, as you might want to leave that to the users’ or other developers’ discretion. You will know that WordPress supports adding custom fields on each post. In many themes, these fields usually do not display at all, unless they are used for a special feature. Some users might be confused, because they believe they can use custom fields to output any information they wish.
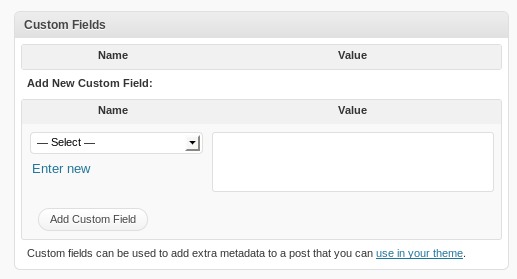
There is a function,
the_meta()
to be called in The Loop, which displays all custom fields attached to a post, as an unordered list in key:value form. Admittedly, it’s not terribly useful, but it might be better than leaving someone wondering why custom fields are not displaying anywhere.
Reference
15: Make Sure Everything Looks Consistent
One of the difficulties of theming a dynamic system, such as WordPress is that there are many edge cases which do not occur too often, but that can still ruin the appearance of the site when they do. Think of posts with closed comments, or with very short bodies. Make sure no weird spaces creep in, or that elements are not mashed together because something is not displayed. The comment section might not be displayed if comments are not allowed, or a password entry field might replace the usual post content when the post is password protected.
Also, try to match the way comments are styled with the main body. This last point requires particular care, because, generally speaking, space is more limited in the comment area — especially when using threaded comments and each reply is knocked to the right (or the left, for RTL).
16: Use the WordPress.org Theme Unit Test
WordPress.org offers a sample content file that you can import into your WordPress installation, which contains an assortment of test posts, pages and images.
To import the file in WordPress 3.0, you need first to install the WordPress Importer plugin. Then, choose Tools > Import > WordPress. Be sure to check the ‘Download and import file attachments’ tickbox when prompted. Otherwise, you won’t get the images associated to some sample posts.
After the import completes, you can use this checklist to determine whether the content displays as it should.
Conclusion
We’ve learned that things to watch out for come in multple varieties. Some are seldom-used features, others are customization opportunities, while others are more akin to common design problems, which will repeat with any WordPress site you design. Our list is certainly far from exhaustive, so we want to hear from you in the comments! What do you think are the most often forgotten pieces of functionality?