
Inking comics can be fun, frustrating, or a mix of each. Working in vector has additional advantages, from not having to worry about resolution to being able to change the line art weight with the click of a button. We will look at some different ways in which you can ink a comic character with Adobe Illustrator.
Using different Width Profiles in the Stroke panel we can give our line art a varied line weight. By using the Art Brush, Pattern Brush, and Scatter Brush we can make detailed design elements in a single stroke.
If you’re making a comic, odds are you’ll spend a lot of time inking. In this tutorial we will help make the process easier, quicker, and hopefully a lot more fun as well.
1. Prepare the Sketch
Step 1
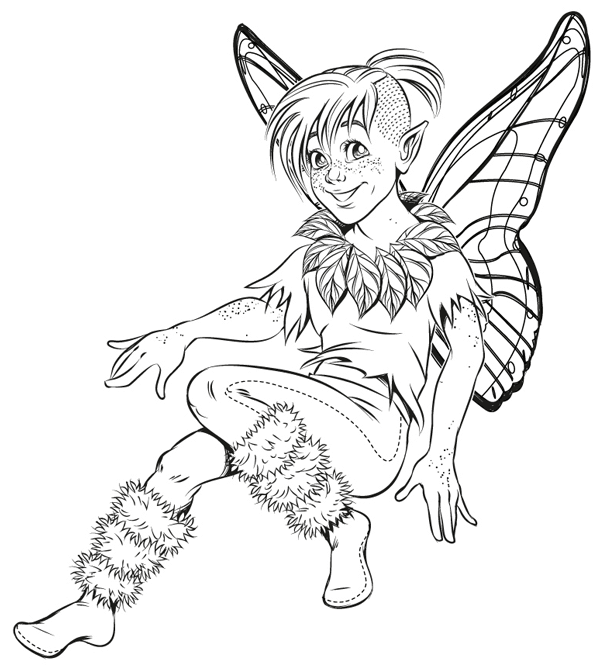
I’ve started by making a rough sketch of a Peter Pan kind of character. I open a new document in Adobe Illustrator and import the sketch by going to File > Place…

Step 2
In the Layer panel I double-click the present layer. I name the layer Sketch and check the Template box. This will enable me to go into Outline mode, Command-Y, with the sketch still visible. I find it helpful to do this every now and then throughout the process.

Step 3
I draw out a stroke along the face of the character, and start determining a look for the main line art brush. There are a lots of default brushes in Illustrator to choose from. I recommend going to the Brushes panel and pressing the icon in the bottom left corner which opens the Brush Libraries menu. From there you can choose Artistic > Artistic_Ink to get some good choices.
Or you can create your own custom line art brush! I will be using the one I made in an earlier tutorial in this series. I set it to 2 pt in the Stroke panel, and choose Width Profile 5 from the dropdown menu in the same panel.

2. Create a Leaf Art Brush
The character will have a collar made of leaves. Instead of drawing every individual leaf by hand, we will create an Art Brush with which we can create a leaf in a single stroke.
Step 1
Using the same brush as in the previous step, I start drawing a leaf design. Art Brushes use a specific design which gets stretched out in the length and shape of a brush stroke.
Keeping this in mind, I make the leaf a little rounder than I want the finished result, so that I can draw them out in the shape I want.
Remember to include a white background for the leaf, as the leaves will overlap each other! Yours truly forgot this and had to redo a couple of steps.

Step 2
When I’m pleased with the look, I group the strokes, drag and drop the group into the Brushes panel, and select Art Brush from the menu that pops up. Alternatively you can press the New Brush button at the bottom of the Brushes menu.
You can see the newly created brush in the Brushes panel as a stroke thumbnail. As I try it out, following the sketch, I feel it isn’t quite the leafy shape I was after.

Step 3
We can adjust this by going to the bottom part of the Stroke panel, where the Width Profiles are. The first one does the job perfectly!

Step 4
Now we can start to add in all the leaves of the collar. Move the leaves on top or below each other with RMB > Arrange > Bring Forward, or RMB > Arrange > Send Backward.

3. Create a Fur Pattern Brush
Step 1
The next repeating pattern in our drawing is the fur on the fairy’s boots. For this I start to draw a line of fur-like strokes with my custom line art brush from before.
When I have a good variation going, I group all the strokes together, press New Brush, select Pattern Brush and OK.

Step 2
Try out the fur brush for a bit to see if it repeats well or if you need to make some corrections. Try making wavy patterns to see how it pinches and stretches.

Step 3
When you’re happy with the fur brush, it’s time to apply it to the boots. It might take a couple of strokes before you get the flow you want from the brush, but then again it’s a matter of seconds compared to how long it would take to render each stroke by hand.

Step 4
Now that the repeating elements of our picture have been taken care of, it’s time to move on to the remaining line art. I use my previous line art brush and draw in broad strokes.
It might help to zoom out a bit if you’re having trouble getting smooth lines and curves. You can also use the Pen Tool, Ellipse Tool and other ones to create the paths, and simply apply the brush strokes afterwards as well.
Right now I don’t care about lines crossing over each other. I just focus on the flow of the lines, and will clean it up after I’m done.

4. Make Repeating Patterns With Dashed Lines
Step 1
To make the seams on the pants and shoes I draw the lines with the Pen Tool, and then check Dashed Line in the Stroke panel.
Here I’m using the default Basic brush from the Brush panel, with Weight of 1 pt. The default setting for the dash is 12 pt, but I want something smaller so I go with 4 pt.

Step 2
For the shaved part of the character’s head I use the same technique, but instead of using the basic brush I use the custom line art brush. I set the Weight to 0.25 pt and the dash to 3 pt, and start drawing the lines.

5. Create a Freckles Scatter Brush
Step 1
For the freckles I simply make a black circle shape, press New Brush and select Scatter Brush. From there I’m presented with a range of options on how to modify the scattering.
I select Random from the dropdown menu of every option (except Rotation, which won’t have any visible effect in this case) and start testing the brush until I get what I want.

Step 2
This is a quick way of adding freckles to a character, but the same technique can be used to make anything from sandy beaches to starry skies: anything you can think of that needs to be scattered in a non-planned way.

6. Finishing Touches
Step 1
We’re finally getting somewhat of an overview of this character, and I think it’s time to clean up the line art. Select the line art strokes you want to correct, and expand them by going to Object > Expand Appearance.
Now, go to the Pathfinder panel and press Divide. This cuts every intersecting path, so now you can remove the unwanted strokes by selecting them with the Direct Selection Tool and pressing Delete or Backspace.

Step 2
Let’s render the eyes a bit more. I like to make the top of the iris darker, so I make a black crescent moon shape with the Pen Tool. I add some repeating strokes underneath with the custom line art brush to make a sort of gradient to the lighter part at the bottom of the eye.
The highlight of the eye will be an oval shape in the middle. The last step is to create a bit of detail in the iris by making small hand-drawn strokes with the Paintbrush Tool.

Step 3
Let’s not forget to add some eyelashes as well! Use the line art brush with Width Profile 4 from the Stroke panel to get some nice tapering eyelashes.

Step 4
Time to zoom out a bit and take a look at what we’ve made so far. Take the time to correct mistakes and things you’ve missed. For example, I was not happy with how I had made the legs, so I took the time to shorten them a bit and to change the angle of one of the feet.

7. Add a Final Element With a Wing Art Brush
Step 1
I feel the character is a bit lacking right now, and I want to turn it into a fairy character instead. To get a quick base layout for the wings, go to the Symbols panel and click the bottom left icon to open the Symbols Libraries menu. From here go to Nature, select the butterfly symbol, and drag it out onto the Artboard.

Right-click the butterfly and select Break Link to Symbol.

Step 2
Select white as the Fill color and black as the Stroke color. With the Direct Selection Tool, select the rectangle shape surrounding the butterfly, and delete it.

Step 3
Create your own rectangle shape on top, making sure one line is vertically aligned to the center of the butterfly. Having both the butterfly and rectangle selected, go to the Pathfinder panel and select Crop.

The butterfly is now split in half. Delete any remaining pieces until all you are left with is a single wing.

Step 4
To customize the look a bit more, I give some of the outer shapes a black Fill instead. I set the Stroke Weight to 0.5 pt, again using the custom line art brush. I try out all the Width Profiles, but finally decide on Width Profile 2.

Step 5
To make the character appear in front of the wings, we need to create a white background for it. Select everything, copy with Command-C, and then paste into a new layer. Set both Fill and Stroke color to white, and then go to Object > Expand Appearance.
With everything still selected, go to Object > Path > Offset Path, set Offset to 0.25 mm, Joins to Round, and press OK.

Step 6
Set Fill color to black, and you should end up with a silhouette looking like the image below. Name this layer White Background and place it at the bottom, underneath all layers with character art on them.

Step 7
Now create a new layer called Wings and place it under the White Background layer. On this layer, draw one of the wings for the fairy with the Wings Art Brush we created.
To make the other wing go in the opposite direction, double-click the brush icon to open the Art Brush Options where you can flip the design horizontally or vertically.
If you change anything and click OK, Illustrator will ask you if you want to apply those changes to the current artwork. Select Leave Strokes and return to draw the other wing.

Step 8
Our little fairy is finally coming together! Take some time again to zoom out and see if there’s anything you might want to add or correct. I decided to add some more shadowy parts here and there, like under the clothing, by the neck and where the legs cross.
Awesome Work, You’re Done!
Adobe Illustrator offers a wide range of ways to use brushes. These are very useful when inking, especially in comics where many elements will be repeated throughout the story.
By making repeating brushes we can cut down on the work hours quite a bit, and since this is vector we can easily make the line weight thicker or thinner with the click of a button.
I hope this tutorial has helped you in coming up with your own brush resources for your comics or ink illustrations, and that you will have a lot of fun inking it.
{excerpt}
Read More