
In the series on Creating Photoshop Brushes from Scratch, I showed my process for creating Custom Shattered Glass Brushes. If you haven’t had a chance to read over that tutorial, I recommend you take a few minutes and take a look at it now. Still not convinced? Well, it involves actually using a hammer to bust the glass! Really, you should go take a look.
Tutorial Assets
To follow along with this tutorial you will need the background stock image of an angry woman.
You will also need the custom Shattered Glass Brushes. Download the ShatteredGlassBrushes.abr file attached to this tutorial. To install the brushes, go to Edit > Presets > Preset Manager. In the Brushes section, use the Load button to navigate to the downloaded file.

This will add 12 new shattered glass brushes to your Brush Presets.
1. Create the Glass Image
The idea is to create the illusion of a pane of glass in front of the model. One of the most effective techniques for this is to create another version of the background that is visually different. It needs to be just different enough that when the broken areas reveal the original image, it is obvious the two are different.
Step 1
Open the stock image and duplicate the background layer with Layer > New > Layer Via Copy (Control-J).

Step 2
Darken the layer by using Levels. Go to Image > Adjustments > Levels (Control-L). Push the left slider handle towards the right until the number beneath it is at 100.

Step 3
Now blur the layer by going to Filter > Blur > Gaussian Blur. Use a Radius of 10 pixels.

Step 4
Set the foreground color to a pale blue #dbfaff. Add a new layer with Layer > New > Layer (Shift-Control-N) and then press Alt-Backspace to fill the layer with the blue color. Set the Blend Mode to Multiply.

Step 5
This step is optional. If you have the Adobe Paper Texture Pro extension (found under Windows > Extensions), you can find a good texture to use to simulate a dirty, dusty window surface. I used the Gertrude_Jekyll texture, set the Blend Mode to Linear Burn, and reduced the Opacity to 70%.

2. Break the Glass
Now we have a convincing glass pane for our heroine to break through. The idea is to use the shattered glass brushes to craft a jagged hole in the glass surface.
Step 1
Add a New Layer and select one of the shattered glass brushes—I started with the Shattered Glass 03 brush. Make sure the paint color is set to Black and just a single click will stamp the image neatly onto the layer.

Step 2
Use the Polygonal Lasso Tool (L) to carefully select a cutout portion of the center of the glass shatter, along with the lower right area, and press the Delete key to remove those pixels. Remember to then cancel the selection with Select > Deselect (Control-D).

Step 3
Grab the Move Tool (V) and hold down the Alt key while dragging the shattered glass layer’s thumbnail downwards. This will create a duplicate of the layer and place it below the original.

Step 4
Press the small checkerboard icon above the layer thumbnails to Lock the Transparency of this layer. Make sure your background color is set to White and press Control-Backspace to fill the layer with the background color. The locked transparency means only the visible pixels receive the fill. This is a quick and easy method of changing the color of the pixels in a layer without affecting the other properties.

Step 5
Tap the Up Arrow Key three times, then the Left Arrow Key twice, to slightly nudge the white copy. This provides the impression of thickness to the broken glass.

Step 6
Repeat the process of adding shattered glass completely around the model’s face. Here I used four different pairs (one dark, one light) of shattered glass layers.

Step 7
Hold down the Shift key and select all the layers except the original photo background layer. Go to Layer > Group Layers (Control-G) to place them all into a single layer group.

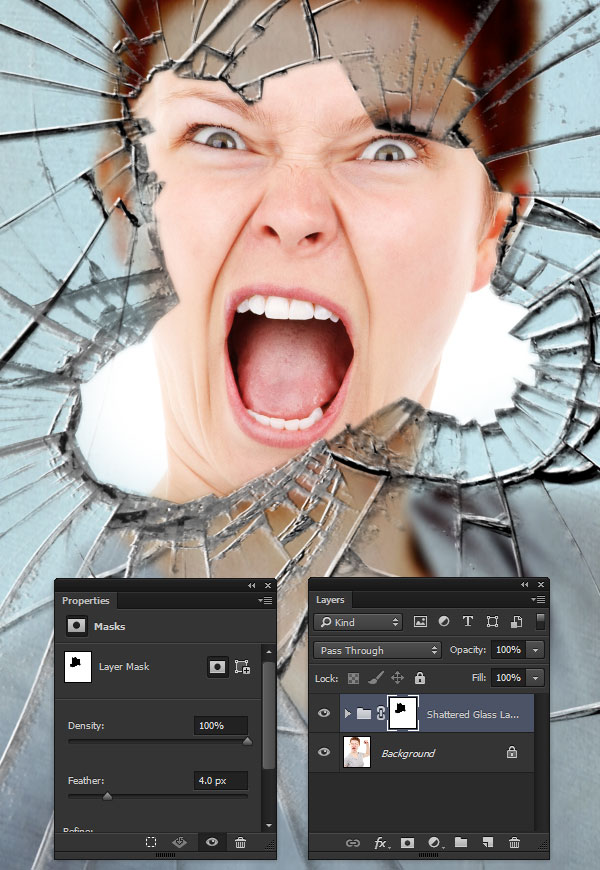
Step 8
Use the Polygonal Lasso Tool again to select the inside area of the hole in the glass. Go to Layer > Layer Mask > Hide Selection to add a mask to the group and allow the original background to show through. In the Properties Panel for the mask, set the Feather to 4.0 pixels so the edge of the glass still appears to have some thickness.
3. Flying Fragments
If this woman were to actually break this glass, there would be tiny shards of glass flying out. The custom brushes contains several glass shard brushes just for this purpose. Let’s use those to add a bit of convincing flair to this project.
Step 1
Repeat the same process as above to create a black and white layer pair using the glass shard brushes.

Step 2
Create a New Layer above the glass shards. Use the Polygonal Lasso Tool to craft a selection of the inside of the glass shards. Fill the selection with a bluish-green hue—I used #bbd2d9—and set the blending mode to Overlay. Don’t forget to cancel the selection with Select > Deselect (Control-D).

Step 3
Select the shard layers and group them together with Layer > Group Layers (Control-L). Then double-click on the area to the right of the group’s name to open the Layer Style dialogue box. Add a Gradient Overlay with the following settings.
- Blend Mode: Multiply
- Opacity: 57%

The result should look like this.

Step 4
Create more shards by using the same process to craft additional layers, or simply duplicate the first group and use the Edit > Free Transform tool to move, scale and rotate the duplicates into new positions.

Then here’s the final effect!

Want More?
A project like this shows just how useful custom brushes made from scratch can be. Imagine trying to illustrate all those cracks and chips in the glass! If you want to see more like this, be sure to check out the rest of the series on creating Photoshop Brushes From Scratch. I’d love to see how you’ve used these brushes in your own works, so please share them below in the comments!
Also, feel free to browse through my other tutorials, quick tips, and courses here at Tuts+. You can find them all linked in my profile.
{excerpt}
Read More