
In the following steps you will learn how to create a laces text effect in Adobe Illustrator. For starters you will learn how to create the main lace shapes using a simple rectangle, three Transform effects and some basic vector shape building techniques. Using similar effects and techniques along with the Warp and Distort effects you will learn how to create the laces tips. Moving on, you will learn how to save two simple pattern and how to use them to create your own pattern brush. Finally, using that pattern brush, some basic masking techniques and several Drop Shadow effects you will create the text.
1. Create a New Document and Set Up a Grid
Hit Control-N to create a new document. Select Pixels from the Units drop-down menu, enter 1000 in the width box and 660 in the height box then click on the Advanced button. Select RGB, Screen (72ppi) and make sure that the Align New Objects to Pixel Grid box is unchecked before you click OK.
Enable the Grid (View > Show Grid) and the Snap to Grid (View > Snap to Grid). For starters you will need a grid every 5px, so simply go to Edit > Preferences > Guides > Grid, enter 5 in the Gridline every box and 1 in the Subdivisions box. You should also open the Info panel (Window > Info) for a live preview with the size and position of your shapes. Do not forget to set the unit of measurement to pixels from Edit > Preferences > Units > General. All these options will significantly increase your work speed.

2. Create the Main Lace Shapes
Step 1
Pick the Rectangle Tool (M) and focus on your Toolbar. Remove the color from the stroke then select the fill and set its color at R=45 G=83 B=208. Move to your artboard and simply create a 6px square, the Snap to Grid should ease your work.
Keep focusing on this tiny shape and switch to the Direct Selection Tool (A). Select the top, left anchor points and drag it 2px up and 4px to the right, select the bottom, left anchor point and drag it 2px up and 2px to the left then select the right anchor point and drag it 6px to the left.. In the end your shape should look like in the second image.

Step 2
Make sure that your shape is still selected and go to Effect > Distort & Transform > Transform. Enter the properties shown in the top window (in the following image), click OK and go again to Effect > Distort & Transform > Transform. Enter the properties shown in the middle window, click OK and go one more time to Effect > Distort & Transform > Transform. Enter the properties shown in the bottom window and click OK.

Step 3
Reselect your blue shape and go to Object > Expand Appearance. Make sure that the resulting group of shapes is selected and hit Control-8 (or go to Object > Compound Path > Make) to turn it into a simple Compound Path.

Step 4
Using the Rectangle Tool (M), create a 22 x 6px shape, set the fill color at R=80 G=112 B=214 and place it exactly as shown in the first image. Make sure that this new shape is selected, send it to back (Shift-Control-[ ) then make a copy in front (Control-C > Control-F).
Select the copy along with your compound path, open the Pathfinder panel (Window > Pathfinder) and click the Intersect button. Make sure that the resulting group of shapes is selected and turn it into a simple Compound Path (Control-8 or Object > Compound Path > Make). Move to the Layers panel (Window > Layers), open your layer, double-click on your newly created compound path and simply name it "pattern".

3. Create the Lace Tips
Step 1
Reselect your "pattern" compound path and make a copy in front (Control-C > Control-F). Select this copy and simply drag it a few pixels down as shown in the first image. Make sure that your new compound path stays selected and go to Effect > Distort & Transform > Transform. Enter the properties shown in the following image and click OK.

Step 2
Reselect your compound path copy and go to Object > Expand Appearance. Make sure that the resulting group of shapes is selected, click the Unite button from the Pathfinder panel then turn those shapes into a simple Compound Path (Control-8 or Object > Compound Path > Make).
Move to the Layers panel (Window > Layers), double-click on your newly created compound path and simply name it "tipPattern".

Step 3
Using the Rectangle Tool (M), create a 22 x 24px shape and set the fill color at R=80 G=112 B=214. Place this new shape as shown in the first image then send it to back (Shift-Control-[ ).

Step 4
Reselect your "tipPattern" compound path along with the 22 x 24px rectangle and Group them (Control-G). Make sure that this new group is selected and go to Effect > Warp > Bulge. Enter the properties shown in the following image, click OK and go to Effect > Distort & Transform > Free Distort. Drag those points roughly as shown in the following image then click OK.

Step 5
Reselect your "pattern" compound path and make a copy in front (Control-C > Control-F). Select this copy and simply drag it a few pixels up as shown in the first image.
Make sure that your new compound path stays selected and go to Effect > Distort & Transform > Transform. Enter the properties shown in the following image and click OK.

Step 6
Reselect your compound path copy and go to Object > Expand Appearance. Make sure that the resulting group of shapes is selected, click the Unite button from the Pathfinder panel then turn those shapes into a simple Compound Path (Control-8 or Object > Compound Path > Make).
Move to the Layers panel (Window > Layers), double-click on your newly created compound path and simply name it "tipPatternSecond". Make sure that your "tipPatternSecond" compound path is selected and go to Object > Transform > Reflect. Check the Horizontal box and click OK. In the end things should look like in the fourth image.

Step 7
Using the Rectangle Tool (M), create a 22 x 24px shape and set the fill color at R=80 G=112 B=214. Place this new shape as shown in the first image then send it to back (Shift-Control-[ ).

Step 8
Reselect your "tipPatternSecond" compound path along with the new, 22 x 24px rectangle and Group them (Control-G).
Next, you need to copy the effects applied for the existing group and paste them onto this new group. You can easily do it using the target icons. Go to the Layers panel, focus on the right side and you’ll notice that every shape, group or layer comes with a little grey circle. That’s a target icon. Hold the Alt button from your keyboard, click on the target icon that stands for your first group and simply drag onto the circle that stands for the group made in this step. In the end things should look like in the second image.

Step 9
Make sure that your top group is still selected and go to Object > Expand Appearance. Select the resulting group of shapes and go to Object > Transform > Reflect. Simply check the Horizontal box then click OK.

Step 10
Focus on the top group of shapes. Select the shape highlighted in the first image and make a copy in front (Control-C > Control-F). Select this copy along with the front compound path and click the Intersect button from the Pathfinder panel.
Make sure that the resulting group of shapes is selected and turn it into a simple Compound Path (Control-8 or Object > Compound Path > Make).

Step 11
Move to the bottom group, select it and go to Object > Expand Appearance. Focus on the resulting group, select the shape highlighted in the second image and make a copy in front (Control-C > Control-F). Select this copy along with the front compound path and click the Intersect button from the Pathfinder panel.
Make sure that the resulting group of shapes is selected and turn it into a simple Compound Path (Control-8 or Object > Compound Path > Make).

Step 12
Using the Rectangle Tool (M), create a 2 x 24px shape, set the fill color at white (R=255 G=255 B=255) and place it as shown in the first image. Focus on the bottom side of this thin rectangle and switch to the Direct Selection Tool (A). Select the left anchor point and drag it 4px to the left then select the right anchor point and drag it 5px to the left. Make sure that your white shape is still selected, lower its Opacity to 70% and change the Blending Mode to Overlay.

Step 13
Using the Rectangle Tool (M), create a 2 x 24px shape, set the fill color at black (R=0 G=0 B=0) and place it as shown in the first image. Focus on the bottom side of this thin rectangle and switch to the Direct Selection Tool (A). Select the right anchor point and drag it 2px to the right then select the left anchor point and drag it 3px to the right. Make sure that your black shape is still selected, lower its Opacity to 50% and change the Blending Mode to Soft Light.

Step 14
Reselect both black and white shapes and go to Object > Transform > Reflect. Check the Horizontal box then simply click the Copy button. Select the newly created shapes, drag them up and place them as shown in the third image.

Step 15
Using the Rectangle Tool (M), create a 2 x 6px shape, set the fill color at black, place it as shown in the following image, lower its Opacity to 50% and change the Blending Mode to Soft Light. Make sure that that Rectangle Tool (M) is still active and create a second 2 x 6px shape. Place it as shown in the following image, set the fill color at white, lower its Opacity to 70% and change the Blending Mode to Overlay.

Step 16
Using the Rectangle Tool (M), create two, 1 x 45px shape, set the fill color at R=53 G=32 B=168 and place them as shown in the first image. Using the same tool, create a new 1 x 45px rectangle, set the fill color at R=44 G=63 B=188 and place it as shown in the second image.

Step 17
Using the Rectangle Tool (M), create a 2 x 45px shape and a 1 x 45px shape. Fill both shapes with R=45 G=83 B=208 and place them as shown in the first image. Using the same tool, create a 2 x 45px shape and a 1 x 45px shape. Fill both shapes with R=82 G=114 B=219 and place them as shown in the first image.

Step 18
Using the Rectangle Tool (M), create a 1 x 45px shape, set the fill color at R=113 G=141 B=227 and place them as shown in the first image. Select this thin shape along with the other seven rectangles highlighted in the second image and Group them (Control-G). Duplicate this new group (Control-C > Control-F), select the copy, drag it up and place it as shown in the third image.

4. Save a Simple Pattern Brush
Step 1
Reselect all the shapes made so far and go to Object > Transform > Rotate. Enter a -90 degrees angle and click OK. In the end things should look like in the second image.

Step 2
Select the shapes highlighted in the first image and simply drag them inside the Swatches panel (Window > Swatches) to save your own pattern. Once you can see it in the Swatches panel you can get rid of the shapes that you used to create it.
Return to the Swatches panel, double-click on your pattern and name it "startTile". Select the shapes highlighted in the second image and turn them into your second pattern. Name it "endTile" then simply remove the shapes that you used to create this new pattern.

Step 3
Focus on your artboard, select the remaining shapes, open the Brushes panel (Window > Brushes) and click the New Brush button (pointed by the little, blue arrow in the following image).
Check the Pattern Brush box then click OK to open the Pattern Brush Options window. Enter "Laces" in the Name box, drag the Scale slider at 70% then move down to the Tile boxes. Select the Start Tile box and add the "startTile" pattern from the list then select End Tile box and add the "endTile".
Finally, click OK and you should find your new pattern brush inside the Brushes panel. If you can see it simply remove the shapes that you used to create it.

5. Create the Text and Use Your Pattern Brush
Step 1
Disable the Grid (View > Hide Grid) and the Snap to Grid (View > Snap to Grid). Pick the Type Tool (T), simply click on your artboard and add the "Laces" black piece of text. Make sure that it stays selected and open the Character panel (Window > Type > Character). Select the "Edwardian Script ITC" font then set the size at 300pt and the tracking at 100. Lower the Opacity of your text to 30% then move to the Layers panel and simply lock it to make sure that you won’t accidentally select/move it.

Step 2
Now the challenging path. Using the Pen Tool (P) or the Paintbrush Tool (B) (if you happen to own a tablet) draw a smooth path along your text as shown in the following image. Try to use the text in the back as a rough reference.
For starters use a simple, red stroke for your path. Once you feel that it looks good enough, replace the red stroke with your "Laces" pattern brush. Move to the Layers panel, double-click on the path made in this step and simply name it "Laces". Also, delete that locked piece of text.

6. Add Subtle Shading for the Overlapping Laces
Step 1
Make sure that your "Laces" path is still selected and make a copy in front (Control-C > Control-F). Select this copy, focus on the Appearance panel (Window > Appearance) and replace the pattern brush used for the stroke with a 15.5pt stroke. Set its color at R=41 G=100 B=190.

Step 2
Focus on the the path with the blue stroke and take a closer look at the overlapping areas. Using the Scissors Tool (C), cut the portions of the path that overlap. Keep focusing on the overlapping path and decide which path goes in the back and which path stays in front. Now, select the front paths and replace the blue with yellow (R=255 G=222 B=23) then select the paths in the back and replace the blue with red (R=237 G=28 B=36).

Step 3
Select one of the remaining paths with a blue stroke and go to Select > Same > Appearance to select the rest of the shapes with similar Appearance attributes. Once you have all those path selected simply hit the Delete button from your keyboard to get rid of them.

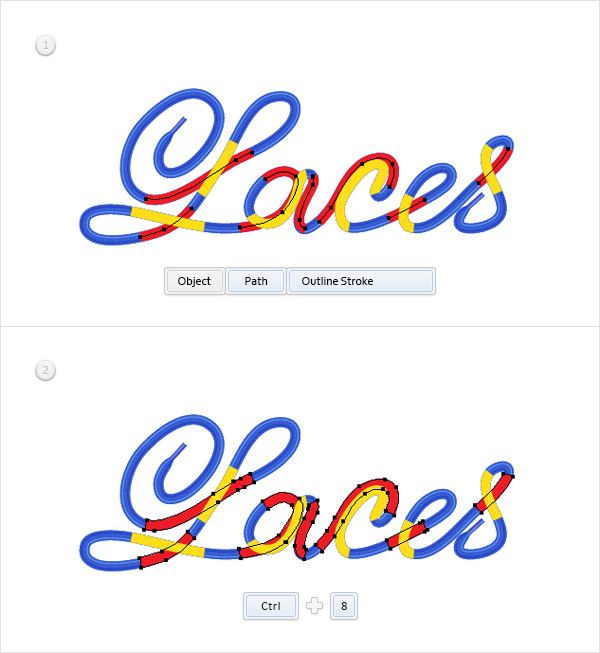
Step 4
Select all the paths with a red stroke and go to Object > Path > Outline Stroke. Make sure that the resulting shapes are selected and turn them into a simple Compound Path (Control-8).
Step 5
Select all the paths with a yellow stroke and go to Object > Path > Outline Stroke. Make sure that the resulting shapes are selected, turn them into a simple Compound Path (Control-8) and bring it to front (Shift-Control-] ).

Step 6
Reselect your yellow compound path and make a copy in front (Control-C > Control-F). Select it along with the red compound path and click the Minus Front button from the Pathfinder panel. Turn the resulting group of shapes into a Compound Path (Control-8) and set its fill color at white.

Step 7
Reselect your yellow compound path and focus on the Appearance. Select the existing fill, replace the yellow with black and go to Effect > Stylize > Outer Glow. Enter the properties shown in the following image and click OK.

Step 8
Reselect your white compound path and bring it to front (Shift-Control-] ). Select it along with the black compound path, open the fly-out menu of the Transparency panel (Window > Transparency) and go to Make Opacity Mask. In the end things should look like in the third image.

7. Add a Second Lace and Recolor It
Step 1
Using the Pen Tool (P) or the Paintbrush Tool (B), add a path around your text and use that same "Laces" pattern brush.

Step 2
Make sure that the path surrounding your text is still selected and go to Edit > Edit Colors > Recolor Artwork. Go to the Edit section, make sure that the Recolor Artwork box and Link harmony colors buttons are checked, then simply play with the Brightness and the color handles. There are countless possibilities.

8. Add Shading for Both Laces
Step 1
Reselect the two main paths and add the five Drop Shadow effects (Effect > Stylize > Drop Shadow) shown in the following image.

Congratulations! You’re Done!
Here is how it should look. I hope you’ve enjoyed this tutorial and can apply these techniques in your future projects.
{excerpt}
Read More