In this tutorial you will learn how to make a scrolling list activated by mouse up and down movements, with different speeds based on the position of the cursor. I’ll also cover preparing list data with PHP, loading XML data and a brief explanation of the algorithm I came up with. Enjoy!
Step 1: Introduction
The other day, when I was testing a smart phone, I saw one of these cool, neat list scroller tweening effects. So, I started thinking how I could accomplish such an effect in Flash, did some research on the web and honestly didn’t find exactly what I was looking for. So here is the result of my little assignment.
Step 2: Planning the Application
After some research I found a nice algorithm. It simply relates the mouse movement with the percentage of the visible area (later on, this will be identified as being the mask) that is actually being pointed. Thereafter, the container is moved in the same proportion.
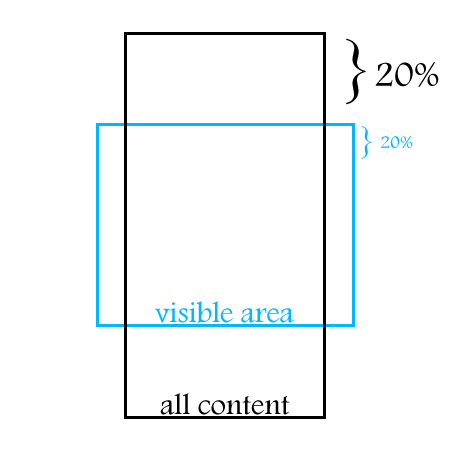
Let’s say, for instance, that the mouse is near the bottom of the blue curly bracket. In this scenario the container would move 20% towards the top.
As you can see this works pretty fine. When the mouse cursor reaches the top or the bottom of the visible area, we have the certainty that we’ve reached the beginning or the end of the list. This technique is quite straightforward because we don’t have to worry about the list reaching, for example, the beginning and continuing moving along.

But… What if we have hundreds of list items? Now we have a problem. If our visible area (mask) has, let’s say, 500 pixels of height and we have a list of 100 items (all content area), each of them with a height of 20 pixels, moving the mouse 1/5 of the visible area (mask) would result in the transition of 20 items (400px / 20px) at the speed of light. So I guess this approach wouldn’t result very well.
So, I came up with this solution:

Basically, I’ve defined two zones – below and above the center. Each zone has a value associated. This value is calculated based on the distance between the mouse cursor and the center. So, if we actually associate this value with a variable we could change the speed based on the mouse position. The minus sign is just for deciding the direction of the movement.
Having said that, let’s get some real content.
Step 3: Grabbing the Data
We will be using an external xml file to feed the application because:
- We will be able to add, remove, edit, delete data very easily
- Actionscript 3 has a great API to work with xml
So, we need a big list of items… What about the list of countries around the world?
(This step is kind of an extra topic because I’ll be using other language to help me out with the xml file preparation. So if this isn’t of your interest don’t worry, this will be in the download files)
I’ve just Googled [list countries world] and in the first result I got this list:
- 1 Afghanistan
- 2 Akrotiri
- (…)
- 256 Zambia
- 257 Zimbabwe
(source: http://www.listofcountriesoftheworld.com)
Copy everything to some text file and save it. I named it countries.txt.
The script below is written in PHP. You will need a web server to run it. I’m using wampserver, a nice bundle that installs PHP, MySQL, and Apache with a couple of clicks.
In order to use this script you will have to initialize the web server, and run the script in a subdirectory of your \www\ directory. One last note: the script and the countries.txt have to be in the same folder.
<?php
$lines = file("countries.txt");
$fp = fopen('data.xml', 'a');
fwrite($fp, '<?xml version="1.0" encoding="UTF-8"?>' . "\n");
fwrite($fp, '<items>' . "\n");
foreach($lines as $line) {
	$line = rtrim($line, "\r\n");
	$pattern = '/\d+\s*/';
	$replacement = '';
	$line =  preg_replace($pattern, $replacement, $line);
	$str = "\t" . '<item>' . $line . '</item>' . "\n";
	fwrite($fp, $str);
}
fwrite($fp, '</items>');
fclose($fp);
?>
The output of this script will be saved in a file with the name data.xml. If you don’t understand this step don’t worry because you can download it from here.
Step 4: Setting up the .fla File
If you watch the demo, you will notice that our application has an interface, buttons and so on. So let’s start putting all the graphics together.
Open your Adobe Flash and create a new ActionScript 3 file with the following settings:
- Width: 450px
- Height: 500px
- frame rate: 63
- Class: DocumentClass

Save the file. I’ve called mine scroll.fla.
Step 5: The Background Image
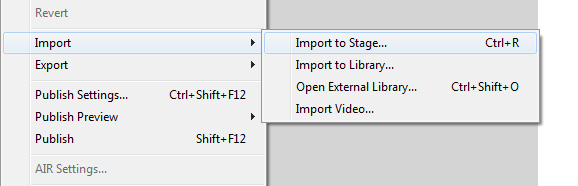
File > Import > Import to Stage and select the background.jpg image (all images are included in assets.zip, within the source download).
Now:
Window > align
This will open the Align Panel. Center the image on the stage, clicking on the buttons shown in the image below.

And now give your layer the name Background (don’t forget to lock it):

Step 6: The Scroller’s Background
Create a new layer and import the image pad.png. The process of importing is precisely the same as the previous step. Press F8 to convert it to a MovieClip and give it the name mcPad. Next click on the Export for ActionScript check box and, in the Class input field, type the name Pad.

Basically we are defining the pad MovieClip as a subclass of the MovieClip class itself. Therefore we are able to use it directly from our code and treat it as a normal MovieClip since it inherits from the MovieClip class. Pretty cool huh?
Now, delete this instance from the stage, but not from the library (because like I said we’ll be using it from the code).
Step 7: The Buttons
Import the image itemBackground.jpg, press F8 to convert it to a MovieClip. Give it the name mcItem. Once again export for ActionScript and name the class Item.

Now the process will be slightly different:
- double-click the mcItem MovieClip for making some changes inside
- rename the only layer there as Back and lock it
- create a new layer and call it Over
- import the image itemBackground-over.jpg to the Over layer
- convert it to a MovieClip and give it a name mcItemOver
- position the mcItemOver MovieClip at x = 0 and y = 0
- give it an instance name of item_btn_over

Finally, lock the Over layer, get back to the main timeline, and delete the mcItem movie clip instance from the stage.
Step 8: The Font
For this application I’m using the Arial Rounded MT Bold Negrito font (it’s a free font, I’ve downloaded mine from here). Since it isn’t a system font we will have to import it too:
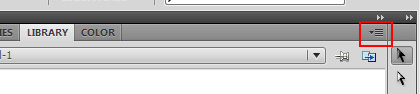
- on the library separator click on the upper right button (the one with a little arrow)
- select New Font
- call it fontArialRounded, then select the font on the dropdown box below. Once again Export for ActionScript and in the class field give it the name ArialRounded

In the main timeline we only need the Background layer, so you can delete the remaining layers.
That’s it for the Flash Authoring tool. Let’s start coding.
Step 9: Adding the Application Background to the Stage
Create a new ActionScript file, save it as DocumentClass.as. Then, add this code:
package {
	import flash.display.MovieClip;
	public class DocumentClass extends MovieClip {

		private var _pad:MovieClip;

		public function DocumentClass() {
			_pad = new Pad();
			addChild(_pad);
			_pad.x = stage.stageWidth / 2 - _pad.width / 2;
			_pad.y = stage.stageHeight / 2 - _pad.height / 2;
		}
	}
}
(If you’re not sure what we’re doing here, check out this quick introduction to document classes.)
Remember the mdPad MovieClip? Recall that we have exported it for ActionScript. So whenever we want to instantiate this MovieClip we just have to type
new Pad();
This code basically creates an instance of the mcPad MovieClip and adds it to the stage using the addChild() method. So now, the _pad is on our DisplayList!
Then I’ve centered it on the stage (vertically and horizontally).
Test the application and you should see the background layout on the flash player.
Step 10: Container
Our application will use a container to hold all the items together. So, we are going to create a new MovieClip in the DocumentClass. Declare the property:
private var _container:MovieClip;
Inside the constructor, at the end:
_container = new MovieClip();
addChild(_container);
Step 11: Importing the XML Data
Add the following import statements:
import flash.events.Event;
import flash.net.URLRequest;
import flash.net.URLLoader;
Declare the following properties:
public var loader:URLLoader;
public var data:XML;
public var items:XMLList;
Then implement the following methods:
private function dataLoad():void {
	loader = new URLLoader();
	loader.addEventListener(Event.COMPLETE, dataLoaded);
	loader.load(new URLRequest("data.xml"));
}

private function dataLoaded(event:Event):void {
	trace("Data Loaded.");
}
Finally add this method call to the constructor:
dataLoad();
So far, we have:
package {

	import flash.display.MovieClip;
	import flash.events.Event;
	import flash.net.URLRequest;
	import flash.net.URLLoader;

	public class DocumentClass extends MovieClip {

		private var _pad:MovieClip;
		private var _container:MovieClip;
		public var loader:URLLoader;

		public function DocumentClass() {
			_pad = new Pad();
			addChild(_pad);
			_pad.x = stage.stageWidth / 2 - _pad.width / 2;
			_pad.y = stage.stageHeight / 2 - _pad.height / 2;

			_container = new MovieClip();
			addChild(_container);

			dataLoad();
		}

		private function dataLoad():void {
			loader = new URLLoader();
			loader.addEventListener(Event.COMPLETE, dataLoaded);
			loader.load(new URLRequest("data.xml"));
		}

		private function dataLoaded(event:Event):void {
			trace(new XML(event.target.data.toString()));
		}

	}
}
Test the application and you should see, in the console, all the xml data. Let’s move on.
Step 12: Building Each Button
Add the following import statements:
import flash.text.TextFormat;
import flash.text.TextField;
import flash.text.TextFieldAutoSize;
import flash.text.Font;
Add these new variables:
public var data:XML;
public var items:XMLList;
private var _item:Item;
private var _itemTextField:TextField;
private var _defaultFormat:TextFormat = new TextFormat();
private var _arialRounded:Font = new ArialRounded();
private var _textFieldXPosition:uint = 10;
private var _textFieldYPosition:uint = 13;
private var _textFieldWidth:uint = 240;
private var _textFieldHeight:uint = 25;
private var _itemPosition:uint = 49;
Update the dataLoaded method:
private function dataLoaded(event:Event):void {

	// this property holds the loaded xml data
	data = new XML(event.target.data);
	// the items property holds all the repeating item elements
	items = data.item;

	// this iterates over every item
	for (var i = 0; i < items.length(); i++) {
		// remember the mcItem? We are instantiating that MovieClip
		_item = new Item();
   		// sets the Over layer MovieClip's alpha to 0
		_item.item_btn_over.alpha = 0;
		// creates the Item textfield
		_itemTextField = new TextField();
			_itemTextField.x = _textFieldXPosition;
			_itemTextField.y = _textFieldYPosition;
			_itemTextField.selectable = false;
			_itemTextField.width = _textFieldWidth;
			_itemTextField.height = _textFieldHeight;
			_itemTextField.embedFonts = true;
			_defaultFormat.color = 0x111112;
			_defaultFormat.font = _arialRounded.fontName;
			_defaultFormat.size = 18;
			_itemTextField.defaultTextFormat = _defaultFormat;
			_itemTextField.text = items[i].toString();

		// adds the textfield to the item's display list
		_item.addChild(_itemTextField);
		// positions each item vertically based on the iteration value
		_item.y = i * _itemPosition;
			_item.buttonMode = true;
			_item.mouseChildren = false;
		// adds the item to the container display list
		_container.addChild(_item);
	}
}
Now we’ve created the 200+ buttons and put them on the screen. If you run the application you will notice that this list begins at postion (0, 0) and fills down the entire stage. That’s not what we want so let’s handle that in the next step.
Step 13: Masking the List
Let’s create a shape to mask the list so that we only see the visible area, as in the picture from before:
At the end we will center the mask and the container. So, add another import statement:
import flash.display.Shape;
Properties:
private var _mask:Shape;
private var _maskWidth:uint = 288;
private var _maskHeight:uint = 290;
private var _paddingTop:uint = 120;
And… In the dataLoaded method at the end, add the following code:
_mask = new Shape();
_mask.graphics.beginFill(0xFF0000);
_mask.graphics.drawRect(0, 0, _maskWidth, _maskHeight);
_mask.graphics.endFill();
// center the mask horizontally on the stage
_mask.x = stage.stageWidth / 2 - _container.width / 2;
// positions the mask vertically at 120px from the top
_mask.y = _paddingTop;
addChild(_mask);
// assigns the mask to the container
_container.mask = _mask;

// centers the container horizontally on the stage
_container.x = stage.stageWidth / 2 - _container.width / 2;
// positions the container vertically at a certain value
_container.y = _paddingTop;
Step 14: Adding a Background to the Container
Just a little improvement… Right now our container has a lot of holes because there’s a margin between each item. So let’s give it a background to avoid undesired results when listening for events.
Property:
private var _background:Shape;
Still in the dataLoaded method, below the existing code:
_background = new Shape();
_background.graphics.beginFill(0xFFFFFF);
_background.graphics.drawRect(0, 0, _container.width, _container.height);
_background.graphics.endFill();
_container.addChildAt(_background, 0);
Step 15: Adding the Event Listeners
As you probably know, listeners listen for events. Here we will use one for the MouseOver event and another one for the MouseOut event.
Add this at the end of the dataLoaded method:
_container.addEventListener(MouseEvent.MOUSE_OVER, movingOver);
_container.addEventListener(MouseEvent.MOUSE_OUT, movingOut);
Let’s now implement the movingOver and movingOut methods:
private function movingOver (event:MouseEvent):void {
	_container.removeEventListener(MouseEvent.MOUSE_OVER, movingOver);
}

private function movingOut (event:MouseEvent):void {
	_container.addEventListener(MouseEvent.MOUSE_OVER, movingOver);
}
Now we can listen for events, more specifically MOUSE_OVER and MOUSE_OUT. Events are like messages that notify any object waiting for that same event. The “message” just broadcasts that the event has occurred. In this case the _container object will be listening for MouseOver and MouseOut events. When they take place the _container has the ability to respond accordingly.
So, first we assign the event listeners to the _container object and then, later on, if the _container is hovered over the MouseOver listener is removed. On the contrary, when the mouse is out of the _container object the mouse over listener is assigned again to the _container.
Step 16: Event Flow
The event flow is a powerful mechanism that allows the programmer to handle several objects with just one event listener. So, as you probably imagine, _container.addEventListener will “listen” for events involving the container, the items and the background shape – that is, the container and everything inside it. You can confirm this by adding the following code in movingOver and movingOut methods:
trace(event.target);
This will trace the object that dispatched the event.
Step 17: OnEnterFrame
When listening for this event we can define a behavior that will take place every frame, in our case 63 times per second. That’s why the OnEnterFrame event is very useful for animations based on the fps. We will need this to move our scroll, so the movingOver and movingOut methods should look like this:
private function movingOver (event:MouseEvent):void {
	_container.removeEventListener(MouseEvent.MOUSE_OVER, movingOver);
	addEventListener(Event.ENTER_FRAME, enterFrame);
}

private function movingOut (event:MouseEvent):void {
	removeEventListener(Event.ENTER_FRAME, enterFrame);
	_container.addEventListener(MouseEvent.MOUSE_OVER, movingOver);
}
Step 18: The enterFrame Method
Add these properties:
private var _maxSpeed:uint = 15;
private var _speed:Number;
Add the following method at the end of the code (below the movingOut method) . This will be run every frame, thanks to the EnterFrame event listener we created earlier. I’ll explain what this code does below.
function enterFrame(event:Event):void {
	_speed = (_mask.height / 2 - _mask.mouseY) / (_mask.height / 2) * _maxSpeed;
	_container.y += _speed;
	if (_container.y >= _paddingTop) {
		removeEventListener(Event.ENTER_FRAME, enterFrame);
		_container.y = _paddingTop;
	}
	if (_container.y <= _mask.height - _container.height + _paddingTop) {
		removeEventListener(Event.ENTER_FRAME, enterFrame);
		_container.y = _mask.height - _container.height + _paddingTop;
	}
}
And here is the logic of the scroller:
_speed = (_mask.height / 2 - _mask.mouseY) / (_mask.height / 2) * _maxSpeed;
This line of code gets the speed by dividing half of the stage height with the mouse Y position.
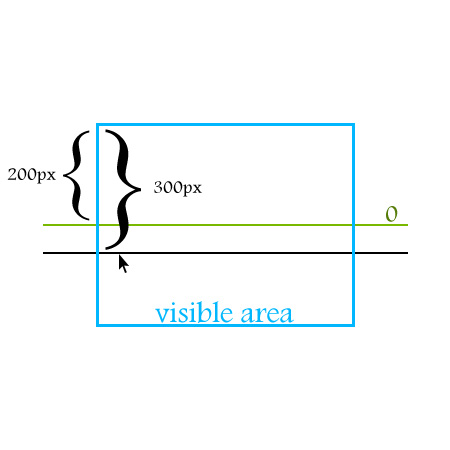
Let’s say that half of the stage is 200px and the mouse cursor is at position 300px. Applying the formula we get:
(200 – 300) / 200 * 15 (_maxSpeed property) = -7.5 which is negative, so the list will give us a downward movement. That’s precisely what we are looking for. If the mouse cursor was above the center we would have a positive value and the list would move up.
Next, with this statement:
_container.y += _speed;
We are assigning the actual speed, every frame (63 times per second) to the _container.y position. Then we check with the if statements whether the container’s y position is where it’s supposed to be. Remember this picture:
Step 19: Animating the Item’s Button
I’m going to use greensock’s TweenMax Library (you can download it from here) to animate to each button on and off (when the mouse is hovering over or leaving the item).
Add this import statement:
import gs.*;
Update the movingOver and movingOut methods:
private function movingOver (event:MouseEvent):void {
_container.removeEventListener(MouseEvent.MOUSE_OVER, movingOver);
	addEventListener(Event.ENTER_FRAME, enterFrame);
	if (event.target is Item)
		TweenMax.to(Item(event.target).item_btn_over, .2, {alpha:1});
}

private function movingOut (event:MouseEvent):void {
	removeEventListener(Event.ENTER_FRAME, enterFrame);
	_container.addEventListener(MouseEvent.MOUSE_OVER, movingOver);
	if (event.target is Item)
		TweenMax.to(Item(event.target).item_btn_over, .2, {alpha:0});
}
Let’s analyze this code in detail. The event.target will reference the object that will dispatch the event, in this case MouseOver or MouseOut. This object could be an _item, the _background or the _container but we are only interested in Item objects so we specify:
if (event.target is Item)
Then, if so, we will animate whatever Item object dispatched the event by typing Item(event.target).item_btn_over. The item_btn_over is the instance name of the mcItemOver MovieClip that we created in Step 7. .2 is the animation’s time, and in the last parameter we specify which property we want to animate (alpha).
Step 20: Refactoring
Right now, our application works pretty fine. However, we have some code repeated and a very centralized application as well. Notice that the dataLoaded method is doing almost everything.
Actionscript has excellent support for Object Oriented Programming. We could use that to detach data loading from application logic etc.
There is a nice design pattern called Model View Controller that works really nicely with user interfaces. This pattern basically separates the application in three distinct layers. The Model deals with the business logic, data handling. The Controller deals with human interaction with the application. And finally the View deals with the visual interface of the application.
In this case our application is too small to implement this pattern. So, let’s adapt just the Model and a miscellaneous View/Controller to our application. First let’s just handle some repeated code.
Step 21: Common Tasks
Create a new ActionScript file and type the following code:
package com.tutsplus.active.util {

	import flash.display.*;

	public class Align {

		public static function centerInStage (stage:Stage, mc:DisplayObject):void {
			mc.x = stage.stageWidth / 2 - mc.width / 2;
			mc.y = stage.stageHeight / 2 - mc.height / 2;
		}

		public static function centerHorizontallyInStage (stage:Stage, mc:DisplayObject):void {
			mc.x = stage.stageWidth / 2 - mc.width / 2;
		}

		public static function centerVerticallyInStage (stage:Stage, mc:DisplayObject):void {
			mc.y = stage.stageHeight / 2 - mc.height / 2;
		}

	}

}
We have to perform this task several times. So I decided to make a class that aligns any display object to the stage whenever we call it. In order to make this work you have to make a directory structure like this:
\com\tutsplus\active\util\
in your production directory or inside your class path. Next, in the refactored DocumentClass you will see how to use this class.
Step 22: Model
The model manages the behavior and data of the application domain, responds to requests for information about its state (usually from the view) and responds to instructions to change state (usually from the controller)
source: MSDN.
Loading the data and storing it in data structures are nice operations for composing our Model. Create a new ActionScript File and call it ScrollModel.as:
package {

	import flash.events.Event;
	import flash.net.URLRequest;
	import flash.net.URLLoader;
	import flash.events.EventDispatcher;

	class ScrollModel extends EventDispatcher {

		public var loader:URLLoader;
		public var data:XML;
		public var items:XMLList;

		public static const MODEL_UPDATE:String = "modelChange";

		public function ScrollModel() {
			loader = new URLLoader();
			loader.addEventListener(Event.COMPLETE, dataLoaded);
		}

		public function load(req:URLRequest):void {
			loader.load(req);
		}

		private function dataLoaded(event:Event):void {
			data = new XML(event.target.data);
			items = data.item;
			dispatchEvent(new Event(ScrollModel.MODEL_UPDATE));
		}
	}
}
With this update, our dataLoaded method has only 3 lines of code now!
It’s almost the same code that we used in the DocumentClass for loading the data, with just one difference:
dispatchEvent(new Event(ScrollModel.MODEL_UPDATE));
After assigning our 200+ items to the XMLList property this line of code dispatches one event to whoever is listening. In practice we will need to know when this occurs to use these data in another class.
Step 23: The ScrollBox Class
Create a new Actionscript File and name it ScrollBox.as:
package {

	import flash.display.Sprite;
	import flash.display.Stage;
	import flash.events.Event;
	import flash.events.MouseEvent;
	import flash.display.Shape;
	import flash.text.TextFormat;
	import flash.text.TextField;
	import flash.text.TextFieldAutoSize;
	import flash.text.Font;
	import gs.*;
	import com.tutsplus.active.util.Align;

	public class ScrollBox extends Sprite {

		private var _container:Sprite;
		private var _item:Item;
		private var _itemTextField:TextField;
		private var _defaultFormat:TextFormat = new TextFormat();
		private var _arialRounded:Font = new ArialRounded();
		private var _textFieldXPosition:uint = 10;
		private var _textFieldYPosition:uint = 13;
		private var _textFieldWidth:uint = 240;
		private var _textFieldHeight:uint = 25;
		private var _itemPosition:uint = 49;
		private var _mask:Shape;
		private var _maskWidth:uint = 288;
		private var _maskHeight:uint = 290;
		private var _paddingTop:uint = 120;
		private var _background:Shape;
		private var _maxSpeed:uint = 15;
		private var _speed:Number;
		private var _items:XMLList;
		private var _stage:Stage;
		public var scrollModel:ScrollModel;

		public function ScrollBox (stage:Stage, m:ScrollModel) {
			this.scrollModel = m;
			this._stage = stage;
			scrollModel.addEventListener(ScrollModel.MODEL_UPDATE, createRollingScroller);
		}

		private function createRollingScroller(event:Event = null):void {
			_container = new Sprite();
			_stage.addChild(_container);

			_items = scrollModel.items;
			for (var i = 0; i < _items.length(); i++) {
				_item = new Item();
				_item.item_btn_over.alpha = 0;

				_itemTextField = new TextField();
				_itemTextField.x = _textFieldXPosition;
				_itemTextField.y = _textFieldYPosition;
				_itemTextField.selectable = false;
				_itemTextField.width = _textFieldWidth;
				_itemTextField.height = _textFieldHeight;
				_itemTextField.embedFonts = true;

				_defaultFormat.color = 0x111112;
				_defaultFormat.font = _arialRounded.fontName;
				_defaultFormat.size = 18;
				_itemTextField.defaultTextFormat = _defaultFormat;
				_itemTextField.text = _items[i].toString();

				_item.addChild(_itemTextField);
				_item.y = i * _itemPosition;
				_item.buttonMode = true;
				_item.mouseChildren = false;
				_container.addChild(_item);
			}

			_background = new Shape();
			_background.graphics.beginFill(0xFFFFFF);
			_background.graphics.drawRect(0, 0, _container.width, _container.height);
			_background.graphics.endFill();
			_container.addChildAt(_background, 0);

			_mask = new Shape();
			_mask.graphics.beginFill(0xFF0000);
			_mask.graphics.drawRect(0, 0, _maskWidth, _maskHeight);
			_mask.graphics.endFill();
			Align.centerHorizontallyInStage(_stage, _mask);
			_mask.y = _paddingTop;
			addChild(_mask);

			_container.mask = _mask;

			Align.centerHorizontallyInStage(_stage, _container);
			_container.y = _paddingTop;

			_container.addEventListener(MouseEvent.MOUSE_OVER, movingOver);
			_container.addEventListener(MouseEvent.MOUSE_OUT, movingOut);
		}

		private function movingOver (event:MouseEvent):void {
			_container.removeEventListener(MouseEvent.MOUSE_OVER, movingOver);
			addEventListener(Event.ENTER_FRAME, enterFrame);
			if (event.target is Item)
				TweenMax.to(Item(event.target).item_btn_over, .2, {alpha:1});
		}

		private function movingOut (event:MouseEvent):void {
			removeEventListener(Event.ENTER_FRAME, enterFrame);
			_container.addEventListener(MouseEvent.MOUSE_OVER, movingOver);
			if (event.target is Item)
				TweenMax.to(Item(event.target).item_btn_over, .2, {alpha:0});
		}

		function enterFrame(event:Event):void {
			_speed = (_mask.height / 2 - _mask.mouseY) / (_mask.height / 2) * _maxSpeed;
			_container.y += _speed;
			if (_container.y >= _paddingTop) {
				removeEventListener(Event.ENTER_FRAME, enterFrame);
				_container.y = _paddingTop;
			}
			if (_container.y <= _mask.height - _container.height + _paddingTop) {
				removeEventListener(Event.ENTER_FRAME, enterFrame);
				_container.y = _mask.height - _container.height + _paddingTop;
			}
		}

	}
}
Notice the Align class methods that we are using:
Align.centerHorizontallyInStage(_stage, _mask);
Align.centerHorizontallyInStage(_stage, _container);
Now we just have to use the method Align.centerHorizontallyInStage() to align any display object horizontally.
The createRollingScroller method will only start when we finish storing all the data in the items:XMLList property.
Step 24: Final DocumentClass
Change the DocumentClass:
package {

	import flash.display.MovieClip;
	import flash.display.Sprite;
	import flash.events.Event;
	import flash.net.URLRequest;
	import flash.net.URLLoader;
	import flash.events.*;
	import com.tutsplus.active.util.Align;

	public class DocumentClass extends MovieClip {

		private var _pad:MovieClip;
		public var scrollModel:ScrollModel;
		public var scrollBox:ScrollBox;

		public function DocumentClass() {
			config();
			scrollModel = new ScrollModel();
			scrollModel.load(new URLRequest("data.xml"));
			scrollBox = new ScrollBox(stage, scrollModel);
		}

		private function config():void {
			_pad = new Pad();
			addChild(_pad);
			Align.centerInStage(stage, _pad);
		}

	}
}
Once again, note how easy it is to center display objects on the stage with the Align.centerInStage() method:
Align.centerInStage(stage, _pad);
Conclusion
That’s it for now guys! I’ve covered some interesting Actionscript 3 topics and I hope you find this useful. Why not improve this application to a next level, recfactoring, adding functionalities, etc?
Thanks for following. Take care!