In this tutorial, we will explain how to draw a camcorder icon from scratch in Photoshop using shape layers, brushes, and layer styles. Let’s get started!
Step 1: Sketch
I started with a simple sketch and then used vector tools to draw the basic shape. I used bright color to help me distinguish each area.

Step 2
Add new layer and then paint rough highlights and shadows manually using Brush tool.

Step 3: Main Body
Using sketch as reference, use pen tool to draw its main body. Use color #4e4d52.

Step 4
It helps to reduce the Opacity so we can see the reference at the same time.

Step 5
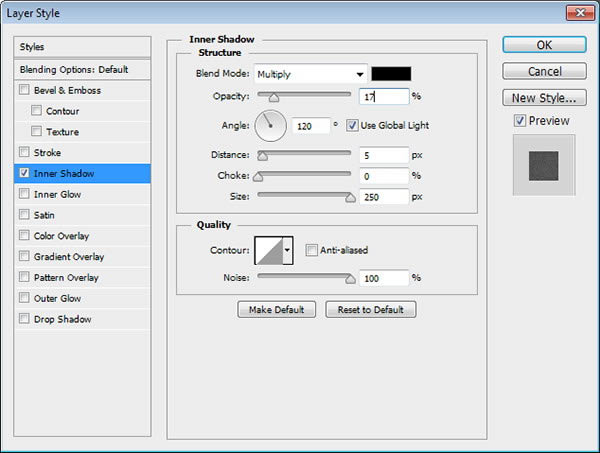
Draw smaller and darker polygon. Double click layer shape and apply Inner Shadow with very big Size to add noise.

Step 6
Draw following shape on end of the camcorder with color #40474d

Step 7
Select some of the shape and paint highlight.

Step 8
Add more highlights and shadows to give it a three-dimensional appearance. As you can see below, I only work on its upper side. That’s because its lower side will be covered by its LCD.

Step 9
Select camcorder main body. Add new layer and then paint white using low Opacity brush. Do this a few times.

Step 10
Reduce its layer Opacity.

Step 11
Use same technique to paint shadow on the body. You can also hit Command/Ctrl + H to temporary hide selection.

Step 12: Lens
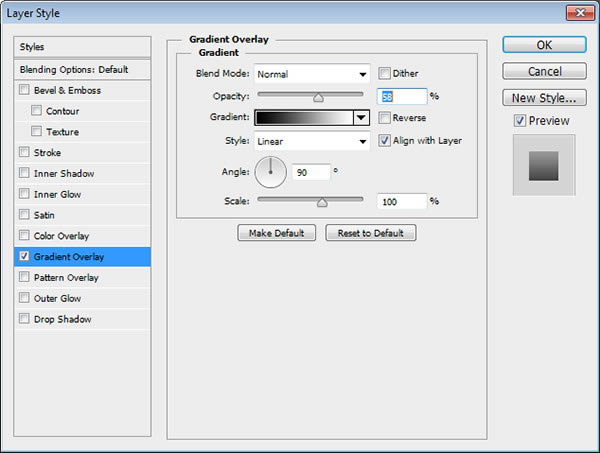
Draw a crescent shape and apply subtle Gradient Overlay from White to Black.

Step 13
Activate Brush tool with low Opacity and paint white on new layer, right on top of the crescent shape.

Step 14
Command/Ctrl-click the crescent shape to make new selection based on its shape.

Step 15
Place highlight and crescent shape inside a group layer. Click Add Layer Mask icon. The highlights now go inside the shape.

Step 16
Add new layer and then draw a rectangular selection. Fill it with white. Click Filter > Noise > Add Noise.

Step 17
Click Filter > Blur > Motion Blur with Angle 90°.

Step 18
HIt Command/Ctrl + T and then rotate it 90°.

Step 19
Hit Command/Ctrl + T. From the Option Bar, select Warp: Arch.

Step 20
Rotate the shape again and place it onto the lens side. You may need to experiment a few times with the Warp setting until we get suitable curvature.

Step 21
Rotate shape and erase its both ends.

Step 22
Change its blend mode to Multiply and reduce its Opacity. Erase both its ends using soft Eraser tool.

Step 23
Draw an ellipse on front of the shape.

Step 24
Add new layer and then convert it to Clipping Mask (Command/Ctrl + Alt + G). Draw some highlight and shadow using low Opacity Brush tool.

Step 25
Add another ellipse covering previous shape.

Step 26
Add new layer and convert it to Clipping Mask. Paint white and black for highlight and shadows.

Step 27
Draw another ellipse and add Gradient Overlay.


Step 28
Add new layer and convert it to Clipping Mask. Paint some shadows.

Step 29
Draw darker ellipse and apply Gradient Overlay again.


Step 30
Select topmost shape. Make new layer and then fill it with #efefef. Move selection 1 px to the left and then hit Delete key.

Step 31
Paint highlight and then draw a black stroke. Cover it with an ellipse.

Step 32
Add another white crescent shape using previous technique. Draw smaller ellipse and add more crescent shape.

Step 33
Paint soft highlight using Brush tool and then cover it with a gray ellipse shape. Apply subtle Gradient Overlay.

Step 34
Add new layer and paint subtle shadow and highlight on the lens surface.

Step 35
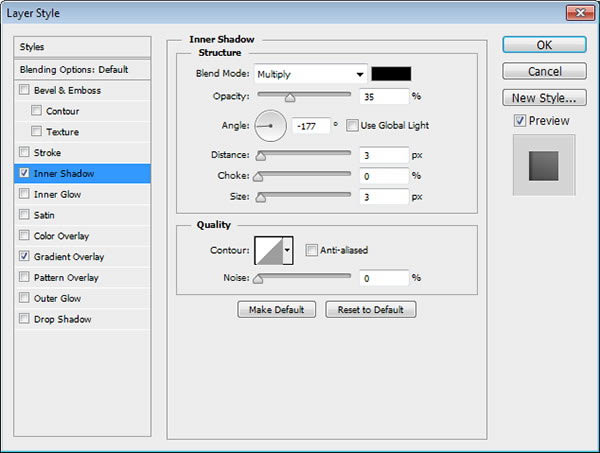
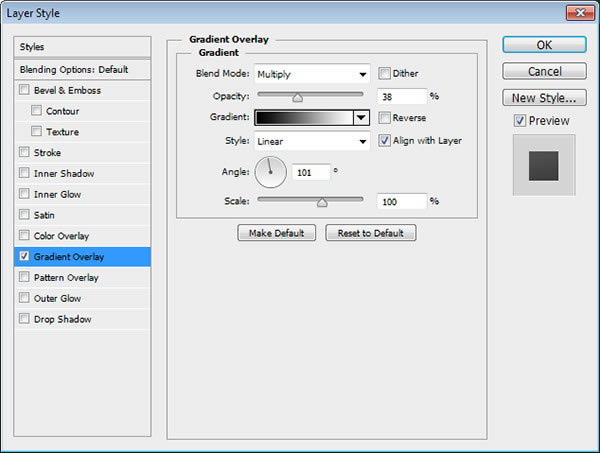
Draw a small ellipse and a parallelogram on center of the lens. Set its mode to intersect. Apply Inner Shadow and subtle Gradient Overlay.


Step 36
Draw a polygon with color #222423.

Step 37
Select left side of the polygon. Add new layer and paint black on top and lighter gray on bottom. This will add three-dimensional appearance.

Step 38
Command/Ctrl-click the polygon. Make new layer and paint some highlights inside it.

Step 39
Don’t remove last selection. Make new layer and fill it with black. Click Filter > Render > Lens Flare.

Step 40
Change its blend mode to Screen and reduce its Opacity.

Step 41
Select outer part of the camera lens and then paint shadows.

Step 42
Select lens and fill it with black. Add lens flare again.

Step 43
Apply Gaussian Blur.

Step 44
Set its blend mode to Screen.

Step 45: Upper Panel
Draw following shape using Pen tool. Apply Gradient Overlay.


Step 46
Add new layer and paint shadow and highlight on top of the shape. See picture below for reference.

Step 47
Keep adding more highlights onto the shape to give it a convincing three-dimensional appearance. It might helps if you put all of your brush strokes on separate layers. This way, you can easily add stronger highlight by stacking them.

Step 48: Buttons
Draw shape below using Pen tool, use white as its color. Apply subtle Gradient Overlay.


Step 49
Add new layer and then manually draw highlights and shadows to give it three-dimensional appearance.

Step 50
Add shadow under the button.

Step 51
Use same techniques to draw another button.


Step 52: Under the Lens
Draw black shape under the lens

Step 53
Paint black underneath the shape.

Step 54
Add highlights using low Opacity brush.

Step 55
Draw some circles. Skew them until the circles look realistically placed onto the surface.

Step 56
Apply Inner onto the circles.


Step 57
Draw another shape and apply Gradient Overlay. See picture below for reference.

Step 58: LCD
Let’s start by drawing LCD hinges. Draw a rounded rectangle. Modify its left points and pull it closer. Add new layer and convert it to Clipping Mask. Add highlight inside the shape to turn it into a hole.

Step 59
Add another layer to add mode highlights.

Step 60
Draw following shape to cover the hole.

Step 61
Add new layer and then paint highlight and shadow inside the cover.

Step 62
Paint very subtle highlight on the cover side using soft small brush.

Step 63
Draw following shape and add subtle Gradient Overlay. Paint highlight on top of the shape.

Step 64
Draw half rounded rectangle shape covering previous shape. Paint highlight and shadow on its edge.

Step 65
Draw a rounded rectangle and then modify its corner until we have following shape. Apply subtle Gradient Overlay.


Step 66
Command/Ctrl-click shape to select it.

Step 67
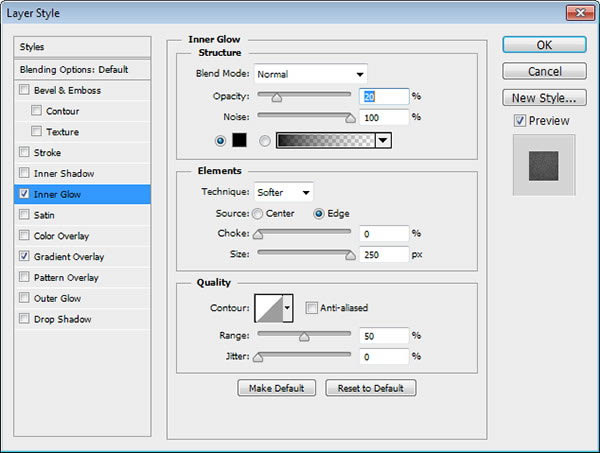
Add smaller shape with darker color. Add Inner Glow and Gradient Overlay.


Step 68
Add new layer and then draw a soft black line on top. Reduce its Opacity.

Step 69
Draw a smaller rounded rectangle. As usual, apply Gradient Overlay.


Step 70
Draw even smaller rounded rectangle. Add Inner Shadow.


Step 71
Add image on top of the screen and then hit Command/Ctrl + Alt + G to convert it to Clipping Mask. The image now goes inside the shape.

Step 72: LCD Buttons
Draw a circle. Apply some Layer Styles.


Step 73
Draw smaller circle on center of the previous. Apply another Layer Styles.


Step 74
Draw smaller circle with lighter color. Reduce its Opacity.

Step 75
Draw red circle shape and apply following Layer Styles.


Step 76
Add new layer and manually draw highlight and shadow on the button.


Step 77
Draw more buttons on the LCD.

Step 78
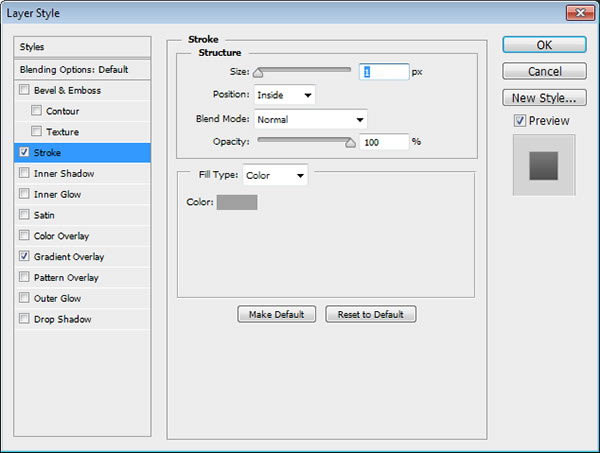
Draw an ellipse shape on its right side. Add Stroke and Gradient Overlay.


Step 79
Paint some shadows.

Step 80
Draw a dark ellipse on the camcorder body. Paint some shadows and highlight on the button. See picture below for reference.

Step 81
Add smaller ellipse and then paint more highlight on top of it using Brush tool.

Step 82
Draw a white line outside the button area.

Step 83
Apply Gaussian Blur to soften it.

Step 84
Reduce its Opacity. Erase some of the stroke. Make sure to use low Opacity Eraser.

Step 85
Place the button into a group layer. Alt-drag to duplicate the button.

Step 86
Draw a black rounded rectangle shape and then skew it.

Step 87
Duplicate the shape. Move it 1 px to the right. Paint highlight on top of it. Again, duplicate the shape. Move it a few pixels to the right and change its color to lighter gray.

Step 88
Add new layer and then draw highlight and shadow on the button surface. Don’t forget to paint the button shadow on the camcorder body.


Step 89
Draw a black polygon and then apply subtle Gradient Overlay. Add another rectangles for its other side. See picture below for reference.

Step 90
Draw following shape and apply Gradient Overlay.


Step 91: Memory Card Slot
Draw following shape on upper part of the camcorder. Add new layer, convert it to Clipping Mask, and then paint some highlights.

Step 92
Draw following shape. As in earlier step, paint its highlight.

Step 93
We will the memory card cover. Start by drawing following shape. Paint subtle highlight using small soft Brush tool.

Step 94
Draw smaller shape with lighter color. Paint highlight on its surface.

Step 95
Add new layer. Command/Ctrl-click the shape. Click Edit > Stroke with white as its color.

Step 96
Apply small Gaussian Blur to soften it. Erase some of the stroke line using soft Eraser tool. Reduce its Opacity.

Step 97
Draw front side of the area. As usual, paint its highlight.

Step 98
Draw following shape behind the memory card slot. Add some highlight and shadow.


Step 99: Handle
We also want to add handle area where we can attach strap onto it. Start by drawing its hook. And apply subtle Gradient Overlay.


Step 100
Select its outer side. Add new layer and paint lighter color to add highlight.

Step 101
Add new layer and add stronger highlight. To do this, use smaller brush.

Step 102
Draw its inner shape and paint its highlight and shadow.

Step 103
Continue drawing a strap attached onto it. Start by drawing following shape. Apply following Pattern Overlay. We can use default pattern that is available on every Photoshop. Also add Gradient Overlay to add natural lighting onto the shape.


Step 104
Command/Ctrl-click the strap to select it. Add adjustment layer Black & White. This will make sure the strap is converted to black and white.

Step 105: Text
Let’s add some label onto the camcorder surface. Start by adding a text using standard Type tool. Hit Command/Ctrl + T and select Skew.

Step 106
Add new text and apply Warp. You can find its button on the Option Bar.

Step 107
Rotate the text until it fit on the surface.


Step 108
Add more text onto the surface.

Step 109
To make it more realistic, let’s add some shadow onto the text. Add layer above the text and then convert it to Clipping Mask. Use soft brush to paint shadow on the text.

Final Image
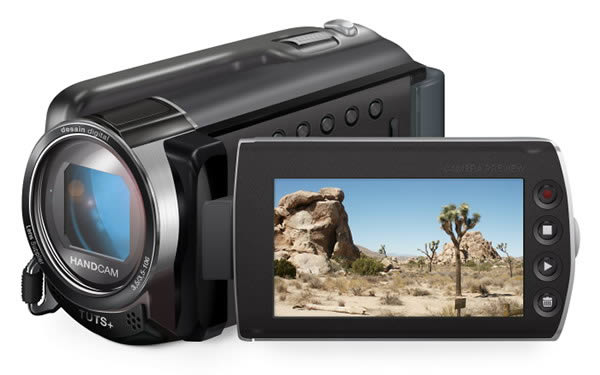
{excerpt}
Read More