In this tutorial, I’ll show you how to make your own table tennis illustration that includes a ping-pong paddle and ball. We’ll be using the Rectangle Tool, Pen Tool and gradients. Also we’ll use the 3D Extrude and Bevel options. If you have some experience working with Adobe Illustrator and want to take your vector illustration skills to the next level, then get your skills moving with this tutorial.
Step 1
Open a new document, pick the Rectangle Tool (M) and draw a rectangle with the size shown in the image below. The color isn’t important because after we apply the Extrude & Bevel option we’re going to fill the shape with gradients.

Step 2
Create the next shape using the Rectangle Tool (M). After that, slide the shape into the Symbols Panel.

Step 3
Now select the shape you created in Step 1, go to Effect > Extrude & Bevel and set the measures as showed below. Now click the Map Art button and apply the symbol you created in the previous step. Click OK and right after that click Expand Appearance.


Step 4
Now we are going to fill the shape with a Radial Gradient. To do this pick the Direct Selection Tool (A), select the top part and fill it with a Radial Gradient. The colors of the gradient should be R:0 G:124 B:124 to R:0 G:87 B:87, as shown below.

Step 5
Pick the Direct Selection Tool (A), select the bottom part of the table as showed below, and fill with color R:0 G:41 B:17. Also, slide the bottom two points a few pixels towards the outer end of the table.

Step 6
Pick the Rectangle Tool (M) and draw a rectangle size of W:21px H:157px. Go to Effect > Extrude & Bevel, then set values as showed below. Now click Ok and right after that click Expand Appearance. Then fill the shapes with colors as shown in the image below.


Step 7
Pick the Pen Tool (P) and add the shapes over the table’s leg as shown. Fill them with black and reduce the Opacity to 50%.

Step 8
Group the shapes of the leg by selecting them. Now go to Object > Group (Command + G). After that, copy the group, flip it horizontal, and move the leg to the other side of the table. Look at the image below.

Step 9
Add the other legs of the table as shown below:


Step 10
Pick the Pen Tool (P), add the shapes shown below, and fill them with a linear gradient.


Step 11
We continue working on it with the Pen Tool (P). Make the shape shown below, fill with a black color, and position the shape. Look at its size under the table’s side shown below.

Step 12
Copy the shape from the previous step by using Command + C followed by Command + F, flip it horizontal, and move the shape to the other side of the table.

Step 13
Pick the Rectangle Tool (M) and add both shapes over the previous ones as shown.

Step 14
Use the Rectangle Tool (M) to draw a rectangle behind the last two shapes as shown. Turn off the Fill color and apply a 4px Stroke. Right after that, go to Object > Expand and fill the shape with the Linear Gradient shown


Step 15
Now draw another rectangle with the same size, send it behind the previous one, turn off the Fill and Stroke colors, then fill with a Pattern. To do this the rectangle must be selected, and then go to Window > Swatch libraries > Pattern > Basic Graphic Textures. Fill with a Diamond texture and right after that go to Edit > Edit Colors > Invert Colors to change the color to white.

In the next steps we’ll make the ping-pong paddle and ball.
Step 16
Pick the Pen Tool (P), make the paddle shape, and fill it with the color R:175 G:204 B:90.

Step 17
Copy the paddles shape from the previous step using Command + C, and Paste in Front. Make the shape from the previous step invisible by clicking on the eye in the path. Now add the following shapes over the copy using the Pen Tool. Fill them in any color you want the bat to be and slide them into the Symbols panel.

Step 18
Make the shape from Step 16 visible, select it and go to Effect > 3D > Extrude & Bevel. Apply values as shown in the image below. Now click on the Map Art button and add the symbol you created in the previous step.


Step 19
Turn on the table’s shapes if you have turned them off. Place the paddle wherever you want on the table.
Step 20
Pick the Ellipse Tool (L), draw a circle with size shown, and fill it with a Radial Gradient.

Step 21
Add any text you wish on the ball and the ball’s shadow. Group the ball’s shapes and place them under the paddle as shown.


Step 22
Add shadow to the paddle too, using the Pen Tool (P), then fill it with a Radial Gradient and apply Gaussian Blur of 9,6 px as shown.

Step 23
In this step, we are going to make the table’s shadow. To do this, grab the Pen Tool (P) and make a shape shown below. Fill it with black, reduce the Opacity to 50%, apply Gaussian Blur of 40px, and move the new shape under the shapes of the table.

At the end you can add any background you like.
Conclusion
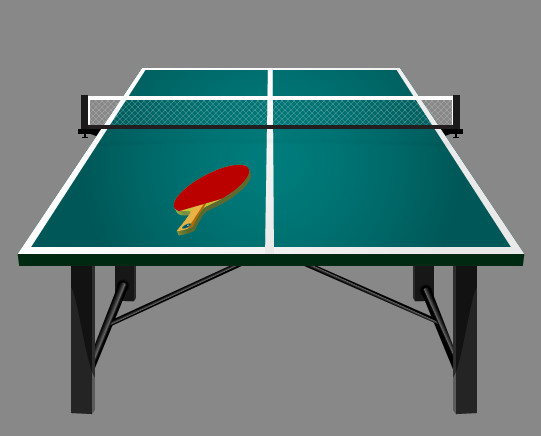
Here is the final result of our table tennis set, complete with ping-pong paddle, ball, and small sporty table.

{excerpt}
Read More